
TeamConnect Business Intelligence Integration Guide (TCBI 6.2)
Note: If you are reading this document as a PDF, you can click the link at the bottom of this document to view the most recent version online.
TeamConnect Business Intelligence provides colorful visual reports embedded within TeamConnect. Interactive dashboards provide multiple visualizations of similar data in one screen for easy user consumption and analysis, and users can drill directly into dashboards to report on specific data. Designers can build ad-hoc reports and dashboards that can include cross-object data and reportable custom fields and objects in the TeamConnect system.
- To learn about features for users with viewer rights, visit the tutorial for view-only users.
- To learn about features for users with designer rights, visit the tutorial for designer users.
Before you begin:
- Review system and software requirements in Reporting Requirements for TeamConnect Business Intelligence.
- Note that any email in TeamConnect must be blank or follow the standardized w3 format.
- Make sure you have an active account able to install Sisense; this account is provided by Mitratech. The license should have long index support and your account should have two unique admins - one web UI admin and one TC Integration admin.
- Mitratech recommends a single node deployment. If a multi-node, high availability setup is needed, contact Mitratech.
Preparing the TeamConnect 6 Instance
Important: if using Data Warehouse, make sure Data Warehouse is installed before continuing with TeamConnect Business Intelligence integration.
Installing Sisense
This step will install the Sisense Server Console, Sisense Web Application, ElastiCube Manager, and ElastiCube Server. To install Sisense, you must have Administrative privileges on the machine and the ability to install on the C:\ drive. Make sure you have an active account able to install Sisense; this account is provided by Mitratech.
To install Sisense on a single Windows Server:
- Open the Sisense installer .EXE file provided by Mitratech Holding, Inc.
- If prompted, click OK to install .NET framework 4.6.1 and reboot the machine.
- On the Welcome to Sisense screen, click Activate.
- On the Sisense Activation screen, sign in with the account given to you by Mitratech. If you are copy and pasting you credentials into the fields, make sure you are not pasting an extra space at the end.
- Click Install.
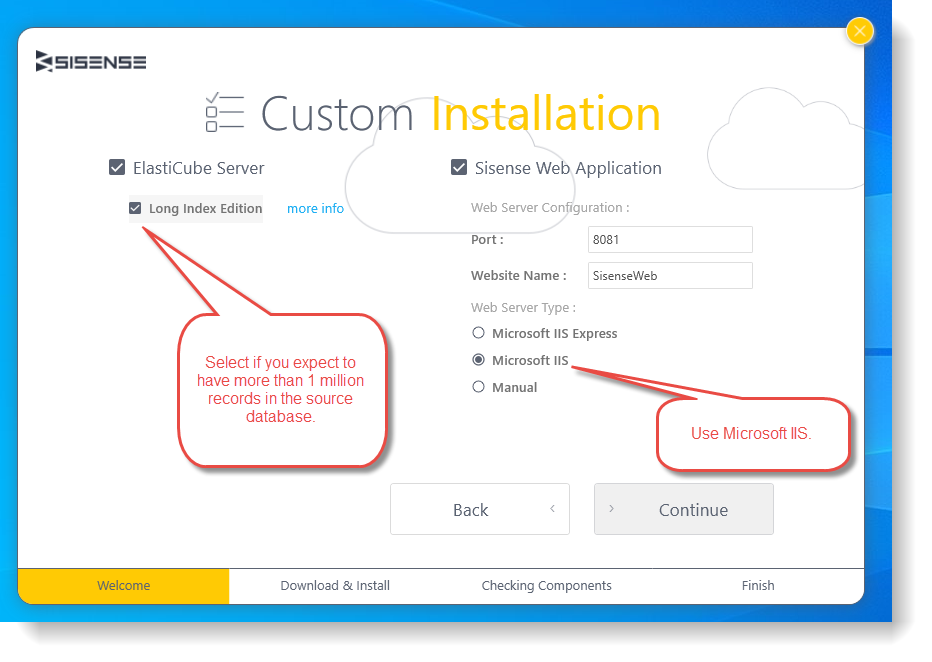
- Click Custom Installation.
- On the Custom Installation screen, if you need to use a port other than 8081, make a note of the port number for configuring the firewall.
- Change the Web Server Type to Microsoft IIS and click Continue. Do not use Microsoft IIS Express.
- If you expect to have more than 1 million records in the source database, select Long Index Edition.
- After Sisense is installed, create a new firewall rule firewall named Sisense Web and open the TCP 8081 and 443 ports (the port mentioned in the previous steps) for both inbound and outbound communication.
- On the Sisense server, create a folder to contain the ElastiCubes.
Note: By default, Sisense is installed on the C:\ drive. For data protection and organization, Mitratech Holdings, Inc. strongly recommends storing the ElastiCubes in a different partition.
To select a partition:
- Choose a partition with enough disk space and create a folder (for example, E:\ElastiCubeData).
- Open the Sisense Server Console as an administrator.
- Click the
 icon to edit server preferences.
 - On the Edit Server Preferences dialog box, click the Browse button for the Default Server data folder and select the partition and folder created in Step 1.
- Stop and start the Sisense Server.
Configuring Sisense for TeamConnect Integration
The installer.bat file performs the following actions that are necessary for configuring Sisense:
- Extracts the Business Intelligence code (bi_installer.bat)
- Installs the custom homepage plugin (plugins_installer.bat)
- Installs the metadata translation plugin (plugins_installer.bat)
- Installs the email templates (plugins_installer.bat)
To extract the BI code and install the custom homepage plugin, metadata translation plugin, and email templates:
- Extract TeamConnect-Sisense-installer-xx.zip to any location on the Sisense server machine.
- Open env.properties and update the following sisense properties:
- Sisense context url, for example, http://server.company.corp:8081
- Admin username and password for the Sisense Web Administrator
- Location of Sisense home folder, for example C:\Program Files\Sisense
- Open a command prompt as an administrator and navigate to the location where you extracted the installer files.
- Run installer.bat.
- When the installation is complete, you receive a Success message. If there are any errors, an output log files is generated inside the folder.
- Restart IIS server using iisreset in a command propmt. Mitratech does not recommend using Powershell to restart IIS.
Creating an ElastiCube for the TeamConnect Database
Creation of the ElastiCube can take hours to create the schema and move the data. For example, creating an ElastiCube for a nearly empty database can take 2 hours, but a fully populated database could potentially take more than 20 hours.
Before you begin:
- Make sure the user has DBA access on the server machine from which they will be running syncs. To check if the user is already a DBA:
- type lusrmgr in the Microsoft Windows search field and open lusrmgr.
- In the lusrmgr window, click Groups in the navigation pane and then ora_dba to see the list of oracle DBAs on the server.
- If the user is not in the ora_dba group, click the Add button and add the user.
- Grant the database schema access to create a materialized view by logging into sqlplus as sysdba and typing the command:
GRANT CREATE MATERIALIZED VIEW TO <DBUsername>;
where <DBUsername> is the database username for your database. For example:
GRANT CREATE MATERIALIZED VIEW TO TCTESTCSM;
To create the Elasticube:
- In the TeamConnect_BI directory on the Sisense server, open the autoCube.properties file with a text editor. Define the values for the following properties. Note that these values are case sensitive.
- database.hostname – the fully qualified domain name of the server that hosts the database
- database.portnumber – the database port number
- database.dbname – the database sid or database service name
- database.dbtype – the database type (for example, Oracle)
- database.driverClassName – the database driver class name (for example: oracle.jdbc.driver.OracleDriver)
- database.connectionString – the database connection string for Sisense. This property is only needed if you are using load balancing or clustering.
- database.username – the database username
- database.userpassword – the database encrypted password (To encrypt the password, use the same encrypt.jar that encrypts the password in the teamconnect.properties file.)
- sisense.cubename – the name of the ElastiCube, not including the .ecube extension
- sisense.serverName – the fully qualified domain name of the server that hosts Sisense
- sisense.buildRetryLimit – the allowed number of attempts to automatically install or sync the cube (due to an issue in Sisense, the first attempt often fails)
- sisense.pluginLocation – the location of the Sisense plugin folder, excluding the "metadata\translations" subfolder and in the path, use \\ in stead of \, for example, C:\\Program Files\\Sisense\\PrismWeb\\plugins. This parameter allows the autoCube to copy the .json file to the translations folder automatically. If the folder location is changed, this property needs to be updated. If this property is left blank, the autoCube will not copy the json file.
- enable.fail.email.notification - YES if you want email notifications for failed builds, NO if you do not
- enable.success.email.notification - YES if you want email notification for successful builds, NO if you do not
- email.recipient - the email of the recipient; If you want to send notifications to multiple recipients, separate the values with a comma
- email.sender - a valid email address for the sender
- email.server - the IP address of the email server
- Open a command prompt as an administrator.
- Change the directory to the TeamConnect_BI folder that you extracted in step 2. This directory contains the TCBI_SchemaSync.bat file.
- Execute TCBI_SchemaSync.bat. The ElastiCube is created, integrated into Sisense, and is now available for use.
- After cube is created, open the log file in the /TeamConnect_BI/autoCube_logs/ directory and check for any error keywords such as error and fail.
Note for TeamConnect Business Intelligence 6.0: Since emails must be configured ON at the Sisense Server level for clients to receive scheduled reports, users will receive an account activation email when their accounts are automatically created in Sisense. Ignore this email and access the reporting features through TeamConnect. This does not apply to 6.1 or later.
Sharing the ElastiCube with the Admin Account
Before the TeamConnect admin configures the integration, the ElastiCube needs to be shared with the Sisense administrator account user manually. You can share ElastiCubes through the Admin page of the Sisense Web Application.
To share an ElastiCube:
- In the Sisense Web Application, select Admin > Data Sources and then the menu button for the relevant ElastiCube.
- Click Share.
- Type and select the Sisense administrator account given to you by Mitratech. The information for this account is listed in the center of the window.
- Click Save.
Note: The following items pertain to configuring a high-availability configuration only.
- For a high-availability environment, add the ElastiCube to an ElastiCube set, share both the individual ElastiCubes and the ElastiCube set with the appropriate Sisense administrator account, and then use the name of the ElastiCube set in the report integration.
- If an ElastiCube is not secured by sharing it with the Sisense administrator account, the ElastiCube will always appear in the selection list when the dataset for a report is selected.
Configuring Single Sign-On
In order to embed dashboards, Single sign-on (SSO) must be configured and working. Single sign-on (SSO) is configured on the Admin tab in Sisense.
- Log into Sisense Web Application as an administrator.
- Click the Admin tab.
- In the navigation pane, click Single Sign-on.
- Enable SSO using the Single Sign-on Configuration toggle.
- Select the method.
- In the Remote Login URL, type the URL TeamConnect instance with the suffix of webservice/sso, typically in the form:
http://<ServeNamer>:<Port>/<Context>/webservice/sso
where<ServerName> is the name of the TeamConnect server
<Port> is the number of the port used to connect to the server
<Context> is the context path for TeamConnectFor a multi-tenant environment you can set the remote login URL to any URL or page as this user should never actually be used.
-
Click Save.
Configuring Report Integration in TeamConnect
Integrating TeamConnect with an external report system requires the following steps:
- Preparing the TeamConnect instance
- Assigning privileges to users in TeamConnect
- Adding the integration to TeamConnect
Preparing the TeamConnect Instance
- After TeamConnect and Data Warehouse (if applicable) are installed and running correctly, open the teamconnect.properties file in the TeamConnect .WAR file and add the location of the Sisense server to the sisense.server.location property, including the http prefix and the port number. Redeploy the .WAR file.
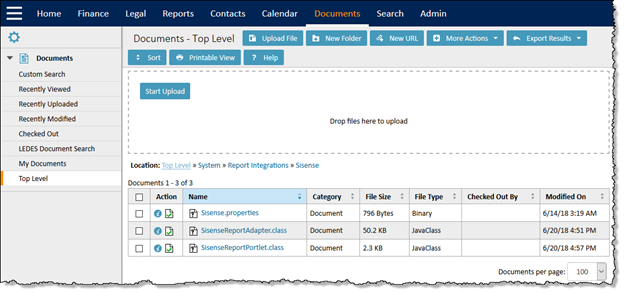
- In TeamConnect, click the Documents tab and select Top Level from the left pane.
- Click the System folder and then click the Report Integration folder.
- Click New Folder and the name specifying the name of the integration you are adding. For the Sisense integration, the folder must be named Sisense and is case sensitive.
- Drop the appropriate .class files and .properties files into this folder. For example, for a Sisense integration:
- Sisense.properties
- SisenseReportAdapter.class
- SisenseReportPortlet.class
Assigning Reporting Privileges to Users in TeamConnect
A user must be assigned rights to the Report Integration tool in order to use reporting.
To assign Report Integration rights:
- In TeamConnect, click the Admin tab and select a user.
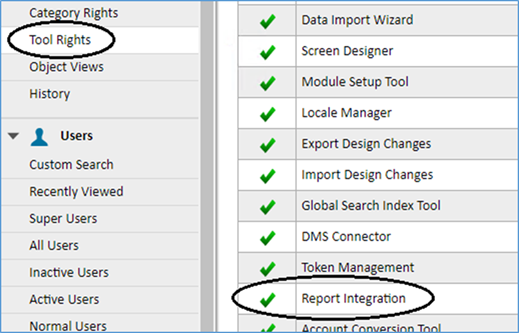
- Click Tool Rights in the navigation pane and click the Edit button.
- Select Report Integration.
- Click Save and Close.
Designer and Viewer rights are assigned to users through Group rights.
To assign Designer and Viewer rights to a group:
- Search for a group and open it.
- In left navigation pane, click System Rights.
- From the View drop-down list, select Report.
- Click the Edit button.
- To assign a Viewer rights, select View Report records (Legacy and New).
- To assign Designer rights, select Create/Edit/Delete Reports (New).
- Click a save option.
Note: if you are updating the reporting rights of a new or existing user and you already have a TeamConnect Business Intelligence integration with Sisense configured, sync the users and groups with the integration. However, if you are in the process of configuring the integration, you do not need to sync at this point.
Adding an Integration to TeamConnect
In TeamConnect, click Tools and select Report Integration.
- In the Report Integrations table, click the Edit icon in the Actions column for the Sisense integration.
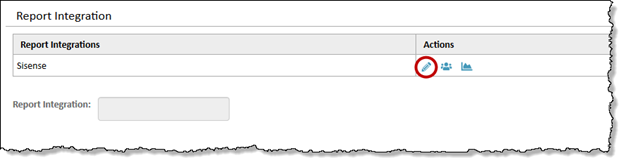
- The values displayed on the page correspond to the values in the the Sisense.properties file. Type the password, SharedSecret, Sisense admin username, ClientID, Environment, ElastiCube name in the appropriate fields.
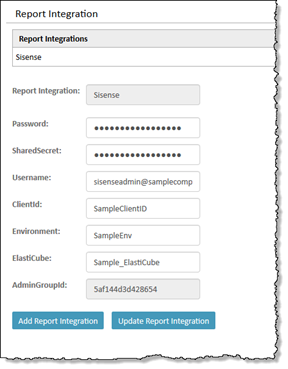
- Note that you must re-type any secured fields such as Password or SharedSecret when you are updating an integration.
- Click Add Report Integration.
Note: Upon initial setup of the report integration, the Client ID and Environment are configured and a new Sisense group is created with all the users in the TeamConnect instance. This group (<Environment>_<ClientID>) allows ElastiCube access for TeamConnect users. This information is used by TeamConnect to create a unique identifier for users on the report server and must not be changed after the initial saving of the settings in the Report Integration Tool. - Click the Sync User and Groups button.
Troubleshooting the Report Integration Tool
- If you do not see the Sisense record listed in the table, verify that you have a Sisense folder in the new Report Integrations folder.
- If you click the Edit icon but do not see any fields displayed, verify that you have the correct Sisense.properties file in Sisense folder in the new Report Integrations folder. The version number for TeamConnect Business Intelligence can be found inside the Sisense.properties file.
Adding the Sisense Admin to the Tenant Group
To enable report sharing with the Sisense admin, add the admin to the Sisense group that contains all the TeamConnect users.
- Log into Sisense Web Application as an administrator.
- Click the Admin tab.
- In the navigation pane, click Groups.
- Find the group with the <Environment>_<ClientID> that was created when the report integration was added.
- Click the Edit (pencil) icon.
- Add the the Sisense administrator account given to you by Mitratech.
- Click Save.
Configuring Syncs
Synchronizing Data between TeamConnect and Sisense
During the initial configuration of the integration between TeamConnect and Sisense, you do not need to manually sync the data but you do need to schedule the task for automatic sync. Schedule schema syncs on a regular basis for maintenance of the system, even if no structural changes are made (changing/adding objects & fields), to ensure deletions and updates are handled properly.
A data sync loads database records and permissions that have been added, modified, or deleted since the last sync so that the most recent information is included in the reports.The data sync can take hours to complete, but reporting functionality is still available during the data sync.
Important: Changing a user's reporting rights and deleting users must be done in TeamConnect so that they are synced in Sisense correctly. Do not delete or modify rights from Sisense; changes made in Sisense will not be reflected in TeamConnect.
To schedule automatic sync at regular intervals:
- Schedule the TCBI_DataSync.bat task using a scheduler such as Microsoft Windows Task Scheduler.
- Because the data sync and the schema sync tasks cannot run at the same time, configure the scheduler to not run the task if the other job is running.
To display the most relevant and recent information or if the connection between the database and the ElastiCube has been lost, you can manually sync the data.
To manually sync the data for reporting:
- Make sure a data or schema sync is not already running.
- On the Sisense server, open a command prompt as an administrator.
- Change the directory to the AutoCube folder that you extracted when creating the ElastiCube. This directory contains the TCBI_DataSync.bat file.
- Execute TCBI_DataSync.bat. The records in the database are loaded into the ElastiCube and are now available for reporting.
- After cube is created, open the log file in the /TeamConnect_BI/autoCube_logs/ directory and check for any error keywords such as error and fail.
You can now run a report to display the updated records.
Synchronizing Semantic Schema between TeamConnect and Sisense
Note: During the initial configuration of the integration between TeamConnect and Sisense, you do not need to manually sync the schema but you do need to schedule the task for automatic sync.
A schema sync loads the database schema updates (including new, modified, or deleted custom fields and objects) from the TeamConnect database into the ElastiCube. The schema can take hours to complete.
Before scheduling or running a sync, take note of the following:
- Schedule schema syncs during non-business hours to prevent the following issues:
- Changes made to the database during the schema sync can cause the sync to fail and render the ElastiCube unusable.
- Reporting functionality is not available during the schema sync and users will receive an error.
- Never have two or more Elasticubes syncing against the same database at the same time.
Scheduling a Schema Sync
To schedule automatic schema sync at regular intervals:
- Schedule the TCBI_SchemaSync.bat task using a scheduler such as Microsoft Windows Task Scheduler.
- Because the data sync and the schema sync tasks cannot run at the same time, configure the scheduler to not run the task if the other job is running.
Including or Removing a Custom Object
Notes:
- Starting in TeamConnect Business Intelligence 6.1, you can use the Setup tool to include or remove custom objects. If you are using 6.0, refer to the instructions in this link.
- Account Budget and Spend, Matter Cost Center, and Invoice Cost Center reportable objects are based on the Financial Module. Clients that are on Legal Module but without Financial Module won't be able to use these three objects. If similar objects are needed, contact Professional Services for assistance on making these objects reportable.
-
Matter Cost Center, Invoice Cost Center, Invoice Vendors, and Line Item Timekeepers have been customized using views. Therefore, these fields cannot be removed from reporting because they are built-in to the integration. If the Matter object is reportable, the Matter Cost Center automatically will be reportable. You can only remove the Matter Cost Center object from being reportable. Removing this field from reporting allows you to report on Matter Cost Center without its custom relation to Matter. If the Matter Cost Center, Invoice Cost Center, Invoice Vendors, or Line Item Timekeepers need to be removed from being reportable when the Matter object is reportable, contact Mitratech Support for instructions on how to disable these fields from being reportable.
Including or Removing Objects and Fields from Reporting
Administrators can include or remove entire custom and system objects from TeamConnect Business Intelligence reporting so that reports display the most relevant information and data syncs are faster.
- If an object is reportable, all fields associated to the object are reportable, except fields explicitly designated as removed from reporting.
- If a parent object is removed from reporting, then all of its child objects or fields are removed from reporting, regardless of the reporting designation for the child or field. The eCube will not create fields that do not already eixst, so if you want to report on a specific child object, the parent object must be included in reporting.
- Business Intelligence does not differentiate between child and embedded objects. Thus, all child and embedded objects will be added to the ElasticCube and be reportable.
Custom objects are removed from reporting by default except the objects in the following table. Admins can change this setting in the Setup tool. By default, the following objects are reportable:
| Code | Type | Object |
|---|---|---|
| ACCT | System | Account |
| CONT | System | Contact |
| INVC | System | Invoice |
| LNI$ | System | Line Item |
| ACPT | OOTB Custom | Advice and Counsel Involved Party (Legal) |
| ADCO | OOTB Custom | Advice and Counsel (Legal) |
| ALLE | OOTB Custom | Allegation (Legal) |
| ASSE | OOTB Custom | Liability Asset (Legal) |
| AWAR | OOTB Custom | Award (Legal) |
| COAC | OOTB Custom | Corrective Action (Legal) |
| COCE | OOTB Custom | Dispute Cost Center (Legal) |
| DAMA | OOTB Custom | Damage (Legal) |
| DISP | OOTB Custom | Matter (Legal) |
| INPA | OOTB Custom | Matter Involved Party (Legal) |
| NEGO | OOTB Custom | Negotiation (Legal) |
| PART | OOTB Custom | Coverage Involved Party (Legal) |
| PROV | OOTB Custom | Matter Provision (Legal) |
| RADC | OOTB Custom | Related Advice and Counsel Matter (Legal) |
| RTAC | OOTB Custom | Related Advice Matter (Legal) |
| SANC | OOTB Custom | Sanction (Legal) |
| TCOC | OOTB Custom | Transaction Cost Center (Legal) |
| TENA | OOTB Custom | Lessee (Legal) |
| TERM | OOTB Custom | Matter Term (Legal) |
| TRAN | OOTB Custom | Coverage (Legal) |
| VIOL | OOTB Custom | Violation (Legal) |
| MTR$ | OOTB Custom | Matter (Essentials) |
| INP$ | OOTB Custom | Matter Involved Party (Essentials) |
(Objects that are provided with TeamConnect and its modules are considered “out-of-the-box” (OOTB) custom objects.)
Note:
- On average, adding an additional custom object to be reportable will add ~3 minutes to the schema sync and ~1 minute for each category that the custom object has. The time it takes to loading the data into the ecube depends on the size of the table in the database.
- If you have removed an object from reporting and that object is used in a report widget, the widget will return an error stating that the field no longer exists. Remove the non-reportable field manually by editing the widget.
- If you are upgrading TeamConnect, before any modules are installed, the admin needs to manually make the module’s “out-of-the-box” (OOTB) custom objects reportable or run a specifically provided script in order for the items to be reportable.
- When an object has the Remove from Reporting (Business Intelligence) checkbox selected, the object is only removed from TeamConnect Business Intelligence reports; Legacy reports with Data Warehouse are not changed. However, when a custom field is removed, it is removed from both TeamConnect Business Intelligence reports and Legacy reports.
To add or remove an object from reporting:
- Click Setup and select Object Definitions from the Go to… menu.
- Select the object and click the General tab.
- To exclude the object from reporting, select the Remove from Reporting (Business Intelligence) checkbox. To include the object in reporting, clear the Remove from Reporting (Business Intelligence) checkbox.
- Click OK. After the next schema sync, the object will be included or removed from TeamConnect Business Intelligence reporting but will still be included in Legacy reports using Data Warehouse.
To add or remove a custom field from reporting:
- Click Setup and select Object Definitions from the Go to… menu.
- Select the object.
- On the Custom Fields tab, select the appropriate fields and click Edit Selected. In the Include in Reporting column, select No to remove the field from reporting, or select Yes to have the field included.
- Click OK. After the next schema sync, the field will be included or removed from both TeamConnect Business Intelligence reporting and Legacy reports using Data Warehouse.
Manually Running a Schema Sync
To display the most relevant and recent information or if the connection between the database and the ElastiCube has been lost, you can manually sync the schema. You can also schedule automatic schema sync on an ongoing basis. If a reportable field is deleted and then re-added, a schema sync is needed to prevent the data sync from failing.
Note: During the initial configuration of the integration between TeamConnect and Sisense, you do not need to manually sync the schema but you do need to schedule the task for automatic sync.
To manually run a schema sync for reporting:
- Make sure a data or schema sync is not already running.
- Make sure that no one will be modifying the TeamConnect database during the schema sync. Changes to the database during the sync can cause the build to fail and render the ElastiCube unusable.
- On the Sisense server, open a command prompt as an administrator.
- Change the directory to the AutoCube folder that you extracted when creating the ElastiCube. This directory contains the TCBI_SchemaSync.bat file.
- Execute TCBI_SchemaSync.bat.
- After cube is updated, open the log file in the /TeamConnect_BI/autoCube_logs/ directory and check for any error keywords such as error and fail.
You can now run a report to display the updated records.
Optimizing Performance
For optimal TeamConnect Business Intelligence performance and lower synchronization, (and sync updates), we recommend:
- Only include the objects and fields that users need in their reports. Each additional object will add around 3 minutes to the sync, on average small object. For more information, see Including and Removing Object and Fields from Reporting.
- Limit the number of users with reporting rights to less than 100. This number includes both view only and designer users combined.
- Google Chrome is the fastest browser. Mozilla Firefox and Microsoft Internet Explorer may be slower to load.
- Limit the number of widgets per dashboard to 6.
- Watch out for many-to-many relationships and queries.
Embedding Reports on Home Pages and Portal Panes
TeamConnect Admins and Solution Designers can embed reports into customizable home pages, allowing users to quickly view reports as soon as they log in, without opening the Reports tab. For more information, see Creating Home Pages and Portal Panes.
When embedding reports in portal panes:
- Verify that the Sisense Admin was added to the TeamConnect tenant group in Sisense. This step is typically done during the integration process and only needs to be done one time; it does not need to be done each time a report is embedded.
- Verify that the dashboard is shared with Sisense Admin user.
- Verify that you are viewing the latest list of reports by clicking the Sync Report List icon in the Report Integration Tool.
Troubleshooting
Connections
Why do I receive an error when trying add an ElastiCube to the report integration?
Confirm that the ElastiCube is shared with Sisense admin user.
Why is TeamConnect not connecting with Sisense?
- Verify that the Sisense web server is running.
- Verify the ElastiCube Manager is running.
- Ping the machines from the TeamConnect server to make sure the server is available from the TeamConnect server.
- Check the logs and make sure the shared secret, admin user, and password are correct.
- If the logs show this error when configuring the report integration using the Report Integration Tool in TeamConnect:
"Caused by: java.lang.LinkageError: loader constraint violation: when resolving method 'org.springframework.http.client.HttpComponentsClientHttpRequestFactory.<init>(Lorg/apache/http/client/HttpClient;)V' "
Verify that you do not have a conflicting version of the HttpClient JAR in System\Libraries. If so, remove it and retry.
Why do I receive a message stating that it looks like I'm lost?
The system may be upgrading or installing licenses. Try again later.
What can I do if I'm having trouble accessing Sisense through TeamConnect?
The Sisense Web Admin can bypass SSO and directly access the Sisense machine using this URL template: http://localhost:8081/app/account#/login
The variables in this URL are the SSL, Port number and localhost. Make sure to replace these variables to reflect your Sisense instance.
Users
Why isn't a user appearing in Sisense?
Users must have an email address in TeamConnect in order to integrate with Sisense correctly. If a user with reporting rights in TeamConnect does not have an email address, the user will not have an account created in Sisense. If a user does not have an email address, the integration will create a "dummy" email address for the user and log an error in the user/group sync. You should create a validly formatted primary email address for the contact record for the user and the "dummy" email address will be replaced with the new email address after a user/group sync occurs.
Why aren’t users created in a second ElastiCube when they were already created in one?
Each TeamConnect user with an automatically created Sisense account must have a unique email address per Sisense server. This means that an on-premise client with a single Sisense server cannot have a TEST ElastiCube and a PROD ElastiCube with users with the same email. The second time an email account is used, the user will not be created automatically on the Sisense server.
The fix is to have separate Sisense servers for each TC instance in the environment (for example, one Sisense server for TEST and one for PROD.) (TC-16847)
Why are User/Group syncs failing?
Sisense validates email addresses using a standardized w3 format. Any email in TeamConnect must either be blank (in which case the integration assigns a properly formatted generated email address) or follow this format, or you will receive an error during User/Group sync.
ElastiCube Syncs and Builds
Why did Sisense fail when creating a new ElastiCube or rebuilding an existing one?
- This issue may be caused by a possible caching issue in Sisense. Make sure that the ElastiCube was removed after the failed attempt, that the folder in which was created is deleted, and that it is not appearing on the Server Console Use the Sisense Server Console to stop and restart the Sisense server and try again. TC-18801, TC-19219
- Note that the values in the autocube.properties file are case sensitive and an incorrect value can cause errors when a ElastiCube is built.
- If you are manually building a cube, make sure you are running the command as an administrator. Verify that you have Admin privilege on your machine, otherwise you may still be running it as a non-privileged user.
- If you are running low on RAM or receiving the error "Accumulative Changes Log Creation Failed Error Create Patch [The requested operation could not be completed due to a file system limitation ]", this may be due to the fact that Sisense saves temporary copies of the ElastiCube during the build on the C:\ drive in C:\ProgramData\Sisense\PrismServer\Patches.To move this location to another drive:
- Using a text editor, open C:\ProgramData\Sisense\PrismServer\ElastiCubeConfiguration.xml.
- On the second to last line, just before the </ElastiCubeConfiguration> closing tag add the the following text:
<DefaultPatchesDirectory>D:\</DefaultPatchesDirectory>
where D:\ is the new patches location. - Restart the ElastiCubeManagementService.
- If the problem still occurs, navigate to the Sisense Server Console preferences and deselect Compress on build or defragment the affected drive.
Why are my syncs failing?
- Make sure the server has enough disk space.
- Make sure the server has enough available RAM.
- Make sure that the sisense.includeObject property in autoCube.properties file in the TeamConnect_BI directory on the Sisense server does not include any objects that are not reportable (for example, CSM$ is not reportable).
- Because the data sync and the schema sync tasks cannot run at the same time, configure the scheduler to not run the task if the other job is running.
- Make sure no custom objects in TeamConnect have a Unique Code starting with numeric value.
- Make sure a reportable field has not been deleted and then re-added. If this happens, perform a schema sync before performing a data sync.
- If you are manually syncing a cube, make sure you are running the command as an administrator. Verify that you have Admin privilege on your machine, otherwise you may still be running it as a non-privileged user.
After I updated a report integration, why can’t I sync the data?
When updating the report integration in the Report Integration tool, re-type any hidden field such as Password or SharedSecret to make sure that the integration saves the field correctly.
Why am I receiving this error when attempting to sync the ElastiCube:
- ERROR java.io.FileNotFoundException: D:\ElastiCube.xml (The system cannot find the file specified)
- Use localhost or 127.0.0.1 (loopback address) as the Sisense host instead of the IP address of the server on which you are running the sync.
- GetTableSchema failed: unknown result
- Check that the database user name is specified in all uppercase if using an Oracle data source.
- ORA-00600: internal error code, arguments: [kkogbro: no kkoaptyp], [0], [], [], [], [], [], [], [], [], [], []
- Option 1: The best way to resolve this corruption is to restore a copy of the affected datafile from before the error and to recover the database so these changes are applied to the restored datafile and brought forward to the current time. This action is possible only if the archivelog feature for your database is enabled. (Enabling this feature ensures that all changes to the database are saved in archived redo logs.)
- Option 2: Create a copy of the corrupted schema into a new schema using Oracle’s export/import feature.
How do I regenerate a Sisense catalog?
Sisense requires some free space on the C: drive, otherwise the catalog can become corrupted. To recover a catalog:
- Open the Start menu or Task Manager and search for Services.
- Stop the ElastiCubeManagementService service.
- Open C:\ProgramData\Sisense\PrismServer and rename the ElastiCubeCatalog to ElastiCubeCatalog1.
- Restart the ElastiCubeManagementService service. Starting the service may take longer than normal as Sisense creates a new catalog folder.
How do I clear the RabbitMQ queue?
The data cache of RabbitMQ can fill the drive. The lack of disk space can cause all cubes to detach from Sisense and all builds to fail. To clear the RabbitMQ queue:
- Open a command prompt as an administrator.
- Navigate to the folder C:\Program Files\Sisense\Infra\Rabbitmq\sbin.
- Type the following command: rabbitmq-plugins enable rabbitmq_management
- If you receive an error, restart the pulse/broker service and proceed to the next step.
- Navigate to "http://localhost:15672" (on the server) and log in with the Username: guest and Password: guest.
- Open the Queues tab and if you see 0 messages, the issue is not related.
- If you see many hanging massages, clear the massages by clicking Queue sisense.ecs.build.logs.persist.
- Click Purge and repeat until there are no more in the queue.
Reports
Why does nothing appear on the Reports tab?
If you are using SSL, make sure that both TeamConnect and Sisense are configured using SSL.
Why is there a null record on my report?
An addition dummy/null record is created on the core system entities to support outer joins in Sisense. This record has blank values across the table except for system_modified_on. You can avoid this record on your reports by adding a filter on one of the entity fields:
1. In the report, select the entity field in the filters (for example, Contact Name)
2. On the list of values that appears, deselect N/A values to filter out the null values.
Why isn't data appearing on my report?
If one of the ElastiCubes in an ElastiCube set is showing “Invalid Status” due to a failed schema sync, data will not appear in the reports that involve that ElastiCube set. Run a schema sync on the failed ElastiCube.
Duplicate reports on the same dashboard can also cause a report to fail. In rare instances, a "ghost widget" may appear on a dashboard, which is a duplicate but hidden widget. It can be removed by editing the .dash file of the dashboard or deleting it in the Application Database.
Why are deleted records still appearing in reports? Why is outdated information shown on the report?
Schedule schema syncs on a regular basis for maintenance of the system, even if no structural changes are made (changing/adding objects & fields), to ensure deletions and updates are handled properly.
Why are newly created users unable to view reporting data even after schema sync?
TeamConnect Business Intelligence components must be on the same minor release. For an x.y.z release, the components must match the x.y version. For example, for a TeamConnect 6.1.2 release, the report adapter must be at 6.1.z and the BI code must also be at 6.1.z.
Why are dates in the reports off by one day as compared to the value you see in the TeamConnect Ui?
Sisense gets the data directly from the database, which is stored in GMT time. Convert any custom fields from timezone dependent into timezone independent (via script), then perform a schema sync to update the data.
Version Information
How do I find the version number of my TeamConnect Business Intelligence installation?
In the TeamConnect_BI directory where the autoCube.properties file is located, open the version.txt file
Updating an Integration
In rare instances, you may need to update the report integration. For example, the TeamConnect instance might need to be integrated with a different ElastiCube, or the ClientID/Environment might need to be changed.
To update an integration:
- In the Sisense Web Application, delete all the existing users for the original TeamConnect environment. Otherwise, a user duplicate email issue will occur.
- In TeamConnect, click Tools and select Report Integration.
- In the Report Integrations table, click the Edit icon in the Actions column for the Sisense integration.
- Type your updates in the appropriate fields.
- Re-type any secured fields such as Password or SharedSecret. Even though the fields appear to have stored hidden values, the values must be re-entered manually.
Logging
How can I configure the reporting logs?
In TeamConnect, on the Admin tab, click Logging and then System. Here, you can change the logging level for Reports.
Common data and log file paths
Prism Server logs: C:\ProgramData\SiSense\PrismServer\PrismServerLogs
Sisense Web log: C:\ProgramData\Sisense\PrismWeb\Logs
ElastCube build logs: C:\ProgramData\SiSense\PrismServer\ElastiCubeProcessLogs<YourElastCubeName>
MongoDB: C:\ProgramData\Sisense\PrismWeb\DB
iisnode (web server) logs: C:\Program Files\Sisense\PrismWeb\vnext\iisnode
Appendix
Creating Separate Admin Accounts on Sisense
Each TeamConnect instance requires its own Sisense administrative account.
In order for reports to appear on portal panes, the TeamConnect user has to share the report with their admin. Since a single Sisense Server can have shared tenancy, you can create a separate Sisense Admin for each TeamConnect instance so that the reports can be shared with the appropriate Admin.
To add a new admin account:
- On the Admin tab in Sisense, click the + User button.
- Type the user's information in the appropriate fields.
- In the Role drop-down list, select Admin.
- To set the password, toggle the Define Password option to ON and enter a password. If you enter a password for the admin, the system does not notify the admin of the password; notify the admin directly.
- Click Save. The admin then receives an email from Sisense that redirects the user to activate their account.
- Add the Admin to the tenant group.
Removing Parts of a Reporting Integration
Uninstalling an ElastiCube
To uninstall an ElastiCube, run the TCBI_Uninstall.bat script from the original installation files. This script uninstalls the ElastiCube and removes all related objects from the TeamConnect database, but does not remove any object related to the TeamConnect instance.
To uninstall the ElastiCube:
- Open a command prompt as an administrator.
- Change the directory to the TeamConnect_BI folder from the original installation files that were extracted during installation. This directory contains the TCBI_Uninstall.bat file.
- Execute TCBI_Uninstall.bat. The ElastiCube is deleted and related objects are removed from the TeamConnect database.
Removing the Plugins
If you are upgrading to a new version, remove the existing plugins first.
To uninstall the Sisense plugins and email templates:
- Open a command prompt as an administrator and navigate to the location where you extracted the TeamConnect-Sisense-installer-xx.zip installer files.
- Run plugins_uninstall.bat.
- When the installation is complete, you receive a Success message. If there are any errors, an output log files is generated inside the folder.
- Restart IIS server using iisreset in a command propmt. Mitratech does not recommend using Powershell to restart IIS.
Removing Related Objects in the Database
You can remove objects related to the ElastiCube from the TeamConnect database without removing the ElastiCube. This script drops all all the tables, views, functions, mviews, and procedures which support the creation and maintenance of the ElastiCube. The script will not remove objects related to the TeamConnect instance.
To remove related objects in the TeamConnect database:
- Using your preferred database tool, make a backup of your TeamConnect database.
- Login to your query tool as an administrative user.
- In the TeamConnect_BI folder from the original installation files that were extracted during installation, open the 040_DropIfExist.sql file.
- Run the SQL script.
Removing a Sisense or Data Warehouse Integration
If both Sisense and Data Warehouse are installed and one of them is removed, run wh_install/schemasync on the remaining reporting integration server in order to recreate the indices.