
TeamConnect 6.2 Installation Guide for PDF
- Last updated
- Save as PDF
This installation guide is for TeamConnect 6.2. If you would like a copy of an earlier version, please download the guide from the TeamConnect PDF Hub. Note: This link may require a login.
Installation Overview
If you would like a copy of the installation guide for previous versions, visit the TeamConnect PDF Hub. Note: This link may require a login.
Before you begin upgrading an existing installation, read the section regarding Upgrade Considerations.
TeamConnect installation should be completed in the following order:
- Download Java and ensure the proper requirements are met for application servers, web servers, or browsers as detailed in Installation Requirements.
IMPORTANT:
TeamConnect 5.0.x supports Java 1.7 and Java 1.8
TeamConnect 5.1, 6.0, and 6.1 only support Java 1.8.
TeamConnect 6.2 supports Java 1.8 unless you are using Apache Tomcat 9.0, which requires Open JDK 11.1.
Note the additional comments on Application and Web Servers for Tomcat users.
- Set up the server that will be used with Elasticsearch.
- Download Elasticsearch (see Elasticsearch Installation for more details).
Important:
TeamConnect 5.1, 5.2, 6.0, and 6.1 only support Elasticsearch 5.3.0.
TeamConnect 6.2 only supports Elasticsearch 7.1.1.
- Configure Elasticsearch for your designated server. For more information, see Elasticsearch Configuration.
- Put in a Support ticket for the TeamConnect Installer with support@mitratech.com.
- Run the TeamConnect installer. More detail on this process can be found on the Running the Installer page. Configure the teamconnect.properties file in the installer (or manually, if desired) for Elasticsearch.
Note: If you add any TeamConnect plug-ins, refer to the corresponding documentation for additional requirements.
Note: If you use a custom logo on your TeamConnect web pages, be sure that it does not exceed 50 pixels in height.
Refer to the TeamConnect PDF Hub for the Tech Spec Sheet for your version of TeamConnect. Access to the PDF Hub requires a log in to the Client Success Center.
Installation Requirements
Database Requirements
The following page and subsequent installation guide section is for TeamConnect 6.2. For earlier versions, download the PDF from the TeamConnect PDF Hub. Note: This link may require a login.
The database server should be installed and configured on a hardware platform and operating system certified by your database server vendor. TeamConnect requires at least 500 MB for its tablespace, and requires a larger tablespace when your data is added or you add custom elements to your design.
Supported Databases
| TeamConnect Version | Supported Versions | Certified On |
|---|---|---|
| TeamConnect 6.2 (Note: we dropped support for SQL Server 2016 starting with 6.2.1) |
Oracle 19c (starting in 6.2.4) | 19.3 |
| Oracle 12c R2 | 12.2.0.1.0 | |
| SQL Server 2017 (TCE 6.2+) | 14.0.1000.169 | |
| SQL Server 2016 (only for TCE 6.2) | 13.0.4224.16 |
Oracle Requirements
For Oracle, the login that you provide for TeamConnect's use must have the following database privileges:
- CONNECT and CTXAPP roles
- CREATE TABLE system privilege
- CREATE VIEW system privilege
- CREATE PROCEDURE system privilege
- CREATE SEQUENCE system privilege
- CREATE TRIGGER system privilege
- CREATE MATERIALIZED VIEW system privilege
- User quota "Unlimited", value -1, unit MBytes
For future expansion, enable auto extend for the data file.
For Data Warehouse you need additional rights, which are listed in the Data Warehouse Release Notes.
SQL Server Requirements
For SQL Server, the login that you provide for TeamConnect's use must have the following roles:
- public role
- db_owner role
Your SQL Server DBA must also alter the database configuration as follows:
- ALTER DATABASE <dbname> SET ALLOW_SNAPSHOT_ISOLATION ON
- ALTER DATABASE <dbname> SET READ_COMMITTED_SNAPSHOT ON
For future expansion, ensure that "Enable Autogrowth" is selected for the database.
Localization
If you plan to localize TeamConnect for multiple languages, your Oracle database configuration should include:
- NLS_NCHAR_CHARACTERSET parameter set to AL16UTF16. (This is the default.)
- All text columns set to NVARCHAR2 datatype. This is done automatically for newly created databases; if you are upgrading from an older version, you may need to perform manual tasks to make your database compatible. See Upgrade Considerations for more information.
Estimating Your Actual Database Size
Each customer's design is unique; thus the number of custom fields, field types, documents stored and the numbers of rows of data for each object type will be unique as well. You must also take into account the amount of data and documents that will be migrated from legacy applications into TeamConnect via your initial data conversions. Finally, the number of users and the volume of new records they will be entering yearly is important. Using this information, and any historic information you have regarding year to year data growth from the legacy systems and expected increases in user community etc., is important to be able to estimate the initial database size and yearly database growth.
For these reasons, estimating the size of the TeamConnect database is not a simple task. We recommend that you conduct a database sizing exercise as part of the initial TeamConnect implementation plan. This will ensure that you are able to provision the correct amount of initial database space and accommodate the yearly growth. Current TeamConnect customers have database sizes varying from less than 5 gigabytes of data to over a terabyte.
Database Search Considerations
TeamConnect features full-text search capabilities (outside of Elasticsearch's Global Search), but those capabilities are constrained by the search capabilities of your database server software. If you store a document with a specific file type that your database server does not support for its full-text search feature, the content of that document is skipped during the TeamConnect full-text search.
Please review the documentation supplied with your database server's version to determine which file types are supported.
Application and Web Server Requirements
Supported Web Application Servers
TeamConnect supports and is certified on the following application servers. Note: If using Tomcat 8.5, TeamConnect requires Java 8 (JDK 1.8) . If using Tomcat 9.0, TeamConnect requires Open JDK 11.1.
| Supported Versions | Certified On | Drivers |
|---|---|---|
| Oracle Weblogic 12c | 12.2.1.2 |
|
| WebSphere 9.0 | 9.0.0.8 |
|
| Tomcat 8.5 | 8.5.5 |
|
| 9.0.22 |
|
Supported Application Server Platforms
TeamConnect supports the hardware platforms and operating systems that are certified by your application server software vendor. Consult the application server documentation for a list of compatible web servers and details regarding application and web server installation:
- Apache Tomcat— tomcat.apache.org
- Oracle WebLogic— www.oracle.com
- IBM WebSphere—pic.dhe.ibm.com/infocenter/wasinfo/v8r5/index.jsp
Additional Requirements for TomCat
For Tomcat, add the following for Connector in the server.xml file (found in root/conf):
relaxedQueryChars=""<>[\]^`\{|}"
If using Tomcat and Elasticsearch 7.1.1, the following files need to be added to the tomcat/lib directory:
- bcpg-jdk15on-1.61.jar
- bcprov-jdk15on-1.61.jar
Additional Requirements for TomCat 8.5
For Tomcat 8.5, add the following for Connector in the server.xml file (found in root/conf):
compression=“on”
compressableMimeType=“text/html,text/ xml,text/plain,text/css,application/javascript”
TeamConnect’s web.xml file (found in the WEB-INF folder) must have the following commented out:
<filter-mapping>
<filter-name>compressionFilter</filter- name>
<url-pattern>*.htm</url-pattern>
</filter-mapping>
<filter-mapping>
- <filter-name>compressionFilter</filter- name>
<url-pattern>*.js</url-pattern>
</filter-mapping>
<filter-mapping>
<filter-name>compressionFilter</filter- name>
<url-pattern>*.css</url-pattern>
</filter-mapping>
<filter-mapping>
<filter-name>compressionFilter</filter- name>
<url-pattern>*.html</url-pattern>
</filter-mapping>
Application Server Hardware Requirements
To provide TeamConnect with sufficient Java heap space to operate optimally, the TeamConnect server must have enough memory and CPU capacity available to support the usage pattern and the number of users.
- These requirements are based on out of the box TeamConnect design.
- Additional customization might change the system requirements needed for the application to run efficiently.
| Number of Concurrent Users | <100 | 100-300 | 300-500 | 500-1000 |
|---|---|---|---|---|
| Processor | 64-bit Single CPU 2-4 Cores 2+ GHz |
64-bit 2x Dual Core or Single Quad Core 2+ GHz |
64-bit 2x Quad Core 2+ GHz |
64-bit 4x Quad Core 2+ GHz |
| Java Heap Size | 2-4 GB | 2-4 GB | 4-8 GB | 8-16 GB |
Application Server Performance Considerations
- The required Java minimum heap size setting is at least 2 GB for TeamConnect, but more may be required depending on your environment and usage. Monitor JVM heap utilization during the test cycle and perform a load test to validate that the settings you are planning to use in production can handle the expected user scenarios and load.
- For optimal performance, refer to the performance tuning documentation provided by your application server vendor and database vendor for more information on other environmental and configuration considerations that should be taken into account when setting up TeamConnect.
- Mitratech recommends that you configure your web server to "keep alive" the TeamConnect session. This is particularly recommended if you are using a single sign-on method of authentication. "Keep alive" improves the performance of TeamConnect.
Testing Your Environment's Support for TeamConnect Features
TeamConnect uses network features that require support from the database, application, and web servers on which it is deployed. Three test applications are provided with TeamConnect that can quickly confirm that your environment supports these features.
All three test applications are run by issuing Java commands from the command line, using tcutility.jar, a file that is found in the utilities/test subfolder of your installation directory. In some cases, you need to use two machines when testing - one as a server and one as a client.
Before testing, copy tcutility.jar to a local directory on the test machines, then start a command- prompt session.
For Windows execute the following command:
set CLASSPATH=<location>/tcutility.jar
For UNIX:
Export CLASSPATH = $CLASSPATH:<location>/tcutility.jar
JDBC Latency Test
This application measures database server response time.
To test SQL Server, execute this command. Type the entire command on a single line:
java -classpath tcutility.jar;sqljdbc.jar teamconnect.jdbc.JdbcLatencyTest arg0 arg1 arg2 arg3 arg4 arg5 To test Oracle:
java -classpath tcutility.jar;ojdbc5.jar teamconnect.jdbc.JdbcLatencyTestarg0 arg1 arg2 arg3 arg4 arg5
The argument definitions are:
- 0: JDBC URL (e.g.,
jdbc:sqlserver://10.0.0.127;databaseName=TEST_DBorjdbc:oracle:thin:@10.0.0.127:1521:test_db) - 1: class name for database driver (e.g.
oracle.jdbc.OracleDriver or com.microsoft.sqlserver.jdbc.SQLServerDriver) - 2: Database username
- 3: Database password
- 4: Number of iterations in the test
- 5: Text of the SQL query (e.g. select * from Y_USER)
The output from the app states the time, in microseconds, required to execute this simple query. Expected acceptable range for this query is 0.6 to 0.8 seconds. Longer times may indicate a database issue that should be resolved before installation.
UDP Test
This application tests clustered server environments. Both UDP and RMI (described below) must work properly for TeamConnect to run on clustered servers.
Login to Machine1 and run these commands:
set CLASSPATH=tcutility.jar
java -classpath tcutility.jar teamconnect.udp.UDPServer 239.192.16.15 6018 5
The argument values shown are examples only. The argument definitions are:
- arg0: UDP address
- arg1: UDP port
- arg2: Time to live (number of hops)
The application responds with message "waiting..."
Login to Machine2 and run these commands:
set CLASSPATH=tcutility.jar
java -classpath tcutility.jar teamconnect.udp.UDPClient 239.192.16.15 6018 Hello 55
The argument values shown are examples only. The argument definitions are:
- arg0: UDP address
- arg1: UDP port
- arg2: Message string to be sent
- arg3: Message count
- arg4: Time to live (number of hops)
The application will respond with messages showing the test string and the status of the send request. These messages will repeat for as many times as are specified in the arg3 value. The server application on Machine1 should display messages, one for each send request, containing the text of the sent string.
Repeat the process by terminating the server application on Machine1, then changing Machine2 to Server and Machine1 to Client.
RMI Test
This application tests clustered server environments. Both UDP (described above) and RMI must work properly for TeamConnect to run on clustered servers.
Note: The RMI registry should not already be running when you begin this test. It is important that the CLASSPATH value be set before the registry is started.
Login to Machine1 and run these commands:
set CLASSPATH=tcutility.jar rmiregistry <port>
java -classpath tcutility.jar teamconnect.rmi.Server <port>
The application responds with "Server ready". Login to Machine2 and run these commands:
set CLASSPATH=tcutility.jar
java -classpath tcutility.jar teamconnect.rmi.Client <IP addr of RMI server> <port>
The application responds with the message "Hello, World" and with the run time that was required to execute the test. Repeat the process by terminating the server application on Machine1, then changing Machine2 to Server and Machine1 to Client, then rerunning the test.
Web Proxy Settings
To provide access to TeamConnect via your organization's URL (for example, http:// www.yourcompany.com/TeamConnect/), set up the appropriate plug-in for your company's web server to proxy (redirect) the HTTP requests to the application server. You must specify the proxy URL (/ TeamConnect in this example) and the hostname and port used by your application server.
Each web server will have a different procedure and syntax for configuring the plug-in. Refer to your web server's documentation for details
Web Browser Requirements
You must specify the proxy URL (/ TeamConnect in this example) and the hostname and port used by your application server.
Each web server will have a different procedure and syntax for configuring the plug-in. Refer to your web server's documentation for details.
The TeamConnect 6.x application platform supports, and is certified for use with, the following web browsers:
Safari (current, Mac only)
Internet Explorer 11 (TeamConnect 6.2.4 and above versions do not support Internet Explorer 11.)
Microsoft Edge
Firefox (current)
Chrome (current)
TeamConnect is best viewed with a browser width minimum of 1366 x 768px.
Note: Safari has an issue when running on 32-bit Mac 10.6.4. Other Mac operating systems, including 64-bit Mac OS, do not have this issue.
Important: The browser options must be set to their default settings. TeamConnect is not certified for use with non-default browser settings.
It is recommended that client workstations do not use JavaScript debugging when accessing TeamConnect or other Mitratech applications.
Elasticsearch Requirements
For information on installing Elasticsearch, see Installing Elasticsearch.
Hardware Requirements
Mitratech recommends the use of three Elasticsearch nodes with each node on a separate server.
| Requirements | Per Server |
|---|---|
| Processor | 4 Cores (If you need to choose between faster CPUs or more cores, choose more cores.) |
| RAM | 16 GB minimum, 64 GB maximum |
| Cores | 4 |
| Java Heap Size | Up to 50% system memory allocated, ideally 12-16 GB, 26 GB maximum |
| JVM | 50% system memory allocated |
Software Requirements
- TeamConnect 6.2 is only certified against Elasticsearch 7.1.1.
- TeamConnect 6.1 is only certified against Elasticsearch 5.3.0.
TeamConnect offers Global Search as part of an integration with Elasticsearch, enabling robust, global searching of TeamConnect instances. The integration is configured in the teamconnect.properties file and uses the Elasticsearch Java API.
Business Object Support
Business Objects Single Sign-on (BOSS) is not dependent on the TeamConnect version. You can deploy BOSS on Apache Tomcat, Oracle WebLogic, or IBM WebSphere. Deploying BOSS and Configuring URLs specifies which versions of these application servers are fully supported for BOSS.
Note:
If you are using Business Objects, ensure that the database server for TeamConnect and the computer that runs Business Objects both use the same character set.
If there is a field you need to add to the universe or something isn't working as expected, refer to the vendor documentation for help or contact Technical Support.
BOSS requires separate purchase. Please contact your account manager for details.
TeamConnect also has a native, feature-rich reporting capability. For more information, see Reports.
Reporting Requirements for Legacy Reports
The TeamConnect Legacy Reports with Data Warehouse requires client computers to have Adobe Flash version 10.1 or higher installed.
TeamConnect was certified with version 11.4.
For exporting report results to PDF format, the client computer must have Adobe Acrobat Reader version 9.4.0 or higher installed.
Reporting Requirements for TeamConnect Business Intelligence
If you will be using TeamConnect Business Intelligence, for the latest capacity and hardware requirements, see the online document, Reporting Requirements for TeamConnect Business Intelligence 6.2.
For information about installing, upgrading, or configuring TeamConnect Business Intelligence, see the online TeamConnect Business Intelligence documentation.
Licensing
The number of users per license is based on your agreement with Mitratech.
Important: If you are upgrading from TeamConnect 4.0 or later, you have a current license file and do not need to upload/activate it again.
Once you install TeamConnect, contact Mitratech Support for your company's licensing file. The license file must be uploaded before users can log in.
Before you Begin
Contact Mitratech Support to obtain the license file and save it to an accessible location.
To upload and activate the license file:
- Log in to TeamConnect.
- Click the Admin tab, and the click the Admin Settings sub-tab link.
- In the left pane, click the About link.
- In the License section, click the Upload License button.
- In the Upload a new license file window, browse to the location of the license file and select it.
- Click Upload.
The license file is now activated and users can log in to TeamConnect.
Expired License
If your license expires, please contact Mitratech Support for a new license. Details about expired licenses can be found in the logs.
For details on licensing concepts and how to upload a license, refer to System Administration for more information.
XML Layer Support
This is to support existing XML Layer integrations developed by existing clients in TeamConnect 2.x who are now upgrading to version 5.1. The XML Layer is not supported for new clients or recommended for new integrations by existing clients who have upgraded to version 5.1. For new integration development, refer to the TeamConnect Web Services integration layer.
TeamConnect Installer Requirements
Before running the TeamConnect Installer:
-
The TeamConnect tablespace and appropriate users should already exist.
- Your machine must be connected to the internet.
- Your machine must have one of the Java environments listed in Application and Web Servers.
The TeamConnect Installer may require in excess of 2 GB of Java heap space, particularly when running against large databases. It is recommended that you use a machine with at least 3 GB of available heap space to run the installer.
Upgrade Considerations
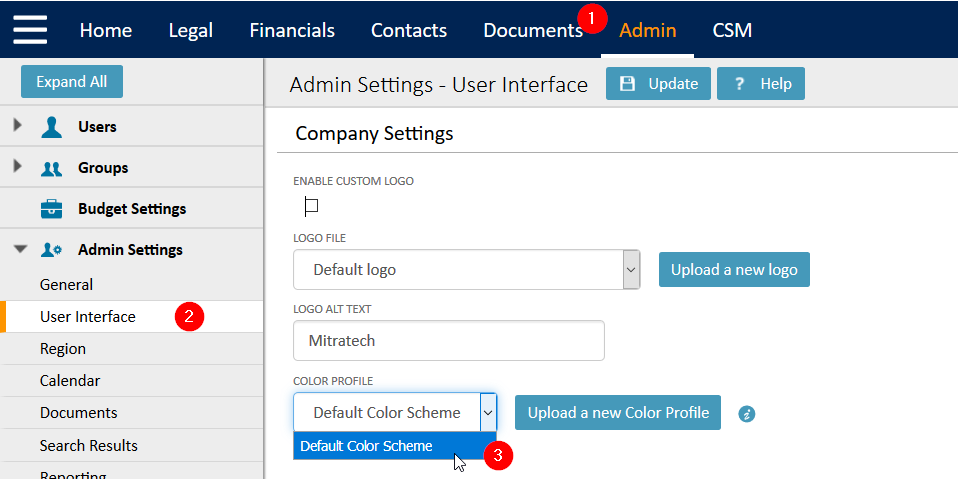
Upgrading with Custom Logos and Color Schemes
If you are upgrading from TeamConnect Enterprise version 5.x and are using a custom logo and/or color scheme, you will need to remove or disable custom color profiles before upgrading.
You can do this by navigating to Admin > Admin Settings > User Interface > Set to Default Color Scheme and ensure the Enable Custom Logo box is NOT checked.
Once your instance is upgraded, the new profile can be uploaded using the 6.X format.
If you have already upgraded and are experience issues, please follow these steps to troubleshoot and resolve the issue.
Upgrading with TeamConnect Modules
If you are upgrading TeamConnect Modules (e.g., Financial Management, Collaborati Spend Management, Legal Matter Management, etc.) from an Enterprise version prior to 5.0, it is important to ensure your Enterprise version is not upgraded beyond an available upgrade path for the modules to reach 6.x. For example, if TeamConnect Enterprise is upgraded to 6.1 while CSM is still at version 3.4, there will be no available upgrade path to get CSM to 5.0. Please consult the Module Upgrade Guide for more information on the best order for upgrading each module and TeamConnect Enterprise.
TeamConnect Business Intelligence
If you have a previous installation of TeamConnect Business Intelligence, follow the specific instructions for upgrading found in Upgrading to TeamConnect Business Intelligence 6.1 or Upgrading to TeamConnect Business Intelligence 6.2.
Elasticsearch
Upgrading to TeamConnect 6.1 with Elasticsearch 5.3.0
Important: The following steps must be incorporated into the upgrade process when upgrading to TeamConnect 6.1 in order for Global Search to perform properly.
- Search Indexes - Due to changes in the Elasticsearch index structure from one index for all objects to one index per object, the index needs to be deleted and rebuilt using this process and timeline:
- Before starting the upgrade process:
- Delete the existing index from the pre-6.1 version of TeamConnect.
- Delete the records from the Y_RECORD_CHANGE table if any exist.
- After the TeamConnect upgrade is complete:
- Build the index for each object using the Global Search Index Tool.
- Before starting the upgrade process:
- Search Guard - In TeamConnect 6.0 and earlier versions, the "ElasticSearchUUID" system setting is stored in the database and the UUID value is the name of the index. The new TeamConnect 6.1 naming convention for the indices is in the format UUID-[uniqueCode for object]. For example, index name for Contacts will be UUID-cont. Existing clients with Search Guard must do the following:
- Since these configurations added the index name (the UUID from the database) to their certificate on the node, update the certificate to include a wildcard after the UUID name.
- In the SG_ROLES.YML file, the index name under each role refer to the ElasticsearchUUID from the database. At the end of the index name, add an asterisk at the end of the name, before the closing single quote.
Upgrading to TeamConnect 6.2 with Elasticsearch 7.1.1
TeamConnect 6.2 requires an upgrade to Elasticsearch 7.1.1. The following steps must be incorporated into the upgrade process when upgrading to TeamConnect 6.2 in order for Global Search to perform properly.
- Search Indexes - The index needs to be deleted and rebuilt using this process and timeline:
- Before starting the upgrade process:
- Delete the existing index from the pre-6.2 version of TeamConnect.
- Install Elasticsearch 7.1.1 and upgrade TeamConnect.
- After the TeamConnect upgrade is complete:
- Build the index for each object using the Global Search Index Tool.
- Before starting the upgrade process:
If using Tomcat and Elasticsearch, the following files need to be added to the tomcat/lib directory:
- bcpg-jdk15on-1.61.jar
- bcprov-jdk15on-1.61.jar
Upgrading to TeamConnect 6.3 with Elasticsearch 7.10
TeamConnect 6.3 requires an upgrade to Elasticsearch 7.10. The following steps must be incorporated into the upgrade process when upgrading to TeamConnect 6.3 in order for Global Search to perform properly.
- Search Indexes - The index needs to be deleted and rebuilt using this process and timeline:
- Before starting the upgrade process:
- Delete the existing index from the pre-6.3 version of TeamConnect.
- Uninstall the older version of Elasticsearch and install Elasticsearch 7.10 and upgrade TeamConnect to 6.3.
- After the TeamConnect upgrade is complete:
- Build the index for each object using the Global Search Index Tool.
- Before starting the upgrade process:
Localization Key Updates
See Localization Key Updates to see the updates in each version of TeamConnect.
Optional Script to Support Data Warehouse and Localization
When upgrading from a version prior to 3.3 SP1, the database schema is altered, but not to the extent necessary to completely support localization. If your organization is upgrading and wishes to support localization, you must run an optional database script after the upgrade process is complete.
Even if your organization does not expect to use localization, you need to run this script if:
- You use Data Warehouse, and
- You expect to add new custom object types to your application design in the future.
That's because some Data Warehouse tables related to custom objects have datatypes that are compatible with localization, but not compatible with the datatypes that existed prior to version TC3.3 SP1. Running the script will resolve this incompatibility. You must drop and recreate the Data Warehouse after running the script.
This script requires exclusive use of your database while it is running. It increases database size by 2% to 4% in internal testing done by Mitratech. Nearly all VARCHAR columns have their datatypes changed to NVARCHAR2 (Oracle) or NVARCHAR (SQL Server.)
Contact Mitratech Support to obtain this script.
Upgrading Legal and Financial Management
For more complex installations across several modules, contact Mitratech documentation at documentation@mitratech.com for the Module Upgrade Detailed Matrix.
The following information details upgrades for users first upgrading to the 6.x product line. Users who are already on 6.0 (or later 5.0.x releases) can download the relevant Legal and Financial Management versions via Available Updates.
Use this page if you have a version of Legal Matter Management prior to 5.0.1 and are upgrading to the following versions:
- TeamConnect Enterprise 6.1 or later
- TeamConnect Legal Matter Management 5.0.1 or later
- TeamConnect Financial Management 5.0.1 or later
Following these steps to upgrade:
- Upgrade TeamConnect Enterprise.
Note: You may run into validation errors that you need to correct before continuing.
- Restart your application server.
- Upgrade to Legal Matter Management 5.0.1.
After correcting conflicts, re-run the Upgrade Toolkit.
Note: If the tool fails, review the error log to identify the necessary fix and report errors to Mitratech support.
- Restart your application server.
- Install Financial Management and any other modules from the About page. Each time you install a new product, restart you application server.
- Configure Financial Management.
- Proceed upgrading.
Validate Your Data Before Running the Installer
When you are upgrading an existing TeamConnect database, particularly one that was once used with a TeamConnect 2.x version, the database may contain duplicate detail records that would interfere with the upgrade to the current version. Such duplicates may have arisen from earlier conversions that disabled validation rules while the conversion was running.
To check for this possibility, you must run a validation SQL script, which will provide information about whether duplicates exist. If they do exist, you must run a second small SQL script, doing a separate run for each duplicate record that must be removed. Follow these steps:
- In your installation media, locate the validation script that is appropriate to your database server:
\validation\TC33_Upgrade_Data_Validation\MSSQL\MSSQL_TC33_upgrade_data_validation.sql\validation\TC33_Upgrade_Data_Validation\Oracle\Oracle_TC33_upgrade_data_validation.sql
- Run this SQL script against your TeamConnect database and observe the results. If the result set is empty, you have no duplicate detail records and you do not need to perform the rest of these steps.
For Oracle, use SQL*Plus to run this script, and look for the result set in file TC33_Data_Validation_report.log, in the same folder as the script file. For SQL Server, the result set is returned on-screen, although you can direct the result set to a file if you wish, depending upon the query tool that you use. - If the validation script returns results, you must manually remove the duplicate records. You will need to supply the values of four parameters, which are found in the validation script's result set:
- TABLE_NAME
- MASTER_PRIMARY_KEY AND
- FIELD_PRIMARY_KEY
- DETAIL_PK_to_keep
- If you are using Oracle, skip to step 6. If you are using Microsoft SQL Server, execute SQL script
\validation\TC33_Upgrade_Data_Validation\MSSQL\MSSQL_Parametrized_To_Remove_Duplicate_Details.sql
This script will create a procedure named remove_duplicate_detail_pro, which you will execute repeatedly in the next step. - For each row in the result set of step 2, execute this procedure, supplying four parameters as shown in this example:
exec remove_duplicate_detail_pro 'E_CONT_DETAIL_TEXT_VALUE ', 703 , 604 , 502 ; - If you are using Oracle, for each row in the result set of step 2, run script
\validation\TC33_Upgrade_Data_Validation\Oracle\Oracle_Parametrized_To_Remove_Duplicate_Details.sql
supplying the four parameters in the syntax shown by the example in step 5. - After you have run the procedure for each row in the validation script's result set, manually drop table BAD_DATA_RPT, then do a final check by running the validation script from step 1 again. This time, there should be no rows in the result set.
Data Warehouse
If you use Data Warehouse, which has a denormalized database containing data from the TeamConnect production database, consider dropping the data from that denormalized database and repopulating it after you upgrade. In some cases, upgrade scripts for TeamConnect may repair incorrect data in the production database but the repaired data is not automatically moved to the denormalized database. Clearing and repopulating the denormalized database resolves this potential issue.
Note: Only Data Warehouse version 5.0.1 and 5.1 will work with TeamConnect version 6.0 and 6.1. Only Data Warehouse 6.1.1 will work with TeamConnect 6.2. Earlier versions of Data Warehouse must be upgraded.
Installing Elasticsearch
Before you begin:
- Read the Installation Overview
- If you are upgrading from a previous version, review the Upgrade Considerations for Elasticsearch.
- Read the Elasticsearch Administration Guide and Best Practices.
- Review the Installation Requirements for Elasticsearch, including supported versions of Elasticsearch.
- Make sure you are using Java 1.8.
- Users upgrading from previous versions of Elasticsearch and/or TeamConnect must re-index their instances. Refer to the Upgrade Considerations for specific instructions.
- If using Tomcat and Elasticsearch, the following files need to be added to the tomcat/lib directory:
- bcpg-jdk15on-1.61.jar
- bcprov-jdk15on-1.61.jar
Note:
- Mitratech does not support multi-tenant Elasticsearch configurations.
For more detailed information on Elasticsearch, clusters and nodes, and global search indexing functions outside of TeamConnect, visit the Elasticsearch help and the latest support matrix for Elasticsearch compatibility.
Upgrading Elasticsearch
Important! If you have an existing TeamConnect installation with Elasticsearch and you need to upgrade Elasticsearch, delete your search indices before proceeding.
Installing Elasticsearch
The following instructions apply to both Linux and Microsoft Windows installation of Elasticsearch. For installations with Search Guard, see Installing Search Guard.
- Download the appropriate installation file from the following website: https://www.elastic.co/downloads/past-releases/elasticsearch-7-1-1. TeamConnect 6.2 is only certified against Elasticsearch 7.1.1.
- Extract the files into a directory (for example for Linux, /opt/elasticsearch/ or for Windows C:\...\Apache\Elasticsearch). Note that the elasticsearch.yml file will be located in the config subdirectory (for example, /opt/elasticsearch-7.1.1/config/elasticsearch.yml).
- Run the following command from the root Elasticsearch directory to install the ingest attachment plug-in:
bin\elasticsearch-plugin install ingest-attachment - If using Search Guard, install Search Guard for TeamConnect 6.2 and configure the Search Guard properties.
- Configure the Elasticsearch properties and the TeamConnect properties.
- Open the appropriate ports in the firewall (http.port and transport.tcp.port).
- To run Elasticsearch, navigate to the bin directory of your Elasticsearch installation and start the elasticsearch.bat file. (Linux users may have to run it from Elasticseach's root directory.)
- Restart TeamConnect.
- Verify the configuration and creating the new indices.
If you encounter any bootstrap check failures, see Elasticsearch Bootstrap Checks.
Installing Search Guard
For the most recent instructions for installing and configuring Search Guard, see Installing Search Guard for TeamConnect 6.2.
Configuring Elasticsearch Properties
The following configuration details cover a basic installation of Elasticsearch for TeamConnect 6.2. If your situation requires a more robust configuration or if you are unable to proceed through the following configuration, contact Mitratech Support.
Many properties can be configured during the installation; however, viewing the configuration file in a text editor provides better visibility and custom configuration options.
To modify the Elasticsearch configuration file:
- If using Search Guard, make sure you have placed the signing authority, node keystore, and truststore files into the elasticsearch-7.1.1/config directory. For example, these files may be signing-ca.crt, node-0-keystore.jks, and truststore.jks.
- Using a text editor, open the elasticsearch.yml file located in elasticsearch-7.1.1/config.
- For Linux, use a text editor such as vim or nano.
- For Windows, use a text editor of your choice.
- Referencing information in the Elasticsearch Configuration Properties table, uncomment and set a value to configure the following:
- Clusters and nodes - cluster.name property (for example, Cluster).
- Network connections
- Unicast discovery
- Search Guard properties (if using Search Guard)
Elasticsearch Configuration Properties (elasticsearch.yml)
The following properties are commented out by default; to use these properties, remove the comment hashtag and modify the default value if necessary.
Important: If you are upgrading from Elasticsearch 5.3.0 to 7.1.1, the discovery.zen.ping.unicast.hosts property has been deprecated; use the value from this property for the new discovery.seed_hosts and cluster.initial_master_nodes properties.
Note: Your Linux host might not start if all Elasticsearch specifications are not met. Users can work around this issue by adding the following line to the config/elasticsearch.yml file:
bootstrap.system_call_filter: false
| Property | Required | Recommendations | |
|---|---|---|---|
| XPack | xpack.security.enabled: false | x | Must be set to false. |
| Cluster | cluster.name | x | Use a descriptive name for your cluster, such as elasticsearch. This setting must match the elasticsearch.server.cluster.name property in the teamconnect.properties file. |
| Node | node.name | x | The name of this specific node. If using Search Guard, this name should match your keystore certificate name. For example, set node.name: node-0 in the elasticsearch.yml file and name your keystore file node-0-keystore.jks. |
| node.att.rack | Adds custom attributes to the node | ||
| node.master | Allows the node to be master eligible. If needed, this property must be added manually. For further detail, see Nodes. | ||
| node.data | Allows the node to store data. | ||
| Paths | path.data | Path to directory where to store the data (separate multiple locations by comma) | |
| path.logs | Path to log files. If this value is not set, log information will not be saved anywhere. | ||
| Memory | bootstrap.memory_lock | x (Requited if on Linux system or if using Search Guard) | Locks the memory on startup. If the server is in a Linux environment or if using Search Guard, set this property to true. It locks the memory for Elasticsearch so that the JVM does not start swapping memory. |
| Network | network.host | x | Sets the bind address to a specific IP (IPv4 or IPv6). This property should match the server listed in the elasticsearch.server.location property in the teamconnect.properties file. |
| http.host | Defaults to 9200. Set for a custom port for HTTP. | ||
| transport.host | Defaults to 9300. Set for a custom port | ||
| transport.tcp.port | This property should match the port listed in the elasticsearch.server.location property in teamconnect.properties file. | ||
| Discovery | discovery.seed_hosts: ["host1", "host2"] | If clustering nodes, pass an initial list of hosts to perform discovery when this node is started. The default list of hosts is ["127.0.0.1", "[::1]"] If you are upgrading from Elasticsearch 5.3.0 to 7.1.1, the discovery.zen.ping.unicast.hosts property has been deprecated; use the value from this property for the new discovery.seed_hosts and cluster.initial_master_nodes properties. |
|
| cluster.initial_master_nodes: ["node-1", "node-2"] | If clustering nodes, bootstrap the cluster using an initial set of master-eligible nodes. If you are upgrading from Elasticsearch 5.3.0 to 7.1.1, the discovery.zen.ping.unicast.hosts property has been deprecated; use the value from this property for the new discovery.seed_hosts and cluster.initial_master_nodes properties. |
||
| Gateway | gateway.recover_after_nodes: 3 | Block initial recovery after a full cluster restart until N nodes are started. | |
| Various | action.destructive_requires_name: true | Require explicit names when deleting indices. |
| Property | Required | Recommendations | |
|---|---|---|---|
| Search Guard Properties Note: Only use if you are using Search Guard |
searchguard.enterprise_modules_enabled | x | false This must be set in order to use the free Search Guard Community edition. |
| searchguard.ssl.transport.keystore_type | x | jks | |
| searchguard.ssl.transport. keystore_filepath |
x | The name of the node and reference the name of your node certificate. | |
| searchguard.ssl.transport. keystore_password |
x | The password used when generating the keystore. Passwords are stored as clear text. |
|
| searchguard.ssl.transport.truststore_type | x | jks | |
| searchguard.ssl.transport. truststore_filepath |
x | Use truststore.jks as the value. | |
| searchguard.ssl.transport. truststore_password |
x | The password used when generating the keystore. | |
| searchguard.ssl.transport. keystore_alias |
x | Set the alias to match the alias of your node's keystore | |
| searchguard.ssl.transport. enforce_hostname_verification |
x | Use false for the value. | |
| searchguard.authcz. admin_dn |
x | This setting configures the admin certificate that you can use with sgadmin.This setting references the certificate name of your certificate (which is set to "esdev" in the example). The format is "CN=<client_username>,OU=client, O=client,L=Test,C=DE": - '*' where <client_username> is the username (for example, "esdev") and references the certificate name of your certificate (for example, esdev-keystore.jks) |
|
| searchguard.ssl.http.enabled | x | true | |
| searchguard.ssl.http.keystore_type | x | jks | |
| searchguard.ssl.http.keystore_filepath | x | The name of the node keystore, references the name of the node certificate. For example, node-0-keystore.jks | |
| searchguard.ssl.http.keystore_password | x | The keystore password used when generating the keystore. For example, changeit | |
| searchguard.ssl.http.keystore_alias | x | Set the alias to match the alias name of your node's keystore. | |
| searchguard.ssl.http.truststore_type | x | jks | |
| searchguard.ssl.http.truststore_password | x | Password used when generating the truststore. For example, changeit | |
| searchguard.ssl.http.truststore_alias | x | Set the alias to match the alias name of your truststore's keystore. | |
| searchguard.ssl.http.truststore_filepath | x | truststore.jks |
Configuring TeamConnect Properties
The teamconnect.properties file can be configured for Global Search optimization. This information can be entered automatically into the teamconnect.properties file during the installation of TeamConnect or manually entered after installation.
To modify the TeamConnect configuration file:
- If using Search Guard, make sure you have placed the client certificate, client keystore and truststore files (for example, signing-ca.crt, esdev-keystore.jks and truststore.jks) in a directory on your PC that is accessible by TeamConnect (for example, config/certs).
- Using a text editor, open the teamconnect.properties file in the TeamConnect .WAR file.
- For Linux, use a text editor such as vim or nano.
- For Windows, use a text editor of your choice.
- Referencing information in the TeamConnect Configuration Properties table, uncomment and set a value to configure the following:
- Elasticsearch server location
- Elasticsearch server cluster name
- Indexing frequency
- Primary and replica shards
- Elasticsearch SSL (only if using Search Guard)
TeamConnect Configuration Properties (teamconnect.properties)
If you want to change any of the following properties and the property is commented out, remove the comment hashtag and modify the default value if necessary.
To configure the properties after TeamConnect is already installed, modify the properties in the teamconnect.properties file in the TeamConnect .WAR file and then redeploy the .WAR file.
| Property | Required | Recommendations and Comments | |
|---|---|---|---|
| Elasticsearch | elasticsearch.server.location | x | IP address and port number of the Elasticsearch server. |
| elasticsearch.server.cluster.name | x | Name of the cluster that can be found in the Elasticsearch configuration file. | |
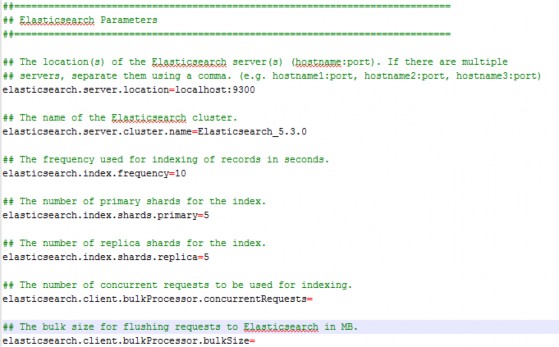
| elasticsearch.index.frequency | x | Frequency (in seconds) in which TeamConnect looks for changes to existing, enabled indexed items and automatically updates them. For example, if set to 10, the index will be scanned for modifications, additions, and entry removal every ten seconds. Default value is 10. | |
| elasticsearch.index.shards.primary | x | The number of primary shards for the index. An ideal maximum shard size is 40-50 GB. For example, if an index size is 500 GB, you would have at least 10 primary shards. Default value is 1. | |
| elasticsearch.index.shards.replica | x | The number of replica shards for the index. The number of replica shards defaults to a value of '1'. Entering in any invalid character here will thereby result in 1 replica shard. Default value is 0. | |
| elasticsearch.client.bulkProcessor. concurrentRequests |
The number of concurrent requests to be used for indexing. This number refers to the number of threads running on the ElasticSearch server. Default value is 4. | ||
| elasticsearch.client.bulkProcessor. bulkSize |
x | The bulk size for flushing requests to Elasticsearch in MB. Default value is 25. | |
| elasticsearch.encryption.enabled | x | The property for enabling/disabling Elasticsearch security during transit. If not using Search Guard, set to NO to disable Search Guard. If using Search Guard or using SSL, set to YES to enable Search Guard. Default value is NO. |
|
|
Elasticsearch SSL Note: Only use these properties if you are using Search Guard |
elasticsearch.client.keystore. password |
x | The password for your Elasticsearch KeyStore file after being encypted with encrypt.jar. |
| elasticsearch.client.truststore. password |
x | The password for your Elasticsearch TrustStore file after being encypted with encrypt.jar. | |
| elasticsearch.keystore.path | x | The actual location and certificate name of your certificate. The file path and certificate name of your certificate. For example, config/certs/esdev-keystore. | |
| elasticsearch.truststore.path | x | The file path for your Elasticsearch TrustStore file. You can use absolute path or relative path. For example, config/certs/truststore.jks. | |
| elasticsearch.transport.username | x | The username paired with Search Guard for basic transport authentication. This "username" user is also used when populating the sg_internal_users.yml and sg_roles_mapping.yml files. |
|
| elasticsearch.transport.password | x | The password paired with Search Guard for basic transport authentication after being encypted with encrypt.jar. This password is used when populating the sg_internal_users.yml file. |
|
| elasticsearch.client.notification. |
The email set here will receive certificate expiration notices. |
Note: The concurrent requests and bulk size for flushing requests are not required and do not have default values.
Verifying the Configuration and Creating Indices
After Elasticsearch has been configured:
- Restart the application and clear the cache.
- Log into TeamConnect and navigate to the Global Search Index Tool from the Tools menu.
- Below the Object Indexing Status table, the UUID should display.
- Click the Test Connection button. If successful, a "Success" message appears.
- Select the objects you want to index and then click Index Selected button.
Installing Search Guard
If you are not using Search Guard, skip this section. These instructions apply to both Linux and Microsoft Windows.
Before you begin:
- Elasticsearch requires Java 8. Make sure that your JAVA_HOME path points to JDK8.
- Make sure the Elasticsearch x-pack plugin is disabled/removed.
- Make sure you have followed the steps to install Elasticsearch for TeamConnect 6.2.
- Make sure that a port is opened in the firewall for the ports being used.
Installing Search Guard Plug-in
To install the Search Guard plugin:
- Open the command prompt and change the directory to your Elasticsearch folder.
- Run the following command:
bin\elasticsearch-plugin install -b com.floragunn:search-guard-7:7.1.1-37.0.0
Creating and Installing Security Certificates
Certificates can be generated in one of two ways. Mitratech Hosting can generate the certificates manually, or you can generate them using the following instructions. OpenSSL is required to generate certificates. Windows users can use the terminal built into SourceTree to run the shell scripts. These certificates need to be in .jks storage format.
To create security certificates:
- Download the scripts from the SearchGuard GitHub https://github.com/floragunncom/search-guard-ssl. Select the 5.3.0 branch since certificates are the same as for that release.
- Navigate to the example-pki-scripts folder.
- Modify the node script for network communication:
- Edit gen_node_cert.sh and modify the "$BIN_PATH" -genkey command and the "$BIN_PATH" -certreq.
- Use the following example and update the highlighted DNS and IP addresses to match the targeted machine that will host Elasticsearch:
-ext san=dns:<YourMachineName>,dns:localhost,ip:10.5.90.50,ip:127.0.0.1,oid:1.2.3.4.5.5
where <YourMachineName> is in the format change-this-dns-address.example.com
- Modify example.sh to only run the following shell scripts:
- ./clean.sh
- ./gen_root_ca.sh capass <Password> where <Password> is the password to be used (for example, changeit)
- ./gen_node_cert.sh <NodeNumber> <Password> capass where <NodeNumber> is the node name and <Password> is the password to be used (for example, 0 and changeit)
- ./gen_client_node_cert.sh <ClientUsername> <Password> capass where <ClientUsername> is the username and <Password> is the password to be used (for example, esdev and changeit)
- Run example.sh to generate a new sets of files.
- example.sh creates the signing authorities, node keystore, client keystore, and truststore files. These files will need to be added
to your system chain in order to recognize the validity of the certificates. - gen_node_cert.sh creates the individual node keystore for the node specified (for example, node-0-keystore.jks) and a truststore.
- gen_client_node_cert.sh creates the client keystore (for example, esdev-keystore.jks) and a truststore.
- gen_root_ca.sh creates new signing authorities. These files sign all keystores on their creation. These files will be located in the /ca subdirectory.
Important- The node certificate must have a SAN (Subject Alternative Name) with an OID of 1.2.3.4.5.5.
- For network communication, the SAN must also contain the machine's unique IP address and the full computer name as a DNS name
- example.sh creates the signing authorities, node keystore, client keystore, and truststore files. These files will need to be added
- Close all Java instances.
- Whitelist your certificates by adding the signing authority to your Java keytool chain.
- Run the following shell command as administrator from the Elasticsearch\config directory:
- keytool -importcert -keystore "%JAVA_HOME%\jre\lib\security\cacerts" -storepass changeit -alias signing-ca -file signing-ca.crt
- Optionally, clean up any duplicate certificate aliases by running the following shell command as administrator from the Elasticsearch\config directory:
- keytool -delete -keystore "%JAVA_HOME%\jre\lib\security\cacerts" -storepass changeit -alias <old alias name>
- Place the signing authority, node keystore and truststore files (for example, signing-ca.crt, node-0-keystore.jks & truststore.jks) into the
elasticsearch-7.1.1/config directory. - Place the client certificate, client keystore and truststore files (for example, signing-ca.crt, esdev-keystore.jks and truststore.jks) in a directory on
your PC that is accessible by TeamConnect (for example, config/certs).
Configuring TeamConnect Properties and Elasticsearch Properties
Follow the instructions for Configuring Elasticsearch Properties (elasticsearch.yml) and Configuring TeamConnect Properties (teamconnect.properties).
Configuring Search Guard
After Search Guard is installed, navigate to the <elasticsearch root>/plugins/search-guard-7/sgconfig folder.
You can run the following commands against your database to get the values mentioned in the steps below.
| value | command |
|---|---|
| <index_name> | select setting_value from y_system_setting where setting_key = 'ElasticSearchUUID' |
| <searchguard_password> | The BCrypt encrypted version of elasticsearch.transport.password in TeamConnect.properties |
| <searchguard_username> | Located in TeamConnect.properties as elasticsearch.transport.username |
To configure Search Guard, modify the following files:
Note: YML file formats have changed for Elasticsearch 7.1.1. All YML files must contain the following at the top:
---
_sg_meta:

type: "roles"

config_version: 2
Configuring SG_CONFIG.YML
Add the following change to configure transport level authentication under authc:
transport_auth_domain:

 enabled: true

 order: 2

 http_authenticator:

 authentication_backend:

 type: internal
Configuring SG_INTERNAL_USERS.YML
- Add the full name of each node certificate as follows where <node_number> is the node specified when generating the certificate above
(for example, "node-0"):
CN=<node_number>,OU=client,O=client,L=Test,C=DE:

    hash: "_transport_only"
- Add the transport username and password from teamconnect.properties (the roles will be defined in the next file). For example, if the searchguard_username= "username", the entry would be as follows:
username:

      hash: "<hashed_password>"

      backend_roles:

         - "username"
where <hashed_password> is "password".
The username and hashed_password are the unencrypted elasticsearch.transport.username and elasticsearch.transport.password located in
teamconnect.properties. - Add the client keystore and password. For example, if the client keystore= "esdev" the entry would be as follows:
esdev:

      hash: "<hashed_password> (where <hashed_password> was "changeit" when generating key)"

      backend_roles:

         - "esdev"
Note: The hashed password can be created by navigating to elasticsearch-7.1.1/plugins/search-guard-7/tools and invoking the hash.bat
script file in command line to encrypt the password.
Configuring SG_ROLES_MAPPING.YML
- Create a role for the client keystore name as below (where client keystore name = "esdev") as follows:
esdev:

      users:

- "esdev" - Create a role for the username as below (where username = "username") as follows:
username:

      users:

- "username" - Add the admin & username to the sgs_all_access group as follows:
SGS_ALL_ACCESS:

      backend_roles:

         - "admin"

         - "username"
Configuring SG_ROLES.YML
Create a role for the client keystore name (where client keystore name = "esdev") as follows:
esdev:

  cluster_permissions:

    - CLUSTER_COMPOSITE_OPS
    - "indices:data/read/scroll*"

  index_permissions:

    - index_patterns:

         - "<index_name>*"

      allowed_actions:

            - UNLIMITED
(where <index_name> is the value from the database)
Note: It's recommended to create a 1:1 individual role for each user. It also helps tracking index permissions if the role name matches the user name.
Loading Search Guard Settings into Elasticsearch Cluster
- Start Elasticsearch. The binary is located in the elasticsearch/bin folder. Linux users may have to run from Elasticseach's root directory. If you encounter any bootstrap check failures, see Elasticsearch Bootstrap Checks.
- Navigate to elasticsearch-7.1.1\plugins\search-guard-7\tools.
- Run the command:
sgadmin -cd <path_to_elasticsearch>\elasticsearch-7.1.1\plugins\search-guard-7\sgconfig -ts <path_to_elasticsearch>\elasticsearch-7.1.1\config\<truststore_name>.jks -ks <path_to_elasticsearch>\elasticsearch-7.1.1\config\<keystore_name>.jks
For example, sgadmin -ks ..\..\..\config\esdev-keystore.jks -kspass changeit -ts ..\..\..\config\truststore.jks -tspass changeit -cd ..\sgconfig -nhnv
Note: The keystore references should be the path to your client keystore (not the node keystore).
Modify the certificate paths and/or add the following optional parameters as needed:
| -h | elasticsearch hostname, default: localhost |
| -p | elasticsearch port, default: 9300 (NOT the http port!) |
| -cn | clustername, default: elasticsearch |
You are now ready to verify the configuration and creating indices.
Running the TeamConnect Installer
These are the main tasks completed by the TeamConnect Installer:
- Preparation—In this section, specify where the TeamConnect installation files should be copied. The Installer will detect whether the local PC has enough disk space for the unzipped installation files (including the application, utilities, and documentation files).
- Extracting Files—In this section, the Installer copies TeamConnect installation files to a local folder.
- Configuration—In this section, the Installer allows screen-based editing of the TeamConnect application configuration information. Ultimately this configuration information is stored in the teamconnect.properties file. If you have already run the Installer and have a local TeamConnect application file or teamconnect.properties file, you can use the Installer to update the configuration information from those sources. The Installer packages the latest configuration information (in the teamconnect.properties file) into a new TeamConnect application file(s).
Elasticsearch parameters are also set via the configuration options in the installer. Users will be able to defer their configuration until after installation; in this case, the parameters will need to be put in manually. For help, see Manually Configuring Search Parameters.
- Create/Upgrade Database—In this section, the Installer either creates a new TeamConnect database schema or upgrades an existing database schema. Refer to the Release Notes for upgrade requirements.
TeamConnect Data Warehouse has its own separate installer programs, which are not discussed here.
Available Updates
TeamConnect Legal Matter Management, Service of Process (SOP), and Collaborati Spend Management (CSM) are installed through the Available Updates feature in the administrative interface of TeamConnect, which will be accessible to you after you install TeamConnect version 6.2. Detailed installation of CSM is not discussed here, but there are some important dependencies and cautions about CSM installation in the CSM installation and admin guides.
After your TeamConnect installation is complete, you may wish to consider installing optional features, as described in Web Folders.
Before You Begin
For customers with older versions of TeamConnect, this chapter includes procedures for upgrading from an older version of TeamConnect to TeamConnect 6.2. Only the versions in the list below are eligible for upgrading. The installer will recognize that you have one of these versions and will run the appropriate procedures.
- TeamConnect 5.0 (through 5.0.9)
- TeamConnect 5.1 (through 5.1.1)
- TeamConnect 5.2 (through 5.2.6)
- TeamConnect 6.0 (through 6.0.2)
- TeamConnect 6.1 (through 6.1.2)
If you are using a version of TeamConnect older than TeamConnect 5.0, you must first separately upgrade to 5.0 before running the tasks in this chapter. Instructions for upgrading to 5.0 can be found in the TeamConnect 5.0 Installation Guide and Release Notes on the TeamConnect PDF Hub. Note: This link may require a login.
Important: When performing an upgrade, there are several important tasks that must be completed before running the installer. Refer to Upgrade Considerations. Regardless of your previous version, you must back up your database before beginning the upgrade.
TeamConnect Installer
Please note the following before running the TeamConnect Installer:
- Review the requirements for running the TeamConnect Installer in Installation Requirements. The TeamConnect Installer must be run from a Windows machine.
- If you are deploying TeamConnect to a Windows-based application server, you may choose to run the TeamConnect Installer directly on the server. If you run the TeamConnect Installer on a different machine, you must transfer the output of the TeamConnect Installer program (either a TeamConnect .war or TeamConnect .ear file, and TeamConnect Online Help .war file) to your application server.
- If you are deploying TeamConnect to a Unix or Linux-based server, first run the Installer on a Windows machine. When finished, you must transfer the output of the Installer program (either a TeamConnect .war or TeamConnect .ear file, and TeamConnect Online Help .war file) to your TeamConnect application server.
- Make sure that your PATH environment variable includes the bin directory of a valid Java Development Kit (JDK).
- The instructions for running the TeamConnect Installer are based on the TeamConnect Installer Form. Print this form and collect the required system data before actually running the TeamConnect Installer.
- Some parts of the TeamConnect Installer, particularly those that run database scripts, may take several minutes to complete. In this version, database scripts related to Account records are complex, so if your instance has many Account records, the installer may run noticeably more slowly than usual. No progress messages appear during this time. Do not presume that the TeamConnect Installer is "hung up" unless it has been running for at least thirty minutes. Check the database server to see whether database activity is still being logged against the installer.
- If you are upgrading an existing TeamConnect database on Oracle, the upgrade includes a script that re-indexes Document records. If your database contains a very large number of Document records, this script may require several hours of runtime. You can postpone the running of this script, allow the installer to finish, then run the script later, manually.
If You are Using Oracle
An optional script is available named ORACLE_upgrade_2_FullTextSearch_Reindexing.sql. The purpose of this script is to resolve an issue with full-text search in Document records when the search string includes a hyphen. Until the script is run, such searches may return incorrect results.
Manually Configuring the Elasticsearch Parameters in the TeamConnect Properties File
Elasticsearch (Global search) parameters are able to be edited in the TeamConnect properties file found in the WEB-INF folder. These properties are explained in detail on the Elasticsearch Setup page of the TeamConnect help.
The server address, name of the cluster, and indexing frequency are required for search to function.
The number of primary shards defaults to a value of '5'. Entering in any invalid character here will thereby result in 5 primary shards.
The number of replica shards defaults to a value of '1'. Entering in any invalid character here will thereby result in 1 replica shard per primary shard.
Note: The concurrent requests and bulk size for flushing requests are not required and do not have default values.
Installing TeamConnect
WebDAV and WebLogic
If you use a WebLogic application server, it is important to edit the server's config.xml file to disable basic authentication. If basic authentication remains enabled, it interferes with WebDAV access and Screen Designer. A WebLogic login dialog pops up before the actual TeamConnect login dialog. End users confuse this WebLogic dialog with the TeamConnect one and enter TeamConnect credentials into it, which causes errors.
Disabling basic authentication prevents this first dialog from appearing and the end user sees only the TeamConnect login dialog.
Introduction
The TeamConnect Enterprise installer can be run repeatedly. On the very first run of the installer, you must choose "Extract files to install or upgrade TeamConnect Enterprise." On any subsequent runs of the installer, you can choose "Continue using previously extracted files." Normally you would want to use the previously extracted files, because they contain information (such as configuration values) that is customized to your installation. However, you may still choose "Extract files to install or upgrade TeamConnect Enterprise." If you do, you can run the installer as if you were running it for the first time.
Configuration
On this screen, you tell the installer how to modify TeamConnect Enterprise's configuration files. Your choice will vary depending on whether you have an existing version of TeamConnect Enterprise already installed, and whether that version is the current version or an older one. If there is no existing version of TeamConnect Enterprise, choose "Manually Configure TeamConnect Enterprise" and fill out the configuration information in screens that appear later. If there is an older version of TeamConnect Enterprise installed, and you want to use the configuration information that is contained in that older version, you have two choices. You can choose "Import Settings (from .war archive)" or "Import Settings (from .xml or .properties files)", depending on which kind of file is available from the older version. The installer will read those files and will extract their configuration information. That information will appear in a series of screens that appear later, and you have the opportunity to accept the existing values or to edit those values. If there is an older version of TeamConnect Enterprise installed, and you don't want to use the configuration information that is contained in that older version, choose "Manually Configure TeamConnect Enterprise", then fill out the configuration information in screens that appear later. If there is a current version of TeamConnect Enterprise installed, and you are simply re-running the installer, your choice depends on what you did during the earlier run of the installer.
If you already filled out configuration information in the earlier run, and you don't need to change anything, choose "Skip this step".
If you did fill out configuration information in the earlier run, but you now want to change some of the information, choose"Manually Configure TeamConnect Enterprise", then fill out the configuration information in screens that appear later.
If you did not fill out configuration information in the earlier run , choose "Manually Configure TeamConnect Enterprise", then fill out the configuration information in screens that appear later.
Create/Upgrade Database
Completed
Running Database Drop Scripts
Caution: These procedures are for reference only and should only be performed if you made a mistake with your initial TeamConnect database schema creation while running the Installer and you want to delete it.
To delete a TeamConnect database on Oracle:
-
Open and log into your database application, using SQL*Plus.
- From your TeamConnect installation path (C:/Program Files/Mitratech/TeamConnect/ database/drop/oracle directory, where /Program Files/Mitratech might be different if you specified a different installation folder during the Installer), run the following script:
TC_drop_tables_oracle.sql
To delete a TeamConnect database on SQL Server:
-
Open and log in to your database application, using the vendor's dynamic SQL tool.
- From your TeamConnect installation path (C:/Program Files/Mitratech/TeamConnect/ database/drop/mssql directory, where /Program Files/Mitratech might be different if you specified a different installation folder during the Installer), run the following script:
TC_drop_tables_sqlserver.sql
Troubleshooting
- If you quit the TeamConnect Installer during the installation procedure, and database schema creation scripts started but did not complete, database changes will not be backed out. If you rerun the Installer and select the Reinstall option, you will be able to drop any existing database tables and rerun the create scripts on a clean database.
- If an error occurs during the TeamConnect installation process, an error message will be displayed. For additional details, click Detail. To quit the installation, click Abort and a summary of performed actions should display with a link to the installation error log. The log can be sent to Mitratech Support for troubleshooting assistance.
Note: The TeamConnect Installer repackages the TeamConnect .war and .ear file with your latest teamconnect.properties configuration settings but you need to manually transfer the .war/ .ear file to your application server and deploy the file.
Deploying
Important: Each release of TeamConnect includes some deployable files that are named differently from one version to the next, since the version number is included as part of the file name. You can always determine the exact file names for your version by examining the file TCE_readme_installer_contents.txt, which is in the root directory of the installation media. Refer to that file for the exact names of the TeamConnect .war file, the TeamConnect .ear file, and the TeamConnect online help .war file. Those files will be referred to in this publication by their generic names, not their explicit version-dependent names.
In order to proceed with deployment, you should have already run the Installer, as described in Running the Installer. The Installer should have output a .war and .ear file, which you will now deploy on your application server.
Note: .war Files can only be deployed on Apache Tomcat. Other application server platforms require you to deploy .ear files.
When you are finished with the steps in this chapter, see Verifying Installation to verify that you have installed TeamConnect successfully.
These instructions assume that your application server is successfully installed. For all details regarding the application server installation, please refer to the vendor's documentation.
Special Considerations for Microsoft Outlook
The following default argument is in teamconnect.properties:
- Djavax.xml.soap.MessageFactory=com.sun.xml.internal.messaging.saaj.soap.ver1_1.SOAP MessageFactory1_1Impl
Creating and Configuring your Domain (WebLogic only)
Important: If you are not deploying TeamConnect on WebLogic, skip this section and go to Preparing for Deployment.
The WebLogic server configuration consists of domains, each having one administrative server running the administrative console, dynamically distributing TeamConnect application information to multiple managed servers. All application management occurs on the administrative server. To install TeamConnect, you must create the domain, configure the administrative server, and deploy TeamConnect to the managed servers.
All WebLogic server activities take place within a domain, for example, the Mitratech domain. You may deploy TeamConnect on a single managed server or on a cluster of managed servers. You can deploy TeamConnect to the administrative server, but it is not recommended, except as a testing environment where application performance is not a factor. This document assumes that you are not deploying TeamConnect to an administrative server.
WebLogic comes integrated with its own web server, which is suitable for serving TeamConnect pages or load balancing a cluster. However, if you wish to access TeamConnect through your company's primary web server, you must configure a plug-in for that web server. For details, see Web Proxy Settings.
Pre-installation Requirements
Aside from the general system requirements listed in Installation Requirements, you should ensure that:
- All of the machines on which you run WebLogic servers (administrative or managed) are using a version of WebLogic that is specified in Application and Web Servers.
- You should use the Sun JVM for the Production Mode.
- Your PATH environment variable should be set up properly on each of your servers.
- Licensing must be correctly configured on your WebLogic installation.
- Modify the instructions in this document to replace the WL_HOME variable with the appropriate directory.
- If you have an Oracle database, modify the instructions in this document to replace the
ORACLE_HOME variable with the appropriate directory.
- To avoid problems displaying special characters such as the Euro currency symbol and British pound currency symbol, be sure that this environment variable is set prior to the command line that starts the WebLogic application server, or add this option to the server start arguments in Managed Server:
setJAVA_OPTIONS=-Dfile.encoding=UTF-8 - Be sure to modify the instructions according to your operating system where necessary.
Recommended Values for Domain Configuration
You can create domains using the Domain Configuration Wizard that walks you through the steps and provides the necessary instructions. In this documentation, we only provide the recommended values that you may use when creating a Mitratech domain (you may use another name for your domain, if you wish):
Recommended Values for Admin Server Configuration
|
Field |
Value |
|---|---|
|
Server Name |
TCAdmin |
|
Server Listen Address |
Leave this field blank. |
|
Server Listen Port |
7001 |
|
Server SSL Listen Port |
7002 |
Recommended Values for Managed Server Configuration
|
Field |
Value |
|---|---|
|
Server Name |
TCManaged |
|
Listen Address |
Enter the hostname or IP address of the machine on which you run this server. |
|
Listen Port |
4001 |
|
SSL Listen Port |
4002 |
After you finish creating and configuring a domain for use with TeamConnect, you must install the TeamConnect .ear file. See Preparing for Deployment.
Preparing for Deployment
Important: You must allocate no less than 2048 MB of memory for the application server.
Before you begin, please note the following:
-
This document assumes that the environment variable for ORACLE_HOME has already been configured on your system, or that you are aware of its actual directory location so that you may make the appropriate substitutions in the instructions.
- Make sure to modify the instructions according to your operating system where necessary.
To prepare the TeamConnect application for deployment:
-
Before installing TeamConnect, please ensure that your system meets the minimum system requirements for TeamConnect. For details, see Installation Requirements. Note the additional comments on Application and Web Servers for Tomcat users.
-
Create a directory on your local machine and name it TeamConnect.
- Copy the TeamConnect .war or TeamConnect .ear file from the C:/Program Files/Mitratech/ TeamConnect/programs/teamconnect directory (from the computer where you ran the TeamConnect installer, where C:/Program Files/Mitratech might vary if you specified a different installation path) to the application server /TeamConnect directory (or location from which to deploy the TeamConnect application).
If you set your PATH environment variable to include the Java bin directory, you are able to run executables from the JDK without using the entire path.
Configuring Clustered Servers
In the case of a recovered session, all work is saved except the uncommitted edits in the browser of the expired session.
Each application server vendor implements clustering and cache synchronization in a different way. This section does not discuss details of a specific vendor's implementation, but describes properties of TeamConnect that are common across all implementations.
Configure your application servers for session replication across all nodes. All nodes must run exactly the same version of TeamConnect.
Editing teamconnect.properties
The TeamConnect installer makes many changes to teamconnect.properties when it runs but to configure clustering you will need to make additional manual edits. Each node in a cluster runs an identical copy of TeamConnect, so the properties file needs to be edited only once per cluster.
Here are the properties that require editing, with their definitions:
Clustering Properties
|
Property Name |
Definition |
|---|---|
|
sync.enabled |
Must be YES to enable clustering |
|
sync.channel |
Use a unique character string of your choice. The purpose of this property is to avoid the situation where multiple clusters of application servers are running on the same network, and one cluster attempts to synchronize cache with a different cluster Each cluster should have a different value in this property. |
|
sync.rmi.port |
Enter a port number that will be used by all nodes in the cluster. The RMI registry is started in-process by TeamConnect. |
|
sync.multicastGroupAdd ress |
Optional. Default is 226.10.12.64 |
|
sync.multicastPort |
Optional. Default is 3121 |
Special Considerations for IMAP
If you are using IMAP to integrate with an Exchange server, you must configure TCP/IP load balancing. IMAP does not use the failover or recovery capabilities of the main TeamConnect clustering feature.
Configuring Database Connection
Using a Data Source
This is the recommended method of connecting to the database if you are using a WebSphere or WebLogic application server. If you are using a Tomcat application server, see Using an EclipseLink Connection Pool.
Once the data source is set up, you only need to know the name of the data source in order to deploy TeamConnect, rather than all of the database connection parameters.
To use a data source as your method of database connection for TeamConnect, you must first configure a JDBC data source in your application server. For details about how to configure a data source, consult your application server documentation, and see driver information in Application and Web Servers.
The following table provides the recommended settings for configuring your data source in WebLogic. For WebSphere settings, see the WebSphere Data Source Configuration Settings table.
WebLogic Data Source Configuration Settings
|
Setting |
Recommended values |
|---|---|
|
Database Driver |
See driver information in Application and Web Servers. |
|
Data source name |
The data source name defaults to TeamConnect. |
|
JNDI name |
where
|
The following table provides the recommended settings for configuring your data source in WebSphere.
WebSphere Data Source Configuration Settings
|
Setting |
Recommended values |
|---|---|
|
Database Driver |
See driver information in Application and Web Servers. |
|
Data source name |
The data source name defaults to TeamConnect. |
Using an EclipseLink Connection Pool
Connection pools can be used with Tomcat application servers. You can use EclipseLink's internal connection pool to connect TeamConnect directly to the database. When using this method, you must know your database connection parameters and write them on your Installer Form. The Installer, which runs prior to deployment, places those parameters into the TeamConnect properties file. You must ensure that your database server's configuration matches the parameters that were entered into the Installer earlier.
Depending on your database server, you must also put a JDBC driver file in the /lib directory for Tomcat. See Application and Web Servers for driver information.
After you have configured the database connection, the TeamConnect application is ready to be installed on an application server by using the administrative console.
Configuring the Java Virtual Machine
A common way to do this is by specifying command-line arguments in the script file that starts the application server itself, but there are other methods of changing the JVM configuration that differ by brand of server. See the instructions for Sun JVM and IBM JVM to learn how to change the configurations.
Sun JVM
Command-line arguments specify the memory allocation for the server.
-Xms???mdetermines the minimum amount of memory the server reserves. If that amount is not available, the application server does not start.-Xmx???mdetermines the maximum amount of memory the server reserves, if available.
Important: Mitratech recommends setting the maximum and minimum memory arguments to the same number, for example: -Xms2048m -Xmx2048m
- Insert the numeric amounts to allocate as much memory as you can for the application server. Make sure that it is at least -Xms2048m -Xmx2048m.
- Directly after the above recommended memory flags, add the following parameters:
- -XX:PermSize=256m
- -XX:MaxPermSize=256m
- Ensure that the final string looks like the following (all within one line):
- -Xms2048m -Xmx2048m -XX:PermSize=256m
- -XX:MaxPermSize=256m -XX:NewSize=100m
Note: These are recommended values for 32-bit operating systems. If you are using a 64-bit operating system, you can alter these values to match your configuration.
Optional Recommended Arguments
There are some optional, recommended arguments that can help tune performance. To apply them, append the following arguments to the ones listed above. All of the arguments should be listed on a single line:
-server -XX:+HeapDumpOnOutOfMemoryError
-XX:+UseConcMarkSweepGC
-Dsun.rmi.dgc.client.gcInterval=3600000
-Dsun.rmi.dgc.server.gcInterval=3600000
-verbose:gc
-Dcollaborati.connection.readTimeout=<number of minutes>
Most of these advanced Java Virtual Machine arguments relate to garbage collection in memory. The last argument shown relates to Collaborati. Default value is 60 minutes and it is rare that you would need to change it. If you anticipate dealing with unusually large volumes of data through Collaborati, you should set this argument to a larger value, to avoid timeouts during synchronization. An example of large volumes would be timekeeper counts of 2000 or more.
For more details on performance tuning your Java environment and garbage collection, see your Sun documentation.
IBM JVM
Heap size should be set to 4000 (MB) for both initial and maximum size, presuming a load of 800 users. If your load is smaller you may be able to reduce the heap size proportionately.
Optional Recommended Arguments
There is a recommended argument that can help tune performance. Specify the following argument in the command line:
Xgcpolicy:gencon -Xmn1000m
If you are running a heap size different than 4000 then you should adjust -Xmn correspondingly to stay at 25% of the heap size.
Another argument relates to Collaborati Spend Management (CSM). The syntax of the argument is:
Dcollaborati.connection.readTimeout=<number of minutes>
Default value is 60 minutes and it is rare that you would need to change it. If you anticipate dealing with unusually large volumes of data through CSM, you should set this argument to a larger value, to avoid timeouts during synchronization. An example of large volumes would be timekeeper counts of 2000 or more.
Deploying TeamConnect
Deployment should always incorporate a full undeployment of the existing TeamConnect instance and a deployment of the new instance. Do not use your application server's update facility. Also, the web server cache should be cleared after the new instance is deployed.
Refer to the procedure for your application server:
- Deploying the TeamConnect .war on Apache Tomcat
- Deploying TeamConnect .ear on WebSphere
- Deploying TeamConnect .ear on WebLogic
Deploying the TeamConnect .war on Apache Tomcat
To set the JVM configuration, refer to Sun JVM or IBM JVM, depending on which JVM your application server is using. Construct a string of JVM arguments with the values recommended in those sections.
To deploy TeamConnect on Apache Tomcat:
- Make an adjustment to the teamconnect.properties file. Remove the hashtags to uncomment the following line:
## appserver.datasourcePrefix=java:comp/env/ - On the Tomcat manager web page, in the Deploy section, browse to and select the TeamConnect .war file.
- Click Deploy.
A message appears near the top of the screen, indicating that the application has been deployed.
In the list of applications (or contexts), in the Running column, the value shown should be true for the TeamConnect application.
Also, the TeamConnect context root should appear in the Display Name column.
- Deploy the TeamConnect online help either on your web server or your application server. TeamConnect should be running and available for login. For details, see Verifying Installation.
Deploying TeamConnect .ear on WebSphere
TeamConnect should be installed by using the WebSphere administrative console and the related WebSphere documentation.
You must first adjust the configuration file for correct database functionality in WebSphere:
- For TeamConnect to connect to Data Warehouse, remove the following file from the TeamConnect .war file:
WEB-INF\lib\validation-api-1.0.0.GA.jar - Make an adjustment to file teamconnect.properties. Extract the TeamConnect .war file from the TeamConnect .ear file, explode the .war file, and locate teamconnect.properties. Remove the hashtags to uncomment the following line:
## appserver.datasourcePrefix=java:comp/env/ - Repackage the teamconnect.properties file into the .war file. Repackage the .war file into the TeamConnect .ear file.
- Install the TeamConnect application as WebSphere advises, then configure the application as described below before starting the application.
To set the JVM configuration:
- Refer to IBM JVM. Construct a string of JVM arguments with the values recommended in that section.
- Set the recommended options using the WebSphere administrative console.
To WebSphere 9.0:
- Before deploying to WebSphere 9.0, ensure the javax.el-3.0.1-b11.jar file is removed from WEBINF/lib of TCE ear file.
Other Configuration Changes
You must ensure that the class-loading policy used by WebSphere is "parent last". Use WebSphere Console to set this policy for the TeamConnect module that you have deployed.
You can improve the performance of TeamConnect by adding the optional command line argument - Xgcpolicy:optavgpause to the Generic JVM arguments field on the Java Virtual Machine page of the WebSphere Application Server settings. For more details on tuning your Java environment, see your vendor's documentation.
You can include optional JSP engine parameter keepgenerated with value true in your module's configuration. This retains Java files after the translator is finished, which can aid in debugging. Refer to WebSphere documentation for details on this and other details on tuning your Java environment.
SSL and Collaborati Spend Management
If you use the Collaborati Spend Management feature, and your application server or web server uses Secure Sockets Layer (SSL), you must perform some additional configuration steps on your WebSphere application server.
- In the utilities\config\ssl subfolder of your installation media, locate files versign.intermediate.cer and verisignroot.cer. Copy those files to a folder that is accessible to the WebSphere Console.
- Use the WebSphere Console to add two new entries to the list of Signer Certificates in the default node truststore. Add each of the files named above, and use data type "Base64-encoded ASCII data".
Restart Required
After performing any of the WebSphere configuration changes described above, you must restart the application server for the changes to take effect.
Deploying TeamConnect .ear on WebLogic
When deploying TeamConnect, you must start and access the administrative console. This involves first starting the WebLogic administrative server, then opening the administrative console. Make sure you know how to do that, as well as how to start and shut down managed servers. If necessary, refer to the WebLogic documentation.
Important: WebLogic is case-sensitive. Use the correct case when you type file names, directory names, or other information.
To set the JVM configuration:
- Refer to Sun JVM. Construct a string of JVM arguments with the values recommended in those sections.
- Use the administrative console to place those values into WebLogic's options.
To deploy TeamConnect:
- Start the WebLogic Server administration console for the domain in which you are working.
- Follow WebLogic documentation instructions for deploying a new application.
Optional Recommended Arguments
There are some optional, recommended arguments that can help tune performance. To apply them, append the following arguments to the ones already existing in Managed Server or Node Manager:
-server -XX:+HeapDumpOnOutOfMemoryError -XX:+UseConcMarkSweepGC - Dsun.rmi.dgc.client.gcInterval=3600000 -Dsun.rmi.dgc.server.gcInterval=3600000 - verbose:gc
Most of these advanced Java Virtual Machine arguments relate to garbage collection in memory. For more details on performance tuning your Java environment and garbage collection, see your Sun documentation.
Configuring Web Servers
The WebLogic Server software suite includes a web server, suitable for processing HTTP requests for TeamConnect pages. However, if you would like your users to be able to access TeamConnect through your company's official URL (for example, http://www.yourcompany.com/TeamConnect/), you need to set up a plug-in for your company's web server to proxy the appropriate HTTP requests to WebLogic.
Also, if you have set up a cluster of managed servers, you must set up a proxy to route the client requests to the appropriate managed servers. If you do not set up a cluster proxy, you cannot take advantage of the benefits of clustering (load balancing, failover, and so on).
Oracle provides plug-ins for Microsoft IIS, as well as Apache and Sun Java System Web Server, which enable the web server to proxy HTTP requests to WebLogic. Many configuration options for these plug-ins can be found in the WebLogic Server Administration Guide.
Troubleshooting WebLogic Installations
- (Windows only) If you did not define your WebLogic servers as Windows services when you ran the Domain Configuration Wizard, you can still set them to start at boot time by using the WL_HOME/user_projects/domains/Mitratech/installService.cmd utility.
- If, when attempting to start the WebLogic server, you encounter a java.lang.OutOfMemory exception, the Java environment does not have enough memory for the WebLogic server.
- If you are having problems connecting to the TeamConnect database, check the following:
- Your TeamConnect database must have been fully configured prior to TeamConnect deployment.
- If you are using an Oracle database, ensure that your Oracle client is installed and properly configured to connect to your database.
- For Solaris/Linux: ensure that ORACLE_HOME/bin is in your LD_LIBRARY_PATH
environment variable. For more information, see the Oracle documentation. - For Windows: ensure that ORACLE_HOME/bin is in your PATH environment variable. For more information, see the Oracle documentation.
Verifying Installation
To verify that TeamConnect has been properly installed, you must also perform the initial TeamConnect application configuration steps. To do so, you must do the following:
- Login to the system as user TeamConnectAdmin.
- If this is a new installation, change the default TeamConnectAdmin password to a secure password.
- In Admin Settings, click the About link and upload the license file.
- Create a group account with the full rights of system administrators.
- Create a contact user account, typically for your TeamConnect system administrator, and make that user a member of the group account that you just created.
- (optional) Configure the TeamConnect Login Screen (for SSL only)
- Log in with that user.
(optional) Verify that the online help can be displayed.
Because the TeamConnect installation files may have been customized before you received them, certain screens may differ slightly from those shown in the following steps. However, if they differ significantly, or if described functionality is missing, carefully ensure that you have followed all of the installation instructions.
Logging in for the First Time
To verify that TeamConnect has been properly installed, you must also perform the initial TeamConnect application configuration steps. To do so, you must do the following:
- Login to the system as user TeamConnectAdmin.
- If this is a new installation, change the default TeamConnectAdmin password to a secure password.
- In Admin Settings, click the About link and upload the license file.
- Create a group account with the full rights of system administrators.
- Create a contact user account, typically for your TeamConnect system administrator, and make that user a member of the group account that you just created.
(optional) Configure the TeamConnect Login Screen (for SSL only) - Log in with that user.
(optional) Verify that the online help can be displayed.
Because the TeamConnect installation files may have been customized before you received them, certain screens may differ slightly from those shown in the following steps. However, if they differ significantly, or if described functionality is missing, carefully ensure that you have followed all of the installation instructions.
To log in to TeamConnect for the first time
- Ensure that the TeamConnect servers are properly configured and running. For more information, see the previous chapters, if necessary.
- Open an internet browser window and input the following address:
http://Hostname:port/TeamConnect/login
ReplaceHostname:portwith the IP address and port of the machine on which TeamConnect is deployed.
If you have deployed TeamConnect to one managed server, this is the IP address and port of the managed server. If you have deployed TeamConnect to a cluster, this is the IP address and port of the administrative server on which the cluster is defined. If you have set up a proxy through an alternate web server, this is the IP address of the web server.
The TeamConnect login screen should appear. - Log in as the following:
User Name:TeamConnectAdmin
Password:PASSWORD(case sensitive)
Input these values into the Username and Password fields, and click Login. You are requested to change your password.
- Enter the appropriate values in the password fields and click Save and log in.
This logs you in as the TeamConnectAdmin user. This user has limited rights within TeamConnect, and should be used only for licensing and to create new users.
Logging in to TeamConnect for the first time takes longer than usual. TeamConnect generates its JSP interface files on the server at the first login. Subsequent login, regardless of the client, do not take as long.
To setup users:
- When you install a new instance of TeamConnect, only the TeamConnectAdmin user should log in. The first task for this user is to upload a licensing file into TeamConnect so that ordinary users can also log in.
- Obtain the licensing file from your Mitratech Support representative.
- After you have received the licensing file, go to Admin, Admin Settings, and About. There you must click a button, Upload License, that prompts you for the location of your license file and uploads it. Then you may begin using TeamConnect with all users.
It is good practice not to use TeamConnectAdmin to log in on a regular basis, so these next steps will set up other usernames with administrator rights, and you can log in with those usernames.
- Create a Group with comprehensive rights.
All rights in TeamConnect are based on user groups. Your system administrator cannot acquire comprehensive rights unless they belong to a group with those rights.
Refer to Creating or Editing Groups to learn how to create a new group, and how to assign rights to that group. Assign all possible rights to the new group. Save the Group record. - Create a User to represent the system administrator.
Refer to Creating or Editing Users to learn how to create a new user account, and how to assign that user to the group that you created in the previous step. Save the User record.
You must associate the User record with a Contact record. Since TeamConnect has just been installed, there aren't any Contact records in existence yet, and you will create a new Contact (with the system administrator's name) as part of the process of creating the user account. - Test your work by logging out of TeamConnect (using the Log Out link in the upper right of the page), then logging in with the username and password of the User account that you just created. This user should have access to all parts of TeamConnect, including the Admin tab and the Setup link, which are both visible on the user's home page.
Logging Options
- TeamConnect debug logging
Set the location of the log files using the TeamConnect web application descriptor
app.logFolder.
In TeamConnect, you can control the level of detail in the logs using the settings on the System Logging screen in Admin Settings. - General server logging
Set the appropriate logging options on all of your application servers. For details, see the respective vendor documentation.
Ensure that all of these logging options are turned off when you have finished configuring the final TeamConnect implementation interface.
Troubleshooting
Issue: After deploying the new WAR file for online help, I do not see the help screens.
Resolution: If your application server or web server does not automatically clear cached JSP or JAR files on restart, you may need to delete those files manually and restart your application server.
Business Objects Single Sign-on
These instructions are not entirely specific to Mitratech products and are provided for convenience only. Mitratech has validated these instructions, but does not claim responsibility for the accuracy or completeness of information about products from other vendors.
For more specific information on system requirements and instructions for deploying applications, please see the appropriate vendor documentation.
Note: BOSS requires separate purchase. Please contact your account manager for details.
Deploying BOSS XI and Configuring URLs
It also describes how to construct URLs to access the main Business Objects login page and to Business Objects documents (reports). These conventions can be used when defining URLs, for example, in a TeamConnect portal pane on a home page.
Following points to be noted before starting the deployment of BOSS war file:
-
BOSSXI.war file works for the new install of BO4.2SP3 and earlier versions.
-
For a new BO4.2SP4 installation or upgrade of BO4.2SP4 to a greater version, BOSS42.war file will be utilized for Single Sign-On (SSO).
Note:
It is recommended to adopt the new BOSS42 SSO, whether or not they upgraded their BO server, because it leverages the supported method by BO of integrating SSO.
Users have to disable the chrome security feature "SameSite by default cookies'' in order for the embedding report in the TeamConnect portal to work on chrome browser. Embedding report in the TeamConnect portal works on both BOSSXI and BOSS42 on both Firefox and Edge browsers.
Procedure to Disable SameSite by default cookies
Users can find this security feature in the Chrome flags menu.
-
Enter the following in the chrome address bar and select “Disabled” from the drop-down menu.
chrome://flags/#same-site-by-default-cookies

-
Select the “Relaunch” button.
Support for Business Objects Single Sign-On (BOSS)
Business Objects is supported for single sign-on (BOSS) with TeamConnect 5.1 and above versions. BOSS has been certified using WebSphere, Apache Tomcat and WebLogic to deploy BOSS war file as an application.
Since BOSS is delivered as a J2EE application, you must deploy it as such on an application server. BOSS cannot be deployed on IIS.
Requirements for Deploying BOSSxx.war
- BOSS war file for Business Objects does not have to be deployed on a Business Objects node. You must simply deploy it on your application server.
- Both the Business Objects server and the application server must be on the same domain (for example, .mitratech.com).
- If BOSS and Business Objects are deployed on the same machine, then it is not required to have a domain name in the Cookie Domain field of Business Objects WebIntelligence Settings in TeamConnect's system settings screen. Also, URLs to BOSS do not need to include a fully qualified domain name. You can simply specify the machine name in the URL.
- From the global.properties file for Business Objects, you must set the trusted.auth.user.retrieval variable to WEB_SESSION.
(You can find the global.properties file at this location: <SAP BOBIE INSTALL DIRECTORY>\SAP BusinessObjects\SAP BusinessObjects Enterprise XI 4.0\warfiles\webapps\BOE\WEB-INF\config\default\global.properties) - Once you have verified that BOSS has been deployed successfully, you must configure the Business Objects WebIntelligence Settings in TeamConnect's System Settings on the Admin menu. For details, see BusinessObjects WebIntelligence Single Sign-on, provided on your TeamConnect Installation package.
-
All the BOE communication ports need to be open (i.e. 6400, 6410, 6405, 8080, 59959), including the CMS Request Port.
-
Navigate to CCM and Properties >> Configuration
-
For CMS request port, Go to CMC >> Servers >> Central Management Console >> Metrics. Check Request port Value.
-
Verifying Successful BOSS Deployment
To verify whether BOSSxx.war file is deployed successfully, open a browser window and type in the following URL. Replace the properties in brackets with the application's property values:
http://<appserver.host>:<appserver.port>/<jsp.app.name>/Logon.jsp
If you see the page below, then BOSSxx.war file has deployed successfully.

Constructing URLs to Business Objects Pages
When providing URLs to end users so that they can access Business Objects documents through TeamConnect (for example, in a portal pane on their home page), you must construct the URLs as described in "OpenDocument Parameters" in the BusinessObjects Enterprise.
For more information on how to construct URLs, please see the appropriate vendor documentation.
The following examples can help you construct the proper URLs. Note that if BOSS is not deployed on a Business Objects node, then the <hostname> must include the fully qualified domain name of the server.
Caution: Do not use a token in your URL. This will invalidate the link .
For details about adding Business Objects URLs to TeamConnect portal panes, see Adding WebIntelligence URLs.
URLs When Business Objects Deployed on IIS
The following are examples of valid URL construction when the Business Objects server is deployed on IIS.
http://<servername>:<port>/BOE/OpenDocument/opendoc/openDocument.aspx
?<parameter1>
&<parameter2>
&...
&<parameterN>
URLs When Business Objects Deployed as J2EE Application
The following are examples of valid URL construction when the Business Objects server is deployed on your application server.
http://<servername>:<port>/BOE/OpenDocument/opendoc/openDocument.jsp
?<parameter1>
&<parameter2>
&...
&<parameterN>
TeamConnect Installer Form
Some of the application parameters described below will already have suggested values. Those values will appear when you run the installer. You can edit them and replace them with your chosen values.
If you are reconfiguring an existing TeamConnect application, that application's values will appear, not the default suggested values.
Most of the parameters shown below have corresponding entries in the teamconnect.properties configuration file which is detailed in teamconnect.properties parameters for all application servers. However, there is not always a perfect correspondence between the installer form's values and the configuration file's values.
Team Connect Installation Data
|
Application parameter |
Description (Suggested value) |
Value |
|---|---|---|
|
Where Would You Like to Install |
TeamConnect installation media will be copied to the default path or the path that you specify. |
|
|
Configuration Folder |
(Not used in this version) |
|
|
Log Folder |
(Optional) You can edit the default location of TeamConnect log files on your application server. For example,
|
|
|
Designer Help URL |
The location of the Designer help file. Use values like: http://hostName/TeamConnectHelp/Designer/tc_designer_help.html (where hostName should be replaced by a server name or IP address and might include port number) |
|
|
User Help URL |
The location of the User and Admin combined help file. Use values like: http://hostname/TeamConnectHelp/usertc_user_help.html (where hostName should be replaced by a server name or IP address and might include port number) |
|
|
jMonitor Config File |
Specifies the location of the file that contains configuration information for the Performance Monitor (see Performance Monitor). |
If you do not specify a location, the file will reside in the same folder as the Java Virtual Machine that is being used by TeamConnect. |
|
Sequence pre- allocation size |
Set this value to 500 always. Do not modify this value. |
|
|
Minimum number of connections |
(If using a connection pool for database connection) The minimum number of connections the connection pool is initialized with. For example, 10 |
|
|
Maximum number of connections |
(If using a connection pool for database connection) The maximum number of connections the connection pool can grow to. For example, 10 |
|
|
Minimum number of read connections |
(If using a connection pool for database connection) The minimum number of connections the READ connection pool is initialized with. For example, 10 |
|
|
Maximum number of read connections |
(If using a connection pool for database connection) The maximum number of connections the READ connection pool can grow to. For example, 10 |
|
|
Database Type |
Select Oracle or SQL Server. |
|
|
Do you want to use data source |
Select Yes to use data source for database connection |
|
|
Data Source Name |
(If you are using data source) Type the data source name. For example, TeamConnect |
|
|
These parameters are only required if you are not using a data source. |
||
|
Database Name |
(SQL Server only) The name of the database. |
|
|
The hostname and port number of your database, separated by colons. Note: Only required if not using a data source. |
For example, jdbc:sqlserver:// serverName :port;databaseName=dbName where serverName, port, and dbName should be changed appropriately. |
|
|
Username |
The database user name. |
|
|
Password |
The encrypted password string. This password needs to be encrypted using the encryption tool. |
|
|
Enable Cache Synchronization |
Select Yes if you will Enable Cache Synchronization; run TeamConnect in a clustered server environment; or No if you will not run TeamConnect in a clustered server environment |
|
|
RMI Registry Port Number |
(No value required unless you will enable Cache Synchronization; running TeamConnect in a clustered server environment) The port number used to create and launch TeamConnect's own internal RMI registry. If you deploy more than one instance of TeamConnect, each instance should use a different value for this parameter. |
|
|
ClusterName |
(No value required unless you will enable Cache Synchronization; running TeamConnect in a clustered server environment) Type a unique name for your cluster of servers, to distinguish it from other clusters on the network. |
|
|
Oracle Database URL |
(If you use an Oracle database) Type the database URL to connect to, to create a database schema and import TeamConnect components. The format should be: jdbc:oracle:thin:@serverName :port:dbName Where serverName, port, and dbName should be changed appropriately. |
|
|
SQL Server Database URL |
(If you Microsoft SQL Server) Type the database URL to connect to, to import TeamConnect components. The format should be: jdbc:sqlserver:// serverName :port;databaseName=dbName |
|
|
Where serverName, port, and dbName should be changed appropriately. |
||
|
Cache synchronization, multi-cast group address |
If you use multi-cast to keep cache synchronized among a group of servers, you must specify the group address. If you provide no value, the default value of 226.10.12.64 is used. |
|
|
Cache synchronization, multi-cast port |
If you use multi-cast to keep cache synchronized among a group of servers, you must specify the port number used for multi- cast. If you provide no value, the default value of 3121 is used. |
|
|
The following parameters are for the Data Warehouse database, not the TeamConnect production database |
||
|
Database Type |
Select Oracle or SQL Server. |
|
|
Do you want to use data source |
Select Yes to use data source for database connection |
|
|
Data Source Name |
(If you are using data source) Type the data source name. For example, DW |
|
|
DataWarehouse Name |
(SQL Server only) The name of the database. |
|
|
The hostname and port number of yourdatawarehouse, separated by colons. Note: Only required if not using a data source. |
For example, jdbc:sqlserver:// serverName :port;databaseName=dbName where serverName, port, and dbName should be changed appropriately. |
|
|
Username |
The database user name if not using data source. |
|
|
Password |
The encrypted password string. This password needs to be encrypted using the encryption tool. |
|
|
Interval (seconds) at which WebLogic checks to see if JSP files have changed and need recompiling |
(WebLogic only) Sets the interval, in seconds, at which WebLogic checks to see if JSP files have changed and need recompiling. If set to -1, page checking and recompiling is disabled (recommended for production mode). If set to 0, pages are checked on every request. |
|
|
Name of the session cookie |
(WebLogic only) The name of the session cookie (for example, TCSESSIONID). |
|
|
IMAP Server Port |
IMAP server port number. Required only if you choose to enable the IMAP server feature. |
Web Application Parameters
weblogic.xml Parameters
Parameters in weblogic.xml
|
Parameter |
Description |
Suggested value |
|---|---|---|
|
pageCheckSeconds |
Sets the interval, in seconds, at which WebLogic checks to see if JSP files have changed and need recompiling. If set to -1, page checking and recompiling is disabled (recommended for production mode). If set to 0, pages are checked on every request. |
-1 (in production environment) |
|
CookieName |
Sets the name of the session cookie. If the session cookie has a unique name, this reduces some runtime behavior issues such as unexpected session time-outs. One way to establish a unique name is to derive the name of the cookie from the context path of the application:
|
TCSESSIONID |
|
container- descriptor |
Sets the policy for checking for expired static resources. Values of -1 suppress checking, thus improving performance. Example:
|
-1 |
teamconnect.properties parameters for all application servers
They are defined in the teamconnect.properties file. Additional parameters are necessary for configuring Elasticsearch for global search. For more details, please see Elasticsearch Setup.
Parameters in teamconnect.properties
|
Parameter |
Description |
Suggested values |
|---|---|---|
|
Application parameters: |
||
|
app.runStartUp |
Indicates whether TeamConnect is set to execute start up code. Enter YES to run start up code defined in TeamConnect's Documents area in the /Root/ System/StartUp folder. Enter NO to disable the start up code. The default value is YES. |
YES or NO |
|
app.runStartUp.failOnError |
Indicates whether TeamConnect will continue to execute start up code if it encounters an error or exception. Enter YES to stop the execution of the rest of the class files on error or exception. Enter NO to continue onto the next class file. The default value is NO. |
YES or NO |
|
app.logFolder |
The directory where TeamConnect stores log files. Logging can be configured through System Logging on the Admin tab, Logging sub-tab, in the TeamConnect user interface. Tip: If you are running multiple instances of TeamConnect on a single application server (for example, in a development environment), set different log folders for each of them so that you can more easily distinguish between the logs. Default value is ./logs. |
./TeamConnect/logs(use backslashes for Windows) |
|
app.dontUseSecurityViews |
This parameter influences how object security is checked when a search is executed. A value of NO means that object security is checked at the database level, using database views introduced in version 3.3. This approach reduces network traffic between application server and database server. A value of YES means that security-related database views are ignored and security checking takes place in the application's memory space. This is the better choice if your database server is not powerful, and if you have resources available on your application server. If you are encountering performance issues when using the security views, change this property to YES. |
NO (default) |
|
app.preLoadStores |
This parameter influences how static resources are fetched into application memory. A value of YES causes all resources to be fetched at startup. This slows the startup process, but improves response time for all subsequent processes during the application session. A value of NO causes resources to be loaded only when required for the current process, which speeds startup but causes all other processes to run more slowly. |
YES (default) |
|
app.expiresHeader.timeInM inutes |
Determines how long, in minutes, static resources may persist in cache before they are explicitly refreshed. |
360 (default) |
|
db.product |
The database being used to store TeamConnect data. Enter the appropriate software name. |
Oracle or SQLServer |
|
url.adminHelp |
Specifies the TeamConnect online Designer help location.
(where <hostname> can be web application server name or IP address and might include port number). |
See under Description |
|
url.userHelp |
Specifies the TeamConnect online user help location.
(where <hostname> can be web application server name or IP address and might include port number). |
See under Description |
|
javax.xml.soap.MessageFa ctory |
Specifies the SOAP messaging implementation that will be used. This is required for using Web Services on WebLogic and WebSphere servers, and overrides the default SOAP implementation that those servers use. This parameter is ignored for Tomcat servers. The parameter has the following default value:
If you have a version of Weblogic earlier than 10.3.6, use the following argument:
|
url.userHelp |
|
jmonitor.configuration.file |
Specifies the location of the file that contains configuration information for the Performance |
See under Description |
|
Monitor (see Performance Monitor). If you do not specify a location, the file will reside in the same folder as the Java Virtual Machine that is being used by TeamConnect. In environments with multiple TeamConnect installations, you should override the default with a location that is specific to the current TeamConnect installation. |
url.userHelp |
|
|
EclipseLink parameters: |
||
|
eclipselink.sequencePreall ocationSize |
The EclipseLink primary key sequence pre- allocation size. This value should not be changed. |
500 |
|
eclipselink.minConnections |
The minimum number of connections the EclipseLink connection pool is initialized with. |
30 |
|
eclipselink.maxConnection s |
The maximum number of connections the EclipseLink connection pool can grow to. |
30 |
|
eclipselink.minReadConne ctions |
The minimum number of connections the EclipseLink READ connection pool is initialized with. |
30 |
|
eclipselink.maxReadConne ctions |
The maximum number of connections the EclipseLink READ connection pool can grow to. |
30 |
|
eclipselink.bindParameters (Optional) |
Whether to use bind variables in database queries. Affects performance. Default behavior is as shown in Suggested Values. |
YES (for Oracle) or NO (for SQL Server) |
|
Parameters for directdatabase connection (Only for Tomcat deployments): |
||
|
db.username |
The username that TeamConnect should use to access the database. |
|
|
db.password |
The password that TeamConnect should use to access the database. Important: This password is encrypted automatically when the Installer runs. Future changes to the password must be manually encrypted using the encryption tool provided by Mitratech. For more details, see Encryption Tool. |
|
|
db.databaseName |
(SQL Server only) The name of the database. |
|
|
db.server |
For SQL Server—Specify only the hostname and port number of your database, separated by colons. For Oracle Thin connection—Specify the hostname, port number, and the SID of your database, separated by colons. |
|
|
Data source parameters: |
||
|
app.useDataSource |
Enter YES to use a data source (defined in the application server) as the database connection mechanism. If set to YES, all EclipseLink connection pool and WebLogic connection pool parameters are ignored. Enter NO to use a EclipseLink connection pool or a WebLogic connection pool. By default, the value is YES. |
YES or NO |
|
appserver.datasourceName |
The name of the data source to use, if app.useDataSource is set to YES. If you do not provide a data source name, the name defaults to TeamConnect. |
|
|
Data Warehouse parameters: |
||
|
dwh.db.product |
The database being used to store Data Warehouse data. Enter the appropriate software name. |
Oracle or SQLServer |
|
dwh.useDataSource |
Enter YES to use a data source (defined in the application server) as the database connection mechanism. If set to YES, all EclipseLink connection pool and WebLogic connection pool parameters are ignored. Enter NO to use a EclipseLink connection pool or a WebLogic connection pool. By default, the value is NO. |
YES or NO |
|
dwh.datasourceName |
The name of the data source to use, if dwh.useDataSource is set to YES. If you do not provide a data source name, the name defaults to TeamConnect. |
|
|
dwh.db.username |
The username that TeamConnect should use to access the Data Warehouse database. |
|
|
dwh.db.password |
The password that TeamConnect should use to access the Data Warehouse database. Important: This password is encrypted automatically when the Installer runs. Future changes to the password must be manually encrypted using the encryption tool provided by Mitratech. For more details, see Encryption Tool. |
|
|
dwh.db.databaseName |
(SQL Server only) The name of the database. |
|
|
dwh.db.server |
The location of the database, in format hostname:port:SID. |
|
|
Global search parameters: |
||
|
globalSearchMenu.doNotS how |
This property can be used to suppress the display of certain options in Global Search. If you do not want the "All" option to appear in the dropdown list of Global Search, enter the following property and value: globalSearchMenu.doNotShow=All If you want neither the "All" option nor the "All Projects" option to appear in the dropdown list of Global Search, enter the following property and value: globalSearchMenu.doNotShow=AllAndAllPr ojects |
|
|
Security enhancement parameters: |
||
|
app.disableSpringSecurityL ogging |
Indicates whether the spring security logger assumes the TeamConnect logging levels. By default, this parameter is not in the .properties file and is automatically set to false, which means that the spring security logger does not use the logging levels. If the logger levels are set to debug and you want the spring security logger to include debug messages, add this parameter to the file and set it to true. Note: If this parameter is set to true, the spring logger may log sensitive information, such a CSRF token and session IDs. Indicates whether the spring security logger assumes the TeamConnect logging levels. By default, this parameter is not in the .properties file and is automatically set to false, which means that the spring security logger does not use the logging levels. If the logger levels are set to debug and you want the spring security logger to include debug messages, add this parameter to the file and set it to true. Note: If this parameter is set to true, the spring logger may log sensitive information, such a CSRF token and session IDs. |
|
|
app.setupAccessPort |
Allows you to specify a valid port number that gives users access to the TeamConnect setup. Even if the user has the correct TeamConnect security rights and permissions, TeamConnect blocks users without this port from accessing the setup. From your web server, you can also specify the same port to block external traffic. |
|
|
encryption.iterations |
Specifies the number of iterations that TeamConnect runs the password encryption algorithm. The default is 10000. |
|
Cache Synchronization Parameters
teamconnect.properties Parameters for Cache Synchronization
|
Parameter |
Description |
Suggested or example value |
|---|---|---|
|
sync.enabled |
A YES or NO value that determines whether TeamConnect attempts to do cache synchronization. |
YES |
|
sync.channel |
A unique name for your cluster so that it won't try to synchronize caches with any other clusters in your network. |
SpendManagemen t |
|
sync.rmi.port |
The port number used to create and launch TeamConnect's own internal RMI registry. If you deploy more than one instance of TeamConnect, each instance should use a different value for this parameter. Default is 2258. |
2258 |
|
sync.multicastGroupAdd ress |
(Optional) To keep cache synchronized among a group of servers, you must specify the group address. If you provide no value, the default value of 226.10.12.64 is used. |
226.10.12.64 |
|
sync.multicastPort |
(Optional) To keep cache synchronized among a group of servers, you must specify the port number used for multi-cast. If you provide no value, the default value of 3121 is used. |
3121 |
|
sync.packetTimeToLive |
(Optional) Multi-cast packets should expire after a certain number of routing hops, to avoid network congestion. Specify the number of hops. If you provide no value, the default of 16 is used. |
16 |
Encryption Tool
Important: Make sure to modify the following instructions according to your operating system.
To encrypt a password:
- In a command-line window, navigate to the directory /utilities/encrypt on the TeamConnect installation media.
- Make sure your Java bin path is set properly. For more information on setting this path, see your Java documentation.
- Run the following command:
java -jar encrypt.jar yourpassword
Replace your password in the example above with the password you would like to encrypt.
This command outputs an encrypted version of your password. The encrypted password is a string of capital letters. You may copy this password and paste it where necessary.
Performance Monitor
Overview
The TeamConnect Performance Monitor silently captures data in the background on all TeamConnect requests. Any time a request exceeds a configurable threshold, the monitor log captures the data for that one request so that the information can be analyzed later by IT staff and/or Mitratech Support. Such analysis, and subsequent design changes, can improve application performance.
In contrast to general debug loggers in TeamConnect:
- Performance Monitor logs data for long-running requests only, so it doesn't create a strain on the system or on the person analyzing these logs.
- All data that is logged by Performance Monitor for a given request is guaranteed to be contiguous in the log file and does not overlap with any data from any other requests, which is another common difficulty when analyzing data from general debug loggers.
Resource requirements
The Performance Monitor is designed to be always on in production environments so that you can capture data related to performance issues whenever they happen. It has been load-tested and shown to incur less than 2% overhead on even highly loaded systems (using an 1800-user load test that drives an 8-core application server to 80% CPU utilization rates).
What information is captured?
For every long-running request, the Performance Monitor captures and logs HTTP request data, (limited) HTTP session data, JDBC call data and periodically gathered stack traces. The HTTP request and (limited) HTTP session data can be used to identify the user, the record, the search, the tool, etc. The JDBC call data, including timings, full SQL text and bind parameter values, can help isolate a variety of issues, including poorly performing queries, too many queries being executed, or too much data being returned. The periodically gathered stack traces can help identify performance issues in custom rules, custom Java blocks, or even core TeamConnect code.
You can configure a threshold, in milliseconds, for "stuck" requests. As soon as a request exceeds this stuck threshold, the monitor immediately logs all of the data it has gathered for this request so far to make sure this information is not lost (since normally long requests are only logged upon completion). Also, if any email addresses have been configured, the monitor will email an alert with the same data that it logged for the stuck request. If the request later completes, a second email is sent that the request has completed (become "unstuck").
The TeamConnect Performance Monitor doesn't capture any information related to hardware utilization. Hardware utilization data can be very valuable and can be captured by a variety of tools. However, often spikes in hardware utilization (e.g. CPU and memory) are caused by long-running requests and not vice versa. Of course, once CPU or memory reaches its limits, this can cause all requests to run slow, but often the key is to identify the initial long-running request(s) which triggered the CPU or memory spike in the first place.
Performance Monitor Configuration
The Performance Monitor is divided into a server agent, which gathers information about specific requests and determines when it should be logged, and a logger, which collects the information from the agent and structures it so that the log is easily readable.
The properties of these two components are configurable through the Performance Monitor user interface. Access this UI through your browser, using the same URL that you use to log in to your TeamConnect instance, but substituting jmonitor for login. For example:
http://myserver:port/instancename/jmonitor
The resulting page displays several buttons.
- Click Change Password to set a new password.
- Click Update Configuration to view and change the various configurable properties, which are described in the table below.
Configurable Properties for Performance Monitor
|
Property |
Definition |
|---|---|
|
Enabled |
This checkbox determines whether the server agent should collect performance data at all. |
|
Threshold (milliseconds) |
All requests exceeding this threshold are logged (along with all associated data) once they complete. Default=30000. |
|
StuckThreshold (milliseconds) |
As soon as a requests exceeds this threshold, it is logged immediately (along with all associated data gathered to that point). Also, if email is configured (see settings below), a "stuck" alert is emailed to the configured address(es) containing the same data that was written to the log file. If the request later completes, an additional email is sent that the request has completed (become "unstuck"). Default=600000. |
|
Stack Trace Initial Delay(milliseconds) |
Once a request exceeds this initial delay, stack traces for the thread processing the given request are gathered periodically (see stackTracePeriodMillis below). Default=10000. |
|
Stack Trace Period (milliseconds) |
Once a request exceeds an initial delay (see Stack Trace Initial Delay above), this is the interval at which successive stack traces for the thread processing the given request are gathered. Default=1000. |
|
Maximum Trace Events per Request/Operation |
If the number of stack traces for one request reaches this maximum number, no additional trace events are gathered Default=1000. |
|
Log Archive Filename Pattern |
This naming pattern controls how frequently the log file is rolled over. It can also control file compression if you add a standard compressed-file extension such as .gz or .zip to the end of the pattern. The pattern can contain a path specification, which is useful in separating the archive log files from the currently active log file (see next property.) Default="jmonitor%d{yyyy-MM-dd}.log, which specifies daily rollover and no compression. |
|
Log Active Filename |
This naming pattern can contain a path specification, which is useful in separating the archive log files from the currently active log file there is no default value. If you do not supply a value, the "Log Archive Filename Pattern" value will be used. |
|
Log Max History |
If you enter an integer here, then the number of archived log files will not exceed that integer. The oldest archives will be deleted as new ones are created. Default=0 (no limit on number of archived logs). |
|
Email Host |
SMTP host to send email through. |
|
Email Smtp Port |
The port used to communicate with the SMPTP host. Default=25. |
|
Email Username |
Username if SMTP host requires authentication. |
|
Email Password |
Password, if SMTP host requires authentication. |
|
Email SLL |
Set to this box to checked if the SMTP host requires an SSL connection. |
|
Email From Address |
Email address to use as the sender. |
|
Email To Addresses |
Comma-separated list of email addresses to send alerts. |
|
Maximum Trace Elements emailed per Operation |
Controls the size of the email messages by limiting how much trace event information is contained in an email. |
Recovering a Lost Password
The value of the administrator password, used for logging in to Performance Monitor, can also be changed by editing the properties file and updating the password property with the new password in clear text, e.g., adminPassword=mynewpassword. Updating the properties file requires a restart, after which the monitor will encrypt the password and update the jmonitor.properties file with the encrypted value. Using this approach requires that you have access and authority to the jmonitor.properties file.
Important Information About Garbage Collection
Garbage collection is a common cause of performance issues which cannot be detected from the TeamConnect Performance Monitor logs. Garbage collection logging should be on in production environments and these logs should be analyzed in conjunction with the TeamConnect Performance Monitor logs. Mitratech typically recommends these GC logging settings for the Sun JVM:
-XX:+PrintGCTimeStamps -XX:+PrintGCDetails -XX:-TraceClassUnloading
Optionally include -Xloggc:<file> if the application server is not capturing stdout to a log file. The only downside to this option is that it overwrites <file> on every restart, which can erase valuable information.
Use this GC logging setting for the IBM JVM:
-verbose:gc
This setting is the same as enabling the Verbose garbage collection checkbox in WebSphere administration console.
Clustering
Support for clustering requires configuring Performance Monitor separately on each node. The monitor web interface is node-specific, so it will work best if you have direct access to address the monitor web interface on each node individually, as opposed to access through a front end load balancer.
Verifying Performance Monitor
For example:
- Start the Performance Monitor UI as described in Performance Monitor Configuration.
- Change property Threshold to an artificially low value such as 100.
- Log into TeamConnect to generate requests which exceed the temporary low threshold.
- Change Threshold back to the previous value (default is 30000) before the monitor log file starts to accumulate a large number of entries.
- View the monitor log file.
- Validate that some of the requests generated above were captured and logged since they should have exceeded the 100 millisecond threshold.
Upgrading from Previous Versions
This appendix contains the following sections:
- Database Design
- Automatic Conversion Processes
- Logging
- Automatic Custom Screen Tag Conversion
- Manual Conversion Suggestions
- Converting ExpressionBuilder References to HLSearchObject
Important: All customers upgrading from a version prior to 3.3 SP1 will need to install a new license file in the first session with the new version. Obtain a new license file by contacting Mitratech Support. See Licensing for more information.
Database Design
If you intend to use Data Warehouse, delay upgrading to the new version until you have altered those field names to 26 characters or less, and you have altered any views, rules, or other logic that refers to those fields.
Automatic Conversion Process
Manual conversion
It is possible to run a conversion tool manually against a single XML file to get a report of possible errors in the file. upgrade.bat, found in the exploded contents of setup.exe, should be run from the command line, taking the XML path and file name as a command-line argument. Example:
upgrade.bat \work\MyCustomJavaBlock.xml
The file specified in the argument is converted and then overwritten with the conversion results.
The output from upgrade.bat can be found in files ConversionLog.txt and ManualConversionLog.txt, in the same folder.
Note: ManualConversionLog.txt is only created when the tool encounters situations that are known to require manual intervention. Such situations are also listed in the console window as the job executes.
Logging
The results of the conversion tools' work is logged in two files:
- ConversionLog.txt contains progress messages for the automated tools.
- ManualConversionLog.txt identifies situations that can't be handled by the automated tool and will require manual editing by a developer familiar with HTML and Javascript and, in some cases, Java.
These files are found in a subfolder beneath the installation media folder:
upgrade/tools/external/CustomScreenConversionTool/logs
It is essential that you read the logs after the installer has run, watching for possible conversion issues.
If a conversion situation is detected then you will find, near the beginning of the log file, the phrase "Custom screen conversion is needed". Additional messages regarding conversion will be found throughout the log file.
In the ConversionLog.txt excerpt below, a summary of successful conversion actions is presented:
06/11/2009 13:08:09 (266ms) --- --------Custom screen conversion-Started--------
06/11/2009 13:08:09 (376ms) --- Root/System/Object Definitions/Account 06/11/2009
13:08:09 (579ms) --- Root/System/Object Definitions/Advice & Counsel 06/11/2009
13:08:09 (719ms) --- WzCjbAdviceCounselSearchResultsSYS.xml
06/11/2009 13:08:10 (251ms) --- Updated 1 tc:component componentType:CLString tag
06/11/2009 13:08:10 (251ms) --- Updated 1 HTML Tag : link tag 06/11/2009
13:08:10 (251ms) --- Updated 11 tc:CLTextField tag
06/11/2009 13:08:10 (251ms) --- Updated 1 tc:useBlockTemplate tag
06/11/2009 13:08:10 (251ms) --- Updated 1 tc:component componentType:WORepetition tag
06/11/2009 13:08:10 (251ms) --- Updated 2 tc:CLRadioButton tag 06/11/2009
13:08:17 (298ms) --- WzCjbAdviceCounselUseExistingSYS.xml
06/11/2009 13:08:17 (313ms) --- Converted Cjb expression cjb.acWasRelated() for class WzCjbAdviceCounselSearchResultsSYS
06/11/2009 13:08:17 (329ms) --- Converted Cjb expression cjb.acWasRelated() for class WzCjbAdviceCounselSearchResultsSYS
06/11/2009 13:08:17 (329ms) --- Updated 4 tc:if tag
06/11/2009 13:08:17 (329ms) --- Updated 1 HTML Tag : link tag
06/11/2009 13:08:17 (329ms) --- Updated 1 tc:useBlockTemplate tag
06/11/2009 13:08:17 (923ms) --- CjbAdviceCounsel.xml
06/11/2009 13:08:18 (016ms) --- Updated 1 tc:if tag 06/11/2009
13:08:18 (016ms) --- Updated 8 tc:label tag
06/11/2009 13:08:18 (016ms) --- Updated 2 tc:component componentType:CLLabel tag
Any problems in conversion will be highlighted by the word ERROR in uppercase. Search the log files for this word and note the preceding conversion action. It will require manual intervention by a TeamConnect professional.
Here is an example of ManualConversionLog.txt, showing some situations that can't be handled by the automated tool. Suggestions for handling some of these situations can be found in Manual Conversion Suggestions.
This file contains XML screens that could not be automatically converted to the 3.x format due to the presence of tags or JavaScript code that need to be rewritten using 3.x API.
Please refer to the 3.x developer guide for the details.
==============================================
Filename: Root/System/Object Definitions/Advice & Counsel/Screens/ CjbAdviceCounsel.xml
Tag: <script ...>
No. of occurrences: 5
Instructions: HTML element names have changed in 3.x. Please rewrite the JavaScript using the 3.x UI element names.
==============================================
Filename: Root/System/Object Definitions/Cost Center/Screens/ CjbCTransactionHistorySYS.xml
Tag: <tc:component componentType=CLBatchDisplay ...> No. of occurrences: 1
Instructions: Please use the 3.x batch display API to rewrite this tag, including the corresponding CJB, NewRow and RegularRow XMLs.
Automatic Custom Screen Tag Conversion
The table below describes the custom screen tags that are handled automatically during the conversion process. A subsequent table describes other tags that will require manual conversions.
Even if a tag is listed in the table below, automatic conversion might not handle every attribute that is associated with the tag. Read the remarks for details. When an attribute is described as being "ignored" in the remarks, that means that the attribute will be dropped from the code as the code is converted to version 3.x syntax.
Custom screen tags that are automatically converted
|
Tag syntax in 2.x |
Tag syntax in 3.x |
Remarks |
|---|---|---|
|
<tc:useBlockTemplate blockTitle="{cjb.blockT itle}"> |
tc:blockTemplate |
Only the blockTitle attribute is supported. Other attributes are ignored. |
|
<tc:component componentType="CLDropDo wnList"> |
tc:select isAlwaysEditable—forceEditable |
These attributes are ignored and not converted:
|
|
<tc:componentType="CLDateFi eld"> or <tc:CLDateField> |
tc:date or tc:dateTime or tc:time isAlwaysEditable—forceEditable |
Converted to tc:date unless attribute showTime is true, in which case the tag is converted to tc:dateTime. Regardless of the conditions above, if attribute doNotShowDate is true, the tag is converted to tc:time These attributes are ignored and not converted:
|
|
<tc:component componentType="CLTimeFi eld"> or <tc:CLTimeField> |
tc:time |
These attributes are ignored and not converted:
|
|
<tc:component componentType="CLCheckB ox"> or <tc:CLCheckBox> |
tc:checkBox |
These attributes are ignored and not converted:
|
|
<tc:component componentType="CLString "> or <tc:CLString> |
tc:string (3.x) |
The following attribute must be handled in a special way: The attribute value of eoObject must be applied to the value attribute by taking the displayStringPath then appending to the eoObject path. Thus, value = eoObject + "." + displayStringPath.) |
|
<tc:component componentType="CLLabel" > or <tc:CLLabel> |
tc:label |
These attributes are ignored and not converted:
|
|
<tc:component componentType="CLString "> or <tc:CLString> |
tc:out |
All other attributes are ignored and not converted. |
|
<tc:component componentType="CLTextAr ea"> or <tc:CLTextArea> |
tc:note isFieldRequired—required |
These attributes are ignored and not converted:
|
|
<tc:component componentType="CLTextFi eld"> or <tc:CLTextField> |
tc:text isAlwaysEditable—forceEditable |
This conversion will occur only if none of the following attributes are present in the tag:
|
|
<tc:component componentType="CLTextFi eld"> or <tc:CLTextField> |
tc:number The FORMAT attribute is converted; any trailing digit becomes the value of new attribute fractionDigits. These attributes are also converted: isAlwaysEditable—forceEditable |
This conversion will occur only if at least one of the following attributes is present in the tag:
These attributes are ignored and not converted:
|
|
<tc:component componentType="CLCatego ryTable"> |
tc:categorySelect
isAlwaysEditable—forceEditable |
These attributes are ignored and not converted:
|
|
<tc:component componentType="CLImage"> Example: <tc:CLImageHyperlink href="${cjb.hyperlink}" tabIndex="2" imageFileName="customim ages/spacer.gif" imageAltText="spacer" / > |
img Example: <a href="#" onClick="${cjb.hyperlink}" tabIndex="2" ><img src="./ customimages/spacer.gif" alt="spacer" /></a> |
Version 3.x uses conventional HTML syntax for this situation, not a custom tag. |
|
<tc:component componentType="CLHidden Field"> |
input |
Version 3.x uses conventional HTML syntax for this situation, not a custom tag. The name attribute is converted from an EO reference to an applicationEntity reference. |
|
<tc:component componentType="CLHyperl ink"> |
link |
|
|
<tc:component componentType="CLDetail Table"> |
tc:customLookup These attributes are renamed: isAlwaysEditable—forceEditable |
The following attributes are ignored and not automatically converted:
|
|
<tc:component componentType="CLSystem Table"> |
tc:systemLookup These attributes are renamed: isAlwaysEditable—forceEditable |
The following attributes are ignored and not automatically converted:
|
|
<tc:registerBlockAction > |
tc:useClass |
If two useClass tags in the same CJB reference the same class name, that is acceptab |
|
<tc:component componentType="CLObject Field"> |
tc:account (or tc:contact, tc:project, etc.) (3.x) tc:contact, tc:project, tc:user (4.x) The actual tag depends upon the value of attritube EntityName. The 3.x tag name should be the value of that attribute, minus the leading "T" character~. The following attributes are renamed: fieldName—name |
The following attributes are ignored and not automatically converted:allUsers
|
|
<tc:if negate="true" conditional="{cjb.isEdi table}">; |
<tc:if negate="true" test="{cjb.isEditable}"> |
The tag is the same but the attribute name changes. If the conversion tool encounters a "1" or "0" as the value for negate, it will replace those values with "true" and "false" during conversion. |
|
<tc:component componentType="CLIntern alTable"> |
tc:enumeration table—enumeration |
enumeration is both a tag name and an attribute name. For each IID class value of table attribute in 2.x, the corresponding 3.x Enum type is substituted as the value in enumeration attribute. For example, ZNContTypeIID becomes contactType. The following attributes are ignored:identifier
|
This section contains suggested approaches for manual editing of code that could not be handled by the automated conversion tool. Such code will be noted in the log file ManualConversionLog.txt, which is produced during the execution of the automated conversion tool.Custom screen tags that are not automatically converted
|
Tag name |
Remarks |
|---|---|
|
<tc:component |
Each instance of batch display must be manually converted by a TeamConnect professional. |
Manual Conversion Suggestions
JavaScript Conversions
DOM: Form name conversion
The document object model consisted of the following naming conventions:
2.x: document.bodyform.EO__Name__STR and document.forms['bodyform'].EO__Name__STR
3.x: document.forms['mainForm'].EO__Name__STR
which must be renamed to for 4.x and 5.x
document.forms['mainForm'].elements
System fields name conversion
Binding to system fields and usage of system fields in Javascript will require edits. For example,
EO__NumberString__STR
must become
enterpriseEntity.idNumber
Also, you must check for changes in field names in the object model. For example the version 2.x field numberString became idNumber in later versions.
Custom fields name conversion
In 2.x custom field names were formatted as:
EO__Detail_{category}__{fieldType}_{fieldName}__{paramType}
In 4.x these must be formatted as:
command_categories[category]_customFields[fieldName]_value
So in the example below, custom field name
EO__Detail_OPPS__DetailNumbValue_PlAcOCReserveChange__DBL
will become
command_categories[OPPS]_customFields[PlAcOCReserveChange]_value
Access to elements in a form, in Javascript, must be rewritten like this:
document.bodyform.EO__Name__STR.value
becomes
document.forms['mainForm'].elements['applicationEntity.name'].value
i.e. document.bodyform becomes document.forms['mainForm']
Another example:
document.forms['bodyform'].EO__Detail_LITP_OUTC__DetailTextValue_InvAccrual5__STR.value
becomes
document.forms['mainForm'].elements['command_categories[LITP_OUTC]_customFields[InvAccrual5]_value'].value
Common Javascript method conversions
Calls to Javascript methods in TeamConnect 2.x required referencing the "top" frame. However, in TeamConnect 3.x, 4.x, 5.x and 6.x, frames do not exist. Thus, all references to the "top" frame must be removed in calls on Javascript functions and variables.
Translating references to top.submitCommand()/invokePageDetailAction() in Tools
In 2.x and 3.x versions, you might see a reference to the submitCommand(...) and invokePageDetailAction functions, which allowed implementers the ability to call methods with or without parameters in page details, as shown in the following examples:
top.submitCommand('_self', 'anchor', 'PD', 'clickEntityCheck(*STR, *STR)', 'checkName', 'entityValue');
invokePageDetailAction(this, 'anchor', 'clickEntityCheck(*STR, *STR), 'checkName', 'entityValue');
top.submitCommand('_self', 'anchor', 'PD', 'generate()'); invokePageDetailAction(this, 'anchor', 'generate()');
While 3.x CJBs using the invokePageDetailAction continue to work, you can use the invokeToolAction function in any new 4.x and 5.x CJBs.
For example, the following examples execute a 4.x and 5.x tool action:
invokeToolAction('action')
invokeToolAction('actionWithArguments', arg1, arg2)
In addition to executing a 4.x and 5.x tool action, you can also indicate the HTML element for the code to focus on once the page reloads, as shown in the following examples:
invokeToolActionAndAnchor('anchor', 'action')
invokeToolActionAndAnchor('anchor', 'actionWithArguments', arg1, arg2)
Translating references to top.submitCommand()/invokeBlockAction() in CJBs
In 2.x and 3.x versions, you might see a reference to the invokeBlockAction function, as shown in the following examples:
top.submitCommand('_self', 'anchor1', 'PD', 'invokeBlockAction(STR, STR)', 'invokeBlockActionCjb', 'argument');
invokeBlockAction(this, 'anchor1', 'invokeBlockActionCjb', 'argument');
While 3.x CJBs using the invokeBlockAction function continue to work, you can use the invokeCustomAction function in any new 4.x, 5.x, 6.x CJBs.
For example, the following examples execute a 4.x block action:
invokeCustomAction(this, 'cjb', 'action')
invokeCustomAction(this, 'cjb', 'actionWithArguments', arg1, arg2)
In addition to executing a 4.x and 5.x block action, you can also indicate the HTML element for the code to focus on once the page reloads, as shown in the following examples:
invokeCustomActionAndAnchor(this, 'anchor', 'cjb', 'action')
invokeCustomActionAndAnchor(this, 'anchor', 'cjb', 'actionWithArguments', arg1, arg2)
Remove occurrences of top.didChange and top.didChangeText()
All occurrences of top.didChange and top.didChangeText should be removed. In 2.x these are used to enable/disable buttons like Save, or Save & Close. In 3.x and 4.x these are no longer needed.
<tc:newRecordLink..> conversion review
The tc:newRecordLink tag is a 3.x, 4.x, 5.x and 6.x autoconversion of the 2.x Javascript method
openPageWithKeyAndArgs(...).
openPageWithKeyAndArgs in 2.x
For example:
<a onClick="top.openPageWithKeyAndArgs('NEW_PROJECT_WIZARD_OBJECT', '{ wizard = ADVICE; application = ADCO; isFromMatter=1; embeddedObject=RADC; parentKey = 3}');">
New Advice And Counsel
</a>
is converted by the automated conversion tool to newRecordLink tag:
<tc:newRecordLink entityCode="ADCO" entityToLink="${enterpriseEntity}" pageArgs="{ isFromMatter=1; embeddedObject="RADC"; parentKey = 3}" wizardUniqueKey="ADVICE">
New Advice And Counsel
</tc:newRecordLink>
Here is the conversion of attributes from openPageWithKeyAndArgs to tc:newRecordLink:
{ wizard = ADVICE; application = ADCO; isFromMatter=1; embeddedObject=RADC; parentKey = 3}
will become
pageArgs="{ isFromMatter=1; embeddedObject="RADC"; parentKey = 3}"
- application value is used as value for entityCode attribute.
entityCode="ADCO" - wizard value is used as value for wizardUniqueKey attribute.
wizardUniqueKey="ADVICE" - Other arguments become attribute values in pageArgs.
- New attribute entityToLink value should be set to ${enterpriseEntity}
Dynamic content conversion
In certain screens dynamic content is rendered by invocation of methods using tags. The following code dynamically renders a call to openPageWithKeyAndArgs.
<tc:component componentType="WOString" value="${cjb.getWizardHref}" />
where getWizardHref() returns:
<a onClick="top.openPageWithKeyAndArgs('NEW_PROJECT_WIZARD_OBJECT', '{ wizard = ADVICE; application = ADCO; isFromMatter=1; embeddedObject=RADC; parentKey = 3}');">
New Advice And Counsel
</a>
In the previous example, tc:component can rewritten as the tc:newRecordLink tag in 3.x, 4.x and 5.x.
Other Conversions
<CLProjectTitle..> conversion:
There is no equivalent tag for the 2.x <CLProjectTitle..> in 4.x, 5.x, and 6.x. This needs to be manually handled in the screens.
An equivalent title can be displayed by writing a method in the CJB:
public String getProjectTitle(){
return platform.getInternationalizationService().getObjectTitle(project);
}
...and then invoking that method in XML with the tc:out tag, like so:
<tc:out value="${cjb. projectTitle}"/>
Converting ExpressionBuilder References
As a result, you must rewrite these searches to use SearchCriteria. Use the ExpressionBuilderHighlighterTool to analyze customizations for references to the ExpressionBuilder class.
To detect existing references to ExpressionBuilder in your code:
- Open the installation directory of TeamConnect on the application server.
- Navigate to the following folder from the installation directory:
\upgrade\tools\external\ExpressionBuilderHighlighterTool. - Open the
upgrade.propertiesfile. - Update the file to point to the TeamConnect database.
- Run the
analyze.batscript.
The analyze.bat script highlights all references.
Web Folders
TeamConnect includes a WebDAV server to enable management of TeamConnect documents through a compatible WebDAV client application. WebDAV is a standardized protocol for accessing and sharing files over a distributed environment. If you enable it, your users can access the TeamConnect Documents area through WebDAV clients. Mitratech supports two clients: Windows Explorer and the Mac OS WebDAV client. The WebDAV server is certified with the Windows Explorer client.
There is one place where access to the TeamConnect WebDAV server is client-specific. If the system setting "Enable WebDAV" check box is checked, then the Documents tab of any TeamConnect record will include a hyperlink, Open Attachments Folder in Windows Explorer. This same hyperlink will also appear in the Documents area of TeamConnect. Clicking this hyperlink opens a Windows Explorer Web Folder to the current record's (or current user's) documents folder. For this hyperlink to work, a Web Folder must be established on every client machine, pointing to the TeamConnect root documents directory. Any client machines that do not have this Web Folder established are not able to use the hyperlink to access WebDAV (though they may still access the WebDAV server through other clients).
Note: Web Folders are a standard Windows feature; for more information on what Web Folders are and how they connect to servers, refer to the Microsoft Windows help.
The following are the points that you should keep in mind when setting up Web Folders in TeamConnect:
- You can create Web Folders through the Add Network Place wizard. For specific steps and instructions, see the Microsoft Windows documentation.
- The URLs that you need to provide as the locations of the Web Folders are based on your TeamConnect URL:
http://Hostname:port/TeamConnect/login
Where you should make the following replacements:- Hostname:port—with the IP address and port of the machine on which TeamConnect is deployed.
- login—with davroot for the Root folder in the TeamConnect Documents area. So the resulting URL for the Web Folder on each client machine is:
http://Hostname:port/TeamConnect/davroot
If a user needs to access their My Documents area through Web Folders, she should use URL
http://Hostname:port/TeamConnect/davroot/Users/<username>
- Every time users access the Web Folder, they are prompted to enter their TeamConnect username and password.