
Document Settings
WebDAV, which underlies the Web Folders / “Open in Explorer” functionality, is a legacy file-access protocol whose security depends entirely on how it is implemented and configured on the server. By itself, WebDAV does not provide encryption or strong authentication; protection must be added via the surrounding stack (for example, HTTPS/TLS and modern authentication mechanisms). This makes improperly configured WebDAV endpoints more susceptible to certain types of attacks.
In November 2023, Microsoft announced that the WebClient (WebDAV) service is deprecated in Windows 10 and Windows 11, and it will no longer be developed going forward. In alignment with this direction and to help ensure the ongoing security and integrity of the TeamConnect platform, TeamConnect Enterprise (TCE) version 7.0 and later no longer support WebDAV-based integration.
Microsoft’s announcement and current status of the WebClient (WebDAV) service can be found in the Windows client deprecation documentation at Deprecated features for Windows client
To configure the following document settings, navigate to Admin → Admin Settings → Documents → Document Settings:
| Document Settings | Field Names and Descriptions | Screenshot for Reference |
|---|---|---|
| Enable document version control | Enable management of files uploaded to TeamConnect. For example, when one user checks out a file, other users can view that file but cannot upload changes to that file. |  |
| Enable WebDAV | Allows users to manage TeamConnect Documents area files using Internet Explorer. | |
| Maximum size of uploaded file (MB) | Defines the maximum document size that can be uploaded to TeamConnect. The default is 1050 MB and the minimum value allowed is 1 MB. Make sure the value entered exceeds the size of the document you upload into TeamConnect via the Office suite add-in.
Note: The recommended maximum size of a document is 1500 MB. The absolute maximum size of a document is 2000 MB.
|
|
| Enable streaming upload (disable if using DMS) | Controls how files are transmitted to the database during upload. When selected, files that meet or exceed the Minimum Streaming Upload Size threshold are streamed to the database in chunks, reducing memory usage on the application server. When cleared, the entire file is loaded into memory before being written — this is the legacy behavior.
Important: This checkbox must be cleared when a DMS integration is active (e.g., iManage, NetDocuments, OpenText). Enabling streaming bypasses the DMS connector hooks, causing documents to be written to the TeamConnect database instead of being routed to the external DMS.
|
|
| Minimum Streaming Upload Size (MB) | Sets the file-size threshold at which streaming upload is activated. Applies only when Enable Streaming Upload is selected. Files below this value use the standard in-memory method; files at or above it use streaming. For example, if set to 5, a 3 MB file uses the standard method while a 10 MB file uses streaming. A typical starting value is 5–10 MB. | |
| Max Design Artifact Size (MB) | Sets the maximum allowed file size for Document Generator merge templates (e.g., Word documents, letter templates). Prevents excessively large templates from causing high memory consumption or slow performance during document generation. Note: This does not govern general document uploads, Design Import/Export packages, or Design Snapshots. | |
| Document Generator: Auto-Format with Commas | When selected, generated documents created via Document Generator automatically include commas when a filter tag loops through records. When cleared, commas are not added.
Note: This feature was introduced in TeamConnect Enterprise (TCE) 7.1.0 Patch Bundle 7, and is also available in TCE 7.2.0 Patch Bundle 16 and TCE 8.0.
|
A conceptual overview of the settings follows. If you prefer to skip to the procedure for configuring the settings, see Managing Documents below.
Document Version Control
- Enabling Document Version Control provides document version management in TeamConnect. When a document has been updated, a user can check out the existing document, and check in the latest document, resulting in an additional document version.
- If you enable Document Version Control, users who need rights to view different document versions will also need the Document Read rights and Document Version Read rights. Users who need rights to revert to previous document versions will also need the Document Update rights and Document Version Revert rights. For more information, see the Documents section of the appendix, Rights for End-users.
- Important: When Document Version Control is enabled, the TeamConnect database stores all versions of all documents, requiring additional storage space.
- For detail on document versioning and how versions interact with search results, please see Global Search and Version Control.
Network File Systems for Documents (WebDAV)
The WebDAV feature allows users to perform the following from Internet Explorer:
- Upload local files to TeamConnect
- Download TeamConnect files locally
- Copy files to other TeamConnect folders
- Move files to other TeamConnect folders
- The TeamConnect WebDAV feature is certified for Internet Explorer versions 6 and 7.
- If you use the WebDAV feature, you must put a valid URL in the Login URL field of Email Settings. See the Admin Settings, Email Page Field Descriptions table for details.
If the Enable WebDAV setting is enabled, TeamConnect Documents pages will display a Open In Explorer link in the upper right. Clicking this hyperlink opens the current TeamConnect Documents folder in Internet Explorer. You can also refer to 3rd party documentation for using Internet Explorer 6 as a WebDAV client.
The following overview includes prerequisites and steps to use WebDAV for Documents folders:
1. Enable WebDAV from TeamConnect Admin Settings.
2. Send users instructions for setting up Internet Explorer to automatically link to TeamConnect Documents folders. In addition, you must provide the following URLs to users:
- User's Documents folder URL:
http://Hostname:PortNumber/application_name/davroot/Users/user_name- For example:
http://10.7.7.3:8005/teamconnect/davroot/Users/John
- For example:
- TeamConnect Root Documents folder URL:
http://Hostname:PortNumber/application_name/davroot/- For example:
http://10.7.7.3:8005/teamconnect/davroot/
- For example:
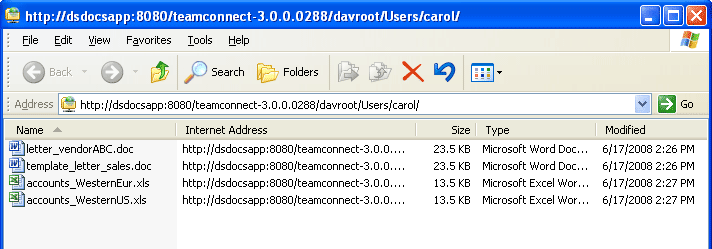
After WebDAV is enabled from TeamConnect and configured from Internet Explorer, a screen like the following becomes available:
Points to Remember
- Internet Explorer only supports WebDAV URLs that are less than 100 characters long. See the following Microsoft Knowledge Base note for more information: http://support.microsoft.com/kb/325355
- TeamConnect includes a WebDAV level 2 server capability.
- TeamConnect supports the WebDAV functionality specified in RFC 2518.
- The WebDAV server uses the same authentication set up for the user in TeamConnect. If single sign-on is not set up, the server requests a username and password; this is the username and password of the TeamConnect user.
- TeamConnect will automatically check out and check in a file when it receives a put (copy) request if the file is not locked by the user or checked out to another user.
- Checking out a file in TeamConnect will not lock the file in Internet Explorer.
- Microsoft refers to WebDAV as Web Folders.
Managing Documents
Use the Admin Settings, Documents page to perform the following tasks:
- Enable document versioning
- Enable WebDAV
- Set the maximum size of documents that can be added to TeamConnect
To set up Documents
- Select the Admin tab.
- Click Admin Settings under the tab bar.
- Click the Documents link in the left pane.
- Edit the fields based on descriptions in the Admin Settings - Documents Page field table.
- Click Update.
Managing Documents
Use the Admin Settings, Documents page to perform the following tasks:
- Enable document versioning
- Enable WebDAV
- Set the maximum size of documents that can be added to TeamConnect
To set up Documents
- Select the Admin tab.
- Click Admin Settings under the tab bar.
- Click the Documents link in the left pane.
- Edit the fields based on descriptions in the Admin Settings - Documents Page field table below.
- Click Update.
Admin Settings - Documents Page Field Descriptions
| Section | Field Names and Descriptions |
|---|---|
|
Document Security Default Settings |
|
|
Document Settings |
|
| DMS Connector |
|