Copying an Entity Record
The Copy Data Wizard facilitates the creation of a new entity record using data from an existing record.
To Run the Copy Data Wizard:
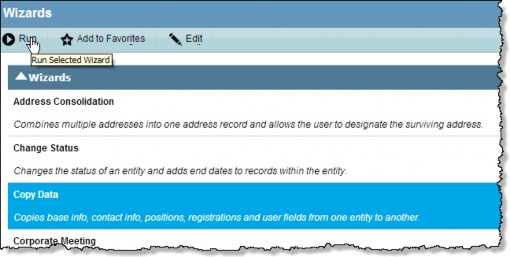
- Open the Wizards module .
- Select the Copy Data Wizard and click
Run.

- On the Copy Data Wizard, click the
button next to the Copy From and Copy To text boxes to locate the entity records.

- Select the appropriate checkbox(es) to indicate the type of data to be copied. The wizard screens that will display are dependent on these choices. The progress bar on the side will reflect the selection(s) made.
- Click
Next to continue.
To Copy Positions:
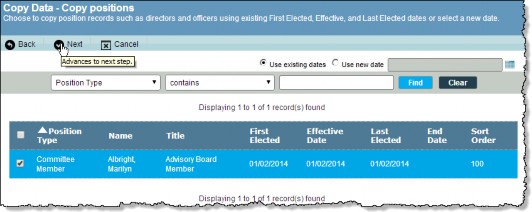
The Copy Positions screen allows you to change the position type when the position records are copied. In other words, you could copy the directors of a for-profit corporation to a not-for-profit corporation and convert the position type to Trustee at the same time. The records will be copied with the same titles; the only thing that will change is the position type.
- Indicate if the existing positions’ record dates are to be used or a new date.
- Select the Use existing dates option button to copy the records exactly as they are from the source entity.
- Select the Use new date option button to activate the As of field and specify a date. All records will be copied with the first elected, effective, and last elected dates substituted with the new date.
Only active records from the source entity will be copied to the destination entity. Active records are those with no end date or an end date that is later than the current system date.

- Select the positions to be copied to the destination entity, or click the checkbox on the heading row to copy all positions.
- Click
Next to continue.
If a record already exists that contains the same name, title, position type, and first elected date as the record being copied, the wizard will not copy that record. If this situation occurs, the final screen of the wizard will show the items that weren’t copied.
To Copy Registration:
The Copy Registrations screen allows you to copy registrations from the source entity to the destination entity.
- Select the Use existing dates option button to copy the record(s) exactly as they are from the source entity. Select the Use new date option button to activate the As of field to specify a date. All records will be copied with the registration date(s) substituted with the new date.
Only active records from the source entity will be copied to the destination entity. Active records are those with no end date or an end date that is later than the current system date.

-
Select the records to be copied to the destination entity.
If a record already exists that contains the same jurisdiction, type, and registration date as the record being copied, the wizard will not copy that record. If this situation occurs, the final screen of the wizard will show the items that weren’t copied.
- Click
Next to continue.
To Copy Other Data:
On the Copy Other Data screen, you can indicate additional data to be copied from the source entity.
- Base information
- Contact information
- Corporate-wide user fields from User Fields tab
- Entity type-specific user fields (not available if the source and destination entity types are not the same)
If data exists in the destination entity, it will be overwritten by data from the source entity. Select the appropriate checkbox(es) and click
Next to complete the data-copying wizard.

To Confirm the Data Copy:
The Confirmation screen lists a summary of the actions to be performed by the wizard. Review this screen carefully and click Finish to update the database and continue to the documents screen, or
Back to return to a previous screen.


