
TeamConnect LegalHold Integration and Setup
Introduction
This guide provides instructions and details on how to fully integrate and configure your TeamConnect instance with the new LegalHold. This includes setting up proper matter security, using the Setup tool to configure the matter screens for your security needs, how to properly create custom groups that have access to both TeamConnect and LegalHold, and other various LegalHold settings with TeamConnect.
Prerequisites
In order to integrate TeamConnect with LegalHold, you must meet the following prerequisites
- Must be on TeamConnect 5.x or higher
- Must be a TeamConnect administrator with rights to the Setup Tool
- Must have an active LegalHold instance
Note: LegalHold does not integrate with TeamConnect Essentials.
LegalHold Settings within TeamConnect
You must establish a connection between TeamConnect and LegalHold before you can adjust any settings within the Setup Tool.
LegalHold Settings within TeamConnect
- Log into TeamConnect with System Administrator credentials.
- Select the Admin tab from the top banner menu, then select Legal Hold Settings.
Integration Settings
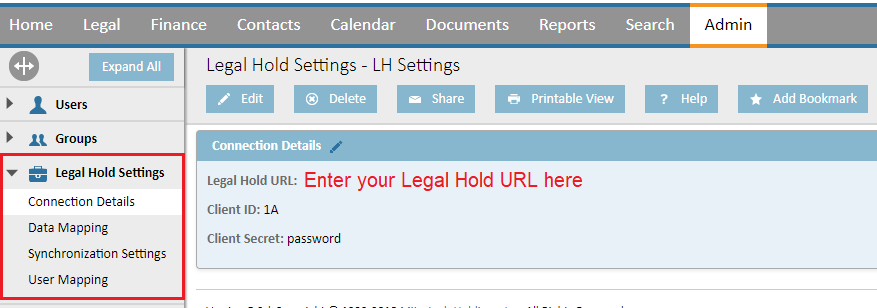
The Connection Details page is used to establish a secure connection between LegalHold and TeamConnect.
To edit these settings:
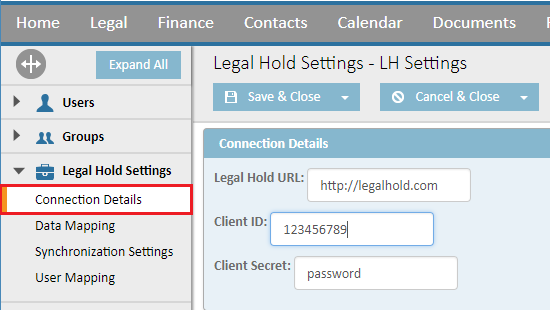
- Select the Connection Details menu option, then click Edit.
- Enter your company's LegalHold URL in the LegalHold URL field.
- Enter the Client ID and the Client Secret (password) then select Save & Close.
- Copy-and-paste your LegalHold URL into the first field.
- Enter a Client ID - this can be anything you want it to be, as long as it is identical on the LegalHold side.
- Enter a Client Secret (password) - this can be anything you want it to be, as long as it is identical on the LegalHold side.
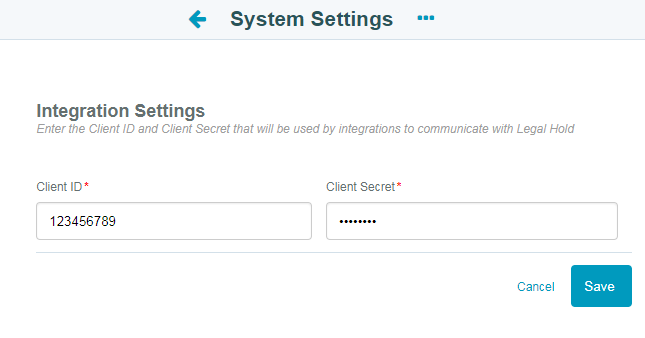
The table below shows the system setting pages from TeamConnect and LegalHold. Note, the Client ID and Client Secret can be any value but the values have to match in both applications.
Note: In the example below the Client Secret is exposed, but in your instance this information will be obfuscated.
| TeamConnect Settings Screen | LegalHold System Settings Screen |
|
|
|
Data Mapping
Standard LegalHold Fields
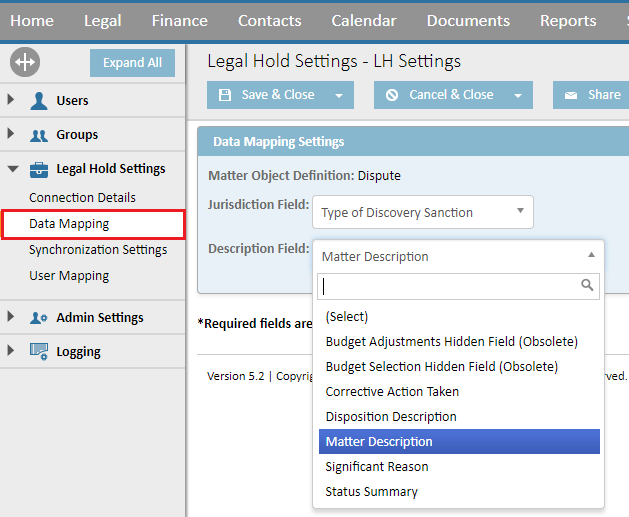
System administrators have the ability to map the information that is synchronized from TeamConnect to LegalHold and vice versa.
To adjust this information, login to TeamConnect as an administrator and navigate to the LegalHold Settings. Use the dropdown menu to change the mapping settings, then select Save & Close.
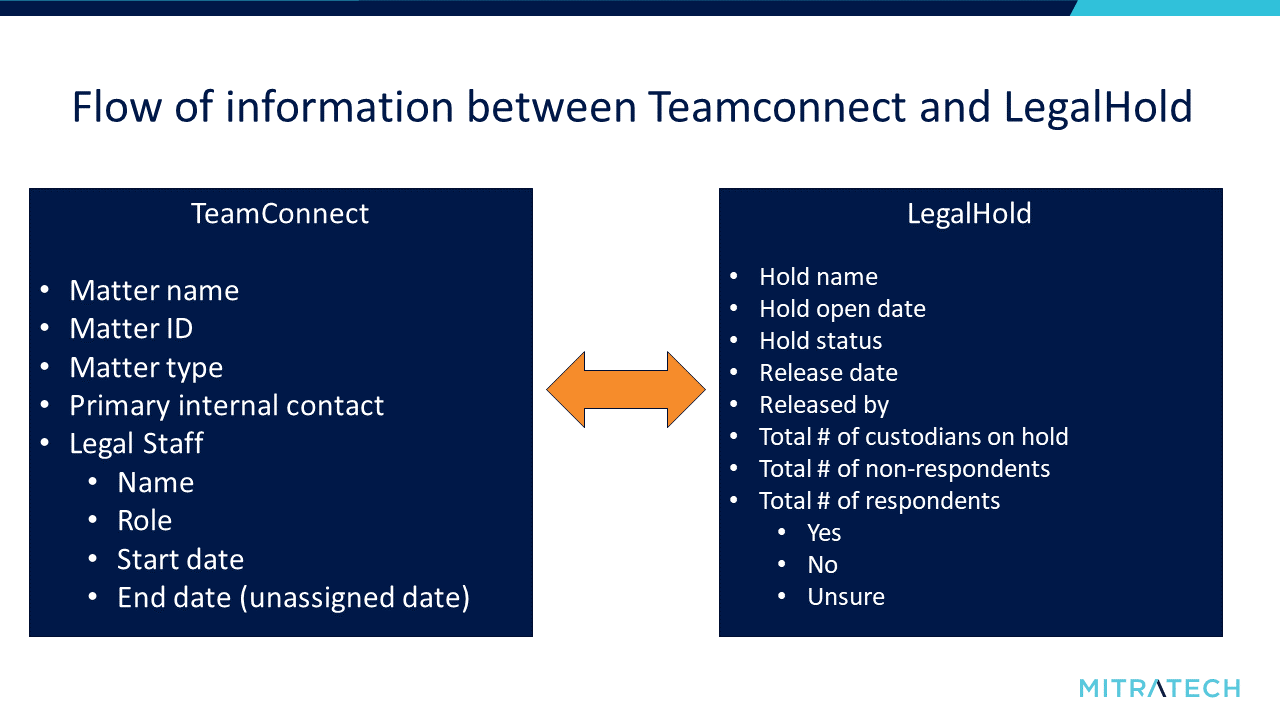
What information is sent between the two systems?
Synchronization Settings
In order to edit the synchronization settings, you must be part of the System Administrator AND LegalHold Administrative Access user groups in TeamConnect. See this article to learn how to give users access to this group.
Edit the Sync Settings
Syncs can be performed manually or configured to run automatically based on the schedule that's set in the Synchronization Settings.
- Log into TeamConnect with System Administrator credentials.
- Select the Admin tab from the top banner menu, then select Legal Hold Settings from the left sidebar menu.
- Select the Synchronization Settings menu option, then select Edit.
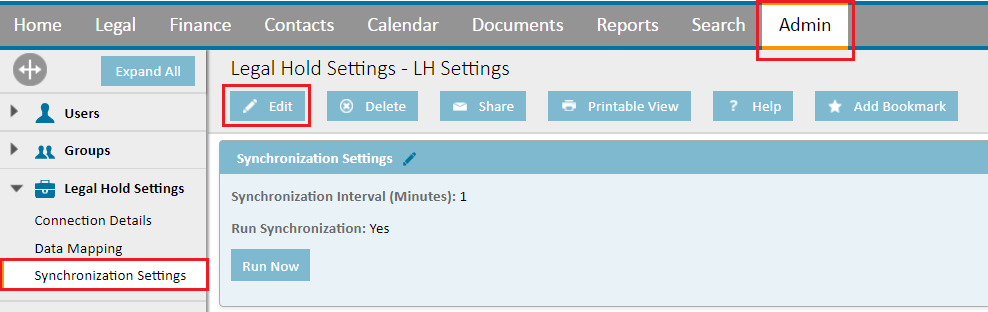
Select the Run Now button to force a synchronization.
Set Up an Automatic Synchronization Schedule
- Follow Steps 1-3 above.
- Use the dropdown menu to set the sync interval schedule (in minutes).
- Check the Run Synchronization checkbox.
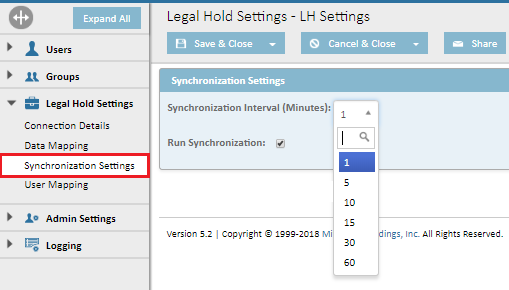
- Select Save & Close.
User Mapping
This setting is used to map TeamConnect users to LegalHold users. Mapping users in this screen is the first step in configuring matter security.
- Select User Mapping from the left sidebar menu.
- Select Edit.
- All users listed in LegalHold appear on the left side of the screen. Find the user you want to map, then use the dropdown to find the corresponding TeamConnect user you want to map to the LegalHold user.
- Select Save.

LegalHold SAML Setup
This section provides links to detailed instructions on how to configure the SAML setup between LegalHold and TeamConnect. The goal of this setup is to enable TeamConnect and LegalHold users to seamlessly navigate from one application to the other. Click here for detailed SAML setup instructions.
Setup Tool Configurations
Within the Setup Tool, you can add the following configurations for LegalHold:
- An "active holds" flag that counts the amount of active holds per matter
- Security tab within matters that allows users to label the matter as public or private, as well as assign users and groups to view private matters
This section covers how to configure these options
Add the Active Holds column to the Legal view
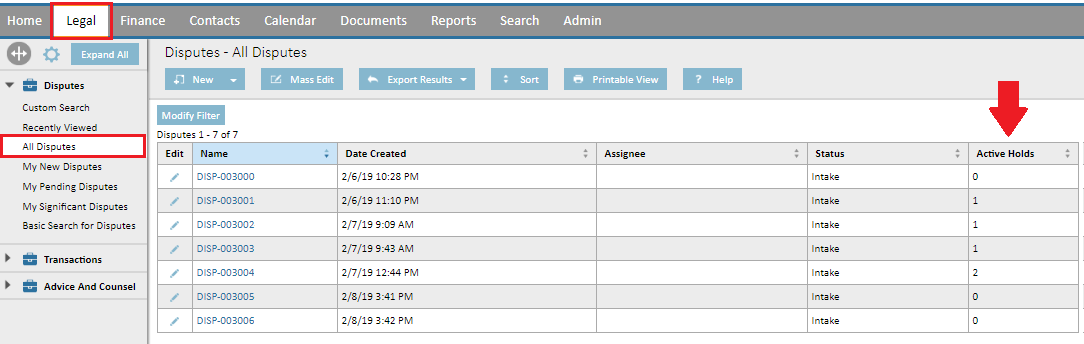
Users can add a column to their All Disputes page that tracks all active holds that are attached to a matter. This column must be added to the application - the instructions below detail how to add it.
The number in the Active Holds column will be updated any time a hold is created, deleted, or updated.
To add the Active Holds column:
In order to add this column, you must be able to log in to TeamConnect as an administrator user that has access to the Setup Tool.
- Go to Setup.
- Select Object Definitions in the Go To drop-down.
- Select the Dispute hyperlink.
- Go to the Search Views tab.
- Select the All Disputes link.

- Go to Results Display tab
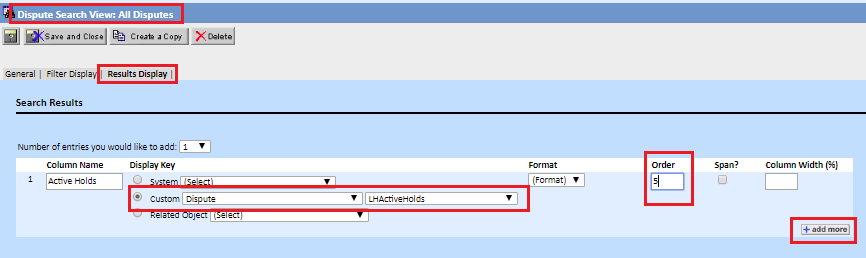
- Type Active Holds in the empty Column Name field.
- Complete the following actions in the Display Key section of the screen:
- Select the Custom option
- Select Dispute in first drop-down
- Select LHActiveHolds in the second drop-down
- Type 5 in the Order field
- Select Add More button
IMPORTANT: If you do not select the Add More button, this rule will not be added to the system. - Select Save & Close at the top of the screen.
- Log out of TeamConnect and log back in. This ensures your changes were committed.
To find this column in TeamConnect, log in and navigate to Legal > All Disputes. The Active Holds column should appear on the far right of the table.
OPTIONAL: Turn the Active Holds Flag On/Off
A rule in TeamConnect automatically counts the number of active holds per matter. This flag is turned ON by default, but when this flag is turned OFF, the table column in TeamConnect will not be updated when a hold is created, deleted or updated.
The instructions below simply detail how to turn this flag on/off, but it is suggested that you keep this flag turned ON.
In order to edit this flag, you must be able to log in to TeamConnect as an administrator user that has access to the Setup Tool.
- Go to Setup.
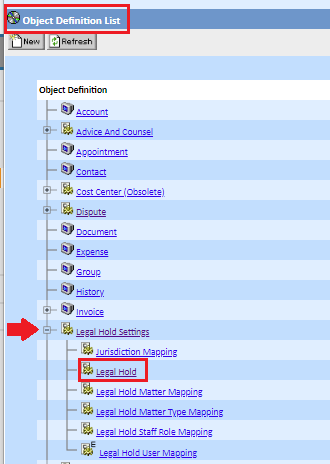
- Select Object Definitions in the Go To drop-down.
- Expand Legal Hold Settings object, then select Legal Hold.
- Go to Rules tab and observe that the Active? column says Yes.
- To turn this flag off, click the Rule hyperlink then un-select the This Rule is Active checkbox.
- If any changes were made in Setup, select Save & Close then log out of TeamConnect and log back in. This ensures your changes were committed.
Add Security Tab to left menu within Disputes screen
Similar to the Active Holds column, the matter Security tab and screen must be added to the TeamConnect UI. This tab controls if the matter is listed as public or private and allows users to give specific Read, Update, Delete, Perm rights to specific users and groups. Click here to see the end-user instructions on configuring matter security with LegalHold.
Users that manage matter security can grant/deny individual or group access to the matter BUT they must also grant user access in the User Mapping screen. If users are not set up in the User Mapping screen, they will not be able to view public or private matters and associated holds.
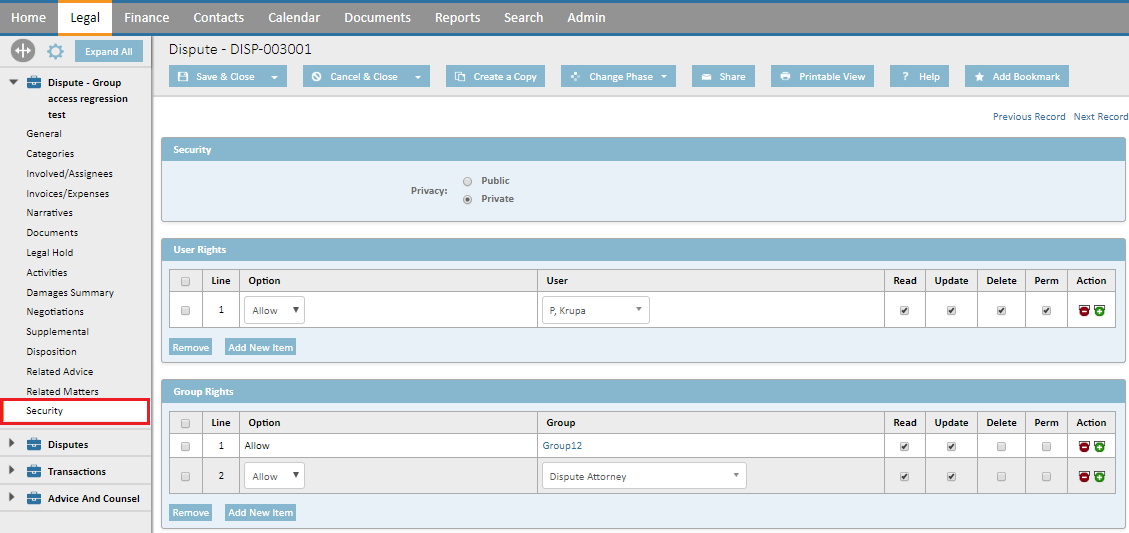
Note: At least one of the "Read / Update / Delete / Perm" checkboxes must be selected in order for users to see private matters or holds in LegalHold. Click here to see detailed information on this process.
Add the Security screen to the Dispute menu:
- Go to Setup.
- Select Object Definitions in the Go To drop-down menu.
- Select Dispute.
- Select Object Views from the tabs at the top, the select the DisputeMatter link.
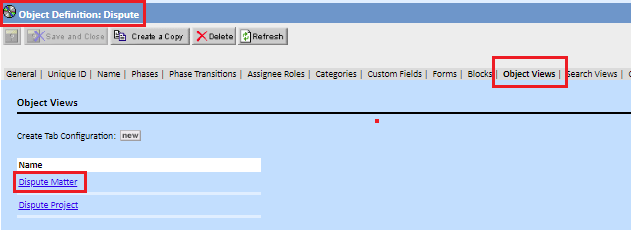
- Type Security in the Tab Name field, and click Add.
This physically creates the Security tab in the Disputes menu. The following instructions detail how to add the "Public/Private", User Rights, and Group Rights sections to the Security screen. - Click the new Security tab at the far right side of the screen.
- In the Add the block drop-down, select Security from dropdown menu then select Add (this creates the Security block where users can set a matter to public/private).
- In the Add the block drop-down, select User Rights from dropdown menu then select Add (this creates the User Rights block where users can gain view access to a matter).
- In the Add the block drop-down, select Group Rights from dropdown menu then select Add (this creates the Group Rights block where groups can gain access to a matter).

- Select Save & Close then log out of TeamConnect and log back in. This ensures your changes were committed.
If Custom Groups are created for this Security tab, they will need to be given View Rights and additional permission in order to access private matters. See the section below for further detail.
Custom Group Permissions
If Custom Groups are created for this Security tab, they will need to be given View Rights and additional permission in order to access private matters. TeamConnect Legal module has an out-of-the-box security group called Dispute Attorney, but TC users can create their own custom groups for to meet their business purposes. If LegalHold users are added to a custom group in TeamConnect, they must be given permissions to view and access private matters.
For Custom Groups:
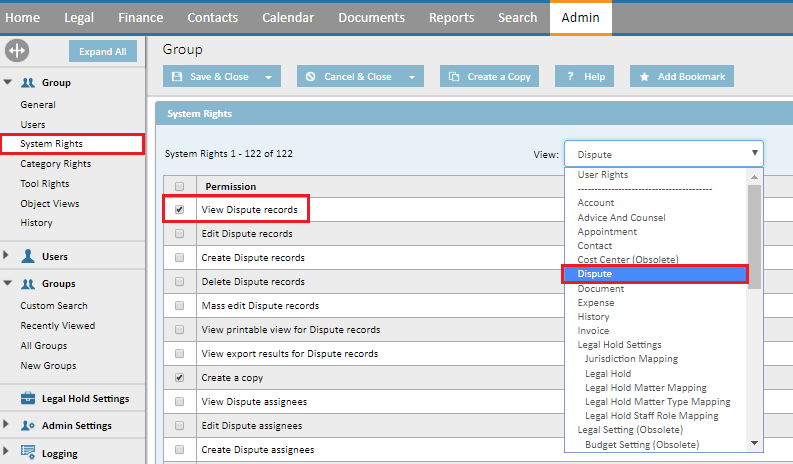
When Legal module is installed, a default group called Dispute Attorney exists. In order to add a specific group to LegalHold, the group has to be created and given View rights. Legal Hold Groups need to have View Dispute Records. This permission gives them access to view all public disputes — to view private disputes they have to be added at the matter level.
- Navigate to Admin and select Groups.
- Select a group from the table.
- Select System Rights from the left sidebar menu.
- In the View dropdown menu, select Dispute.
- Select the View Dispute Records rule.
- Select Save & Close.
See this page for more information on configuring Custom LegalHold Groups in TeamConnect.