User Permissions and Custom Groups
Ensure All the Correct Permissions Are Set Up
In order for LegalHold and TeamConnect users to navigate between the two applications and view or edit matters and holds, their security permissions must be set up correctly in TeamConnect. Follow each set of instructions on this page to ensure users can seamlessly manage private matters and holds. Setting up user and group permissions is easiest if you do it in this order:
- Configure the User Mapping in TeamConnect's LegalHold settings.
- Create custom groups of LegalHold users and enable them to view Dispute Records. Creating custom groups allows administrators to quickly add a set of users to a private hold.
- Add individual users to a private matter at the matter level.
User Mapping
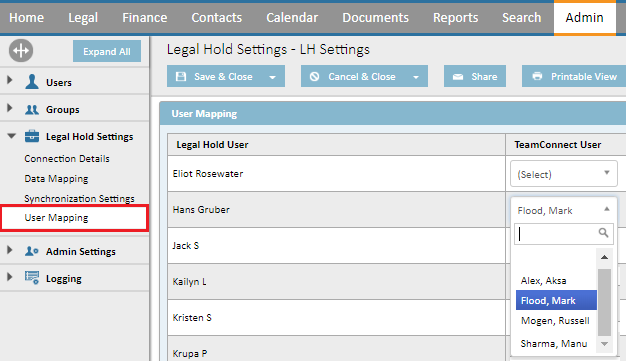
This setting is used to map LegalHold users to TeamConnect users. Mapping users in this screen is the first step in configuring matter security. When a LegalHold user is connected (mapped) to a TeamConnect user, the LegalHold user will have permissions to view holds attached to private matters in which the TeamConnect user is listed as the primary assignee.
User mapping is mandatory for ALL users that need to use TeamConnect.
You must have administrator access in TeamConnect in order to edit these settings.
- Log in to TeamConnect and navigate to Admin and expand LegalHold Settings from the left menu.
- Select User Mapping from the left sidebar menu.
- Select Edit.
- All users listed in LegalHold appear on the left side of the screen. Find the user you want to map, then use the dropdown to find the corresponding TeamConnect user you want to map to the LegalHold user.
- Select Save.

Note: Mapping is a 1:1 process. If a LegalHold user is mapped to a TeamConnect user, the LegalHold user cannot be mapped to a different TeamConnect user.
Give Users View Rights for Disputes
The user groups that come with TeamConnect's Legal module will automatically have View Rights for disputes (ex: dispute attorney). However custom groups need to be given access to view dispute records in TeamConnect and LegalHold. You must have permission to create groups in TeamConnect to complete this process.
- Log into TeamConnect and navigate to Admin > Groups and click New.
- In the General tab, give the group a name and fill in the other required fields.
- In the Users tab, add all of the respective users to the group.
- In the System Rights tab, select Dispute from the View dropdown menu then check the View Dispute Records checkbox.
This permissions gives users in this group access to view all public disputes; they must be added at the matter level to view private disputes.

The next set of instructions details how to add users and groups at the matter level.
Adding Matter Security, User Rights, and Group Rights
The instructions below detail how to configure user and group security at the matter level. In order to complete this process, ensure the Security tab has been set up in your TeamConnect environment. If this has not been set up, contact your system administrator.
To begin, open a matter/dispute and navigate to the Security tab and select edit. If you do not have the Security tab set up, see these instructions.

Note: These permissions cannot take effect until the users have been mapped. See the User Mapping section of this topic and ensure this step has been completed.
User Rights
Depending on your company's configuration, you may not have both Group Rights and User Rights sections of the screen.
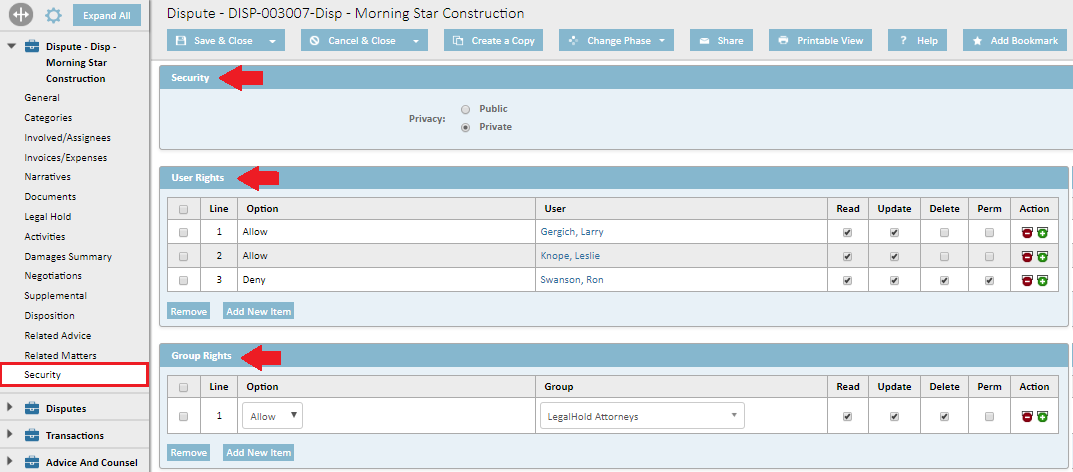
In the User Rights section of the screen, administrators can add individual users you want to give access to this matter. The Matter Assignee and matter creator will automatically be populated in this section of the screen.
You can grant individual users access to view a dispute record via this screen OR by adding them to a custom group (preferred). The instructions below detail how to grant an individual user access to a dispute record in TeamConnect and LegalHold.
- Log in to TeamConnect, navigate to any matter or dispute, select the Security tab from the left menu, then select Edit.
- In the User Rights section of the screen:
- Select a user from the dropdown menu.
- Select if you'd like to Allow or Deny this group access to dispute records.
If a user or group is denied rights in this screen (as seen in the User Rights section of the image) he/she will not be able to see a hold or matter in LegalHold. - Select at least one of the checkboxes in the far right of the screen.
At least one checkbox in the "Read / Update / Delete / Perm" section must be checked, otherwise users will not be able to see holds.
- Select Save & Close.
Users must be set up in User Mapping before they can view dispute records in LegalHold and TeamConnect.
Group Rights
Depending on your company's configuration, you may not have both Group Rights and User Rights sections of the screen.
In the Group Rights section of the screen, administrators can add custom groups you want to give access to this matter. TeamConnect's Legal module comes equipped with predetermined groups that have access to view matters (ex: dispute attorney), but any custom groups will need to be given access to view public or private dispute records.
Only system administrators can give custom groups access to view dispute records.
- Log in to TeamConnect and create a new group of users.
Important: Ensure all users in this group have been set up in the User Mapping setting. If users are not mapped between TeamConnect and LegalHold, they will not be able to see matters or holds in either application. - Navigate to any matter or dispute and select the Security tab from the left menu, then click Edit.
- In the Group Rights section of the screen:
- Select the group you just created.
- Select if you'd like to Allow or Deny this group access to dispute records.
If a user or group is denied rights in this screen (as seen in the User Rights section of the image) they will not be able to see a hold or matter in LegalHold. - Select at least one of the checkboxes in the far right of the screen.
At least one checkbox in the "Read / Update / Delete / Perm" section must be checked, otherwise users will not be able to see holds.
- Select Save & Close.
Who Can See Holds Attached to a Private Matter?
The table below offers a different perspective concerning who can see holds that are attached to a private matter.
Note: Matter assignees and matter creator will be populated automaticallyin the User Rights block (in security tab).
- Assume "Matter Creator" and "Assignee" both are different users
- Assume "Other User" is neither "Assignee" nor "Matter Creator"
| User | Add under "User Rights" block of Matter Security tab | Is Mapping Required? | Access via |
|---|---|---|---|
| 1. Matter Creator | No | Yes | Managed Holds links / Report links / URL |
| 2. Assignee | No (assignee automatically added under "User Rights" block) |
Yes | Managed Holds links / Report links / URL |
| 3. Other User | Yes (manually add that user into "User Rights" block) |
Yes | Managed Holds links / Report links / URL |
Note: Hold recipients always see holds attached with private matter via My Holds links irrespective of matter access status.

