
VendorInsight - TAP Integration Guide
VendorInsight - TAP Integration Guide
Introduction
Through integration with TAP, clients now enjoy the capability to connect with any workflow within the TAP platform. TAP, a no-code automation software, efficiently transforms high-volume workloads into well-organized workflows. The integration between TAP and VendorInsight (VI) ensures a smooth experience for users subscribed to TAP, allowing them to link TAP workflows with VI and tailor the exchange of data points between the two platforms.
With this latest update, users can fulfill PCM requirements directly through TAP workflows, eliminating the need to log in to TAP to initiate a workflow. Instead, these workflows can now be triggered directly from VI itself, facilitating document transmission.
TAP Authentication
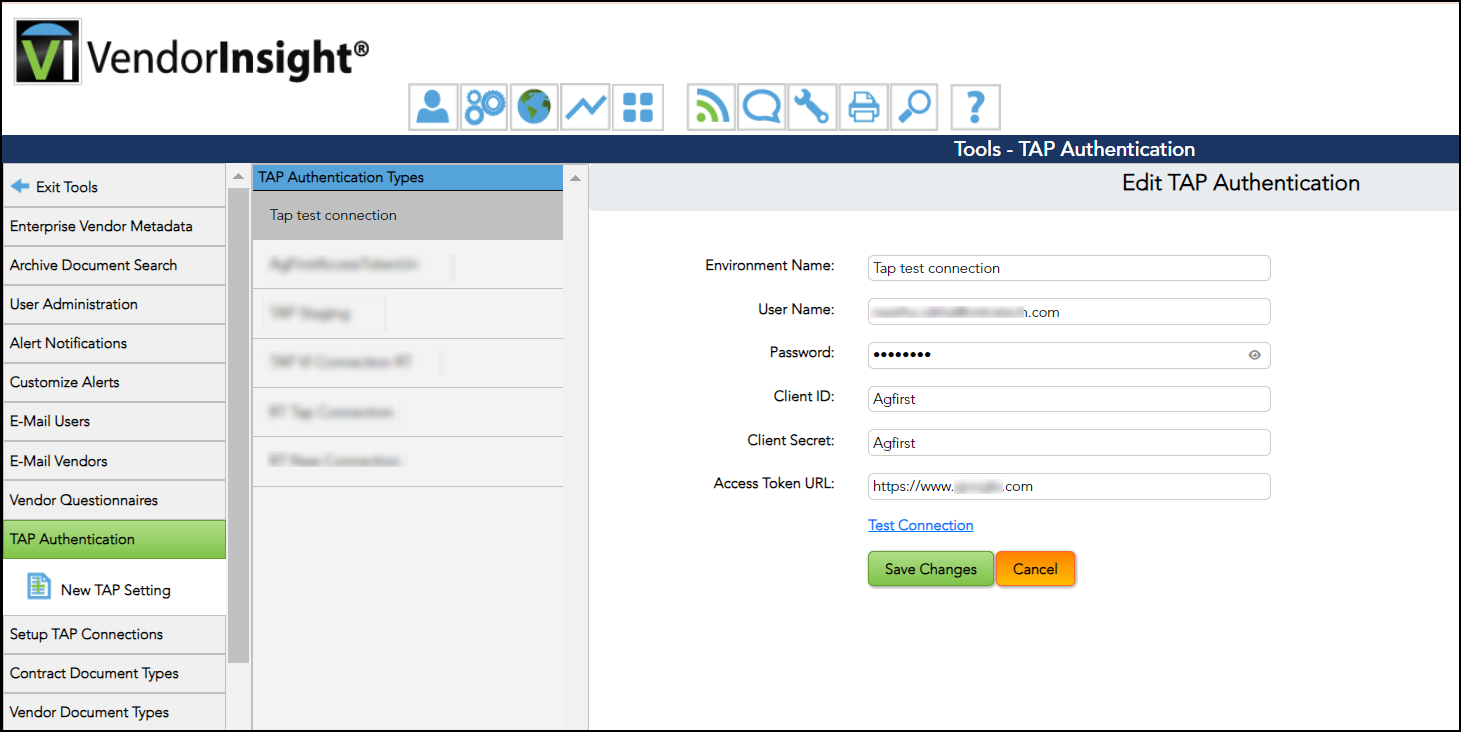
The TAP Authentication screen serves as an interface for configuring the settings required to get an authentication token for accessing the TAP workflow. Users have the ability to save different sets of authentication settings tailored to different environment types, such as Beta, Sandbox, and Production. The Authentication screen can be found in the Tools section, labeled as TAP Authentication.
Note: Only “Admins with Vendor Management Officer (VMO)” roles and “VMOs” have access to the Authentication screen.
To establish a connection between VI and TAP, follow the instructions below:
- Enable TAP integration in the VI back office.
.png?revision=1&size=bestfit&height=545)
- Setup TAP Authorization
- Select TAP Authentication from the Tools menu.
- A new tab is included, titled New TAP Setting.

Note: This will be enabled under tools only when it is enabled in the back office.
The below table details the list of fields available on the TAP Authentication screen needed to establish a connection between VI and TAP successfully. This setup only needs to be done once per user in the company, granting access to the workflow link for all users. These fields match TAP requirements, and users can obtain this information from TAP:
| Field Type | Field Type | Description |
| Environment Name | Mandatory | Enter the name of the environment. |
| User Name | Mandatory | Enter the TAP-associated email ID. |
| Password | Mandatory | Enter the TAP-associated password. |
| Client ID | Mandatory | Enter the name of the client ID. |
| Client Secret | Mandatory | Enter the secret of the client. |
| Access Token URL | Mandatory | Enter the URL to get the access token. |
| Test Connection | Mandatory | Use this option to check the connection link. |
Note: Users are allowed to make changes to the TAP Authentication Types.
- Create Workflow in TAP.
- This step needs to be performed in TAP. Please refer https://success.mitratech.com/TAP
TAP Authentication Types
Users can select from available authentication types by tapping on them and can edit connections by clicking on existing links. To edit any connections, click on the existing link.
This allows users to adjust connections based on their preferences.
Setup TAP Connections
A new tab labeled "Setup TAP Connections" is added under the "Tools" section. This page provides the following information:
- VI admins can establish a new integrated workflow.
- Specify the data to be updated, along with its location.
- Additionally, VI admins can modify and maintain existing integrated workflows.
- They can also enable or disable a specific integrated workflow.
- The Setup TAP Connections page will provide a list of all connections previously created.
These connections will be presented in a table format, featuring the following data:

| Option | Description |
| Search box | Allows users to search for workflows. |
| Add Connection | Facilitates the addition of new TAP connections. |
| Workflow Name | Identifies the name of the workflow. |
| Data Direction | Specifies the direction of the workflow (Inbound, Outbound, or Both). If data fields/document mapping are configured in both TAP to VI and VI to TAP, the data direction will be labeled as "Both" on the list screen. |
| Created Date | Indicates the date when the workflow was created. |
| Created By | Displays the name of the user who initiated the workflow. |
| Status |
Provides information about the current status of the workflow.
|


The following details will be displayed:
- Workflow Name (mandatory): Identifies the name of each integrated workflow being connected.
- Tap Environment Type (mandatory): Specifies the type of Environment from a list.
- Workflow ID (mandatory): Associates each integrated workflow with a single TAP workflow connected to one or more VI data points.
- Dataflow Direction (at least one must be specified): There are two available directions:
- VendorInsight to TAP (Outbound)
- TAP to VendorInsight (Inbound)
- For any TAP to VI integration to work, it should also have VI to TAP configured in the same connection for the PCM reference link event.
- The user will receive the authentication key from the back office when enabling the TAP integration for a company.
- Depending on the selection, the options will change accordingly.
- The following fields will be displayed when " VendorInsight to TAP" is selected in the Dataflow Direction:

- Trigger Event (mandatory): Users can select from a predefined list of available events within each system. Currently, we are only supporting PCM reference links.
- Event Type: The “Start TAP workflow” option is accessible for the PCM reference link.
- Data Field Mapping: Users will choose a VendorInsight field from a drop-down menu and specify the corresponding TAP field by entering its ID. Additional rows can be added as needed. The following VendorInsight fields can be selected from the drop-down menu.
- Workflow Request Id
- Vendor name
- Contract name
- Description
- Owner
- Affiliate
- Vendor Contact
- Contact E-Mail
- Requestor Email
- Business/Technical Systems Owner
- The following fields will be displayed when "TAP to VendorInsight" is selected in the Dataflow Direction:

- Data Field Mapping:
- TAP
- VendorInsight - The following option will be displayed in the drop-down menu:
- Start date
- End date
- PO Number
- Field Type (mandatory) - The following field type options will be displayed in the drop-down menu:
- Date
- Number
- String
- Document Field Mapping:
- TAP
- VendorInsight
- Document Type - Users will identify the document source and destination and define document types for validation purposes to ensure the receipt of valid document types. The following document types are available options and are mandatory:
- .xls
- .xlsx
- .doc
- .docx
- Validation: After setting everything up, validation messages will be displayed in case of any upon the user clicking the "Save" button. Also, users must pick at least one direction for the data flow.
- Save: In the end, the user will save their edits, a confirmation message will be displayed. Click OK to store or create the connections.

Error Messages
The following error messages will be shown depending on the scenarios.
| Error Message | Scenario/Action needed |
| "[Field name] is missing. Please enter a value to continue" | Mandatory field missing |
| "To create a connection, you must define at least one flow (VendorInsight to TAP or TAP to VendorInsight)" | No data entered for VendorInsight to TAP or TAP to VendorInsight |
| “Another mapping has same selection, please remove the duplicate selection” | The same VendorInsight field value is specified for both directions |
Due Diligence Requirements
This page will allow VMOs to set up subject matter experts and default file request instructions for each of your organization's due diligence requirements.
Three new fields have been included for each requirement: one is a drop-down menu, and the other two are text fields:
- PCM TAP Connection: Refers to the connections available under Setup TAP Connections, identified by their Workflow Name.
- TAP URL Custom Display Name: Represents the custom name for the TAP URL.
- PCM TAP Workflow Instructions: Refers to the instructions provided for the TAP workflow.

Note: The client must enable TAP integration from the back office.
- Users establish connections between their TAP fields and VI contract fields for updates.
- Documents uploaded in TAP can be transferred to the PCM in VI, where the workflow starts, meeting the requirement.
- The system handles many-to-many workflows effectively.
- The configuration of different TAP workflows for various clients requires updates to support many-to-many options.
Follow these steps to locate the "PCM TAP Workflow" link:
- Click “Oversight & Policy Compliance”.
- Select the requirement for which we have configured the TAP link, whether it is satisfied or unsatisfied, and then click on the vendor.

- Clicking PCM automatically redirects to the Policy Requirements Status page.
- Select the highlighted PCM TAP Workflow link to start the workflow.
- The following pop-up will be displayed once the workflow has been successfully initiated. Click “OK” to receive the email from the TAP.

- The following pop-up will be displayed if the workflow details are not configured correctly.

- The following pop-up will be displayed once the workflow has been successfully initiated. Click “OK” to receive the email from the TAP.