This page provides instructions for generating a “Users vs Object Permissions” audit report, enabling precise sorting of users and objects, managing report progress, and downloading the final report for in-depth permissions analysis.
This enhancement provides a user to generate reports more precisely when they want to sort their “User” and “Objects” from the interactive grids and to check the latest report status block and download the generated report.
The user can follow the instructions below on how to generate “Users vs Object permissions” audit report.
| Instructions |
Screenshot for reference |
- Login to TeamConnect.
- Select the "Security Rights Audit" option from the "All" menu in the Top Navigation bar.
|
 |
- Click on Users vs Object permissions hyperlink.
Note: Users can go back to the previous page incase if some groups are missed to select by using the Back button. Also, users can cancel anytime in this stage by clicking on the Cancel button.
|
 |
|
Note: Time taken to generate the report depends upon the number of users selected.
- Click on the “Selected users” radio button. The interactive grid will be loaded and displayed once the user clicks on the “selection” radio button only.
Note: The user has to wait until the interactive grid loads with the data depending on the number of “Users” & “Objects”.
Important: Using the select all or deselect all buttons may have some lag time when selecting or deselecting all users as it depends on the number of users in the grid. A high number of users, for example, 5000 users could result in a 1-3 seconds delay in selecting all. These numbers are subjective to the configuration of the TeamConnect instance such as heap size + no. of concurrent users using the system, etc. For more information, please visit Application and Web Servers - Mitratech Success Center
|
 |
|
Note:
- A warning message is displayed as "Depending on number of users in your System, Page might take longer to load and process."
- With the “Select all” option, users will be able to select all results in the Interactive Grids and with “Deselect all” option, user will be able to deselect all results in the Interactive Grids across all pages instead of having to navigate to each individual page in the result set to select.
|


|
- Users will have the option to select “Active” or “Inactive” or “Both”.
- The user can have All, Limited Privilege, Normal and Super Options under “User Type” Column.
- Select the required groups through the checkbox.
Note: If the user does not select any users and clicks the Next button, an error is displayed as, “No user is selected. Kindly choose at least one user to proceed.”
|
 |
- To select all users, select the “All users” radio button.
|
 |
- Now, click the “Next” button to open the “Select Object(s)” window.
|
 |
- Similarly, under the “Select Object(s)” window, the users can run reports for “All objects” or “Selected objects”.
Note:
- No interactive grid will be loaded with the object details if “INCLUDED OBJECTS” is selected.
- This option will select only those objects where the users are actually included or have access to (it can be any level of permission to the object).
- If a user does not have access to an object, they will not be included in the generated report.
- If an object does not have any users with permissions to it, the report will not be generated for that object.
- For the “SELECTED OBJECTS” option, select the required objects through the checkbox.
|
 |
- To select all objects, select the “All objects” radio button.
|
 |
- Click the “Next” button to open the “Generate Report” window and click the “Finish” button.
Note: Depending on the report type and the amount of data being exported, it could take minutes or hours to generate the report.”
|
 |
- Once the “Finish” button is clicked, a warning message is displayed saying, “Users vs Object Permission report generation is in progress”.
Note:
|


|
|
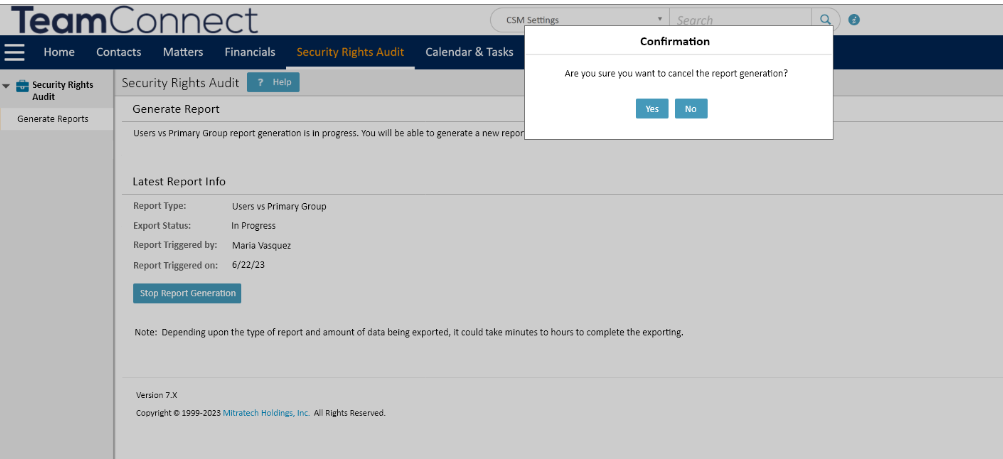
Important: To stop the generation of reports, click on the “Stop Report Generation” button.
- A Confirmation modal pop-up will be opened with the options of "Yes" and "No".
- Click on the Yes button in the confirmation modal pop-up.
- The on-going report generation process will be canceled and a notification will be displayed stating : "Report generation has been canceled. Please check the logs for more information".
- The Export Status field from Latest Report info will display the status as: "Canceled. Please check the logs for more information".
|

|
- Now, from the global navigation bar, navigate to Document > Top Level > Security Rights Audit Reports to find the generated report.
|
 |
- Click on the hyperlink of the report to download in ZIP format to your local system.
|
 |
- Once downloaded, extract the zip file, and a list of CSV files will be displayed based on the number of objects selected including parent-child objects.
-
You will find the below content in the CSV file:
- The Report will have side by side comparison of access rights for groups across objects.
- Cells will be highlighted with an “X” mark if the group has that right.
- The report will clearly identify objects that have rights across which groups access, and what type of CRUD permissions they have (for example: read, write, etc).
- The report will also have a column for All rights.
- Similarly, you can generate reports on read and write access only to groups and various objects like: Account, Documents, Expense, Appointment, Contact, History, Invoice, Task, custom object.
|
 |
