
TeamConnect/TAP Admin Guide: Ver1.1
TAP Admin User
The users of the TAP Admin group perform administrative actions such as creating and editing TAP Instance records and TAP Workflow Action records. End users who perform TAP-related actions are part of the TAP User group.
TAP Instance
A TAP Instance record holds the connection information required to make API requests. Multiple TAP Instance records may be created/edited, each containing the connection information for a different TAP instance.
Creating a TAP Instance
- Go to ALL >> TAP Settings. The system displays both TAP Instances and TAP Workflow Actions grids.

- The TAP Instances grid consists of the following:
- TAP Instance – Displays the given TAP Instance name.
- TAP URL – Displays TAP Instance API URL.
- Created By - Displays the name of the Admin User who created the TAP Instance in the system.
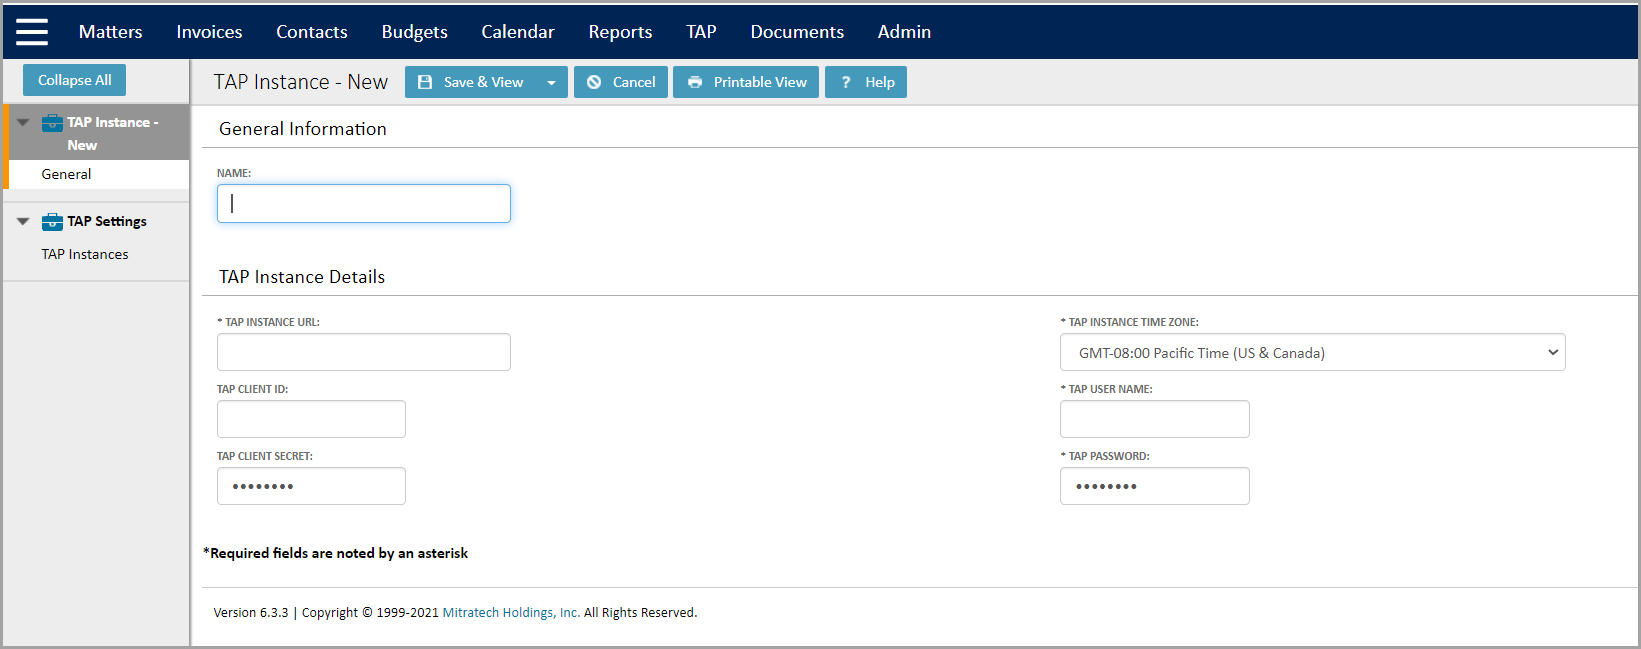
- Click New under TAP Instances. The system displays TAP Instance >> New window.
-
Under General Information, enter a name for the TAP Instance.
-
Under TAP Instance Details, complete the following TAP Instance Details fields
- TAP Instance URL: Enter the TAP Instance API URL.
- TAP Instance Time Zone: Select the hosted TAP Instance Time Zone from the drop-down list.
- TAP Client ID: Enter the Client ID.
- TAP User Name: Enter the username.
- TAP Client Secret: Enter the TAP Client Secret.
- TAP Password: Enter the password for TAP User.
-
Click Save & Close.
-
A new TAP Instance is created and displayed in the TAP Instances grid.
Editing a TAP Instance
- Click the existing TAP Instance hyperlink and modify the required fields.
- Click Save & Close. The system displays the updated TAP Instance details in the grid.
Validating the TAP Instance
- Click the TAP Instance hyperlink.
- Click Test Connection.

- If a proper connection from TeamConnect to TAP is established using the provided credentials, the system displays a confirmation message, Connection was successfully established.
- If the connection is not established, the system displays an error message, Unable to test connection. Could not authenticate to TAP instance.
TAP Workflow Action
A TAP Workflow Action record defines the template for a workflow operation.
TAP Implementation
The following configurations are required to use the Teamconnect/TAP integration in TAP:
- The template initiated from TeamConnect must have a TeamConnect Records field with object type TAP Workflow. A TAP Workflow Action (TAC$) record in TeamConnect references the TAP field via custom field TAC$.workflowJobElementName.
- When a workflow is Initiated, TC sends the ID of the newly created TAP Workflow (TWO$) record.
- When a workflow Initiated in TAP from TeamConnect, TAP updates the TAP Workflow (TWO$) record in TeamConnect by sending the workflow name to the newly created workflow in the custom field TWO$.tapWorkflowName.
Creating a Workflow with the TeamConnect Integration
Creating a workflow with the TeamConnect Integration on TAP Application.
Create a new TAP Workflow Action
- Go to ALL >> TAP Settings. The system displays both TAP Instances and TAP Workflow Actions grids.
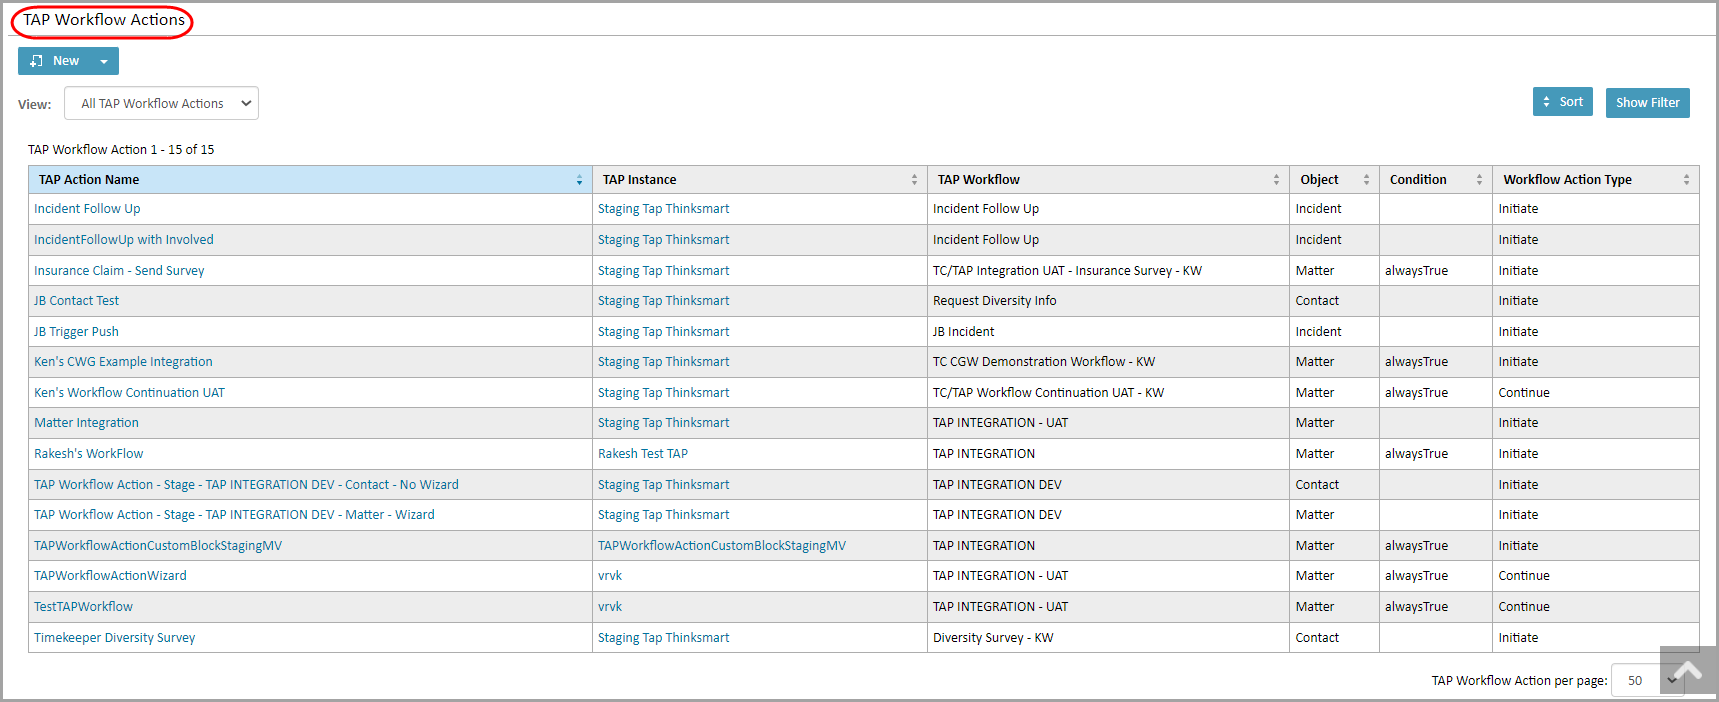
- Under the TAP Workflow Action grid, enter the following fields:
- TAP Action Name – Displays entered action name, linked to the action view page
- TAP Instance – Displays the TAP Instance name.
- TAP Workflow – Displays the name of the selected TAP workflow template that are defined in TAP.
- Object - Displays the TeamConnect Objects to which this workflow action applies.
- Condition – Displays the name of the condition of the object only when it meets the condition. Displays the teamConnect objects records when the condition is true.
- Workflow Action Type – Displays the Workflow Action Type (Initiate and Continue).
-
Click New under TAP Workflow Action. The system displays TAP Workflow Action - New.
-
Complete the following fields.
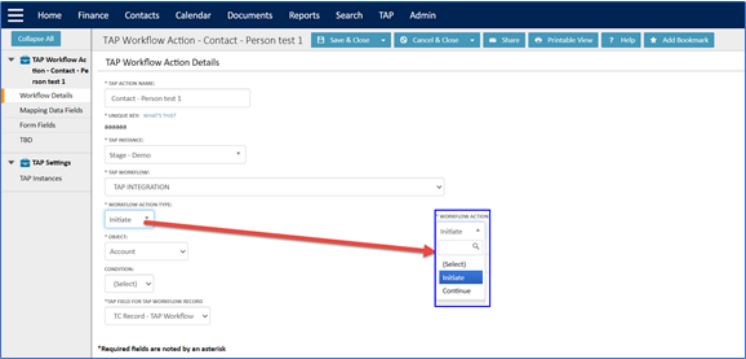
- TAP Action Name: Enter a name for the TAP Action.
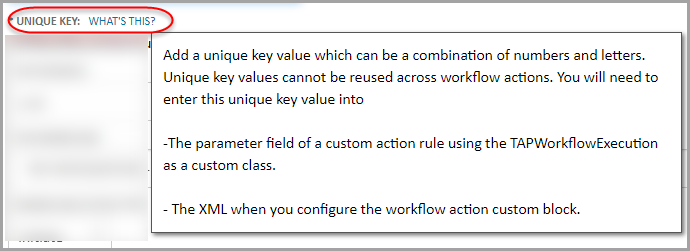
- Unique Key: Enter alphanumeric value as the unique key. Click What’s this? for more information on Unique Key.
- TAP Instance: Select the TAP Instance record from the drop-down.
- TAP Workflow: Select the TAP workflow template from the drop-down that is associated with the selected TAP Instance.
- Workflow Action Type: Select the Workflow Action Type (Initiate and Continue) from the drop-down.
-
Initiate: The Initiate operation starts a workflow in TAP to gather and pre-populate data into the workflow form.
-
Continue: Moves an existing workflow from its current step to the next step and sends the data to TAP for the workflow to continue.
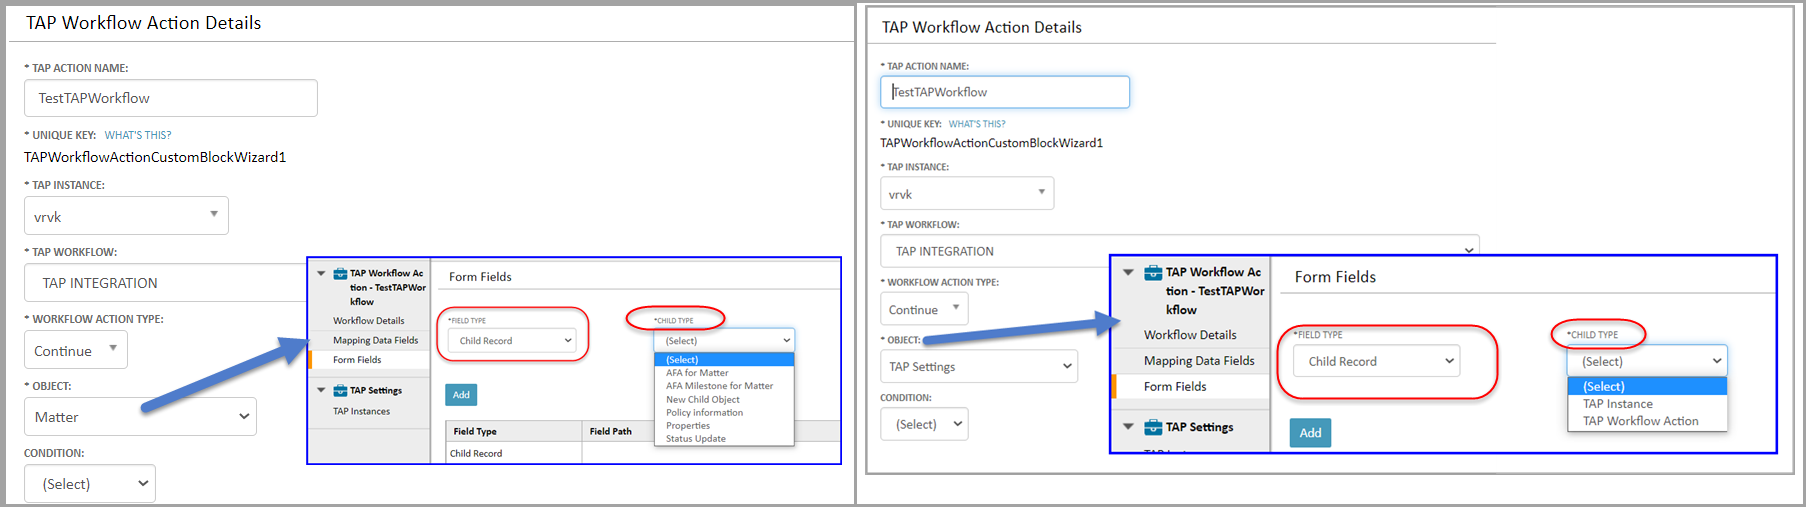
- Object: Select the TC Object name from the drop-down to which this workflow action is associated. This TAP Workflow Action uses a custom block or custom rule only on the selected object. (Eg. If you select Matter in Workflow Action Details, in FormFields the Child Record field type displays Child Type records related to Matter. Selecting TAP Settings, in FormFields the Child Record field type displays Child Type records related to TAP Settings. See below image).
- Condition: Select the condition defined for the TC Object Definition from the drop-down. Click here for How to configure Condition?
- TAP Field for TAP Workflow Record: When a Workflow Action Type is ‘Initiate’ by TC, the ID of the newly created TAP Workflow record is sent to the TAP element.
-
Click Save & Close.
Editing a TAP Workflow Action
- Click the TAP Action Name hyperlink and edit the required fields.
- Click Save & Close.
Configuring/Mapping the list of Object Definitions to TAP Workflow
- Click the TAP Workflow action hyperlink. The system displays the TAP Workflow Details page.
- Select Form Fields from the left navigation pane. The system displays the Form Fields page.
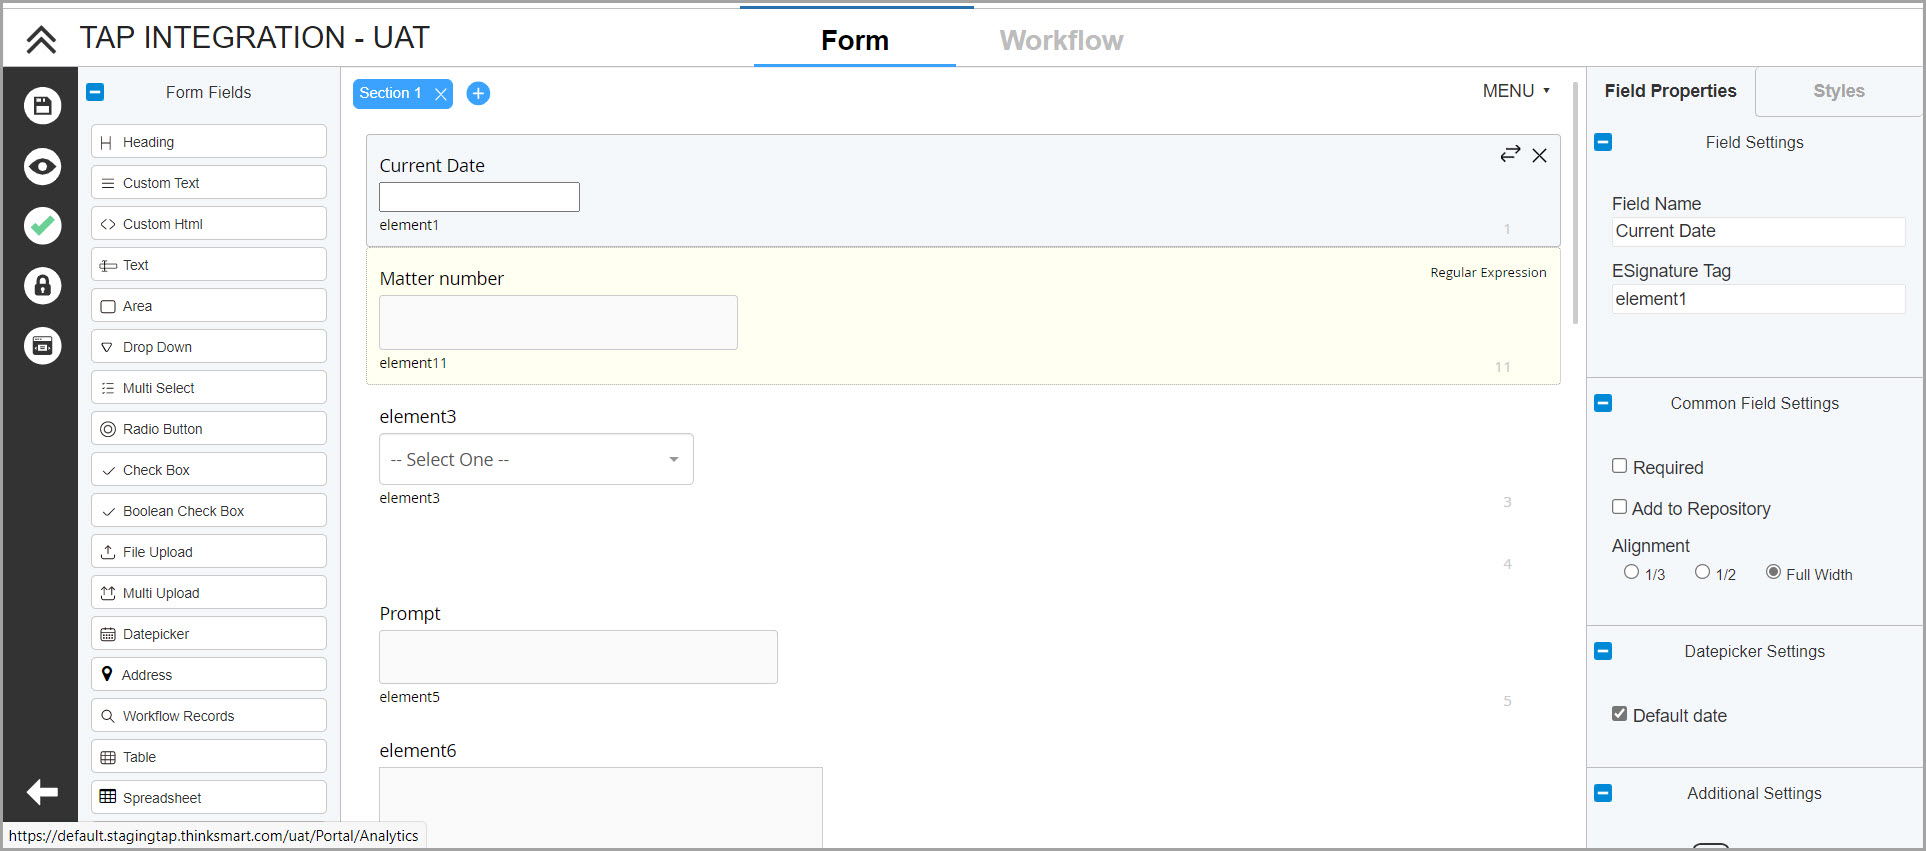
Form Fields: Each TAP Workflow Form Field record represents the information that is to be collected from the TC user and passed to TAP. The values defined on the TAP Workflow are collected using a wizard.
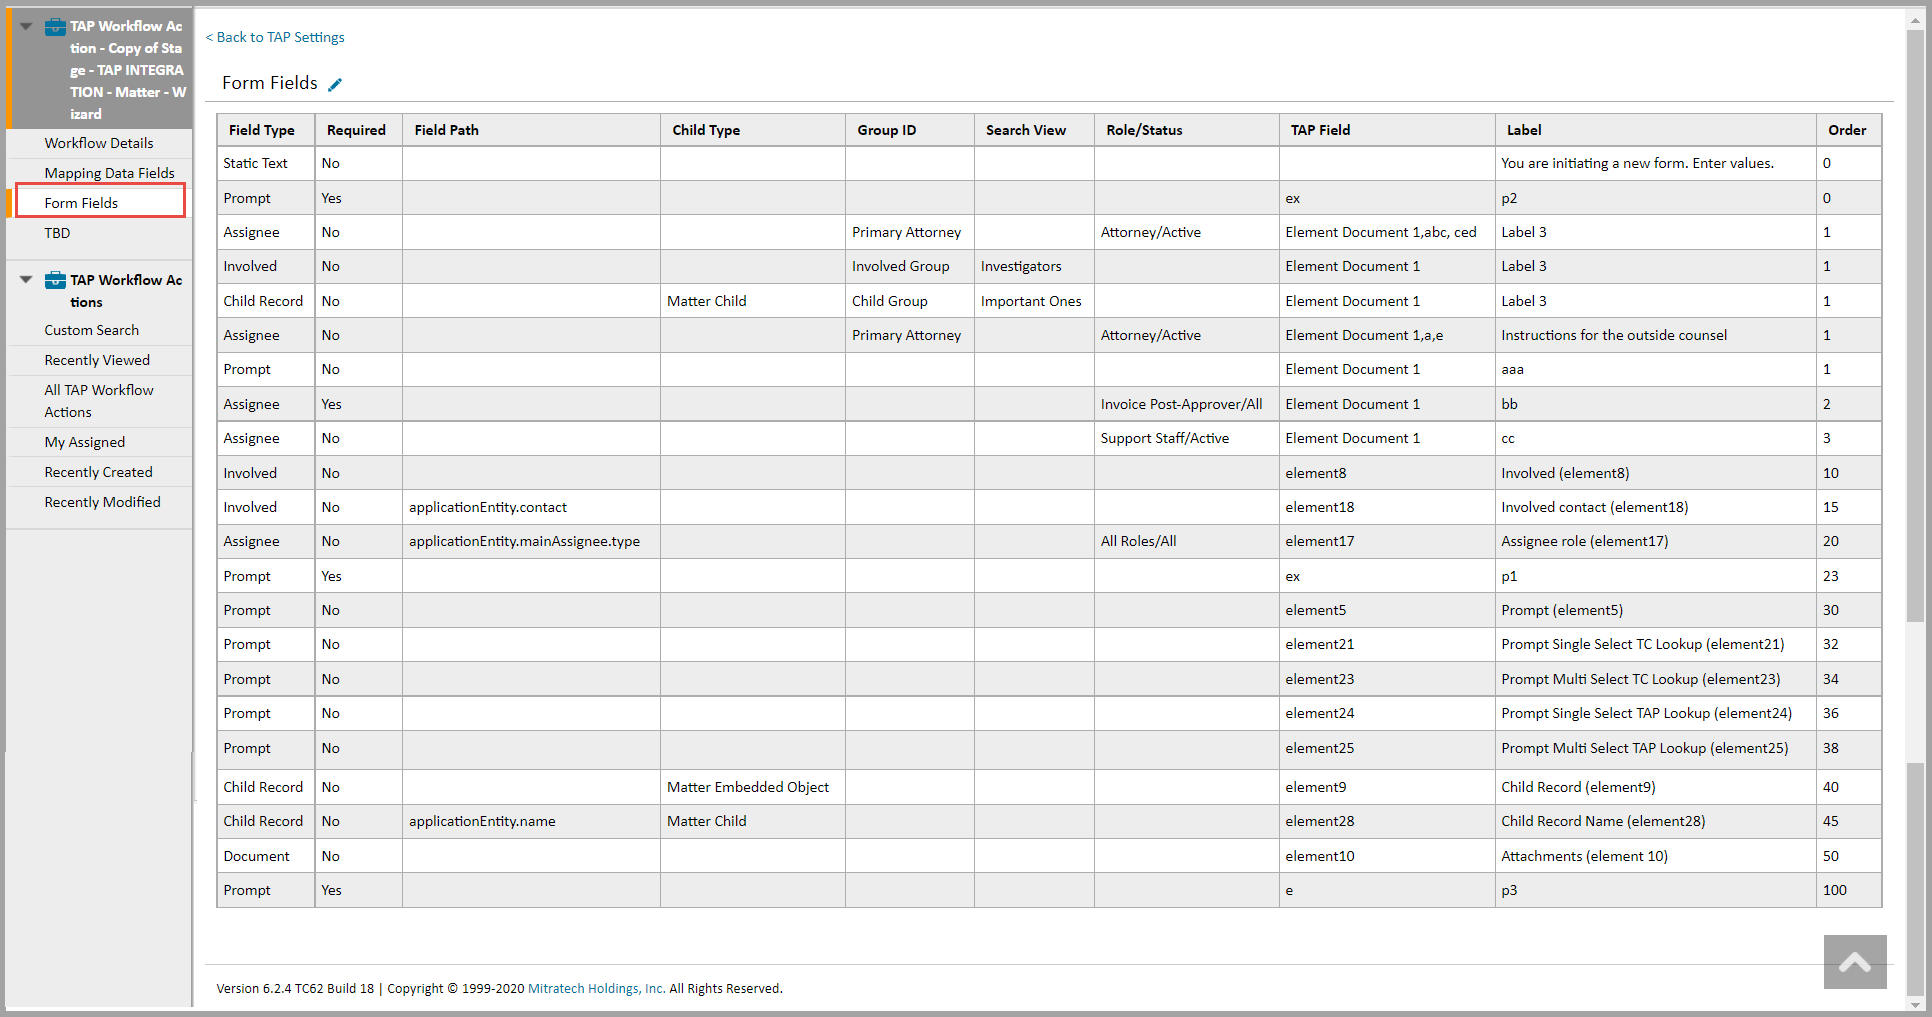
Form Fields grid consists of the following columns:
- Field Type: Displays the selected Field Type from the drop-down of which the information is sent to TAP. Fields Types are:
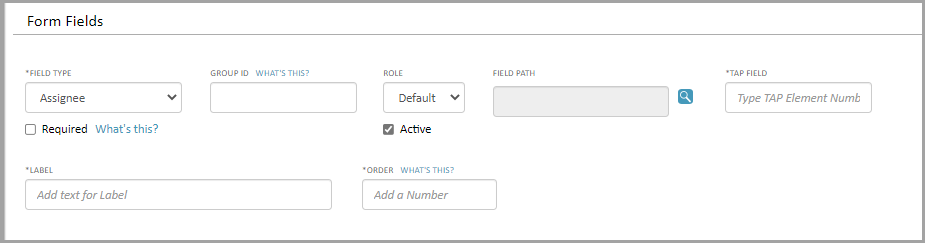
- Assignee: To send the Assignee details to TAP, select the Assignee from the drop-down of current Assignees of the Custom Object on which the wizard is invoked and applied only to Custom Object records. The assignee list is filtered as the Assignee Role/Status values defined in the TAP Workflow Form Field. Selecting the Active checkbox displays all the Active Roles, otherwise all Roles (Active and Inactive).
- If a Field Path is selected, a preview of the path value is displayed. Ensure the field path starts with the Main Assignee.
- If Group ID is selected, the selected values appear in the wizard drop-down list.
- If TAP Field is a comma-separated list, the user can select multiple Assignees but not more than the number of fields in the list. Field Path is evaluated on each selected Assignee, in the order the Assignees were selected, and the values sent to the TAP fields in the specified order in the TAP Field.
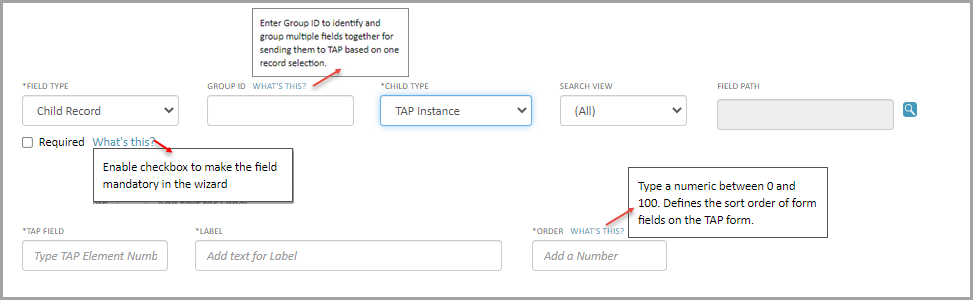
- Child Record: To send the details of the Child Record of the Custom Object to TAP, select the Child Record from the drop-down and select the associated Child Type record for the Custom Object on which the wizard is invoked. The selected list of Child Records displays the under the Object field in Workflow Action. (Eg.: If the user selects Matter as Object in Workflow Action, Child Type drop-down displays related to Matter. If the user selects Tap Settings as Object in Workflow Action, Child Type drop-down displays related to Tap Settings). Search View field appears with the list of filtered child records based on the search view criteria.
- If a Field Path is selected, a preview of the path value is displayed. If the Field Path is empty, 'applicationentity' is not displayed.
- If Group ID is selected, the selected values appear in the wizard drop-down list.
- If TAP Field is a comma-separated list, the user can select multiple child records but not more than the number of fields in the list. Field Path is evaluated on each selected child record, in the selected order. The values in the TAP Field are sent to the TAP in the specified order.
- Document: Displays the list of documents attached to the record on which the wizard is invoked. A checkbox Required is provided to mark as a mandatory field.

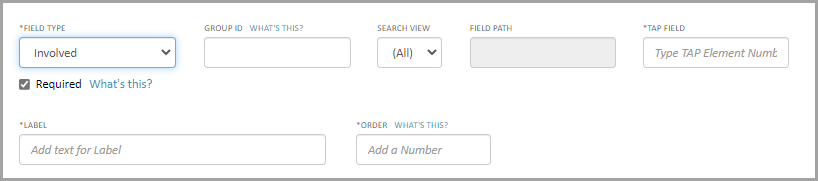
- Involved: Displays the Involved Field Type for a selected Workflow Action record with the object navigator path. The object navigator is disabled if the TAP Workflow Action's Object field is not a custom object with an Involved object definition.
- If a search view is selected, the list of Involved records is filtered based on the search view criteria.
- If a Field Path is selected, a preview of the path value is displayed. A preview is not displayed. If the Field Path is empty, 'application entity is not displayed.
- If Group ID is selected, the selected values appear in the wizard drop-down list.
- If TAP Field is a comma-separated list, the user can select multiple Involved records but not more than the number of fields in the list. Field Path is evaluated on each selected Involved, in the selected order. The values in the TAP Field are sent to the TAP in the specified order.
- Prompt: Displays Prompt Field Type text/instructions where users add more information to the selected workflow action in the label.
- Static: The user can enter the text/instructions of the workflow in the text field with Order number. The given instructions are displayed on the wizard form as read only text on the wizard.
- Required: Indicates that the user must enter a value for this field in the wizard.
- Field Path: Displays the Object navigator path which evaluates the path against the Involved/Assignee/Child and Embedded records value selected in the wizard.
- Child Type: Displays the child object type for the selected Child Record.
- Group ID: Applies to Assignee, Child Record and Involved records. Fields with the same group ID are grouped in the wizard. Hovering on the What’s This? a pop-up message displays as shown below.

- Search View: Displays the selected Search View result of Child Type and used to filter the results displayed in the wizard.
- Role/Status: Displays the Role/Status of the Assignee used to filter the results displayed in the wizard.
- TAP Field: Displays the name of the TAP Workflow template field (elements configured on TAP shown below) that sets for using the collected value.
- Label: Displays the label of the TAP Workflow Action record referred to workflowJobElementName. This field is required when the Workflow Action Type is Initiate. Displays the given input text in the field of the TAP Workflow Action to the user in the wizard. This field is required when the Workflow Action Type is Initiate.
- Order: Displays the order of the input field in the wizard. The TAP Workflow Form Field records associated with the TAP Workflow Action record specify the type of data that is to be collected and the display order of the collection form.
- Action: Enables the user to delete the record.
Adding a Form Field to the selected Workflow Action
- Select Field Type from the drop-down list (Assignee/Child Record/Document/Involved/Prompt/Static Text).
- Enter the details in the fields that are mapped to the Field Type.
- Click Add.
- New Form fields mapped to Workflow appear in the grid.
Adding a Mapping Data Fields to the selected Workflow Action
By mapping the fields, the user sends the information from TeamConnect to TAP.
- Click the TAP Action Name hyperlink.
- Select Mapping Data Fields from the left pane.

Mapping Data Fields grid consists of the following columns:
- TAP Field: Displays the name of the TAP Field for the selected TAP workflow template based on the mapping.
- Mapping Type: Displays the type of the mapping field that maps to the TAP field.
- TeamConnect Field: Displays the Object navigation path only if mapping type is Object Field mapping
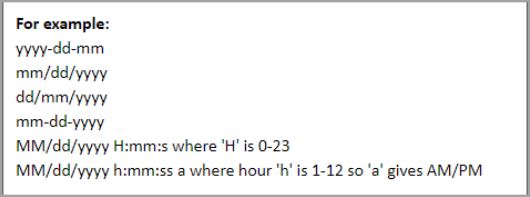
- TAP Date Format: Displays the date in TAP format. When the mapping type is Current Date Field Mapping or an Object Field Mapping for a TeamConnect Date field, the date is formatted using the provided pattern (eg: dd/mm/yyyy). By default, the date format is DD/MM/YYYY.
5. Action: Enables the user to delete the record.
Adding a Mapping Data Field record to the selected Workflow Action
- Enter the TAP Field name.
- Select the Mapping Type (Current Date Field Mapping/Object Field Mapping/Static Value) from the drop-down.
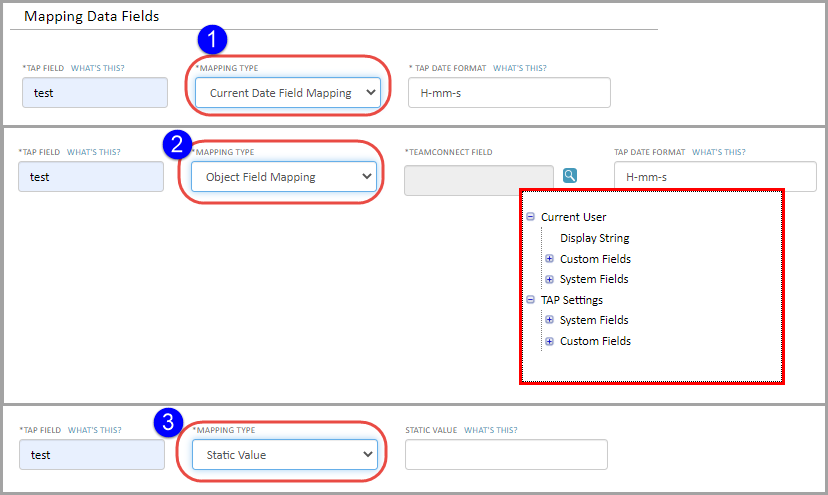
- Current Date Field Mapping: On Selecting Current Date Field Mapping from the drop-down, enter date in the given format MM/dd/yyyy as configured for TapWorkflow Action on TAP.
- Object Field Mapping: Selecting the Object Field, Teamconnect field appears to select the object navigation path. Select the field from the pop-up window.
- Static Value: Value that should be sent to TAP. Applicable when mapping type is Static Text.
- Click Add.
- New mapping fields TAP Field and TeamConnect Field mapped to Workflow, appear in the grid.
TAP Workflow Action Custom Block
This block can be added to any object definition. The block displays a button which when clicked, initiates a workflow in TAP. It also displays a list of open workflow jobs for the associated workflow action for the current record.
If there is a Condition to Initiate the Workflow Action and the Condition is not met, then the system hides the button to initiate a workflow. If the Initiate button is hidden and there are no open workflow jobs, then the system hides the entire block.
To use/creating a block to Workflow Action
-
Go to Documents >> Top Level >> System >> Screens.
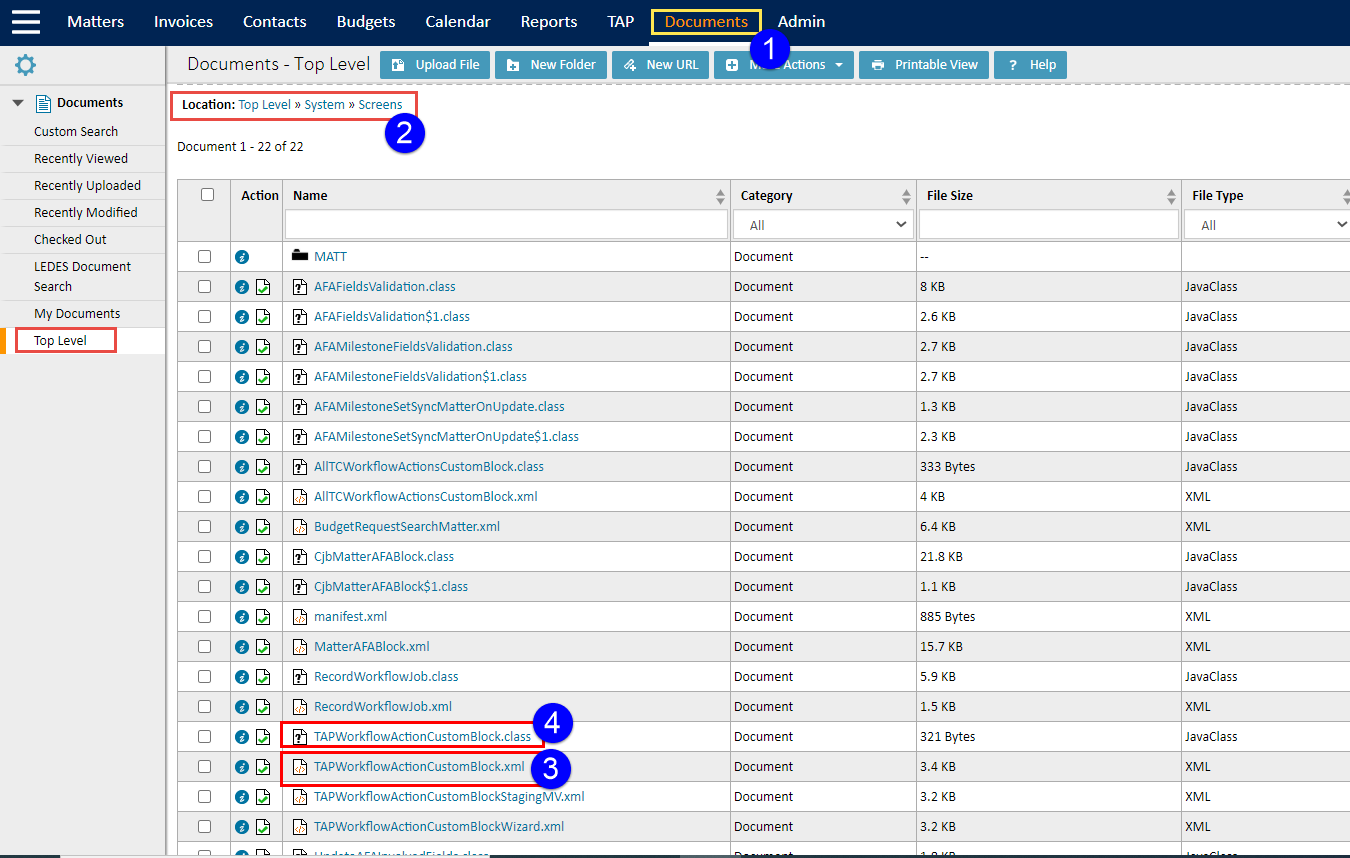
- Download the xml file by clicking on the existing TAPWorkflowActionCustomBlock.xml file (3).
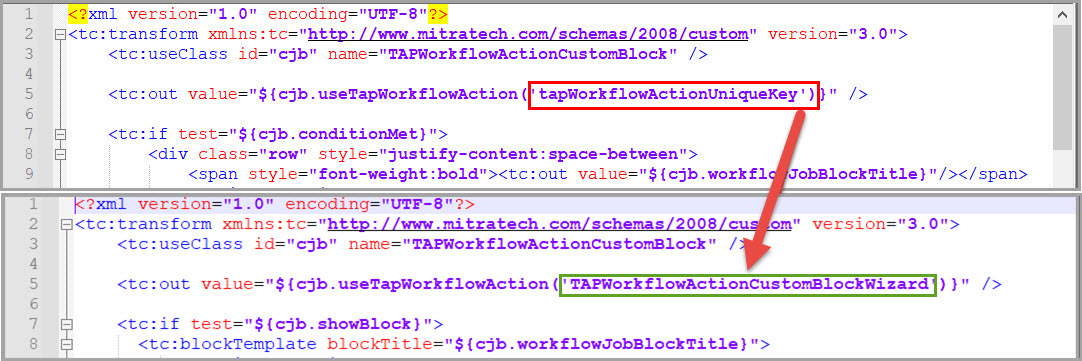
- Edit the xml file and replace the occurrence of the placeholder text tapWorkflowActionUniqueKey with the unique key of a TAP Workflow Action (TAC$) record (as shown in below image).
- Download and upload TAPWorkflowActionCustomBlock.class file (4).
- Go to Setup.
- Click Go to drop-down >> Object Definitions >> Matter >> Blocks >> Go to Screens folder.
- Upload the new xml file (TAPWorkflowActionCustomBlock.xml and TAPWorkflowActionCustomBlock.class to the Screens folder.

- Now select the uploaded file from the drop-down list and enter Friendly Name.
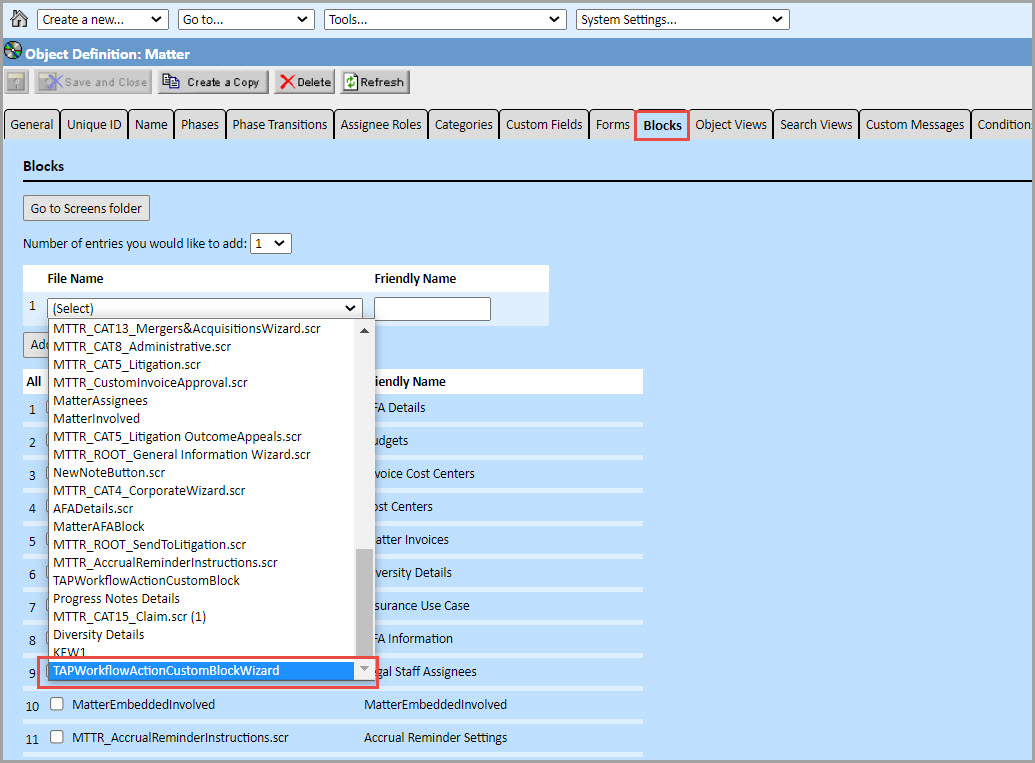
- Click Save.
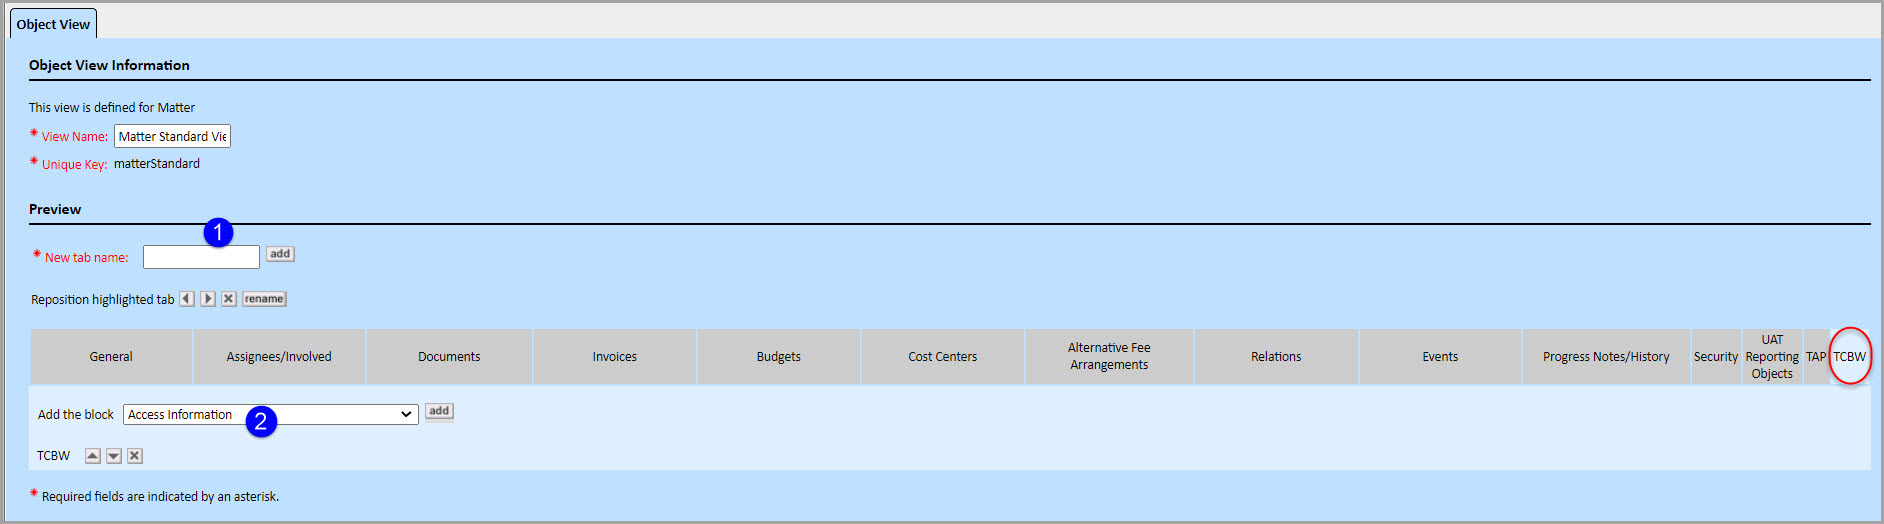
- Go to Matter >> Object Views.
- Enter new Tab Name (1) and click Add.
- Add the block to the new TAB by selecting from the drop-down list (2).
- Click add.
- Now click on the newly created workflow button to create a wizard.
To view the open workflow jobs for the current record
- Copy RecordWorkflowJob.xml and RecordWorkflowJob.class (4) (Do not rename the files).

- Upload the files to the Screens folder of the object definition where the block is to be displayed
- Create a TC Block for the xml screen and add the Block to an Object View.
- The new custom block appears in the left panel and TAPWorkflowActionWizard button inside the grid.
Viewing TAP Workflows
To view the list of TAP Workflows:
- Go to All >> Matters.
- Click on the required Matter.
- Click on TAP Workflows on left pane.
- The block displays a list of Workflows and Open Workflows for the current record.
The TAP Workflows consists of the following columns:
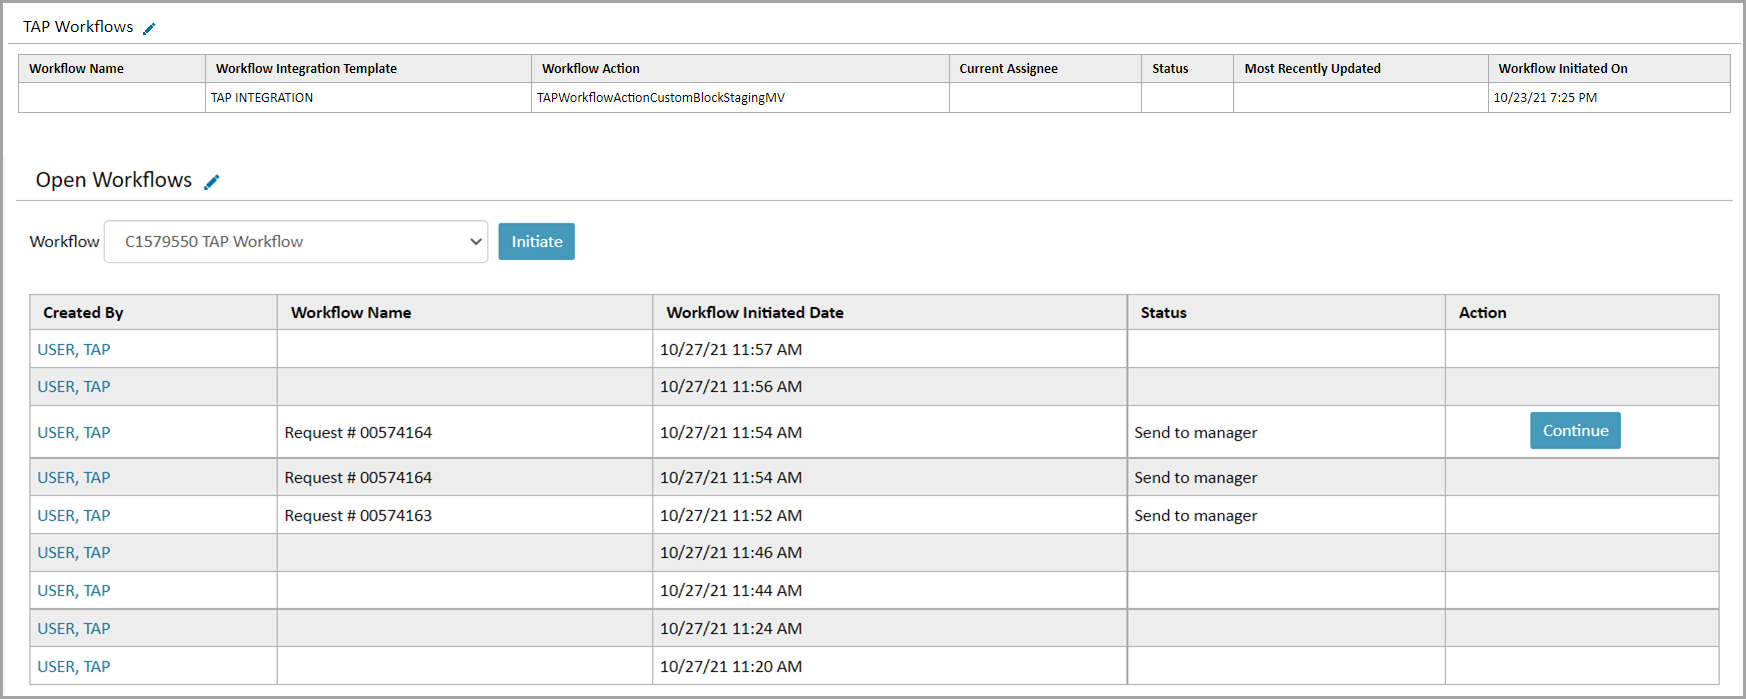
- Workflow Name: Displays the name of a workflow.
- Workflow Integration Template: Displays the Workflow Integration template name in TAP corresponding to the workflow job.
- Workflow Action: Displays the TAP Workflow Action (TAC$) record that defines the metadata for the workflow job.
- Current Assignee: Displays the name of the current assignee in TAP.
- Status: Displays the status of the workflow as reported by TAP.
- Most Recently Updated: Displays the date of last activity in TAP.
- Workflow Initiated On: Displays the date on which the workflow was initiated.
Open Workflows
The Open Workflows grid consists of the following columns.
- Created By: Displays the name of the TeamConnect user who initiated the workflow.
- Workflow Name: Displays the name of the Workflow.
- Workflow Initiated Date: Displays the Workflow Initiated date.
- Status: Displays the status of the workflow as reported by TAP.
- Action: Displays the Continue button to complete workflow record in TAP
The Open Workflows widget displays the Workflow drop-down list for the current record with Initiate button.
To initiate a Workflow
- Select the Workflow from the drop-down list that are reference to the Initiate action.
- Click Initiate button.
- The record is sent to the manager and a new row is added with the status as send to manager in the Open Workflow Jobs grid.
- If the Condition of the the Workflow Action is Continue, then the system displays the Continue button to complete the workflow.
TAP Workflow Execution rule
The condition is added to any object definition and associated with a TAP Workflow Action (TAC$) record via a rule parameter. The TAP Workflow Action is of Initiate or Continue type.
When triggered, the condition executes if there is NO Condition on the Workflow Action or the Condition is met.
The condition evaluates the current record of the TAP Workflow Action records with Mapping Data Fields. The Workflow Action record initiates the workflow by evaluating values that are sent to TAP.
-
If the condition references a Workflow Action of type Initiate, the system initiates a new workflow in TAP.
-
If the condition references a Workflow Action of type Continue, the rule finds the most recently created open Workflow Job (TWO$) and Continue when the token id of the workflow job is available.
TAP Workflow Rule Configuration
- Navigate to Setup
- Select Object Definitions from the Go To Drop-down
- Select the Object you want to configure rule for
- Go to Rules --> Create New Rule
- You will see a screen with three tabs - General, Qualifier, Action

Click here to know the complete details on How to configure rules and what to input in each field.
Condition Configuration
- Navigate to Setup.
- Click Go to drop-down >> Object Definitions >> Matter >> Conditions.
- Click Create New Condition button or click on the existing Condition (Always True).
- Add the logical conditions to display the continue button or to hide the button.
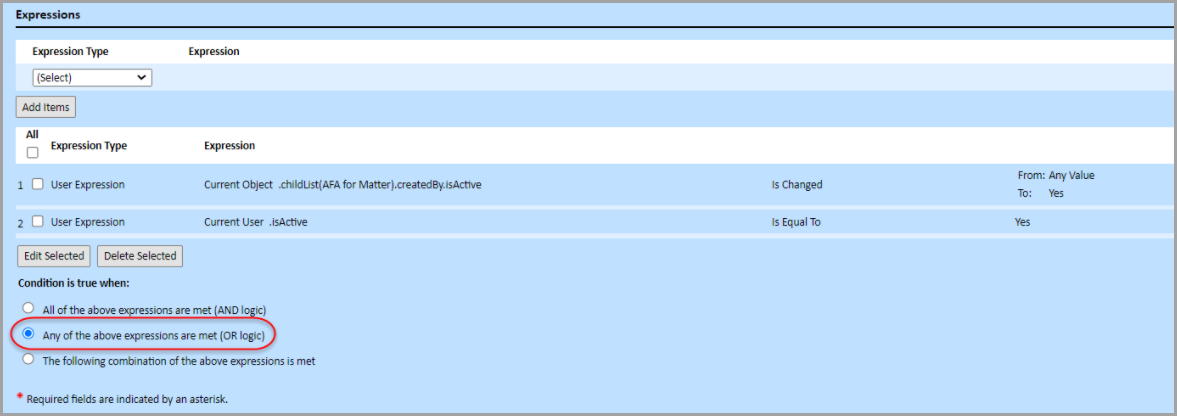
- Example:
- For Initiate, create the Expression and select Condition All of the above expressions are met (AND Logic), then the Continue button is not displayed.
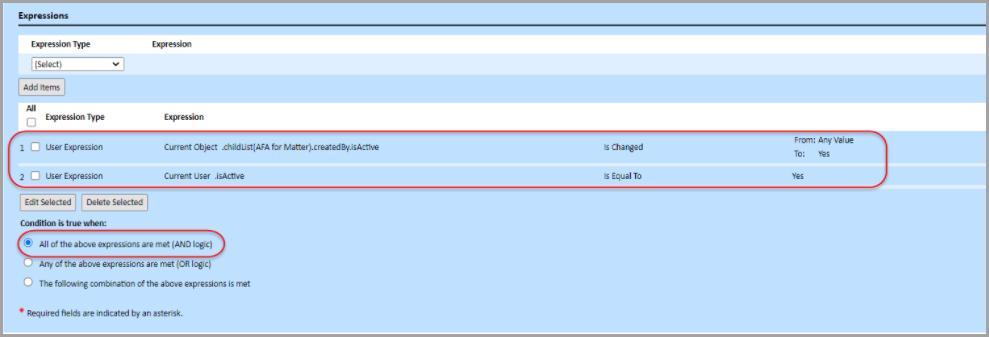
- For Continue, create the Expression and select Condition Any of the above expressions are met (OR Logic), then the Continue button is displayed.
NOTE: Based on the configuration, User can view the Continue button on the TeamConnect User Interface to complete the TAP Workflow Action.
Workflow Phase Change in TAP
Workflows are created in the Workflow (Pane | Page) of the Designer. Here you can add stages and relationships as well as a variety of properties and settings to each that allow you to create custom & unique workflows for your individual company needs.
Understand the workflow stages and access the workflow page to get complete details on how to create a workflow for your organization.
Here is a sample workflow in which there is a phase change that is created under one use case.

- In order to avoid the concurrent update, you can setup one of the transitions to auto-submit to the above stage with a one minute delay (refer above screenshot)
- When there is auto-submit in any transition, there is a one-minute delay.
- With auto-submit, you always get back to the "TC Phase Change" phase, so you have only one exit condition for the final phase and its good to keep TAP as the workflow controller (in theory it's good to have TC be able to continue only after TAP has granted it again)
- To prevent a phase change on the TC side until that field is populated or it could get out of sync with TAP because technically nothing would prevent a user from choosing the wrong phase, realizing it, and changing to the correct phase. In the meantime, a field may be wiped out by the last run and it does not get updated in TAP.
- Saving the "workflow instance id" on a different field so you can directly create new workflow continue records from TC avoids the "loop"
- In order to implement a robust workflow, you would have to implement a safe card. This can be accomplished using a custom field checkbox that will be used by TC to control when a new change is allowed or not, enforcing the user to wait a little bit, something like this:

How to send or exchange information with TAP?
Open the TAP Workflow Instance
-
Navigate to Business Automation → Designer → Create a Workflow
- Select Dropdown Form Field → Click Options → Select Teamconnect List Field

- Enter TC Key, TC Object, Object Category, and Lookup Tables and Save the Configuration. Your organization will provide TC Key.

-
Add a Button to trigger
-
Add a stage in the workflow
-
Select the Stage → Properties → Select and add Teamconnect Support Stage
-
Go to the Attributes tab. Enter the relevant information that is to be displayed in Teamconnect. Object type selection is mandatory.

-
Go to the Options tab. Enter the label name. Select the button added in the drop-down option for Button Trigger. Click the Save button.
-
Click on Add new object and select TC Key, TC Object, and Primary Category
-
Click the Save button

- Publish, Save, and Preview the Workflow

-
Enter the TC data and Submit the Workflow
-
Login to TC Instance and Search for the Recently Created Records
-
Validate the recent record with the Data that was submitted from the TAP
How to continue a workflow that was initiated from TAP?
Workflow initiated from TAP can be viewed or edited in TeamConnect. Any changes to this workflow can be done through the Team Connect instance also.
-
Select the Team Connect Object/Record to edit.

- Select the Edit button on the top of the screen to edit the complete form or select the pen icon
 beside each category to edit the category separately.
