
Auto Submits and Auto Skips
What are Auto Submits and Auto Skips?
Auto Submit and Auto Skip allows you to automatically submit or skip over a stage within a workflow. The auto submit and auto skip property is always configured on the relationship preceding the stage that you will be auto submitting or auto skipping. Auto submits and auto skips can be configured to submit or skip immediately, after a certain amount of time has passed, at an exact date and time, or based on a value entered within a date field on the form.
When auto submit is configured, the stage following that configuration will be automatically submitted. This means that any form mapping, formulas, prepopulation, or other functionality that is configured on the stage will trigger as long as it is set to trigger on stage submit. This also means that the stage will appear in the audit log as a submitted stage.
When auto skip is configured, the stage following that configuration will be skipped over. No functionality on that stage will be triggered and the stage will not display within the audit log.
- Auto Submit helps you prevent bottlenecks in the workflow. Automatically submitting a stage can be useful if you are under the clock and need a particular task completed by a particular time.
- Auto Skip is used to skip particular stages.
NOTE: Auto Skip is not shown in the Audit Trail whereas Auto Submit is.
Where are Auto Submit and Auto Skip applied?
Apply Auto Submit or Auto Skip to the relationship preceding the stage you would like to automatically submit or skip.
To set up an Auto Submit:
- Select the relationship at which you would like to apply an Auto Skip.
- Click the
 Auto submit button in the Workflow Page toolbar.
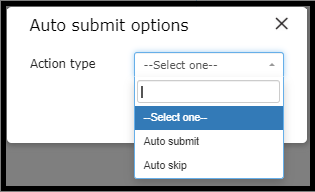
- The Auto submit options dialog displays.
- The Auto submit options dialog displays.
- Select Auto Submit from the Action Type menu.
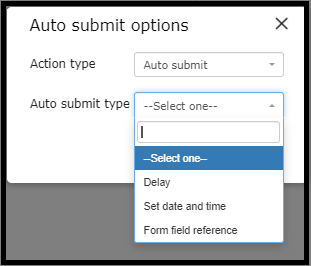
- The Auto submit options dialog refreshes to display the Auto submit type menu.
- Select the desired auto submit type from the Auto Submit type. Three options are available. Each option is configured in a slightly different way. The Auto submit options dialog refreshes when the desired auto submit type is selected to display the appropriate value fields.
- Delay: This option lets you delay the time at which a stage automatically submits by a specified amount of time.
- Use the Specify delay fields to specify the number of Days, Hours, and Minutes after which the form will automatically submit.
- Set date and time: This option lets you set a specific date and time at which the stage will automatically submit.
- Use the Specify date and time options to select the specific date and time at which the form will automatically submit.
- Form field reference: This option lets you determine when a stage will be submitted dependent upon a date picker form field and a specified rule.
- The Reference field menu populates with any date picker form fields you have used in your previous forms. Select the desired date picker field, then use the (#) days, at (time)options to select the specific number of days and time before or after that date picker date, at which the stage is automatically submitted.
- Delay: This option lets you delay the time at which a stage automatically submits by a specified amount of time.
- Click the Save button to save your changes.
To set up an Auto Skip:
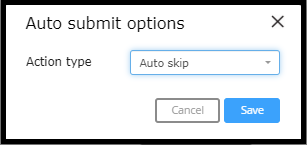
- Select the relationship at which you would like to apply an Auto Skip.
- Click the
 Auto submit button in the Workflow Page toolbar.
- The Auto submit options dialog displays.
- Select Auto Submit from the Action Type menu.
- Click the Save button to save your changes.
Use Cases
-
Automatically progress a workflow based on a variety of factors.
-
Push workflow ahead if the user has taken too much time to complete the stage or if there is a deadline for the user to respond within a form.
-
Skip stages if they are unnecessary based on decisions made within a form.