
Connection
Use the information provided to you in your "Welcome to CSM" email to fill in the Collaborati URL, User ID and Password to establish and test your connection with Collaborati on the Connection page. If you or another designated user in your organization did not receive this email, please contact Mitratech Support.
Next, complete the rest of the synchronization setup steps to establish a continuous transfer of information between TeamConnect and Collaborati. This is commonly referred to as "CSM Sync". Finally, provide billing and technical contact information to designate the administrative users responsible for addressing technical and business issues.
Note: You can configure proxy authentication, which requires users to be verified through a proxy server before they can access Collaborati. Proxy authentication is configured in the main TeamConnect Administration interface.
To define CSM connection and synchronization settings
- From CSM Settings, make sure the Connection page is selected, and then click Edit.
Connection Settings Page - Under Connection Settings, keep the existing Collaborati URL unless you have been specifically instructed to change it by Mitratech.
- Under Connection Settings, enter the User ID (case-sensitive) and Password (case- sensitive) that you received in a welcome email.
- Click Save and View. The Test Connection button appears.
- To test the connections, click the Test Connection button. The message should read Connection was successfully established. If another message displays, there may be a problem with the connection and you should attempt to correct it using table below. If you tried to resolve the issue and you are still having trouble with your connection, please contact Mitratech Support.
|
Connection Status |
When does this occur? |
What does the message mean? |
How can I resolve the error? |
|---|---|---|---|
|
Connection could not be established. Invalid User Id or Password. Please try again. |
Only after the Test Connection button is pressed and the password or ID is not valid. |
Informs you that there has been a connection failure due to an invalid User ID or Password entry. |
Re-type (or cut-and- paste) your user ID and Password from the "Welcome to CSM" email and attempt to connect again. Note: This will only work for the initial connection establishm ent; if this error occurs after a successful synchroniza tion run, please contact your IT or Mitratech support |
|
Connection with the specified URL could not be established. |
Only after the Test Connection button is pressed and a connection with the specified URL could not be established, or there is a possible authentication failure. |
Informs you that there has been a connection failure and possibly an invalid URL entry. |
Your technical administrator should review the System Log file and attempt to connect again. |
|
Connection refused. Unrecognized CSM identifier. |
After the Test Connection button is pressed and validation indicates that the values for TeamConnect database instance, TeamConnect database schema name, TeamConnect database schema creation date, or last CSM connection date do not match the last saved information. |
Informs that you are attempting to connect to Collaborati from a TeamConnect/CSM instance that does not pass validation. |
If you are trying to connect from CSM Settings to Collaborati with the same connection information (URL, User ID, Password) from multiple TeamConnect instances, this error can result. Revert to the original TeamConnect/CSM instance or contact support for assistance. Also see Unable to start a connection between CSM and Collaborati. |
- Click Edit to continue.
- Under the Synchronization Settings section, select a Run Interval. The Run Interval allows you to set the interval of information transfer requests between your TeamConnect application and Collaborati. Options range from 1 to 120 minutes. The recommended interval for production is 15 minutes or longer.
Once the first synchronization runs, the Synchronization Settings section displays the date and time of the last successfully completed synchronization. - Under Notifications, enter the technical administrator's email address and the business administrator's email address.
- In the Technical admin email address field, enter the email address of the person who will be addressing technical issues for your department. This person will receive notifications if your CSM ID (User ID and Password) is changed on request by Mitratech Support.
- In the Business admin email address field, enter the email address of the person who will be responsible for the business side of setup, as described in this guide. TeamConnect will send notifications to this email address when additional settings are needed (for example, when offices add new timekeepers that need to be mapped).
Note: For security reasons, after the first data synchronization between CSM and Collaborati, the system will automatically replace the CSM password (originally sent to the client in a notification email). The password will also be automatically changed every 90 days afterwards. If you edit or delete the Connection Settings password after the system has changed it, you will not be able to establish the connection with Collaborati, and will need to contact Mitratech Support for assistance.
- Click Save and View.
Starting or Stopping CSM Synchronization with Collaborati
After you configure CSM Settings, you can start or stop synchronization between CSM and Collaborati in the following locations:
- CSM Settings, Connection Page
- Edit mode for CSM Settings, Offices, Timekeepers, and Budget Requests
See Editing CSM Settings, Editing Timekeeper Contact Information, and Managing Budget Settings. - Authorization wizards for Offices or Timekeepers
See Authorizing or Unauthorizing Timekeepers and Authorizing Offices.
To start or stop synchronization on the CSM Settings page
- From CSM Settings, click Connection in the left pane.
- To start or restart synchronization, click Start. The Start button is available if synchronization has not started and the current status is Stopped.
If there are five consecutive unsuccessful attempts to synchronize with Collaborati, synchronization will pause for an hour, then resume attempts to synchronize. - To stop synchronization, click Stop. The Stop button is available if the Status is Running, Waiting, or Retrying.
The Status field provides the current synchronization status as follows:
Important: Updated status information may not appear automatically. Please refresh your browser to ensure that you are seeing the most current status.
- Running—CSM is actively synchronizing with Collaborati.
- Stopped—Synchronization is stopped.
- Stopping—The Stop button is clicked and synchronization continues to run in the background until the current item is done. The status changes to Stopped when the synchronization is done.
- Waiting For Next Sync—The current synchronization action is complete and waiting for the next scheduled execution.
- Waiting to Retry Sync—The scheduled synchronization action failed and is waiting for the next scheduled action synchronization to try to re-establish the connection with Collaborati and synchronize.
Note: If you have manually stopped the syncing process, a notification will appear in the application to inform you. Syncing will not resume until it is manually restarted, or a restart time is scheduled
Additionally, the Synchronization Settings section displays the date and time of the last successfully completed synchronization.
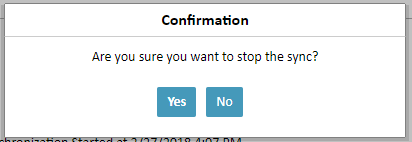
If you try to stop the synchronization while a CSM task is in progress, a warning message will appear prompting you to confirm the stop (See below)
Your technical administrator can review the TeamConnect System Log history for errors by clicking the Connection Log link under the Synchronization Settings section. The Connection Log contents refer to the Collaborati Appender link content from the Admin tab > Logging link (under the tab bar) > System link (from the left pane) > System Appenders section.
If the Connection log does not display, you may need to set the System Logger Rule Logger level to Debug. For more information, click the Help button from the System Loggers page.
Scheduling a restart time for synchronization
While stopping the CSM synchronization process, a confirmation screen will appear with the option to set an automatic restart time. This will allow the program to resume synchronization without having to manually access the settings and restart it yourself.
- From the CSM settings page, navigate to the "connection" tab on the left
- Click the "stop" button in the synchronization settings
- Check the "set automatic restart time" button
- Select the restart date by pressing the calendar icon to right of the date
- Select the restart time by pressing the checkmark icon to the right of the time
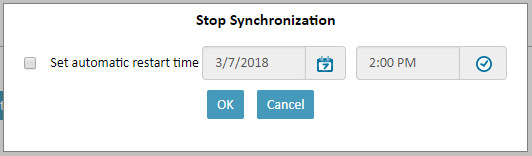
The CSM sync will run according to schedule once restarted (for example, if the sync was set to run every 30 minutes, it will resume it's normal cadence)
Email Notifications for CSM Synchronization
The Email Notifications feature keeps CSM Administrators informed about the status of CSM synchronization without needing to log in to TeamConnect and review Synchronization History. Administrators will automatically receive email alerts for key sync events, helping them quickly identify successes, delays, or connection issues.
Successful Sync Notification: An email is sent when a CSM synchronization completes successfully that confirms that the sync cycle finished without errors and no further action is required.
Long-Running Sync Notification: The system sends an email notification when a synchronization exceeds the configured time threshold. A time threshold setting is available on the CSM Settings tab. The system uses this value to determine whether a sync is considered long running. The field is prepopulated with a default value. Administrators can modify the value based on historical sync duration and the volume of data transmitted between sync cycles. This notification helps administrators identify potential performance delays.
Connection Issues: The system sends an email notification when a connection issue occurs with Collaborati during synchronization. This notification enables administrators to promptly investigate and resolve connectivity issues.
Notifications
In the notification section, input a technical admin email address and a business admin email address. These are the two default email addresses where you might receive questions for Offices or receive notifications of issues with the synchronization.