
TeamConnect 6.0 Installation Guide for PDF
This installation guide is for TeamConnect 6.0. If you would like a copy of an earlier version, please download the guide from the TeamConnect PDF Hub.
Installation Overview
Installation Requirements
Database Requirements
Application and Web Server Requirements
Web Browser Requirements
Elasticsearch Setup
Before you begin:
- Read the Installation Overview
- Make sure you are using Java 1.8.
- After upgrading Elasticsearch or TeamConnect, you must drop and rebuild the index. Open the Global Search Index Tool, select your index, click the Drop Index button, and then click the Index Selected button. Note that items will be unavailable for search during this time. Preliminary testing finds that it takes roughly one hour per 4GB for indexing. This number will vary based on the types of files present in the index.
Note: Only Elasticsearch 5.3.0 is certified for TeamConnect 5.1 and later. Elasticsearch 5.3.x patches and updates are supported, but no updates outside of the 5.3.x versioning are supported.
For more detailed information on Elasticsearch, clusters and nodes, and global search indexing functions outside of TeamConnect, visit the Elasticsearch help and the latest support matrix for Elasticsearch compatibility.
Elasticsearch Installation
The following instructions detail a RedHat and Windows installation via the Elasticsearch file. If your system is unable to perform this type of installation, contact Mitratech Support at support@mitratech.com. For installations with Search Guard, see Elasticsearch with Search Guard.
For Linux
- Download the RPM file from https://www.elastic.co/downloads/past-releases/elasticsearch-5-3-0. TeamConnect is only certified against Elasticsearch 5.3.0. Later 5.3.x patches and updates will be supported. No updates outside of the 5.3.x line will be supported.
- yum install the elasticsearch.xxxxx.rpm or rpm –Uvh elasticsearch.xxxxx.rpm
- chkconfig –add elasticsearch to have Elasticsearch start on boot.
For the following steps, the paths listed below should be accurate to your installation. If not, find the elasticsearch/bin folder and substitute that path in the directions below.
- Run the following command from the root Elasticsearch directory:
bin\elasticsearch-plugin install mapper-attachments
This plug-in provides the 'attachment' field type to Elasticsearch, thereby allowing it to index to content of documents like PDF files and Microsoft Word files.
- Configure properties as detailed in Elasticsearch Configuration below on this page.
- Start elasticsearch with: /etc/init.d/elasticsearch start after configuration is set.
For Windows
- Download the Elasticsearch zip file from the following website: https://www.elastic.co/downloads/elasticsearch
Note: If you are looking for an older version of ES, look here: https://www.elastic.co/downloads/ past-releases - Unzip the file in your directory of choice. Having a dedicated folder not in Program Files is usually a good choice. (e.g. C:\...\Apache\Elasticsearch)
- Navigate to your Elasticsearch /bin either through the command line using Windows Explorer and typing cmd in the top bar.
The directory should be similar to C:\...\app\Apache\Elasticsearch\elasticsearch-5.3\bin - Install the Mapper Attachments Plugin.
This plugin is used to parse documents that are sent over from TeamConnect. It must be installed for documents to index properly. https://github.com/elastic/elasticse...er-attachments - Run the following command from the root Elasticsearch directory:
bin\elasticsearch-plugin install mapper-attachments
- Configure properties as detailed in Elasticsearch Configuration.
To run Elasticsearch, navigate to the bin directory of your Elasticsearch installation and start the elasticsearch.bat file.
Elasticsearch Configuration
The following configuration details cover a basic, functional installation of Elasticsearch for TeamConnect 6.0. If your situation requires a more robust configuration or if you are unable to proceed through the following configuration, contact Mitratech Support.
Many properties can be configured during the installation; however, viewing the configuration file in a text editor provides better visibility and custom configuration options. The configuration file is the same for both Windows and Linux.
To modify the Elasticsearch configuration file:
- Using a text editor, open the elasticsearch.yml file located in elasticsearch-5.3.0/config.
- For Linux, use a text editor such as vim or nano.
- For Windows, use a text editor of your choice.
- Uncomment and set a value for the cluster.name property (for example, Cluster).
- Since multicast is disabled, provide the entry points into the cluster by specifying the server locations. For example, if a configuration has two notes and only one server, designate the one server without duplication or a "hostname2:port":
discovery.zen.ping.unicast.hosts: ["hostname1:port", "hostname2:port"]
Elasticsearch Configuration Properties
The following properties are commented out and set to the following default values. If you would like to enter custom values for these properties, remove the comment hashtag and replace the default value.
|
Property |
Default Value |
Recommendation, if available |
|---|---|---|
|
network.host |
0.0.0.0 |
Recommended to set this to the IP Address where Elasticsearch is/will be running |
|
http.port |
9200 |
|
|
transport.tcp.port |
9300 |
Note: Your Linux host might not start if all Elasticsearch specifications are not met. It is not highly recommended, but users can work around this issue by adding the following line to the config/elasticsearch.yml file:
bootstrap.system_call_filter: false
Additional Properties Regarding Nodes
The following properties are optional, but may be useful for instances with multiple nodes:
This is the name of this specific node. If it is not set, Elasticsearch selects a name from the Marvel Universe.
node.name: Node1
This allows the node to be master eligible. You will need to manually add this property in if desired. For further detail, please see the Master Node sections below.
node.master: true
This allows the node to store data. The default is true.
node.data: true
Set this to true if the server is in a Linux environment. It locks the memory for Elasticsearch so that the JVM does not start swapping.
bootstrap.memory_lock: true
Master Nodes
The single master node is the node that controls the state of the cluster. All nodes within the cluster report to the master node.
A cluster can have multiple master-eligible nodes that can temporarily replace the function of the master node if the master node stops or encounters a problem.
If a configuration has more than one master-eligible node, a condition called "split brain" can occur. For example, if a cluster has 2 master-eligible nodes and one of the node loses communication but does not crash, the lost node now has no communication with a master node so it elects itself as master.
The communication is regained between the nodes, and there are now 2 Master Nodes.
Data is sent to one node for indexing, and search requests are sent to another node that does not hold the recently indexed information. This causes corruption of data.
In order to remedy this, Elasticsearch has a setting called discovery.zen.minimum_master_nodes. This allows you to set the minimum number of Master Eligible Nodes that need to be present for a Master Node to be elected. The idea is that if you have 3 Master Eligible Nodes, you can set this setting to "2". If one node gets lost, the cluster will still be up and running because it has 2 Master Eligible Nodes. The one node that lost communication will try to elect itself as master but won't be able to because it needs at least one more Master Eligible Node in the cluster to become Master.
A general rule of thumb is to have this setting set to (number of master-eligible nodes / 2) + 1.
This setting is useless if you have 2 Master Eligible Nodes in the cluster. Setting it to 2 means that if one node goes down, the entire cluster is inoperable. Setting it to 1 does not protect against split brain.
Dedicated Master Nodes
If the cluster becomes too large, then it becomes difficult for a data/master node combo to maintain the state of the cluster and perform the regular work of a data node. In these cases, it becomes useful to have Dedicated Master Nodes.
A Dedicated Master Node is a node that has node.data: false & node.master: true. Since a master node is only in charge of maintaining the state of the cluster, it is fairly lightweight; thus, it can be allocated less memory than a normal node. This reduces the risk of the Master Node crashing and making the cluster inoperable.
Because there is already a Dedicated Master Node, other nodes in the cluster can also be relieved of their burden as Master Eligible Nodes (i.e. node.data: true & node.master: false).
A good configuration for larger clusters is to have the proper number of Master Eligible Nodes that are Dedicated Masters, and an equal (or more) amount of data nodes underneath them with the Master Eligible Nodes being the entry point into the cluster (discovery). An example configuration would be:
- 3 Master Eligible Nodes that are Dedicated Masters with discovery.zen.ping.unicast.hosts pointing to them.
- 6 Data nodes.
- discovery.zen.minimum_master_nodes: 2
TeamConnect Properties Configuration
Details for optimizing and configuring Global Search for TeamConnect can be found below. This information can be entered automatically into the TeamConnect properties file during the installer or manually entered into the teamconnect.properties file after installation.
Configuring the TeamConnect Properties File
Elasticsearch (Global search) parameters are able to be edited in the TeamConnect properties file found in the WEB-INF folder.
The server address, name of the cluster, and indexing frequency are required for search to function. The name of the cluster can be found in the Elasticsearch configuration file referenced here. The indexing frequency refers to how often (in seconds) TeamConnect will look for changes to existing, enabled indexed items and automatically update them. In the image below, the index will be scanned for modifications, additions, and entry removal every ten seconds.
The number of primary shards defaults to a value of '5'. Entering in any invalid character here will thereby result in 5 primary shards.
The number of replica shards defaults to a value of '1'. Entering in any invalid character here will thereby result in 1 replica shard.
Details on shards and replicas from Elasticsearch documentation:
An index can potentially store a large amount of data that can exceed the hardware limits of a single node. For example, a single index of a billion documents taking up 1TB of disk space may not fit on the disk of a single node or may be too slow to serve search requests from a single node alone.
To solve this problem, Elasticsearch provides the ability to subdivide your index into multiple pieces called shards. When you create an index, you can simply define the number of shards that you want. Each shard is in itself a fully-functional and independent "index" that can be hosted on any node in the cluster.
Note: The concurrent requests and bulk size for flushing requests are not required and do not have default values.

Elasticsearch Best Practices
Indexing and Performance
Your Elasticsearch indexing time may vary significantly based on the objects and fields selected to be indexed. For example, memo fields containing large volumes of text will be indexed exponentially slower than numeric-type fields. As such, it is recommended to discern which fields you plan to leverage for global search before your initial indexing. Limiting the index to these fields (as opposed to a blanket index of the instance) will result in quicker indexing times while also reducing the load on the memory required for indexing.
Indexing of documents stored in external DMS systems may also slow performance times. Users are encouraged to appropriately schedule their indexing if they have a significant volume of documents being indexed from an external DMS.
Allocated Memory
Never allocate all available memory to Elasticsearch. A best practice for this is to only ever allocate 50% of your available memory to Elasticsearch. The other half should be reserved for Lucene caching, which uses ANY free memory on the machine. It loads segments (inverted indices) into memory for faster searching, so definitely keep that in mind when calculating Elasticsearch memory requirements.
General Best Practices
If multicast is disabled (which is suggested), it is a good practice to make the Master Eligible Nodes the discovery nodes.
For TeamConnect instances that are 100GB, it usually suffices to have a single node cluster where the node acts as both a master and data node.
For instances that require more nodes, or if the client wishes to utilize Elasticsearch's shard replication for backup and high availability, then a larger cluster is usually preferred.
In order to utilize shard replication, you simply need to start up another node within the same cluster (don't forget to specify the entry point into the cluster for unicast).
In order to utilize shard replication, you simply need to start up another node within the same cluster (don't forget to specify the entry point into the cluster for unicast).
Please read the Master Eligible Nodes details here for more information.
Elasticsearch FAQ
|
Question |
Answer |
|---|---|
|
Is the full-text search in TeamConnect the same as Elasticsearch? |
No. Elasticsearch provides global searching based on an index stored on a dedicated server. Full text search can still be achieved directly from your database, though it may not be as robust as the new global search. |
|
How many shards should I use? |
The default value of 5 primary shards should be more than sufficient for almost all clients. |
|
Can Elasticsearch work with clustered instances? What infrastructure is needed on premise? |
Yes. On-premise clients will need one instance of TeamConnect Enterprise (clustered or not) and one instance of Elasticsearch. |
|
What hardware requirements are suggested for Elasticsearch? (Heap Size) |
The suggested Elasticsearch hardware requirements are flexible depending on each use case. General requirements include: 8 GB RAM (most configurations can make do with 4 GB RAM) |
|
Are there words which Elasticsearch will not search on? |
Elasticsearch/Lucene has the following words filtered out of searches: "a", "an", "and", "are", "as", "at", "be", "but", "by", "for", "if", "in", "into", "is", "it", "no", "not", "of", "on", "or", "such", "that", "the", "their", "then", "there", "these", "they", "this", "to", "was", "will", "with" |
Elasticsearch with Search Guard
Business Object Support
Reporting Requirements for Legacy Reports
Reporting Requirements for TeamConnect Business Intelligence
Note: This document is intended for internal use only.
TeamConnect Business Intelligence is an integration that provides colorful visual reports embedded within TeamConnect. This document provides technical details for TeamConnect Business Intelligence and is intended to provide general guidelines for hardware and software requirements for the integration. Mitratech can provide more detailed recommendations based on your company’s specific needs upon request.
Note that for hosted clients, Mitratech provides the server requirements in your hosted implementation.
For information on installing and configuring the integration, see the installation guide appropriate for your version:
- TeamConnect Business Intelligence 6.1 Integration Guide
- TeamConnect Business Intelligence 6.2 Integration Guide
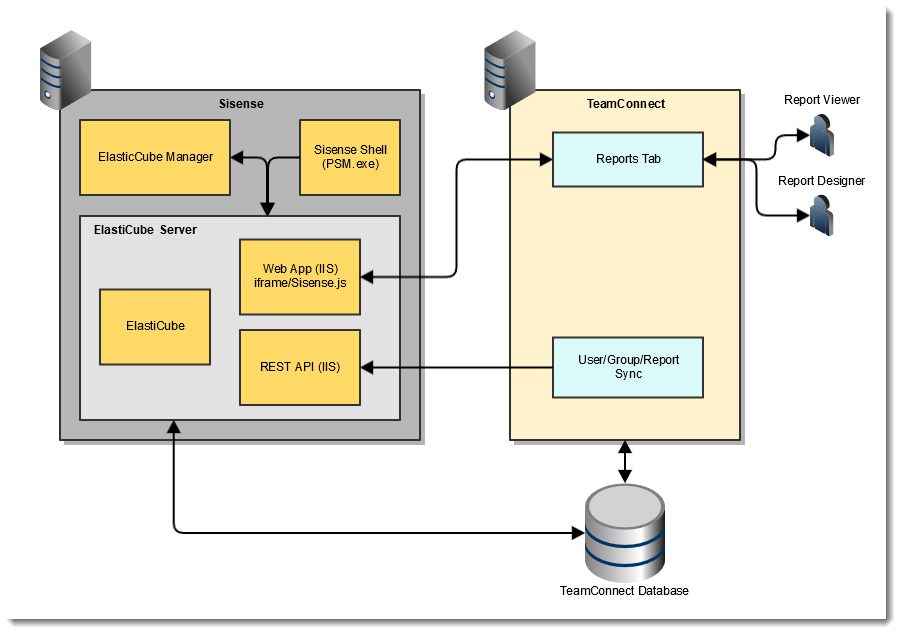
Components
TeamConnect Business Intelligence uses Sisense as the reporting tool that provides Designers with a report creation environment and easy-to-use interface and gives View-only users the ability to view and drill down into data. The integration relies on the creation of an ElastiCube as the analytics database.
Sisense Server
The Sisense server houses the following components:
- Sisense Server Console - used for starting and stopping the ElastiCubes
- Sisense Web Application - used for administrative tasks such as sharing an ElastiCube with the admin account, configuring single sign-on (SSO), etc.
- ElastiCube Manager - used for tasks such as modifying the data source for ElastiCubes or importing ElastiCubes
- ElastiCubes - the analytics database that retrieves its data from the TeamConnect database
ElastiCubes and Builds
TeamConnect Business Intelligence uses Sisense as the Business Intelligence tool. Sisense has an internal online analytical processing (OLAP) database to store data that is populated periodically from the online transactional processing (OLTP) database (TeamConnect’s database). The internal database is called an ElasticCube. The ElasticCube contains the object model and the data.
ElasticCubes are created, populated and published through a build process that serves as the Sisense extract, transform, load (ETL) process. If the cube already exist, schema sync will synchronized the schema in the cube with TeamConnect design. This build process involves three types of syncs:
- Schema syncs are builds that create a cube, populate it with the object model, and then reload a fresh set of data from the OLTP. The schema sync requires the longest time to build and will consume the most system resources.
- Data reloads, like Schema Synchs, reload the data, but they use an existing cube and repopulate the data from scratch. Data reload syncs are faster than schema synchs but are slower than data synchs.
- Data syncs load incremental changes into the ElasticCube. They are the fastest of the builds.
For more information about the Sisense ETL and OLAP technology, please refer to the Sisense documentation found here: https://documentation.sisense.com/7-....htm#gsc.tab=0
Cube Sizes
Hardware requirements are heavily influenced by cube size. The size of the ElastiCube is impacted by the following:
- Number of reporting users
- Number of reportable objects
- Number of reportable fields
- Size of tables
- Security model
Increasing the number of reportable objects also increases the number of tables included in the ElastiCube and therefore increases the build time. Sisense pulls data from the OLTP in blocks of a hundred thousand rows at a time. However, if a custom table is created in the cube or if the table is large enough, the table is pulled completely into memory in order to process deleted elements.
The security model also impacts ElasticCube size. The TeamConnect security model is calculated based on the user access to records in TeamConnect. The resulting security model is approximately the cross product between the number of projects and the number of reporting users that have access to those projects. This security model is calculated on the fly during the ElastiCube build and the result is loaded into the ElastiCube, increasing the size of the ElastiCube itself.
The size of the ElastiCube should be less than 25 GB to allow for faster building time and less memory usage during the building and querying time. The AutoCube Estimator tool can help predict cube size.
AutoCube Estimator Tool
The AutoCube Estimator tool runs against the TeamConnect database, reads the TeamConnect design, analyzes the data, and estimates the ElastiCube size. Contact Support or Professional Services to use this tool to estimate the ElastiCube size and sync times.
The tool consists two files:
- ClientDataDetailAnalysis.sql
- TCBI schemaSync and dataSync Estimator.xlsx
The SQL script needs to be run against the TeamConnect OLTP as the schema owner or using connect through access. It reads the TeamConnect design, tables size, and data types, and then produce a tab delimited set of text. Copy and paste the result of the SQL script into the Excel file. Using pre-defined calculations and formulas, the spreadsheet calculates the results from the SQL script and estimates the time and size of building the ElasticCube.
If the estimated build time and size of the ElasticCube are not within the desired range, you can use the spreadsheet to make an educated guess to remove some users from reporting access, some of the unneeded custom fields, or even custom objects from reporting. The spreadsheet automatically re-adjusts the estimated build time and ElastiCube size.
Before adjusting or removing any field or object from the spreadsheet for re-estimation, understand the following:
- The data type of the fields that you are trying to remove
- The relation between those fields with the categories/objects
- The relation between the objects and their children/embedded objects
For example, if you are trying to reduce the size of Matter’s custom fields table, analyze the custom fields belong to that category and the data types. If the fields that can be removed are 1 date field and 1 text field, you can reduce the number of the date field in the spreadsheet by 1, reduce the number of the text field by 1, and reduce the size of the text field by 2000.
If you are trying to remove an object from the spreadsheet, make sure to remove all tables that belong to the same object and note if the object is a parent object. If the object is a parent object, all its children and embedded objects need to be removed as well.
After the spreadsheet has been adjusted and has achieved the targeted build time and ElastiCube size, make the real adjustment in the TeamConnect and run the schema sync.
Reports, Queries, and Concurrent Users
The TeamConnect Business Intelligence has a number of elements as part of the integration interface:
- Reports, or widgets, are the foundational visualization objects used in dashboards. They are used to represent ElastiCube data as visualizations like bar charts, line graphs, pie charts and tables.
- Dashboards provide the canvas to organize reports into a related set of visualizations. A dashboard can contain one or many reports and can be shared with others for viewing or editing. Best practice recommends creating dashboards with six or fewer reports.
- Queries are the fundamental method by which reports retrieve their data from the ElastiCube. When a report is rendered, it sends a query request for data. A report usually issues a single query to retrieve the data it needs to render. Because a dashboard can contain many reports, each report in the dashboard will execute a query to retrieve the data necessary to render.
- Custom Blocks are a feature of TeamConnect where dashboards and or reports can be embedded in a page in TeamConnect. Use of this feature requires knowledge of creating custom block elements.
- Homepage Portlets are a feature in TeamConnect that allow homepage managers the ability to embed specific functionality as windows on the homepage. Only specific reports, not dashboards, can be embedded using Homepage Portlets.
Together, these elements impact requirements for hardware.
A dashboard is comprised of one or many individual reports. When a report is rendered, a query request is sent to the query server for the data necessary to render that report. For example, a single dashboard containing five reports will submit five total requests to the query server. As reports are loaded and queries executed, the ElastiCube data is cached on the query server to improve performance the next time that data is needed for a query request. Therefore, when sizing the Sisense machine for memory, make sure that all data be able to fit completely in memory. If the system does not have enough memory to fit all data, then data will be ejected from the cache. If reports continuously eject data to make room for new reports, cache thrashing will occur which could negatively impact the performance and throughput of reports.
Queries have the potential to impact both the servers CPU and memory resources. A complex query with many joins or a Cartesian product can consume all the available memory on the server. Take caution when creating joins between objects in reports to avoid performance issues. When calculating the total number of queries you expect to support, note that embedded reports in TeamConnect custom blocks and homepage portlets also issue queries and must be considered in your sizing. The homepage portlet is only capable of embedding a single report, whereas a report embedded in a custom block can embed a complete dashboard or a single report.
Architectural Diagram
Software Requirements
| Software | Version | Comments |
|---|---|---|
| TeamConnect | TeamConnect Enterprise 6.1 for TeamConnect Business Intelligence 6.1 TeamConnect Enterprise 6.2 for TeamConnect Business Intelligence 6.2 |
. |
| TeamConnect Database | Oracle 12c or 12c R2 | |
| Sisense | Sisense 7.1.0.11010, provided by Mitratech | Mitratech only supports the version of Sisense and Sisense plug-ins included with the installation media. Any other version of Sisense or any other plug-ins are not supported. Mitratech is not responsible for unsupported configurations. |
| Java | 1.8 | Builds 8u201 and 8u202 are the last builds before the new paid licensing structure was put into place by Oracle. |
| TLS Protocol | 1.2 | Transport Layer Security protocol that products data as it's been communicated across the internet. |
Server Requirements
Supported Platforms
The following prerequisites and supported platforms are required for working with Sisense.
| ElastiCube Server and ElastiCube Manager Operating Systems | Product | Version |
|---|---|---|
| Microsoft Windows Server (64-bit) |
2016 | |
| 2012 | ||
| Client Browsers |
Product | Version |
| Microsoft Internet Explorer | 11 and higher | |
| Google Chrome | Current | |
| Firefox | Current |
Capacity and Hardware Requirements
Actual capacity requirements are provided after consultation with Mitratech. The requirements of your configuration may vary depending on the number of concurrent users, builds running in parallel, ElastiCubes hosted on a server, and additional factors specific to your server, for example, non-Sisense applications running on the same server.
TeamConnect Business Intelligence deals with large amounts of data. Both the ETL (build of an ElasticCube) and the queries for the cube must process this data that is proportional to the original TeamConnect database (OLTP). The hardware recommendations in this document are based on a set of use cases and sizes from an average TeamConnect database, but TeamConnect can be highly customized and these customizations impact the hardware required to run TeamConnect Business Intelligence.
Factors that can affect the hardware requirements include:
- Numbers of reportable objects
- Number of categories per object
- Number of rows per table and number of columns (and their associated data type)
- The security model, which is a cross product of the users and the number of projects to which they have access
- Number of concurrent users
- What data is included in the cube
- TeamConnect customizations
 Important: Read and understand the information in the following sections before estimating your hardware requirements:
The listed hardware specifications are based on the following:
- A typical TeamConnect deployment
- An Elasticube that is less than 25 GB (see Cube Size and AutoCube Estimator Tool for estimating the size of your ElastiCube)
- Fewer than 50 concurrent reporting users
- A typical number of concurrent queries (see Reports and Queries)
- Recommended use cases and best practices
- A single-node, on-premise configuration
| Processor | 16 Cores 2.5 GHz Supports Advanced Vector Extensions (AVX) |
|---|---|
| RAM | 96 GB |
| Disk Space | 256 GB SSD |
Contact Mitratech if any of the following are required:
- More users
- A larger cube
- A different set of behaviors
- A different data profile
- More than one cube is being build or queried
- Sisense is being used for more than TeamConnect Business Intelligence
Integration Requirements
- Each TeamConnect instance should have two Sisense administrative accounts - one for web UI login and one for TeamConnect integration.
- For on-premise installations, TeamConnect only supports one ElastiCube per Sisense server machine. Each TeamConnect instance can only be connected to one ElastiCube.
- Each TeamConnect user with an automatically created Sisense account must have a unique email address per Sisense server. This means that an on-premise client with a single Sisense server cannot have a TEST ElastiCube and a PROD ElastiCube with users with the same email. The second time an email account is used, the user will not be created automatically on the Sisense server..
- Using TeamConnect Business Intelligence solution outside of the intended purpose or using unsupported versions and plug-ins may impact your Upgrades Included Program eligibility. Mitratech is not be responsible for unsupported configurations.
Security
Project-centric Cascading Security
TeamConnect Business Intelligence offers project-centric cascading security at the object and record level, but not field/category level. This security is applied regardless if cascading security is enabled or disabled in TeamConnect.
An object inherits security from its parent matter. For example, Dispute security overrides all associated objects' security. System objects do not have security applied. (System Objects are objects that cannot be modified by end users and are identified by a monitor icon in the Setup Tool. For example, Document, Task, Invoice, Account, etc. In contrast, Custom objects can be modified by end users and can be created automatically in the system when new modules are installed. They are identified by a gear icon in the Setup Tool. For example, Dispute.) For example:
- If a user has access to a specific dispute, the user can report on anything associated to that specific dispute, even child items to which the user has not explicitly been granted access.
- If a user does not have access to a specific dispute, the user cannot report on anything associated to that specific dispute, even if explicitly granted access to one of the items.
SSL
If using SSL is configured for either TeamConnect or Sisense, both products must be configured for SSL. Otherwise, using mixed ssl and non-ssl products may trigger mixed-mode security errors and prevent you from viewing the Reports tab in your browser.
Recommended Use Cases and Best Practices
This section describes the use cases and best practices used relative to the hardware recommendations. Sisense is a generalized business intelligence tool, however TeamConnect uses it in a specific manner. The following guidance documents the usage of Sisense.
Building Sisense ElasticCubes
- The best practice when building the TeamConnect Business Intelligence ElasticCube is to build the cube at night after resetting IIS and the ElasticCube Management Service. It is recommended that you perform either a Data Reload or Data Synch during the week and a schema synch during the weekend. If you want to clean sensitive data that has been removed from the OLTP, use a Data Reload, otherwise a data synch is recommended.
- The hardware recommendations in this document assume that hardware resources used during the ElasticCube build will be re-used during the day to support the query load. If it is desired to refresh the ElasticCube during the day, it is recommended you contact Mitratech for guidance.
- The recommended maximum size of the resultant ElasticCube should be less than 25 GB to allow the ElasticCube to be built easily during the night. The hardware recommendations in this document are based on a 25 GB ElasticCube. If the resultant cube is less than 25 GB in size, allowances should be made for growth of the ElasticCube over time.
- Depending on whether you are using Data Synchs or Data Reloads, the time to build will vary. Data Synchs take less time as TeamConnect Business Intelligence reloads only the changed values. Data Reloads replace the complete data set. Schema synchs take the most time, as it prepares the ElasticCube by populating it with the schema and then doing a full Data Reload. After a Schema Synch is performed, then a second Data Synch should be immediately performed as it will help query times by pre-building the indices in the ElasticCube.
- The number of CPUs do not impact build performance; however, the speed of CPU helps in processing the data, but the main factors in build performance will be disk I/O and the OLTP latency. It is recommended to use SSD drives for the Sisense servers.
Queries
- The hardware recommendations in this document should be able to handle 50 concurrent users and their associated queries. Assuming the recommended maximum of 8 widgets per Dashboard and 50 concurrent users, the below hardware specification should be able to handle bursts of 100 queries per minute under load.
- Note: When a cube is rebuilt, the first set of queries need to repopulate the Sisense cache, resulting in slower initial queries that are not an artifact of inappropriately sized hardware.
- Query performance is tied directly to CPUs. Increasing the number of CPUs impacts the performance of the Sisense server for queries. Have enough memory to hold the complete data set for commonly run queries or Sisense will perform poorly as it will need to continuously reload the data sets. The type of the query also has a large impact. Understanding of the TeamConnect Business Intelligence object model so that you can avoid large, cross product queries that require large amounts of temporary space in memory. Memory should be large enough to handle the largest set of unique, concurrent cross product queries and all the cube.
Server Restart and Maintenance
- It is recommended to restart IIS and the Sisense ElasticCube Management Service every night. To restart IIS, use iireset in a command command prompt instead of PowerShell.
- The RabbitMQ logs will need to be cleared if they reach over 500,000 queued messages as the data cache can fill the drive. If these logs are not cleared, then both memory and diskspace will be affected causing Sisense to fail to build the cube and queries may fail or return errors. To clear the RabbitMQ queue:
- Open a command prompt as an administrator.
- Navigate to the folder C:\Program Files\Sisense\Infra\Rabbitmq\sbin.
- Type the following command: rabbitmq-plugins enable rabbitmq_management
- If you receive an error, restart the pulse/broker service and proceed to the next step.
- Navigate to "http://localhost:15672" (on the server) and log in with the Username: guest and Password: guest.
- Open the Queues tab and if you see 0 messages, the issue is not related.
- If you see many hanging massages, clear the massages by clicking Queue sisense.ecs.build.logs.persist.
- Click Purge and repeat until there are no more in the queue.
Disclaimer
Using TeamConnect Business Intelligence solution outside of the intended purpose or using unsupported versions and plug-ins may impact your Upgrades Included Program eligibility. Mitratech is not be responsible for unsupported configurations, including but not limited to:
- Adding or deleting ElastiCubes
- Using more than one ElastiCube per TeamConnect instance
- Deleting schemas
- Using versions of Sisense or plug-ins other than the specified version provided to you by Mitratech
- Using Sisense outside of the TeamConnect Business Intelligence integration
Mitratech reserves the right to not support non-standard or non-default functionality and extended functionality available in third-party software, unless specifically documented as supported or certified in the Mitratech product documentation.
For further information regarding third-party non-standard or non-default functionality, please contact Mitratech Support. This document, along with the software that it describes, is furnished under license and may be used or copied only in accordance with the terms of such license. The content of this document is furnished for informational use only, is subject to change without notice, and should not be construed as commitment by Mitratech. Though every effort was made to ensure that the information in this document is correct and reliable, Mitratech does not assume any liability for any errors encountered in this document. If you need support, please contact the Mitratech support team by sending an email to: support@mitratech.com.
Licensing
XML Layer Support
TeamConnect Installer Requirements
Upgrade Considerations
Upgrading with Custom Logos and Color Schemes
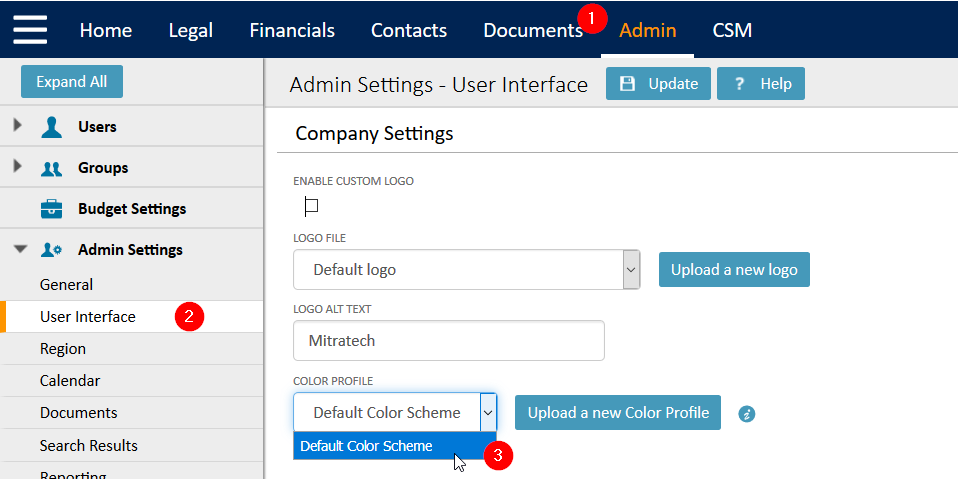
If you are upgrading from TeamConnect Enterprise version 5.x and are using a custom logo and/or color scheme, you will need to remove or disable custom color profiles before upgrading.
You can do this by navigating to Admin > Admin Settings > User Interface > Set to Default Color Scheme and ensure the Enable Custom Logo box is NOT checked.
Once your instance is upgraded, the new profile can be uploaded using the 6.X format.
If you have already upgraded and are experience issues, please follow these steps to troubleshoot and resolve the issue.
Upgrading with TeamConnect Modules
If you are upgrading TeamConnect Modules (e.g., Financial Management, Collaborati Spend Management, Legal Matter Management, etc.) from an Enterprise version prior to 5.0, it is important to ensure your Enterprise version is not upgraded beyond an available upgrade path for the modules to reach 6.x. For example, if TeamConnect Enterprise is upgraded to 6.1 while CSM is still at version 3.4, there will be no available upgrade path to get CSM to 5.0. Please consult the Module Upgrade Guide for more information on the best order for upgrading each module and TeamConnect Enterprise.
TeamConnect Business Intelligence
If you have a previous installation of TeamConnect Business Intelligence, follow the specific instructions for upgrading found in Upgrading to TeamConnect Business Intelligence 6.1 or Upgrading to TeamConnect Business Intelligence 6.2.
Elasticsearch
Upgrading to TeamConnect 6.1 with Elasticsearch 5.3.0
Important: The following steps must be incorporated into the upgrade process when upgrading to TeamConnect 6.1 in order for Global Search to perform properly.
- Search Indexes - Due to changes in the Elasticsearch index structure from one index for all objects to one index per object, the index needs to be deleted and rebuilt using this process and timeline:
- Before starting the upgrade process:
- Delete the existing index from the pre-6.1 version of TeamConnect.
- Delete the records from the Y_RECORD_CHANGE table if any exist.
- After the TeamConnect upgrade is complete:
- Build the index for each object using the Global Search Index Tool.
- Before starting the upgrade process:
- Search Guard - In TeamConnect 6.0 and earlier versions, the "ElasticSearchUUID" system setting is stored in the database and the UUID value is the name of the index. The new TeamConnect 6.1 naming convention for the indices is in the format UUID-[uniqueCode for object]. For example, index name for Contacts will be UUID-cont. Existing clients with Search Guard must do the following:
- Since these configurations added the index name (the UUID from the database) to their certificate on the node, update the certificate to include a wildcard after the UUID name.
- In the SG_ROLES.YML file, the index name under each role refer to the ElasticsearchUUID from the database. At the end of the index name, add an asterisk at the end of the name, before the closing single quote.
Upgrading to TeamConnect 6.2 with Elasticsearch 7.1.1
TeamConnect 6.2 requires an upgrade to Elasticsearch 7.1.1. The following steps must be incorporated into the upgrade process when upgrading to TeamConnect 6.2 in order for Global Search to perform properly.
- Search Indexes - The index needs to be deleted and rebuilt using this process and timeline:
- Before starting the upgrade process:
- Delete the existing index from the pre-6.2 version of TeamConnect.
- Install Elasticsearch 7.1.1 and upgrade TeamConnect.
- After the TeamConnect upgrade is complete:
- Build the index for each object using the Global Search Index Tool.
- Before starting the upgrade process:
If using Tomcat and Elasticsearch, the following files need to be added to the tomcat/lib directory:
- bcpg-jdk15on-1.61.jar
- bcprov-jdk15on-1.61.jar
Upgrading to TeamConnect 6.3 with Elasticsearch 7.10
TeamConnect 6.3 requires an upgrade to Elasticsearch 7.10. The following steps must be incorporated into the upgrade process when upgrading to TeamConnect 6.3 in order for Global Search to perform properly.
- Search Indexes - The index needs to be deleted and rebuilt using this process and timeline:
- Before starting the upgrade process:
- Delete the existing index from the pre-6.3 version of TeamConnect.
- Uninstall the older version of Elasticsearch and install Elasticsearch 7.10 and upgrade TeamConnect to 6.3.
- After the TeamConnect upgrade is complete:
- Build the index for each object using the Global Search Index Tool.
- Before starting the upgrade process:
Localization Key Updates
See Localization Key Updates to see the updates in each version of TeamConnect.
Optional Script to Support Data Warehouse and Localization
When upgrading from a version prior to 3.3 SP1, the database schema is altered, but not to the extent necessary to completely support localization. If your organization is upgrading and wishes to support localization, you must run an optional database script after the upgrade process is complete.
Even if your organization does not expect to use localization, you need to run this script if:
- You use Data Warehouse, and
- You expect to add new custom object types to your application design in the future.
That's because some Data Warehouse tables related to custom objects have datatypes that are compatible with localization, but not compatible with the datatypes that existed prior to version TC3.3 SP1. Running the script will resolve this incompatibility. You must drop and recreate the Data Warehouse after running the script.
This script requires exclusive use of your database while it is running. It increases database size by 2% to 4% in internal testing done by Mitratech. Nearly all VARCHAR columns have their datatypes changed to NVARCHAR2 (Oracle) or NVARCHAR (SQL Server.)
Contact Mitratech Support to obtain this script.
Upgrading Legal and Financial Management
For more complex installations across several modules, contact Mitratech documentation at documentation@mitratech.com for the Module Upgrade Detailed Matrix.
The following information details upgrades for users first upgrading to the 6.x product line. Users who are already on 6.0 (or later 5.0.x releases) can download the relevant Legal and Financial Management versions via Available Updates.
Use this page if you have a version of Legal Matter Management prior to 5.0.1 and are upgrading to the following versions:
- TeamConnect Enterprise 6.1 or later
- TeamConnect Legal Matter Management 5.0.1 or later
- TeamConnect Financial Management 5.0.1 or later
Following these steps to upgrade:
- Upgrade TeamConnect Enterprise.
Note: You may run into validation errors that you need to correct before continuing.
- Restart your application server.
- Upgrade to Legal Matter Management 5.0.1.
After correcting conflicts, re-run the Upgrade Toolkit.
Note: If the tool fails, review the error log to identify the necessary fix and report errors to Mitratech support.
- Restart your application server.
- Install Financial Management and any other modules from the About page. Each time you install a new product, restart you application server.
- Configure Financial Management.
- Proceed upgrading.
Validate Your Data Before Running the Installer
When you are upgrading an existing TeamConnect database, particularly one that was once used with a TeamConnect 2.x version, the database may contain duplicate detail records that would interfere with the upgrade to the current version. Such duplicates may have arisen from earlier conversions that disabled validation rules while the conversion was running.
To check for this possibility, you must run a validation SQL script, which will provide information about whether duplicates exist. If they do exist, you must run a second small SQL script, doing a separate run for each duplicate record that must be removed. Follow these steps:
- In your installation media, locate the validation script that is appropriate to your database server:
\validation\TC33_Upgrade_Data_Validation\MSSQL\MSSQL_TC33_upgrade_data_validation.sql\validation\TC33_Upgrade_Data_Validation\Oracle\Oracle_TC33_upgrade_data_validation.sql
- Run this SQL script against your TeamConnect database and observe the results. If the result set is empty, you have no duplicate detail records and you do not need to perform the rest of these steps.
For Oracle, use SQL*Plus to run this script, and look for the result set in file TC33_Data_Validation_report.log, in the same folder as the script file. For SQL Server, the result set is returned on-screen, although you can direct the result set to a file if you wish, depending upon the query tool that you use. - If the validation script returns results, you must manually remove the duplicate records. You will need to supply the values of four parameters, which are found in the validation script's result set:
- TABLE_NAME
- MASTER_PRIMARY_KEY AND
- FIELD_PRIMARY_KEY
- DETAIL_PK_to_keep
- If you are using Oracle, skip to step 6. If you are using Microsoft SQL Server, execute SQL script
\validation\TC33_Upgrade_Data_Validation\MSSQL\MSSQL_Parametrized_To_Remove_Duplicate_Details.sql
This script will create a procedure named remove_duplicate_detail_pro, which you will execute repeatedly in the next step. - For each row in the result set of step 2, execute this procedure, supplying four parameters as shown in this example:
exec remove_duplicate_detail_pro 'E_CONT_DETAIL_TEXT_VALUE ', 703 , 604 , 502 ; - If you are using Oracle, for each row in the result set of step 2, run script
\validation\TC33_Upgrade_Data_Validation\Oracle\Oracle_Parametrized_To_Remove_Duplicate_Details.sql
supplying the four parameters in the syntax shown by the example in step 5. - After you have run the procedure for each row in the validation script's result set, manually drop table BAD_DATA_RPT, then do a final check by running the validation script from step 1 again. This time, there should be no rows in the result set.
Data Warehouse
If you use Data Warehouse, which has a denormalized database containing data from the TeamConnect production database, consider dropping the data from that denormalized database and repopulating it after you upgrade. In some cases, upgrade scripts for TeamConnect may repair incorrect data in the production database but the repaired data is not automatically moved to the denormalized database. Clearing and repopulating the denormalized database resolves this potential issue.
Note: Only Data Warehouse version 5.0.1 and 5.1 will work with TeamConnect version 6.0 and 6.1. Only Data Warehouse 6.1.1 will work with TeamConnect 6.2. Earlier versions of Data Warehouse must be upgraded.
Running the Installer
TeamConnect Installer
Please note the following before running the TeamConnect Installer:
- Review the requirements for running the TeamConnect Installer in Installation Requirements. The TeamConnect Installer must be run from a Windows machine.
- If you are deploying TeamConnect to a Windows-based application server, you may choose to run the TeamConnect Installer directly on the server. If you run the TeamConnect Installer on a different machine, you must transfer the output of the TeamConnect Installer program (either a TeamConnect .war or TeamConnect .ear file, and TeamConnect Online Help .war file) to your application server.
- If you are deploying TeamConnect to a Unix or Linux-based server, first run the Installer on a Windows machine. When finished, you must transfer the output of the Installer program (either a TeamConnect .war or TeamConnect .ear file, and TeamConnect Online Help .war file) to your TeamConnect application server.
- Make sure that your PATH environment variable includes the bin directory of a valid Java Development Kit (JDK).
- The instructions for running the TeamConnect Installer are based on the TeamConnect Installer Form. Print this form and collect the required system data before actually running the TeamConnect Installer.
- Some parts of the TeamConnect Installer, particularly those that run database scripts, may take several minutes to complete. In this version, database scripts related to Account records are complex, so if your instance has many Account records, the installer may run noticeably more slowly than usual. No progress messages appear during this time. Do not presume that the TeamConnect Installer is "hung up" unless it has been running for at least thirty minutes. Check the database server to see whether database activity is still being logged against the installer.
- If you are upgrading an existing TeamConnect database on Oracle, the upgrade includes a script that re-indexes Document records. If your database contains a very large number of Document records, this script may require several hours of runtime. You can postpone the running of this script, allow the installer to finish, then run the script later, manually.
If You are Using Oracle
An optional script is available named ORACLE_upgrade_2_FullTextSearch_Reindexing.sql. The purpose of this script is to resolve an issue with full-text search in Document records when the search string includes a hyphen. Until the script is run, such searches may return incorrect results.
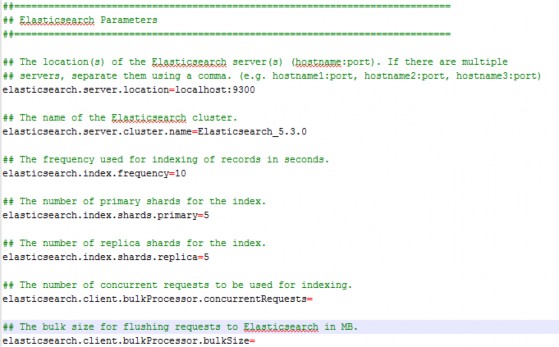
Manually Configuring the Elasticsearch Parameters in the TeamConnect Properties File
Elasticsearch (Global search) parameters are able to be edited in the TeamConnect properties file found in the WEB-INF folder. These properties are explained in detail on the Elasticsearch Setup page of the TeamConnect help.
The server address, name of the cluster, and indexing frequency are required for search to function.
The number of primary shards defaults to a value of '5'. Entering in any invalid character here will thereby result in 5 primary shards.
The number of replica shards defaults to a value of '1'. Entering in any invalid character here will thereby result in 1 replica shard per primary shard.
Note: The concurrent requests and bulk size for flushing requests are not required and do not have default values.
Installing TeamConnect
Running Database Drop Scripts
Troubleshooting
Deploying
Special Considerations for Microsoft Outlook
Creating and Configuring your Domain (WebLogic only)
Preparing for Deployment
Configuring Clustered Servers
Configuring Database Connection
Configuring the Java Virtual Machine
Deploying TeamConnect
Verifying Installation
Logging in for the First Time
To verify that TeamConnect has been properly installed, you must also perform the initial TeamConnect application configuration steps. To do so, you must do the following:
- Login to the system as user TeamConnectAdmin.
- If this is a new installation, change the default TeamConnectAdmin password to a secure password.
- In Admin Settings, click the About link and upload the license file.
- Create a group account with the full rights of system administrators.
- Create a contact user account, typically for your TeamConnect system administrator, and make that user a member of the group account that you just created.
(optional) Configure the TeamConnect Login Screen (for SSL only) - Log in with that user.
(optional) Verify that the online help can be displayed.
Because the TeamConnect installation files may have been customized before you received them, certain screens may differ slightly from those shown in the following steps. However, if they differ significantly, or if described functionality is missing, carefully ensure that you have followed all of the installation instructions.
To log in to TeamConnect for the first time
- Ensure that the TeamConnect servers are properly configured and running. For more information, see the previous chapters, if necessary.
- Open an internet browser window and input the following address:
http://Hostname:port/TeamConnect/login
ReplaceHostname:portwith the IP address and port of the machine on which TeamConnect is deployed.
If you have deployed TeamConnect to one managed server, this is the IP address and port of the managed server. If you have deployed TeamConnect to a cluster, this is the IP address and port of the administrative server on which the cluster is defined. If you have set up a proxy through an alternate web server, this is the IP address of the web server.
The TeamConnect login screen should appear. - Log in as the following:
User Name:TeamConnectAdmin
Password:PASSWORD(case sensitive)
Input these values into the Username and Password fields, and click Login. You are requested to change your password.
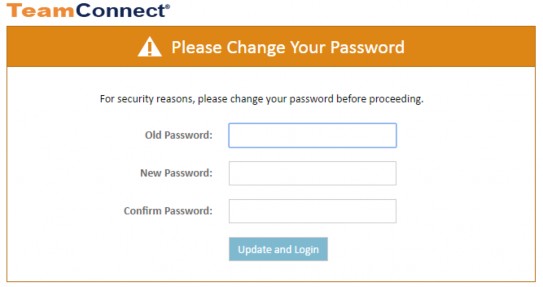
- Enter the appropriate values in the password fields and click Save and log in.
This logs you in as the TeamConnectAdmin user. This user has limited rights within TeamConnect, and should be used only for licensing and to create new users.
Logging in to TeamConnect for the first time takes longer than usual. TeamConnect generates its JSP interface files on the server at the first login. Subsequent login, regardless of the client, do not take as long.
To setup users:
- When you install a new instance of TeamConnect, only the TeamConnectAdmin user should log in. The first task for this user is to upload a licensing file into TeamConnect so that ordinary users can also log in.
- Obtain the licensing file from your Mitratech Support representative.
- After you have received the licensing file, go to Admin, Admin Settings, and About. There you must click a button, Upload License, that prompts you for the location of your license file and uploads it. Then you may begin using TeamConnect with all users.
It is good practice not to use TeamConnectAdmin to log in on a regular basis, so these next steps will set up other usernames with administrator rights, and you can log in with those usernames.
- Create a Group with comprehensive rights.
All rights in TeamConnect are based on user groups. Your system administrator cannot acquire comprehensive rights unless they belong to a group with those rights.
Refer to Creating or Editing Groups to learn how to create a new group, and how to assign rights to that group. Assign all possible rights to the new group. Save the Group record. - Create a User to represent the system administrator.
Refer to Creating or Editing Users to learn how to create a new user account, and how to assign that user to the group that you created in the previous step. Save the User record.
You must associate the User record with a Contact record. Since TeamConnect has just been installed, there aren't any Contact records in existence yet, and you will create a new Contact (with the system administrator's name) as part of the process of creating the user account. - Test your work by logging out of TeamConnect (using the Log Out link in the upper right of the page), then logging in with the username and password of the User account that you just created. This user should have access to all parts of TeamConnect, including the Admin tab and the Setup link, which are both visible on the user's home page.
Logging Options
Troubleshooting
Business Objects Single Sign-on
Deploying BOSS XI and Configuring URLs
It also describes how to construct URLs to access the main Business Objects login page and to Business Objects documents (reports). These conventions can be used when defining URLs, for example, in a TeamConnect portal pane on a home page.
Following points to be noted before starting the deployment of BOSS war file:
-
BOSSXI.war file works for the new install of BO4.2SP3 and earlier versions.
-
For a new BO4.2SP4 installation or upgrade of BO4.2SP4 to a greater version, BOSS42.war file will be utilized for Single Sign-On (SSO).
Note:
It is recommended to adopt the new BOSS42 SSO, whether or not they upgraded their BO server, because it leverages the supported method by BO of integrating SSO.
Users have to disable the chrome security feature "SameSite by default cookies'' in order for the embedding report in the TeamConnect portal to work on chrome browser. Embedding report in the TeamConnect portal works on both BOSSXI and BOSS42 on both Firefox and Edge browsers.
Procedure to Disable SameSite by default cookies
Users can find this security feature in the Chrome flags menu.
-
Enter the following in the chrome address bar and select “Disabled” from the drop-down menu.
chrome://flags/#same-site-by-default-cookies

-
Select the “Relaunch” button.
Support for Business Objects Single Sign-On (BOSS)
Business Objects is supported for single sign-on (BOSS) with TeamConnect 5.1 and above versions. BOSS has been certified using WebSphere, Apache Tomcat and WebLogic to deploy BOSS war file as an application.
Since BOSS is delivered as a J2EE application, you must deploy it as such on an application server. BOSS cannot be deployed on IIS.
Requirements for Deploying BOSSxx.war
- BOSS war file for Business Objects does not have to be deployed on a Business Objects node. You must simply deploy it on your application server.
- Both the Business Objects server and the application server must be on the same domain (for example, .mitratech.com).
- If BOSS and Business Objects are deployed on the same machine, then it is not required to have a domain name in the Cookie Domain field of Business Objects WebIntelligence Settings in TeamConnect's system settings screen. Also, URLs to BOSS do not need to include a fully qualified domain name. You can simply specify the machine name in the URL.
- From the global.properties file for Business Objects, you must set the trusted.auth.user.retrieval variable to WEB_SESSION.
(You can find the global.properties file at this location: <SAP BOBIE INSTALL DIRECTORY>\SAP BusinessObjects\SAP BusinessObjects Enterprise XI 4.0\warfiles\webapps\BOE\WEB-INF\config\default\global.properties) - Once you have verified that BOSS has been deployed successfully, you must configure the Business Objects WebIntelligence Settings in TeamConnect's System Settings on the Admin menu. For details, see BusinessObjects WebIntelligence Single Sign-on, provided on your TeamConnect Installation package.
-
All the BOE communication ports need to be open (i.e. 6400, 6410, 6405, 8080, 59959), including the CMS Request Port.
-
Navigate to CCM and Properties >> Configuration
-
For CMS request port, Go to CMC >> Servers >> Central Management Console >> Metrics. Check Request port Value.
-
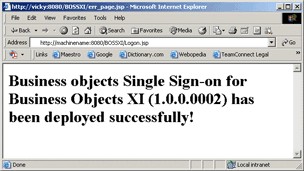
Verifying Successful BOSS Deployment
To verify whether BOSSxx.war file is deployed successfully, open a browser window and type in the following URL. Replace the properties in brackets with the application's property values:
http://<appserver.host>:<appserver.port>/<jsp.app.name>/Logon.jsp
If you see the page below, then BOSSxx.war file has deployed successfully.

Constructing URLs to Business Objects Pages
When providing URLs to end users so that they can access Business Objects documents through TeamConnect (for example, in a portal pane on their home page), you must construct the URLs as described in "OpenDocument Parameters" in the BusinessObjects Enterprise.
For more information on how to construct URLs, please see the appropriate vendor documentation.
The following examples can help you construct the proper URLs. Note that if BOSS is not deployed on a Business Objects node, then the <hostname> must include the fully qualified domain name of the server.
Caution: Do not use a token in your URL. This will invalidate the link .
For details about adding Business Objects URLs to TeamConnect portal panes, see Adding WebIntelligence URLs.
URLs When Business Objects Deployed on IIS
The following are examples of valid URL construction when the Business Objects server is deployed on IIS.
http://<servername>:<port>/BOE/OpenDocument/opendoc/openDocument.aspx
?<parameter1>
&<parameter2>
&...
&<parameterN>
URLs When Business Objects Deployed as J2EE Application
The following are examples of valid URL construction when the Business Objects server is deployed on your application server.
http://<servername>:<port>/BOE/OpenDocument/opendoc/openDocument.jsp
?<parameter1>
&<parameter2>
&...
&<parameterN>
TeamConnect Installer Form
Web Application Parameters
weblogic.xml Parameters
teamconnect.properties parameters for all application servers
Cache Synchronization Parameters
Encryption Tool
Performance Monitor
Overview
Performance Monitor Configuration
Verifying Performance Monitor
Upgrading from Previous Versions
Database Design
Automatic Conversion Process
Manual Conversion Suggestions
Converting ExpressionBuilder References
Web Folders