
Data Sources
Data sources let you define groups of common data values (such as customers and email address, or staff members and employee ID numbers) that can be referenced by other functions within the TAP system. A typical example is using a data source to populate a drop-down form field in a workflow form. The method of data entry depends on the type of data source. Three types of data sources are supported:
- Standard Data Sources are lists of related single values (such as vendor names or sales regions) or value pairs (such as employee names/email addresses). Standard data sources can be added by manual entry, by uploading a comma-separated values (CSV) file, or by creating an email list. You can also attach and associate data items (documents) with one or more values in the data source.
- Conditional Data Sources are used to create a relationship between two drop-down form fields, where the selection made in the first (parent) form field determines the content of the second (child) form field.
- Grid Data Sources generally contain complex groups of data values (such as vendor names, addresses, phone numbers, and email addresses). Grid data sources are added by uploading a comma-separated values (CSV) file.
- External Data Sources are used to retrieve lists of related single values (such as vendor names or sales regions) from a web resource external to the TAP system.
- External Grid Data Sources are used to retrieve complex groups of data values (such as vendor names, addresses, phone numbers, and email addresses) from a web resource external to the TAP system.
Accessing Data Sources
To access Data Sources:
- Click the Business Automation
 button in the TAP Toolbar to access the Business Automation module.
- The Designer tab is selected by default, and the screen displays the Designer Homepage.
- Click the Data Sources tab.
- The Data Sources page displays.
- The Data Sources page displays.
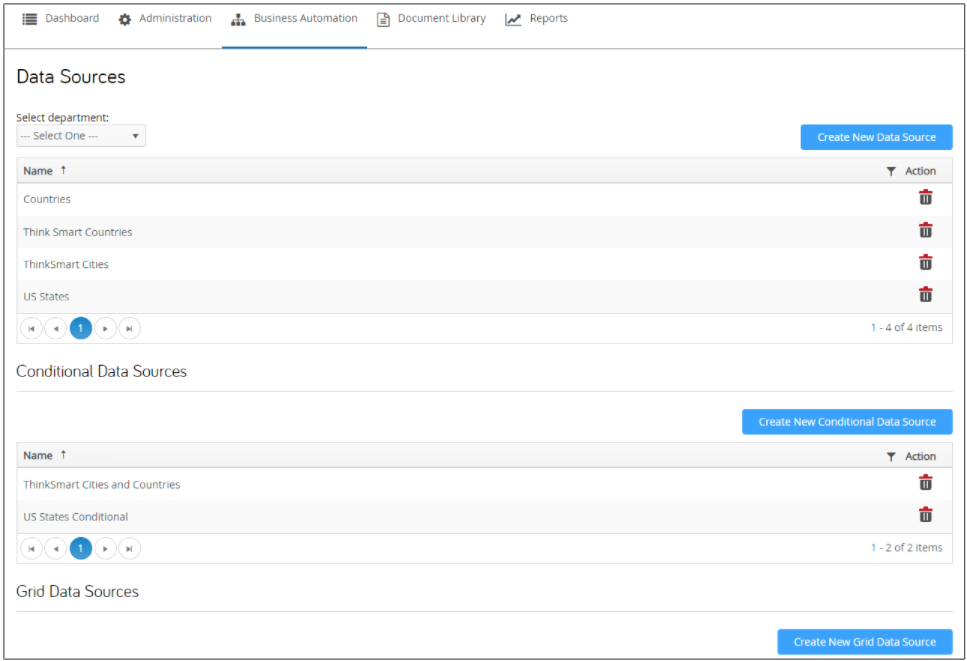
The Data Sources page lists all currently available data sources grouped according to data source type; standard Data Sources, Conditional Data Sources, and Grid Data Sources. Each list shows the Name and Description for the data source. Controls for navigating the lists are shown in the lower left corner of each list. The lists are initially sorted in alphanumeric order, by Name. If desired, you can sort a list according to a selected sort key or filter a list to display a subset of data sources. Additionally, the standard Data Sources list can be limited to display only those data sources associated with a department chosen from the Select department menu.
Standard Data Sources
You can add a new Standard Data Source to your TAP system.
NOTE
All fields in the Create Data Source form are mandatory.
Creating a Data Source
To create a data source:
- Click the Create New Data Source button on the Data Sources page.
-
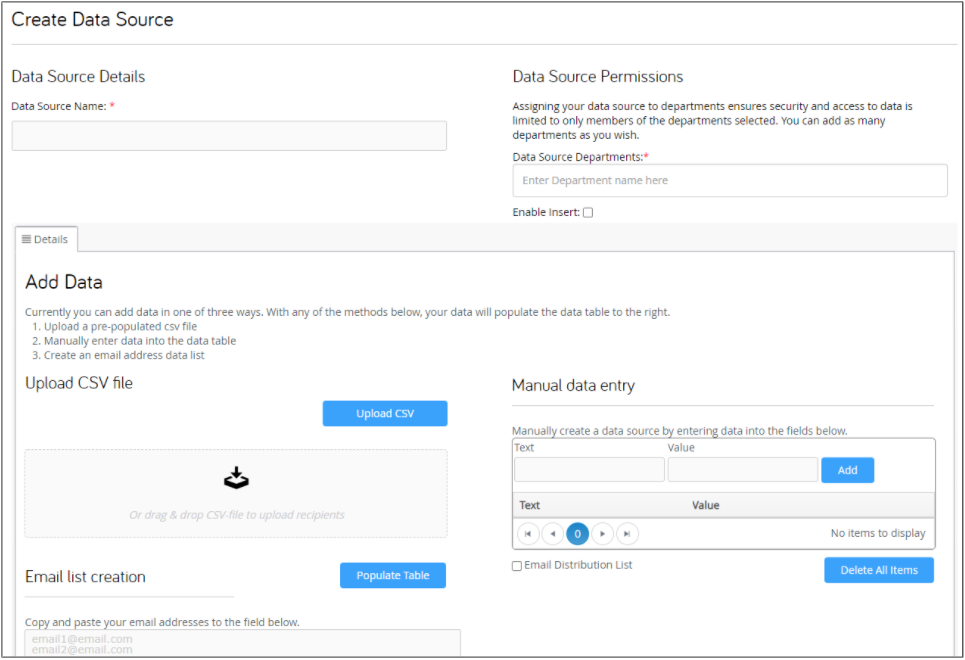
The screen refreshes to display the Create Data Source form.
-
- Enter a name for the data source in the Data Source Name text box.
- Enter a description of the data source in the Data Source Description text box.
- Select the departments that are granted access to the data source form the Data Source Departments menu.
- You can select one or more Data Source Departments.
- Click the Data Source Departments field and select the desired department. Repeat as necessary to select additional departments.
- To remove a department from the Data Source Departments field, click the x icon for the desired department.
- To remove a department from the Data Source Departments field, click the x icon for the desired department.
- Add the data for the data source through any of the following methods:
- Upload a CSV file to be used as the data source.
- Copy and paste an email list to be used as the data source.
- Manually enter the data to be used as a data source.
- Use the Email Distribution List check box to indicate whether or not the data source is an Email Distribution List.
- When all necessary values for the data source have been entered, click the Save Data Source button to save the data source. (Click the Cancel button to cancel the addition and return to the Data Sources page.)
-
The Create Data Source form closes, and the Data Sources page refreshes with the new data source added to the Data Sources list.
NOTE
If you omit a required field or do not supply data for the data source, an advisory message displays and the field is highlighted in red. Enter the required information, then click the Save Data Source button to save the data source.
-
Uploading a CSV File
You can upload a comma-separated values (CSV) file containing the appropriate data when adding a Data Source. You can upload a CSV file either by "drag and drop" or by using the Upload CSV function.
To upload a file using "drag and drop:"
- Locate the document you wish to upload on your local workstation.
- Make sure both the directory containing the file for upload and the Create Data Source form are visible on the desktop.
- Click and hold the left mouse button, then "drag" the file to the drag & drop csv to upload recipients field on the Create Data Source form.
- When the upload has completed, the uploaded file is shown below the drag & drop csv to upload recipients field.
- When the upload has completed, the uploaded file is shown below the drag & drop csv to upload recipients field.
To upload a file using the Upload CSV function:
- Click the Upload CSV button.
- A standard File Upload dialog displays.
- A standard File Upload dialog displays.
- Locate and select the document you wish to upload, then click the Open button on the File Upload dialog.
- When the upload has completed, a confirmation dialog displays the message "CSV file was successfully uploaded to the Grid Data Source."
- When the upload has completed, a confirmation dialog displays the message "CSV file was successfully uploaded to the Grid Data Source."
- Click the OK button to close the confirmation dialog.
- The name of the uploaded file is shown below the drag & drop csv to upload recipients field.
- The name of the uploaded file is shown below the drag & drop csv to upload recipients field.
To remove a CSV file:
- Click the X next to the file name.
- The file is removed from the Create Data Source form.
Using Manual Data Entry
You can add data for the Data Source by manually entering email addresses in the Manual data entry table.
To use Manual data entry:
.jpg?revision=2)
- Enter an identifier in the Text text box.
- If you do not wish to include an identifier, leave the Text text box blank.
- If you do not wish to include an identifier, leave the Text text box blank.
- Enter the associated value in the Value text box.
- Click the Add button.
- The specified Value (and identifier Text, where applicable) are added to the Manual data entry table.
- In cases where the Text text box was left blank, the contents of the Value text box is added to both columns of the Manual data entry table.
- Repeat steps 1 through 3 to add additional values.
- To remove a text/value pair from the Manual data entry table:
- Click the
.jpg?revision=1) icon for the desired text/value pair.
icon for the desired text/value pair. - The Manual data entry table refreshes with the selected text/value pair removed from the table.
- Click the
- To remove a text/value pair from the Manual data entry table:
Creating an Email List
You can add data for the Data Source by copying and pasting and exiting list of email addresses in the Email list creation field. You can also add data to the Email list creation field manually.
NOTE
When copying and pasting email addresses from an existing list, be sure each entry in the list is formatted as a valid email address (e.g., "name@domain") and only one address is included per line.
To copy and paste email addresses:
- Locate and open the file containing the email addresses you wish to use in the Data Source.
- Select and copy the list using the appropriate procedures for the application in which the list was created.
- Position the cursor over the Email list creation text box, and click the right mouse button.
- A shortcut menu displays.
- A shortcut menu displays.
- Select Paste from the shortcut menu.
- The copied list is pasted into the Email list creation text box.
- The copied list is pasted into the Email list creation text box.
- Click the Populate Table button.
-
Data from the Email list creation text box is added to the Manual data entry table.
NOTE
If data in the Email list creation text box is not properly formatted, an advisory dialog displays the message "Not valid email in 'Email list creation'." Click the OK button to close the dialog. Edit the contents of the Email list creation text box as needed, then click the Populate Table button to add the data to the Manual data entry table.
-
To manually enter email addresses:
- Click the the cursor in the Email list creation text box.
- Type the desired email addresses. Be sure to enter only one email address per line.
- When all desired email addresses have been entered, click the Populate Table button.
-
Data from the Email list creation text box is added to the Manual data entry table.
NOTE
If data in the Email list creation text box is not properly formatted, an advisory dialog displays the message "Not valid email in 'Email list creation'." Click the OK button to close the dialog. Edit the contents of the Email list creation text box as needed, then click the Populate Table button to add the data to the Manual data entry table.
-
Editing a Data Source
You can edit an existing Standard Data Source.
To edit a Data Source:
- Locate the data source you wish to edit in the standard Data Sources list.
- Click the entry for the desired data source.
- The screen refreshes to display the Edit Data Source screen. The form is pre-filled with the current values for the selected data source.
- The screen refreshes to display the Edit Data Source screen. The form is pre-filled with the current values for the selected data source.
- Edit the Data Source Name, Data Source Description and/or Data Source Departments, as desired.
- If desired, edit the data for the data source through any of the following methods:
- Upload a CSV file to be used as the data source.
- Copy and paste an email list to be used as the data source.
- Manually enter the data to be used as a data source.
-
If desired, add or delete documents and manage data item relationships for the Data Source.
- When all desired changes have been made, click the Edit Data Source button to save your changes and return to the Data Source Page.
Data Item Relationships
You can add and delete documents for the Data Source, and associate the files with a value in the data source. Additionally, you can associate values in the data source with documents from the Document Library.
To add a document for a Data Item Relationship:
.jpg?revision=1)
- Click the Data Item Relationships tab on the Edit Data Source screen.
- Click the Map To - Documents tab.
- The Documents Mapping field displays.
- The Documents Mapping field displays.
- Select the value in the Item Selection List with which you wish to associate the document.
- If the desired value is not in the list, you can add the value using manual data entry.
- If the desired value is not in the list, you can add the value using manual data entry.
- Click the Select files... button.
- A standard File Upload dialog displays.
- A standard File Upload dialog displays.
- Locate and select the document you wish to upload, then click the Open button on the File Upload dialog.
- When the upload has completed, the uploaded document is added to the Map To - Documents list, and the association to the selected value is completed.
How To use the Document Library for a Data Item Relationship
- Click the Data Item Relationships tab on the Edit Data Source screen.
- Click the Map To - Documents tab.
- The Documents Mapping field displays.
- The Documents Mapping field displays.
- Select the value in the Item Selection List with which you wish to associate the document.
- If the desired value is not in the list, you can add the value using manual data entry.
- If the desired value is not in the list, you can add the value using manual data entry.
- Click the Document Library button.
- The Document Library Dialog displays.
- The dialog lists all available documents in the Document Library.
- Select the document(s) you wish to use in the Data Item Relationship.
- To select multiple documents from the Document Library dialog, press and hold the <Ctrl> key, then select all desired documents.
- To select multiple documents from the Document Library dialog, press and hold the <Ctrl> key, then select all desired documents.
- When the desired documents have been selected, click the Assign selected Documents button.
- The selected documents are added to the Map To - Documents list, and the association to the selected value is completed.
- The selected documents are added to the Map To - Documents list, and the association to the selected value is completed.
To remove a document from a Data Item Relationship:
- Select the value in the Item Selection List with which you wish to remove a relationship.
- Click the icon for the desired document.
- A confirmation dialog displays the message "Are you sure you want to remove "(document name)" from selected value ?"
- A confirmation dialog displays the message "Are you sure you want to remove "(document name)" from selected value ?"
- Click the OK button to delete the selected document. (Click the Cancel button to cancel the deletion.)
- The confirmation dialog closes, and the selected document is removed from the Map To - Documents list.
Deleting a Data Source
You can delete an existing Data Source from your TAP system.
To delete a Data Source:
- Locate the data source you wish to delete in the Data Sources list.
- Click the icon for the desired data source.
- A confirmation dialog displays the message "Are you sure you want to remove "(data source name)" DataSource?"
- A confirmation dialog displays the message "Are you sure you want to remove "(data source name)" DataSource?"
- Click the OK button to delete the selected data source. (Click the Cancel button to cancel the deletion and leave the data source unchanged.)
- The confirmation dialog closes, and the selected data source is removed from the Data Sources list.
Conditional Data Sources
You can add a new Conditional Data Source to your TAP system.
NOTE
All fields in the Create Data Source form are mandatory.
Creating a Conditional Data Source
To add a data source:
- Click the Create New Conditional Data Source button on the Data Sources page.
-
The screen refreshes to display the Create Conditional Data Source form.
-
- Enter a name for the data source in the Data Source Name text box.
- Enter a description of the data source in the Data Source Description text box.
- Select the departments that are granted access to the data source form the Data Source Departments menu.
- You can select one or more Data Source Departments.
- Click the Data Source Departments field and select the desired department. Repeat as necessary to select additional departments.
- To remove a department from the Data Source Departments field, click the x icon for the desired department.
- To remove a department from the Data Source Departments field, click the x icon for the desired department.
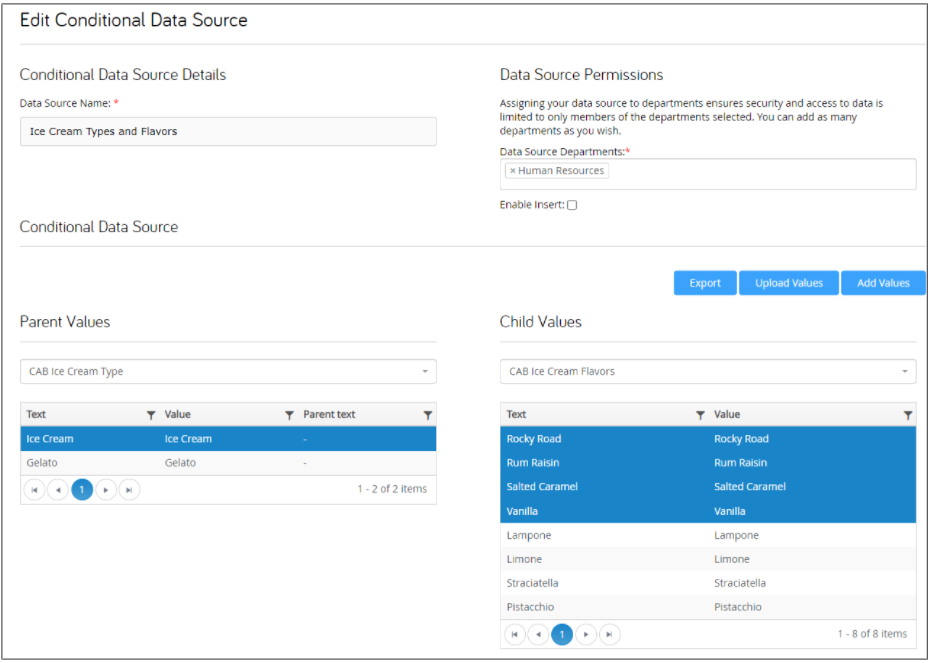
- Select the desired data sources from the Parent Values and Child Values menus, and add the desired values to the Conditional Data Source list.
- Use the Email Distribution List check box to indicate whether or not the data source is an Email Distribution List.
- When all necessary values for the data source have been entered, click the Save Data Source button to save the data source. (Click the Cancel button to cancel the addition and return to the Data Sources page.)
-
The Create Conditional Data Source form closes, and the Data Sources page refreshes with the new data source added to the Conditional Data Sources list.
NOTE
If you omit a required field or do not add at least one value to the Conditional Values list, an advisory message displays and the field is highlighted in red. Enter the required information, then click the Save Data Sourcebutton to save the data source.
-
Parent Values
The Parent Values menu lists all currently defined data sources. The values contained in the data source selected from the Parent Values menu (when associated with a "parent" drop-down form field) are used to determine the content of a "child" drop-down form field. For example, the value selected from a "parent" field containing "Sales Regions" might be used to determine the content of a "child" field listing "Sales Managers."
You can optionally upload a CSV file containing the desired Parent Values.
Child Values
The Child Values menu lists all currently defined data sources. The values contained in the data source selected from the Child Values menu (when associated with a "child" drop-down form field) are associated with a selected parent value to determine the content of the "child" form field. For example, the value selected from a "parent" field containing "Sales Regions" might be used to determine the content of a "child" field listing "Sales Managers."
Adding Values
A Conditional Data Source is configured by associating each parent value with one or more child values.
To add values to the data source:
- Select the desired parent data source from the Parent Values menu.
- The values contained in the selected data source are shown to the Parent Values list.
- The values contained in the selected data source are shown to the Parent Values list.
- Select the desired child data source from the Child Values menu.
- The values contained in the selected data source are shown to the Child Values list.
- The values contained in the selected data source are shown to the Child Values list.
- Click a value in the Parent Values list, then select the child value(s) you wish to associate with the selected parent value from the Child Values list.
- To select multiple values from the Child Values list, press and hold the <Ctrl> key, then select all desired values.
- To select multiple values from the Child Values list, press and hold the <Ctrl> key, then select all desired values.
- When all desired Child Values have been selected for the current Parent Value, click the Add Values button.
- The selected values are added to the Conditional Data Source list.
- The Conditional Data Source table shows the DataSource of Parent Value, the parent value on which the associated child values are based (Show only when this is selected), and the Text of the child value(s).
- Repeat steps 3 and 4 for the remaining parent values, as appropriate.
To remove values from the data source:
- Select the row in the Conditional Data Source list that you wish to remove.
- To select multiple rows from the Conditional Data Source list, press and hold the <Ctrl> key, then select all desired values.
- When all desired rows for deletion have been selected, click the Remove selected rows button.
- The selected rows are removed from the list.
Uploading Values
As an alternative to entering parent-child values on a line-by-line basis as described above, you can upload a comma-separated values (CSV) file containing parent-child value combinations.
To prepare the CSV file:
When preparing a CSV file for upload, be sure the file conforms to the following requirements:
- The first column of the CSV file will contain the values from the parent data source.
- The second column will contain the appropriate values from the child data source.
- The values in the CSV file must match the data in the Value column of the respective Parent Values and Child Values in order to successfully upload the values.
For example, for the following Parent Values and Child Values selections
.jpg?revision=1)
a valid CSV file might be prepared as shown below:
San Francisco,1
San Jose,4
Los Angeles,2
Los Angeles,3
To upload values:
- Select the parent data source for which the CSV file was prepared from the Parent Values menu.
- The values contained in the selected data source are shown to the Parent Values list.
- The values contained in the selected data source are shown to the Parent Values list.
- Select the child data source for which the CSV file was prepared from the Child Values menu.
- The values contained in the selected data source are shown to the Child Values list.
- The values contained in the selected data source are shown to the Child Values list.
- Click the Upload Values button.
- A standard File Upload dialog displays.
- A standard File Upload dialog displays.
-
Locate and select the document you wish to upload, then click the Open button on the File Upload dialog.
NOTE
The Upload Values option will upload CSV files only. If you select a file that does not include the .csv extension, an advisory dialog displays the message "Only .csv files can be uploaded." Click the OK button to close the dialog, and repeat steps 3 and 4 to upload the CSV file.
-
If the file upload is successful, a confirmation dialog displays the message "Successfully loaded the conditional data source file." Click the OK button to close the dialog.
- If the file upload is not successful, an advisory dialog displays the message "CSV file loaded but with problems in the following relationships: (relationship errors list)." Click the OK button to close the dialog. Review the CSV file and correct any errors, then repeat steps 3 and 4 to upload the CSV file.
-
-
When the CSV file has been successfully uploaded, the values from the CSV file are added to the Conditional Data Source list.
-
The Conditional Data Source table shows the DataSource of Parent Value, the parent value on which the associated child values are based (Show only when this is selected), and the Text of the child value(s).
-
To remove values from the data source:
- Select the row in the Conditional Data Source list that you wish to remove.
- To select multiple rows from the Conditional Data Source list, press and hold the <Ctrl> key, then select all desired values.
- When all desired rows for deletion have been selected, click the Remove selected rows button.
- The selected rows are removed from the list.
Editing a Conditional Data Source
You can edit the content of an existing Conditional Data Source.
To edit a Grid Data Source:
- Locate the data source you wish to edit in the Conditional Data Sources list.
- Click the entry for the desired data source.
- The screen refreshes to display the Edit Grid Data Source screen. The screen is pre-filled with the current values for the selected data source.
- The screen refreshes to display the Edit Grid Data Source screen. The screen is pre-filled with the current values for the selected data source.
- Edit the Data Source Name, Data Source Description and/or Data Source Departments, as desired.
-
If desired, add or remove values for the data source.
- When all desired changes have been made, click the Edit Data Source button to save your changes and return to the Data Source Page.
Deleting a Conditional Data Source
You can delete an existing Conditional Data Source from your TAP system.
To delete a Conditional Data Source:
- Locate the data source you wish to delete in the Conditional Data Sources list.
- Click the icon for the desired data source.
- A confirmation dialog displays the message "Are you sure you want to remove "(data source name)" DataSource?"
- A confirmation dialog displays the message "Are you sure you want to remove "(data source name)" DataSource?"
- Click the OK button to delete the selected data source. (Click the Cancel button to cancel the deletion and leave the data source unchanged.)
- The confirmation dialog closes, and the selected data source is removed from the Conditional Data Sources list.
Grid Data Sources
You can add a new Grid Data Source to your TAP system.
NOTE
All fields in the Create Grid Data Source form are mandatory.
Creating a Grid Data Source
To create a Grid Data Source:
- Click the Create New Grid Data Source button on the Data Sources page.
- The screen refreshes to display the Create Grid Data Source form.
- The screen refreshes to display the Create Grid Data Source form.
- Enter a name for the data source in the Data Source Name text box.
- Enter a description of the data source in the Data Source Description text box.
- Select the departments that are granted access to the data source form the Data Source Departments menu.
- You can select one or more Data Source Departments.
- Click the Data Source Departments field and select the desired department. Repeat as necessary to select additional departments.
- To remove a department from the Data Source Departments field, click the x icon for the desired department.
- To remove a department from the Data Source Departments field, click the x icon for the desired department.
- Upload the CSV file to be used as the grid data source.
-
Use the Ignore Values in First Row check box to indicate whether or not the first row of the CSV file should be ignored.
NOTE
This option is generally selected in cases where the first row of the CSV file contains column headers.
-
When all necessary values for the data source have been entered, click the Save Data Source button to save the data source. (Click the Cancel button to cancel the addition and return to the Data Sources page.)
-
The Create Grid Data Source form closes, and the Data Sources page refreshes with the new data source added to the Grid Data Sources list.
NOTE
If you omit a required field, an advisory message displays and the field is highlighted in red. Enter the required information, then click the Save Data Source button to save the data source.
NOTE
If you do not upload a CSV file, and advisory dialog displays the message "The CSV file is required. Please, upload this file before save." Click the OK button to close the dialog. Upload the CSV file to be used as the grid data source, then click the Save Data Source button to save the data source.
-
Uploading a CSV File
You must upload a comma-separated values (CSV) file containing the appropriate grid data when adding a Grid Data Source. You can upload a CSV file either by "drag and drop" or by using the Upload CSV function.
To upload a file using "drag and drop:"
- Locate the document you wish to upload on your local workstation.
- Make sure both the directory containing the file for upload and the Create Grid Data Source form are visible on the desktop.
- Click and hold the left mouse button, then "drag" the file to the drag & drop csv to upload recipients field on the Create Grid Data Source form.
- When the upload has completed, the uploaded file is shown below the drag & drop csv to upload recipients field.
- When the upload has completed, the uploaded file is shown below the drag & drop csv to upload recipients field.
To upload a file using the Upload CSV function:
- Click the Upload CSV button.
- A standard File Upload dialog displays.
- A standard File Upload dialog displays.
- Locate and select the document you wish to upload, then click the Open button on the File Upload dialog.
- When the upload has completed, a confirmation dialog displays the message "CSV file was successfully uploaded to the Grid Data Source."
- When the upload has completed, a confirmation dialog displays the message "CSV file was successfully uploaded to the Grid Data Source."
- Click the OK button to close the confirmation dialog.
- The name of the uploaded file is shown below the drag & drop csv to upload recipients field.
- The name of the uploaded file is shown below the drag & drop csv to upload recipients field.
To remove a CSV file:
- Click the X next to the file name.
- The file is removed from the Create Grid Data Source form.
Editing a Grid Data Source
You can edit the content of an existing Grid Data Source.
To edit a Grid Data Source:
- Locate the data source you wish to edit in the Grid Data Sources list.
- Click the entry for the desired data source.
- The screen refreshes to display the Edit Grid Data Source screen. The screen is pre-filled with the current values for the selected data source.
- The screen refreshes to display the Edit Grid Data Source screen. The screen is pre-filled with the current values for the selected data source.
- Edit the Data Source Name, Data Source Description and/or Data Source Departments, as desired.
- If desired, upload a new CSV file to be used as the grid data source.
-
Use the Ignore Values in First Row check box to indicate whether or not the first row of the CSV file should be ignored.
NOTE
This option is generally selected in cases where the first row of the CSV file contains column headers.
-
- If desired you can:
- Download the latest CSV file
- Edit the latest CSV file
- Restore the previous CSV file
- When all desired changes have been made, click the Save Data Source button to save your changes and return to the Data Source Page.
To download the latest CSV file:
- Click the Download Latest CSV File button.
- A standard File Download dialog displays.
- A standard File Download dialog displays.
- Select the "save" options from the File Download dialog.
- A standard Save As dialog displays.
- A standard Save As dialog displays.
- Navigate to the location in which you wish to save the CSV file.
- If desired, enter a new name for the CSV file in the File name text box. Be sure to retain the file extension.
- Click the Save button on the Save As dialog.
- The CSV file is downloaded to the selected location.
To edit the latest CSV file:
.jpg?revision=1)
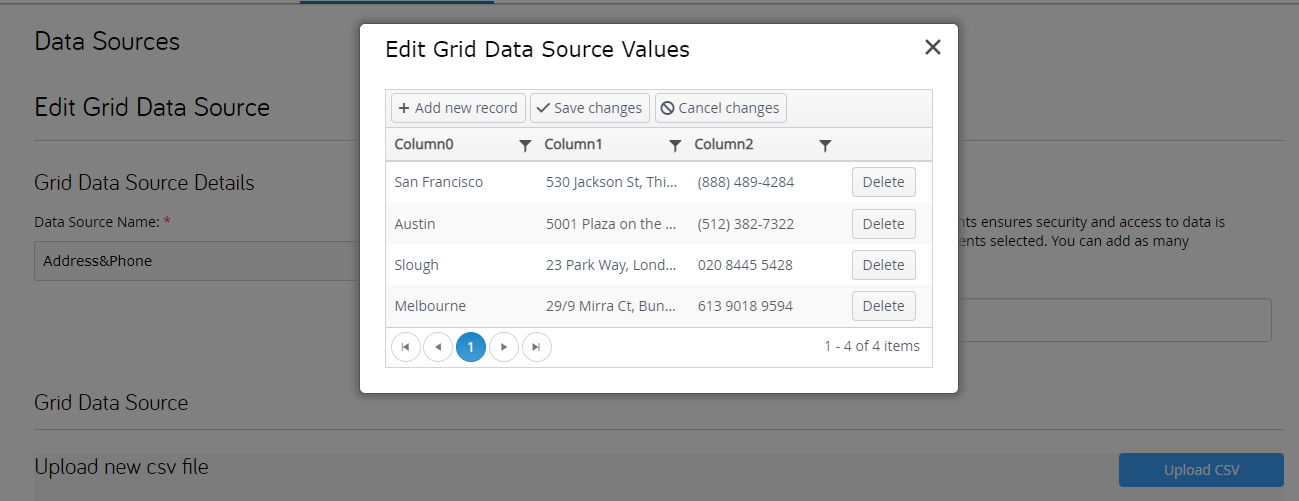
- Click the Edit Latest CSV File button.
- The Edit Grid Data Source Values dialog displays.
- The Edit Grid Data Source Values dialog displays.
- To edit an existing value in the CSV file:
- Double-click the value you wish to change and enter a new value.
- Double-click the value you wish to change and enter a new value.
- To add a new record to the CSV file:
- Click the Add new record button.
- A blank data entry line displays.
- Enter the desired values for the new record.
- Click the Add new record button.
- To delete a record from the CSV file:
- Click the Delete button for the desired record.
- A confirmation dialog displays the message "Are you sure you want to delete this record?"
- Click the OK button to close the dialog and delete the selected record.
- Click the Delete button for the desired record.
- When all desired changes have been made, click the Save changes button to save the data source.
- A confirmation dialog displays the message "Are you sure you want to save all changes?"
- Click the OK button to close the dialog and save your changes.
- A confirmation dialog displays the message "CSV file changes have been successfully saved."
- Click the OK button to close the dialog.
- Click the OK button to close the dialog.
- A confirmation dialog displays the message "Are you sure you want to save all changes?"
- The system returns to the Edit Grid Data Source form.
To restore the prior version of a CSV file:
NOTE
The Restore Previous CSV File button is available only when the originally uploaded CSV file has been edited as described above.
- Click the Restore Previous CSV File button.
- A confirmation dialog displays the message "Do you really want to restore the Grid Data Source to the previous CSV file version?"
- Click the OK button to close the dialog and restore the previous version of the CSV file.
- A confirmation dialog displays the message "Successfully restored previous CSV file"
- Click the OK button to close the dialog.
Deleting a Grid Data Source
You can delete an existing Grid Data Source from your TAP system.
To delete a Grid Data Source:
- Locate the data source you wish to delete in the Grid Data Sources list.
- Click the icon for the desired data source.
- A confirmation dialog displays the message "Are you sure you want to remove "(data source name)" DataSource?"
- A confirmation dialog displays the message "Are you sure you want to remove "(data source name)" DataSource?"
- Click the OK button to delete the selected data source. (Click the Cancel button to cancel the deletion and leave the data source unchanged.)
- The confirmation dialog closes, and the selected data source is removed from the Grid Data Sources list.