
Workflow Level Permissions
The Designer Permissions feature lets you establish the specific permissions granted to users for a given workflow based on department affiliation or user role.
User roles and departments are created and managed through the Administration module.
Please allow the Form to fully load before accessing the Workflow Permissions, otherwise previously applied permissions may not Save.
!Setting up permissions both at workflow and stage level can cause a conflict, and the permissions, although set up, might not behave as expected. Even though same permissions are being setup, it is recommended to use either of them, and not both together.
Accessing and Assigning Permissions
To access Workflow Permissions:
- Click the Business Automation
.jpg?revision=1) button in the TAP Toolbar to access the Business Automation module.
button in the TAP Toolbar to access the Business Automation module.
- The Designer tab is selected by default, and the screen displays the Designer Homepage.
- The Designer tab is selected by default, and the screen displays the Designer Homepage.
- Access the workflow for which you wish to assign Workflow Permissions:
- Click the Create button to create a new workflow.
- Click the Import button to import an existing workflow from your local workstation.
- Use the Actions menu to Load an existing workflow.
- The Designer displays the Forms - Properties page.
- Click the Permissions link.
- The Workflow Permissions dialog displays.
- The Workflow Permissions dialog displays.
To Assign Workflow Permissions:
- Common permissions are granted based on user role or department affiliation. Administration permissions and Audit log permissions are granted based on user role.
- Use the Roles and Departments menus to select the user role(s) and department(s) that will be granted the associated permission.
- You can select one or more values from the Roles and Departments menus.
- Click the appropriate menu and select the desired value. Repeat as necessary to select additional values.
- To remove a value, click the x icon for the desired value.
- To remove a value, click the x icon for the desired value.
Common Permissions
The Common page of the dialog lets you configure the following workflow permissions:
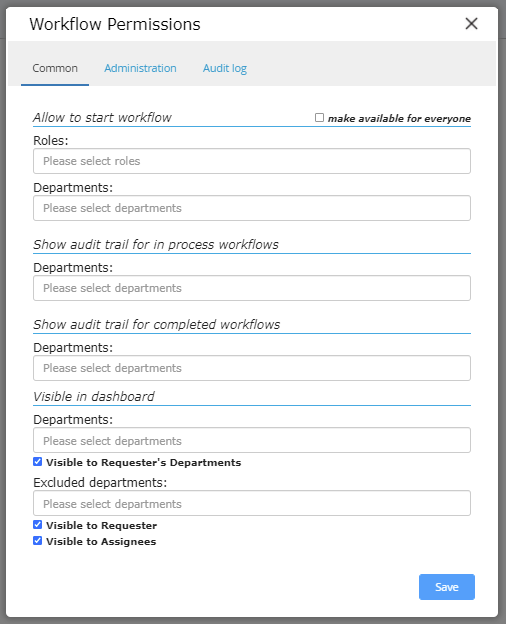
- Allow to start workflow - determines the user roles authorized to initiate the workflow through the Workflow Dashboard.
- To allow the workflow to be initiated by all users, select the make available for everyone check box.
- NOTE: When the make available for everyone option is enabled, selections made in the Roles and Departments menus are ignored.
- To limit users that can initiate the workflow based on department or user role, select the desired options from the Roles and Departments menus as appropriate.
- To allow the workflow to be initiated by all users, select the make available for everyone check box.
- Show audit trail for in process workflows - determines the Departments authorized to view currently active (in process) workflows through the Workflow Dashboard.
- Show audit trail for completed workflows - determines the Departments authorized to view completed workflows through the Workflow Dashboard.
- Visible in Dashboard
- Departments - Used to tie dropdowns that are linked to TAP Departments. When configured will make records visible to users in the Department selected in that field.
- Visible to Requester's Departments - When selected, allows users in the same Department as the Requester to see the workflow in his/her dashboard even if department settings for the user would not otherwise allow him/her to see the workflow.
- Excluded Departments - Appears only if "Visible to Requester's Department" is selected and allows exclusion of selected Departments.
- Visible to Requester - When selected, allows a requester to track a workflow in his/her dashboard to completion, even if department settings for the requester would not otherwise allow him/her to see the results of the workflow.
- Visible in Dashboard to Assignees - When selected, allows any user assigned to a workflow instance at any point throughout its lifecycle to track the progress of that workflow in his/her dashboard.
Administration Permissions
Administration permissions determine the functions available to a user through the Workflow Dashboard Actions menu. Administration permissions are granted based on user role. The Administration page of the dialog lets you configure the following workflow permissions:
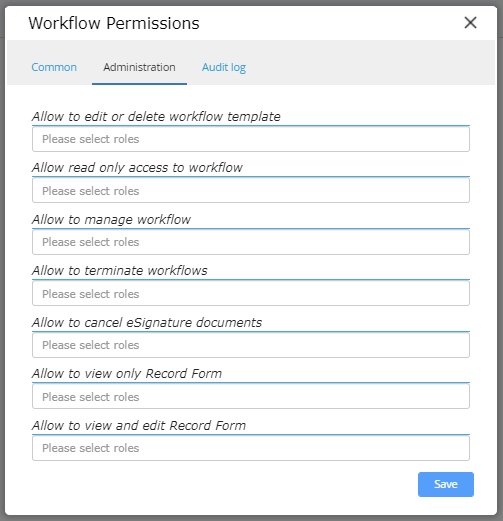
- Allow to edit or delete workflow template - determines the user roles authorized to edit or delete a workflow template.
- Allow read only access to workflow - determines the user roles allowed to view the workflow but not edit or take action.
- Allow to manage workflow - determines the user roles authorized to manage a workflow. This permission gives a user access to all functions of the workflow as long as a user with an equal or lower role rank initiates the workflow. This permission can override default Collaboration Stage permissions/roles and gives users the ability to Reassign and Edit/Edit Request.
- Allow to terminate workflows - determines the user roles authorized to terminate a workflow.
- Allow to cancel eSignature documents - determines the user roles authorized to edit or cancel an e-signature.
- Allow to view only Record Form - determines the user roles authorized to view record forms (in read-only format).
- Allow to view and edit Record Form - determines the user roles authorized to view and edit record forms.
Audit Log Permissions
Audit log permissions determine the features and functions available to a user when viewing workflow history through the Workflow Dashboard (Via the Actions column on the Dashboard | Click the three dots icon and then click Audit History). Audit log permissions are granted based on user role. The Audit log page of the dialog lets you configure the following workflow permissions:
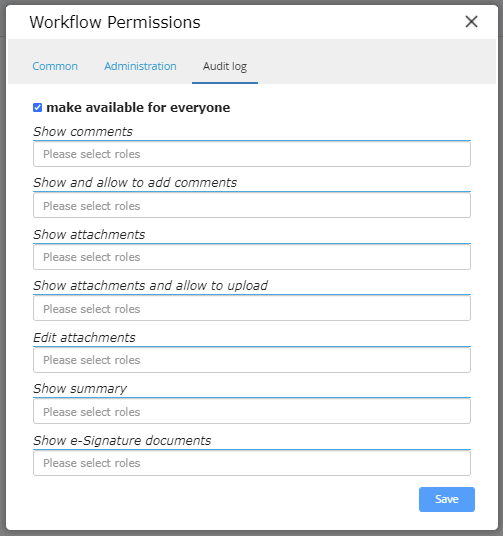
- Make available to everyone - allows the entire audit history of the workflow to be viewable by all users (if user is not directly assigned to workflow, user must have the 'Repository - All Records Privilege' permission to see the workflow in his/her dashboard.
- Show comments - determines the user roles authorized to view comments attached to a workflow.
- Show and allow to add comments - determines the user roles authorized to view, add, edit and delete comments attached to a workflow.
- Show attachments - determines the user roles authorized to view attachments to a workflow.
- Show attachments and allow to upload - determines the user roles authorized to view and add to a workflow.
- Edit attachments - determines the user roles authorized to edit existing attachments in a workflow.
- Show summary - determines the user roles authorized to view the workflow summary.
- Show e-Signature documents - determines the user roles authorized to view e-signature documents attached to a workflow.
Note:- As the Audit logs permissions are role specific and not department, you can still add different roles to the users from specific department and add those roles in the Audit logs as show the audit history content.
Also, for workflow permissions on the audit log tab, a workflow must either have the box checked for 'everyone' OR each field in the audit log tab must explicitly state which role/dept should see which section. Also, best practices is to not have the same role/dept values for every field on the Administration tab on Workflow Permissions because they are designed for either/or purposes: either that role/dept has read-only or they have edit. granting the same role both read-only and edit will be contradicting and can impact expected access.