
Workflow Delegation
In cases where a user responsible for completing one or more stages of a workflow will be unavailable for a prolonged period of time, the Workflow Delegation (formerly known as Workflow Routing) function allows all notification and workflow stages to be delegated to another user for a specified period of time.
Workflow Delegation Management:
- Super Admins: Users with 'Super Admin' access possess the authority to oversee and manage access to Workflow Delegation. This privilege grants them the ability to select any 'Source User' and any 'Destination User' for delegation purposes.
- Normal Users: Regular users can utilize the workflow delegation feature to establish rules for themselves. When accessing 'Workflow Delegation,' they can only select themselves as the 'Source User' while the 'Destination User' can be any individual of their choosing.
Accessing Workflow Delegation

To access Workflow Delegation:
- From the Dashboard screen, click the
 icon at the top right
 - Click Workflow Delegation
- The Workflow Delegation page displays. The page shows a list of currently defined workflow delegations, if any exist.
- Each item in the list shows the name of the Source User and Destination User, and the period of time during which the routing will be active. Currently active workflow routings show the notation
.jpg?revision=1) .
.
Adding a Workflow Delegation
To add a workflow delegation:
- Access the Workflow Delegation page.
- Click the Add button at the bottom of the page.
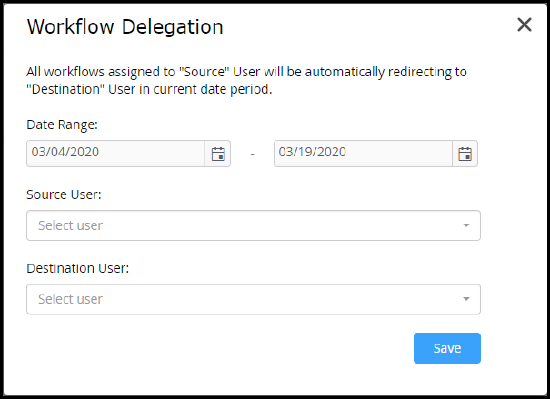
- The Workflow Delegation dialog displays.
- The Workflow Delegation dialog displays.
- Use the Date Entry Calendars to enter the time period during which the workflow routing will be effective in the Date Range text boxes.
- Enter the starting date for the time period in the first Date Range text box.
- Enter the ending date for the time period in the second Date Range text box.
- Select the user from whom the workflow will be routed from the Source User menu.
- Type one or more characters of the desired user's name in the Source User field.
- The menu will refresh as you type to display all users that match your search term. Select the desired user.
- Select the user to whom the workflow will be routed from the Destination User menu.
- Type one or more characters of the desired user's name in the Destination User field.
- The menu will refresh as you type to display all users that match your search term. Select the desired user.
- When all required values for the workflow routing have been entered, click the Save button to save the routing.
- The Add Routing dialog closes, and the new routing is shown on the Workflow Delegation page.
Editing a Workflow Delegation
To edit a workflow delegation:
- Access the Workflow Delegation page.
- Click the
.jpg?revision=1) icon for the routing you wish to edit.
icon for the routing you wish to edit.
- The Edit Routing dialog displays. The dialog is pre-filled with the current values for the workflow routing.
- The Edit Routing dialog displays. The dialog is pre-filled with the current values for the workflow routing.
- Edit the Date Range, Source User and/or Destination User, as appropriate.
- When all desired changes have been made, click the Save button to save your changes.
- The Add Routing dialog closes, and the Workflow Delegation page displays your changes.
- The Add Routing dialog closes, and the Workflow Delegation page displays your changes.
Deleting a Workflow Delegation
To delete a workflow delegation:
- Access the Workflow Delegation page.
- Click the
 icon for the routing you wish to delete.
- The selected routing is removed from the Workflow Delegation page.
Real-Time Use Cases for Workflow Delegation
Use Case 1: Manager Delegating Tasks During Leave
Scenario: A manager responsible for approving leave requests and expense reports plans to go on a two-week vacation. To ensure no disruptions in the workflow, they use the Workflow Delegation feature to delegate their responsibilities.
Steps:
- The manager logs into the system and navigates to the Workflow Delegation page.
- They click on the Add button and set the delegation period using the date range picker (e.g., from March 4, 2020, to March 19, 2020).
- The manager selects their account as the Source User and their assistant’s account as the Destination User.
- Once saved, all tasks and notifications assigned to the manager during this period will automatically be routed to the assistant, ensuring task completion. However, email routing will be active only until the day before the selected end date. For uninterrupted email routing, select an end date one day later than the final intended date.
Outcome: Tasks and notifications are reassigned without interruptions, and the assistant can act on behalf of the manager during the specified period.
Use Case 2: Workflow Delegation for Temporary Resource Assignment
Scenario: An employee in a support role falls ill suddenly and cannot perform their duties for a week. To handle pending workflows, the Super Admin sets up delegation to another team member.
Steps:
- The Super Admin accesses the Workflow Delegation page.
- They click Add and configure the delegation period (e.g., March 2, 2020, to March 17, 2020).
- In the Source User field, they select the unavailable employee’s account.
- In the Destination User field, they select another team member who will handle the workflows temporarily.
- The delegation is saved, and tasks are seamlessly redirected to the replacement team member.
Outcome: Tasks are handled efficiently by the replacement team member, ensuring minimal disruption to workflows despite the absence of the original resource.
The above 2 use cases illustrate how Workflow Delegation ensures continuity in operations by reassigning tasks and notifications based on user availability.
FAQs for Workflow Delegation
1. What is Workflow Delegation, and when should it be used?
Workflow Delegation allows users to redirect tasks, notifications, and workflow stages from a Source User to a Destination User for a specified time period. It is commonly used when a user is unavailable due to leave, illness, or other reasons to ensure workflows are not interrupted.
2. Who can access and manage Workflow Delegation?
- Super Admins: They can manage delegations for all users, selecting any Source and Destination User.
- Normal Users: They can only delegate their own workflows, selecting themselves as the Source User and another user as the Destination User.
3. How do I add a Workflow Delegation?
To add a Workflow Delegation:
- Navigate to the Workflow Delegation page.
- Click Add and specify the date range.
- Select the Source User (task owner) and Destination User (assignee).
- Click Save to activate the delegation.
4. Can I edit or delete an existing Workflow Delegation?
Yes.
- To edit, click the edit icon next to the desired delegation, modify the details, and save the changes.
- To delete, click the delete icon, and the delegation will be removed immediately.
5. What happens to the workflows after the delegation period ends?
After the delegation period ends, tasks and notifications revert to the original Source User. Any new workflows will no longer be redirected unless a new delegation is set up.