
Customizing Accrual Notification E-mails
Prior to an accrual notification being sent, the to and from addresses, subject, and body of the e- mail that is sent to each primary vendor contact for all applicable matters can be customized. The body of the e-mail includes variables for the period end and due date that will be populated from these fields on the accrual notification schedule record.
 Only users who have been granted permission to create notification Accruals schedules (by the System Administrator) can configure the e-mail template.
To Customize the Notification E-mail Template:
- On the eCounsel console, click Tools on the menu bar.
- On the Tools page, select Accrual Notification.
- In the E-mail area, type a valid e-mail address for the person from whom the e-mail will be sent. This value is necessary so that any replies to the e-mail will be sent to the correct person.
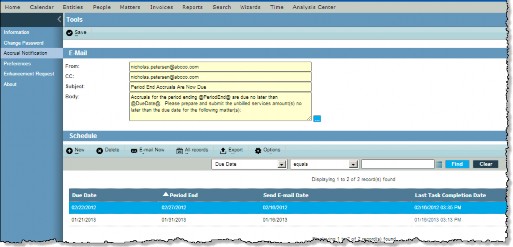
- Type a valid e-mail address to which a copy of all e-mails will be sent. This value is necessary as a record of all e-mails sent since the list is generated from eCounsel and the e- mails will not appear in the Sent Items e-mail folder.
- Type the text for the Subject of the e-mail. Be aware that the same e-mail will be sent to all vendors for all schedules.
- Type the text for the Body of the e-mail. Make sure that you do not delete the variables that are denoted by a preceding and following @ symbol if you want these variables to be populated with the information from the Period End and Due Date fields in the notification schedule. Also, once sent, the e-mail will have a list of applicable matters appended to it for each vendor (in other words, a vendor for multiple matters will only receive one e-mail with a list of all matters for which he/she is assigned as a primary vendor contact).
- Click Save.
- Click Close on the message box notifying you the template has been updated.