
Configure System Settings
System Settings Window
The System Settings window allows you to configure Suite. From this window, you can configure settings that apply to both products, eCounsel only, or Secretariat only.
Suite Tab
- General – Allows you to set the data root for Suite.
- Document Storage – Allows you to specify the method in which files are stored and linked to records.
- Document Indexing – Allows you to specify whether full-text search is enabled and to manual index the documents stored in Suite.
- E-mail – Allows you to establish the server connection that allows users to send reports and matter summaries as e-mail attachments.
- Business Objects – Allows you to configure settings to use SAP Business Objects to run Crystal Reports.
- Calendar Integration – Allows you to indicate the program with which Suite will integrate calendar appointments and events.
- Document Assembly – Allows you to configure settings for HotDocs integration with Suite.
- Duplicate Name Checking – Allows you to activate the duplicate check feature to specify how people and entity records are checked.
- Currency – Allows you to define settings that will be used when displaying currency within Suite.
- Custom Words Dictionary – Allows you to add words to the dictionary that is stored on the Web server and used for both eCounsel and Secretariat for all users.
- Date and Time – Allows you to set the date and time zone in which the server is located.
- Office Link Settings – Allow you to enable and configure the Office Link add-ins for Microsoft Office and Microsoft Outlook
eCounsel Tab
- Home Page Message – Allows you to specify a system-wide message that will appear on the Message of the Day widget on the home page of each user.
- General – Allows you to specify the player type and role to be used for a matter’s primary contact information, the entity record to be associated with your company, and enable private matters.
- Matter Number Generation – Allows you to configure eCounsel to automatically generate matter numbers when matters are created.
- Invoice Integration Settings – Allows you to configure and activate an integration with Collaborati Website.
- Invoice Settings – Allows you to select the information that will display under the Invoices Awaiting My Approval widget on the eCounsel home page.
- Timekeeper Integration – Allows you to configure a timekeeping application to be integrated with eCounsel.
Secretariat Tab
- Home Page Message – Allows you to specify a system-wide message that will appear on the Message of the Day widget on the home page of each user.
- Ownership – Allows you to configure settings for the Ownership tab in the Entities module in Secretariat.
- NetViewer – Allows you to configure settings for NetViewer.
Buttons
- Save – Click to save changes to the window.
Suite Tab
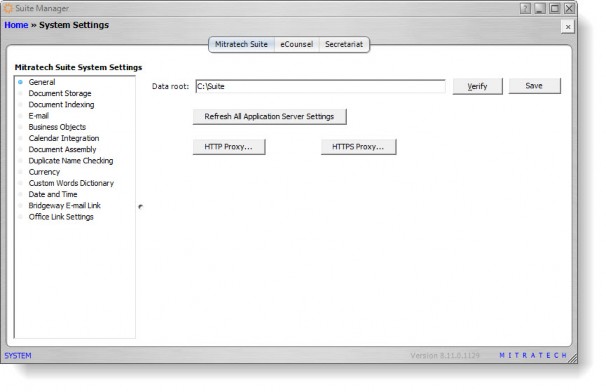
General Settings
The General settings on the Suite tab of the System Settings window allow you to set the data root for Suite. The data root must be verified to enable spell check of comment fields for all users.
Fields
Data root – A folder structure that allows for separation of data/log files in order to make upgrades simpler. The Data Root field is a path to the directory where the data/log files will be stored. It can be a folder on any server as long as the Java server has read/write access to it. The Data Root must be a UNC path if the folder structure is on a different server. If the Data Root is located on the Java server, a local path can be designated. An example Data Root folder path is C:\Bridgeway.
Buttons
Refresh All Application Server Settings – Click to immediately update the server with the configuration changes.
HTTP Proxy – Click to open the Proxy Settings dialog box to specify the proxy server used to connect to Suite through HTTP.
HTTPS Proxy – Click to open the Proxy Settings dialog box to specify the proxy server used to connect to Suite through HTTPS.
Verify – Click to perform a check that the folder exists.
Save – Click to save changes to the window.
Document Storage Settings
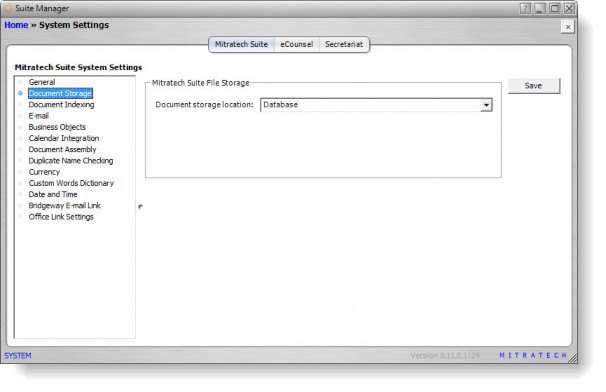
The Document Storage settings on the Suite tab of the System Settings window allow you to specify the method in which files are stored and linked to records. Electronic files can be stored locally (either network or on a user’s computer), stored in the database.
Fields
Document storage location – An indication of whether documents should be stored in the database or on a file server. If the File server option is selected, specify the file path on the file server where the documents will be stored. The path must exist on the file server and the Java server must have read/write access to the path. Use a Universal/Uniform Naming Convention (UNC) path if the folder structure is on a different server. Click the Verify button to make sure the path exists.
Buttons
Save – Click to save changes to the window.
Document Indexing Settings
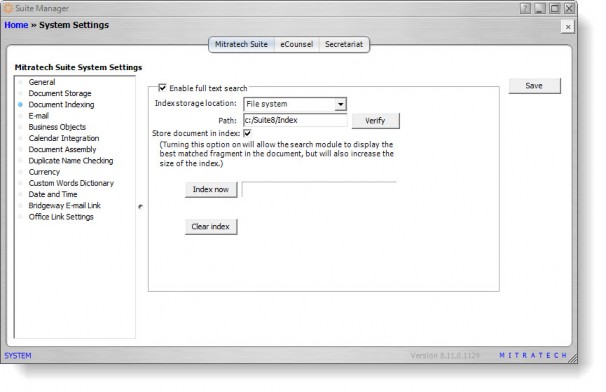
The Document Indexing settings on the Suite tab of the System Settings window allow you to enable searching of all documents within Suite for words or phrases (typically known as a full-text search).
Fields
Enable full text search – An indication of whether the full-text search functionality is activated.
Index storage location – This setting is independent of the document storage method. When you select File system, type the directory path in which the index files will be created and click Verify to check that the path exists.
The Java application server must have read/write access to the directory in which the index files are stored.
The size of the index is limited only by the amount of space on the file server.
Store document in index – An indication of whether a fragment of the file containing textual matches in the search results will be displayed with the search results. Selecting this checkbox may increase the size of the index and time in creating the index. If this checkbox is not selected, the search will return only the name of the document.
Buttons
Index Now – Click to run a batch index process immediately. After the initial index has been created, clicking Index Now will update the index based on documents being added, deleted, or modified within Suite.
To schedule a process to automatically index documents, see “Batch Document Indexing Task” on page 326.
Clear Index – Click to remove all entries from an index in case of data corruption.
E-mail Settings
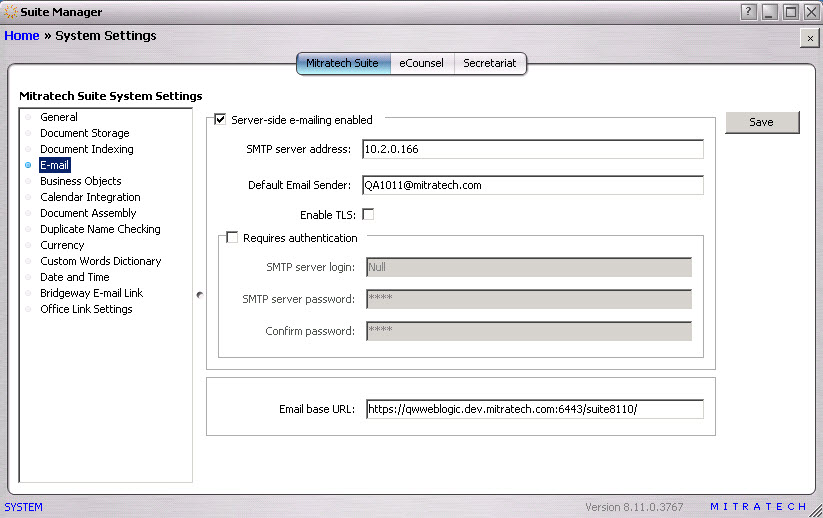
The E-mail settings on the Suite tab of the System Settings window allow you to establish the server connection that allows users to send summary pages as e-mail attachments.
Fields
Server-side e-mailing enabled – An indication of whether certain pages may be sent as e-mail attachments from Suite.
SMTP server address – The name of the Simple Mail Transfer Protocol (SMTP) server through which the e-mail should be sent.
Default Email Sender– Beginning with Suite 8.11.0 Service Pack 12, a new option to specify the default email addresse used when e-mailing summaries from eCounsel and Secretariat has been included. This option allows Mitratech Hosted Subscription clients to specify a Mitratech Cloud e-mail address so that e-mails of Invoice, Matter, Entity, and People summaries will not be flagged as spoofed by the client's infrastructure. If the field is left blank, the e-mail summary feature will use the last value the individual user entered and remember this value as a default preference. If the field has a value, the e-mail summary feature will use this value for all users unless the user changes the value.
Requires authentication – An indication of whether the e-mail address should be authenticated on the SMTP server when an e-mail is sent.
SMTP server login – The name of the user account for the system administrator for the SMTP server.
SMTP server password – The password for the user account.
Confirm password – The re-entered password for the user account.
Buttons
Save – Click to save changes to the window.
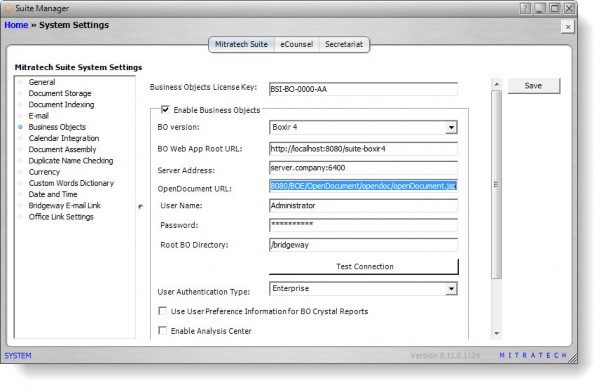
Business Objects Settings
![]() Premium feature – A registration key code is required to activate.
Premium feature – A registration key code is required to activate.
The Business Objects settings on the Suite tab of the System Settings window allow you to use the SAP Business Objects Business Intelligence Platform as the server-side engine that powers Crystal Reports templates that are run through the Suite applications. All standard reports for Suite are provided in Crystal Reports 10.
In addition, you can enable the Analysis Center powered by SAP Business Objects Business Intelligence Platform in the Suite to create ad-hoc reports and queries.
Fields
Business Objects License Key – The license key to enable Business Objects.
Enable Business Objects – Indicates whether Business Objects will be used for Crystal Reports.
BO Web App Root URL – The full URL path to the deployment of the Business Objects Web application (see the Suite Installation Guide for more information).
If your deployment is integrated with SiteMinder for login authentication, do not use the SiteMinder-specific URL as a value for this field. Suite communicates with the Business Objects Web application using URL strings, and authentication only occurs when data is supplied to Business Objects to execute a report.
SiteMinder authentication is not used during this process.
Server Address – The address for the Business Objects server.
User Name – The user name of an account to access the Business Objects server.
Password – The corresponding password for the account to access the Business Objects server.
Root BO Directory – The folder that is created on the Business Objects server for imported reports.
User Authentication Type – The type that will be used for authenticating users when running Business Objects reports or using Analysis Center. If you select Enterprise, you must associate Business Objects user accounts with each Suite user. See “Configuring Analysis Center Users” on page 212. Currently, the Suite/Business Objects integration supports SiteMinder using LDAP. For this authentication type, you will need to configure security attributes for those users or groups who will be editing Analysis Center reports and/or accessing Business Objects BI Launch Pad.
Use User Preference Information for BO Crystal Reports – Indicates whether your company uses named users instead of the concurrent name for running reports. Each user can specify a named Business Objects account on the Business Objects tab of the user preferences in eCounsel and/or Secretariat. This option is only available for the Enterprise user authentication type.
Analysis Center Key – The license key to enable the use of Analysis Center.
Enable Analysis Center – Indicates whether Analysis Center is enabled for Suite. Analysis Center is Business Objects’ Web-based (DHTML) query and analysis tool that provides you with a simple WYSIWYG report creation environment and easy-to-use interface. Analysis Center gives you the ability to drill down into data and the ability to customize reports without programming.
Buttons
Save – Click to save changes to the window.
Test Connection – Click to verify that the settings for Business Objects are valid.
Test BI Launch Pad URL – Click to verify that the URL to Business Objects BI Launch Pad is valid.
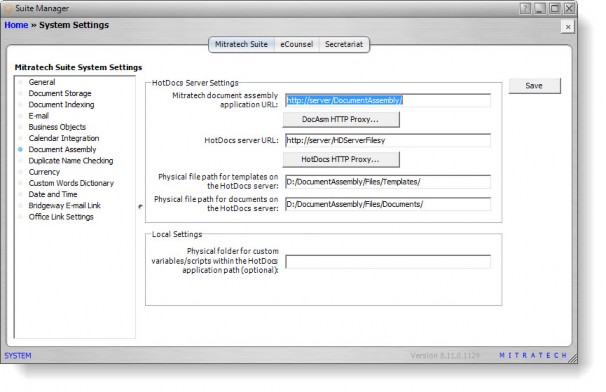
Document Assembly Settings
The Document Assembly settings on the Suite tab of the System Settings window allow you to configure settings for HotDocs integration with Suite. Licenses for HotDocs are included with the Secretariat license. It is optional and separately licensed for eCounsel. Contact Mitratech for licensing information.
Fields
HotDocs Server Settings – Mitratech will provide this information after an account is created on the hosted HotDocs Server. Contact Mitratech’s Customer Support department to create an account on the hosted HotDocs Server (888-664-0005 or support@bridge-way.com).
Suite document assembly application URL – The Uniform Resource Locator (URL) to the Suite document assembly application (for example, http://server/DocumentAssembly).
Mitratech will provide this information after an account is created on the hosted HotDocs Server.
HotDocs server URL – The URL to the HotDocs server (for example, http://server/HDSServerFiles). Mitratech will provide this information after an account is created on the hosted HotDocs server.
Physical file path for templates on the HotDocs server – The directory that contains the files for temporary storage of HotDocs templates (for example, C:\Program Files\HotDocsServer\templates). Templates are stored in the database and must be copied to a hard drive in order for HotDocs to have access.
Physical file path for documents on the HotDocs server – The default directory where newly created documents will be saved (for example, C:\Program Files\HotDocsServer\documents).
Local Settings – This information pertains to the deployment of custom files.
Physical folder for custom variables/scripts within the HotDocs application path (optional) – The directory in which the customvariables.xml file and any custom script files are stored. In most cases, the entry will be variables (verify the directory name on the Java server by browsing to the directory).
Buttons
Save – Click to save changes to the window.
DocAsm HTTP Proxy – Click to open the Proxy Settings dialog box to specify the proxy server used to connect to the Suite document assembly application through HTTP.
HotDocs HTTP Proxy – Click to open the Proxy Settings dialog box to specify the proxy server used to connect to the HotDocs server through HTTP.
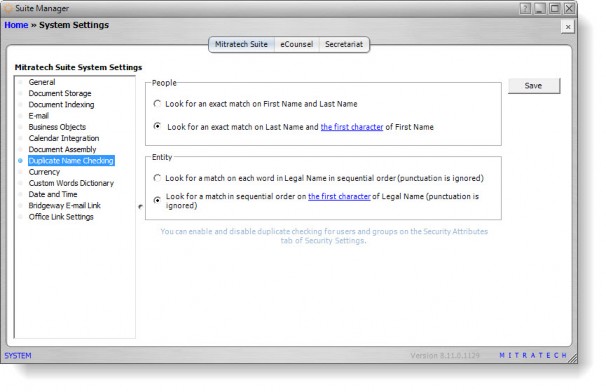
Duplicate Name Checking Settings
The Duplicate Name Checking settings on the Suite tab of the System Settings window allow you to activate the duplicate check feature to specify how people and entity records are checked.
If a possible duplicate is found when a user begins creating a new record, a popup window will display the records that match. The user can click Continue to create the new record or click Select to cancel the new record and open the existing record. In the case of multiple duplicates, the user would need to select a record first.
Duplicate checking can be enabled or disabled for individual users and groups of users using security attributes on the Security Settings window.
Fields
People – When checking for duplicate person records, select to Look for an exact match on First Name and Last Name or Look for an exact match on Last Name and the first character of First Name.
Entity – When checking for duplicate entity records, select to Look for a match on each word in Legal Name in sequential order (punctuation is ignored) or Look for a match in sequential order on the first character of Legal Name (punctuation is ignored).
If you select the latter option on the above fields, you can click on the first character link to enter the number of characters that are used for matching purposes.
Buttons
Save – Click to save changes to the window.
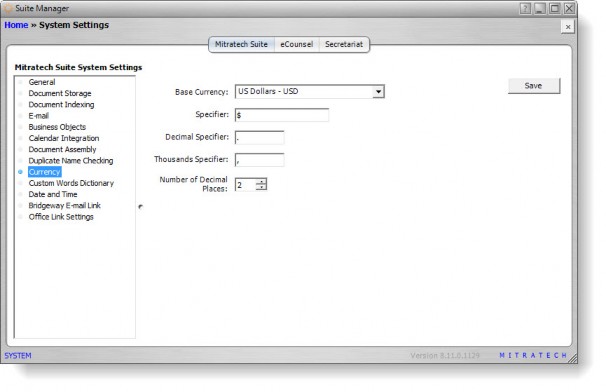
Currency Settings
The Currency settings on the Suite tab of the System Settings window allow you to define settings that will be used when displaying currency within Suite.
Fields
Base Currency – The default currency to be used in fields that contain monetary amounts. The options in this field are maintained in the Lookups component in Suite Manager.
Specifier – The symbol that represents the base currency in the monetary fields (i.e., $=Dollars).
Decimal Specifier – The symbol to denote decimal place separation.
Thousands Specifier – The symbol to be used to separate thousands.
Number of Decimal Places – The number of decimal places to display.
Although up to seven decimal places may be selected, the data entry is restricted by the field type (decimal precision) in the database. Thus, you can configure more decimal places to be displayed then can be entered. Suite will add trailing zeroes in this case.
Buttons
Save – Click to save changes to the window.
Custom Words Dictionary Settings
The Custom Words Dictionary settings on the Suite tab of the System Settings window allow you to add words to the dictionary that is stored on the Web server and used for both eCounsel and Secretariat for all users. Only the system administrator has access to add words to the dictionary. The list of words in the dictionary is not comprehensive; only those words that you have added are listed.

Fields
Custom Words in Spell Check Dictionary – Lists words that have been added to the dictionary.
Buttons
Save – Click to save changes to the window.
Edit Word – Click to make changes to the selected word.
Delete Word – Click to remove the selected word from the dictionary.
Clear List – Click to remove all words from the dictionary.
Add Word(s) – Click to append the specified word(s) to the dictionary.
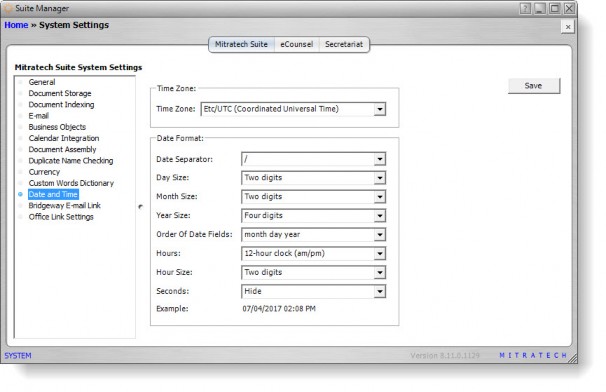
Date and Time
The Date and Time settings on the Suite tab of the System Settings window allow you to specify the time zone of the server for Suite. In addition, you can specify the system-wide default display of dates and times for calendar appointments within all Suite products. Each user can override these display settings within his/her own preferences in a Suite application.
Fields
Time Zone – The time zone in which the Suite server is located.
Dates/times are stored using UTC – Universal Coordinated Time (formerly called GMT – Greenwich Mean Time), and any offsets are applied to the date/time when displayed in Suite.
Date Format – System-wide display settings for date/times for calendar appointments.
Date Separator – The character (such as a forward slash) used between date fields.
Day Size – The number of digits (either one or two) to display for the day.
Month Size – The number of digits (either one or two) to display for the month.
Year Size – The number of digits to display for the year.
Order of Date Fields – The order in which the date fields appear.
Hours – The type of clock (either 12-hour or 24-hour) that is used to display time.
Hour Size – The number of digits (either one or two) to display for the hour.
Seconds – An indication of whether seconds are shown or not.
Buttons
Save – Click to save changes to the window.
eCounsel Tab
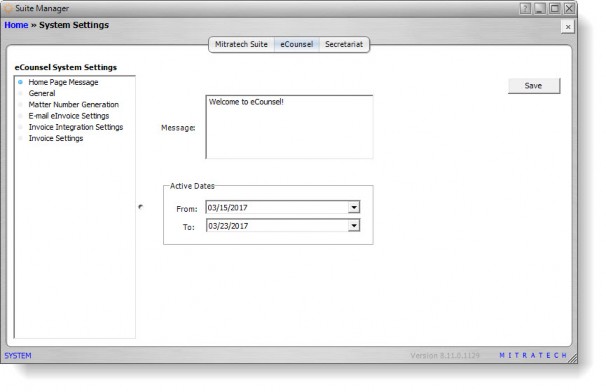
Home Page Message Settings
The Home Page Message settings on the eCounsel or Secretariat tab of the System Settings window allow you to specify a system-wide message that will appear in a popup message box when a user logs in to eCounsel or Secretariat.
Fields
Message – The text of the system-wide message.
Active Dates – The start and end dates for the message to be active.
Buttons
Save – Click to save changes to the window.
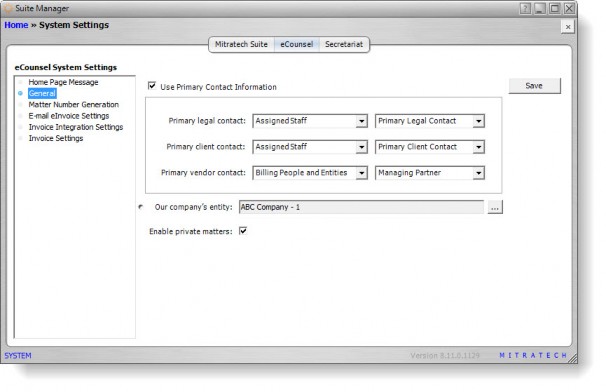
General Settings
The General settings on the eCounsel tab of the System Settings window allow you to specify the player type and role to be used for a matter’s primary contact information, the entity record to be associated with your company, and enable private matters.
Fields
Use Primary Contact Information – An indication of whether you can select the player type and role to be assigned to a person who is listed as the primary client, legal, and/or vendor contact for a matter. The options available in these dropdown lists are specified through lookups. Primary legal, client, and vendor contact information is displayed on the Base Info tab in the Matters module. The primary vendor contact will receive notifications for matter accrual due dates if the matter accruals feature has been configured for the specific matter or matters. See the eCounsel User Guide for more information on enabling accruals for a matter.
Primary legal contact – The type and role of a player that may be designated as a primary legal contact.
Primary client contact – The type and role of a player that may be designated as a primary client contact.
Primary vendor contact – The type and role that may be designated as a primary vendor contact.
Our company’s entity – The entity record that will be associated with your company for timekeeping and electronic invoicing.
Enable private matters – An indication of whether private matters are implemented. The Private Matters feature allows access to a matter to be restricted to specifically designated users only, even if the matter is assigned to a logical group to which a non-designated user has access.
When enabled, the Private Matter checkbox appears on the Base Info tab in the Matters module.
Buttons
Save – Click to save changes to the window.
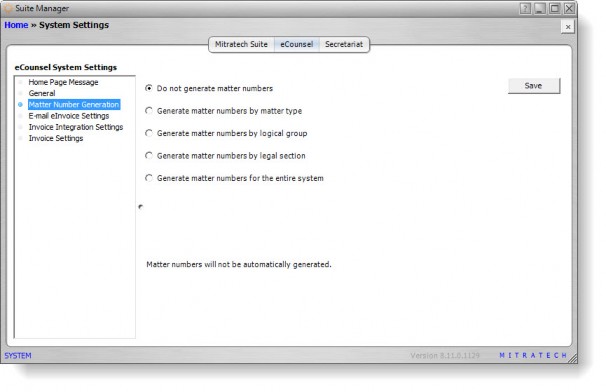
Matter Number Generation Settings
The Matter Number Generation settings on the eCounsel tab of the System Settings window allow you to have eCounsel automatically generate matter numbers when matters are created. eCounsel does not allow multiple numbering methods. See “Matter Number Generation Details Dialog Box” on page 199 for more information on customizing the settings for generating matter numbers.
Fields
Do not generate matter numbers – An indication of whether matter numbers will be entered manually.
Generate matter numbers by matter type – An indication of whether matter numbers will be created sequentially by matter type categorization. Selecting this option opens the Matter Types dialog box to configure settings for each matter type.
Generate matter numbers by logical group – An indication of whether matter numbers will be created sequentially by logical group categorization. Selecting this option opens the Logical Groups dialog box to configure settings for each logical group.
Generate matter numbers by legal section – An indication of whether matter numbers will be created sequentially by legal section categorization. Selecting this option opens the Legal Sections dialog box to configure settings for each legal section.
Generate matter numbers for the entire system – An indication of whether matter numbers will be created sequentially as matters are created. Selecting this option opens the Matter Number Generation Details dialog box to configure settings for the system.
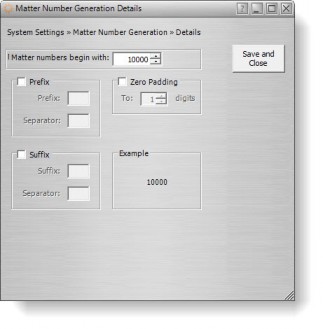
Matter Number Generation Details Dialog Box
The Matter Number Generation Details dialog box allows you to customize the settings for generating matter numbers.
Fields
Prefix – An indication of whether text will be prepended to the matter number.
Prefix – The character string to be used at the beginning of each new matter number.
Separator – Optionally, the character to be used to separate the prefix from the matter number (such as “–”).
Suffix – An indication of whether text will be appended to the end of each matter number.
Suffix – The character string to be used at the end of each new matter number.
Separator – Optionally, the character to be used to separate the matter number from the suffix (such as “–”).
Zero Padding – An indication of whether each matter number generated will be a minimum number of digits. Zeroes will be added to complete the number.
To X digits – The number of zeroes to be added to the beginning of each new matter number. The number of zeroes are adjusted automatically to fill the number of characters specified.
Buttons
Save and Close – Click to save changes to the window.
Invoice Integration Settings
![]() Premium Feature – Additional Purchase Required
Premium Feature – Additional Purchase Required
The Invoice Integration settings on the Suite tab of the System Settings window allow you to specify settings for Collaborati.
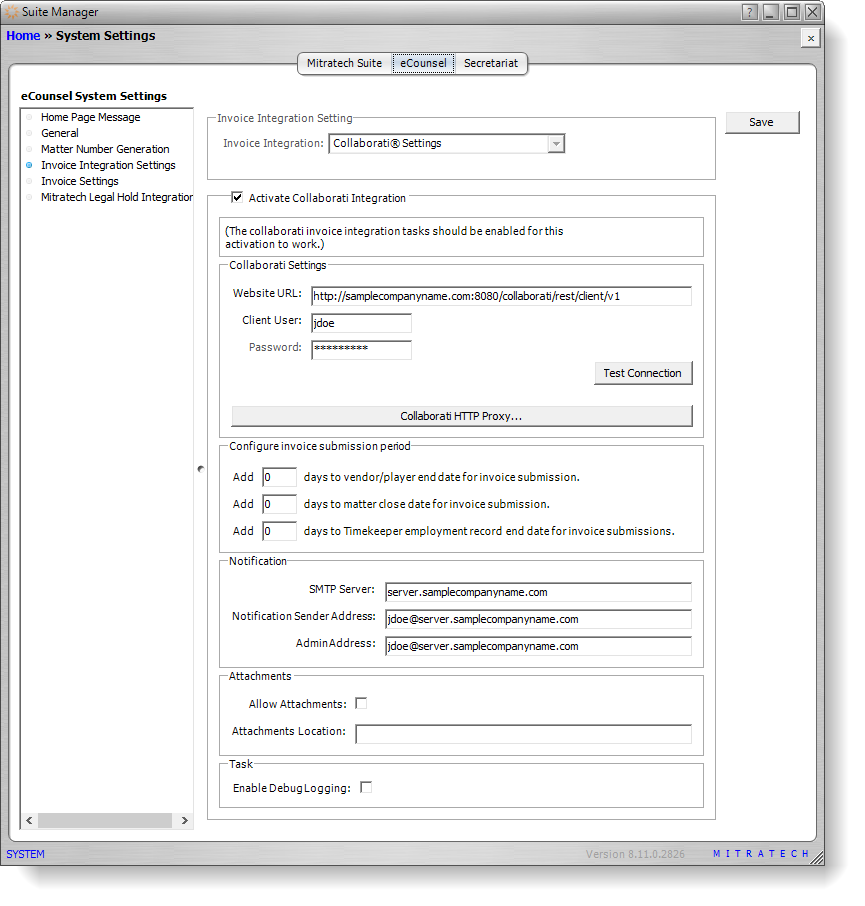
Fields
Invoice Integration Setting – Allows to you select Collaborati settings
Activate Collaborati Integration – Allows you to specify information for the integration.
Website URL – The Uniform Resource Locator (URL) to access the Collaborati Website.
Client User – Client user for the Collaborati Website.
Password – Password for the Client user.
Configure invoice submission period – Allows you to specify the number of days after a vendor’s end date on the matter that the vendor is allowed to submit invoices, the number of days after the matter has a close date that the vendor is allowed to submit invoices, and/or the number of days after a timekeeper is inactivated via an end date for which the timekeeper can continue to bill on invoices.
Notification – Allows you to enter information that will be used for notifications and rejected electronic invoices.
Attachments – Allows you to enter information concerning attachments to invoices.
Test Connection – Click to connect to the Collaborati service.
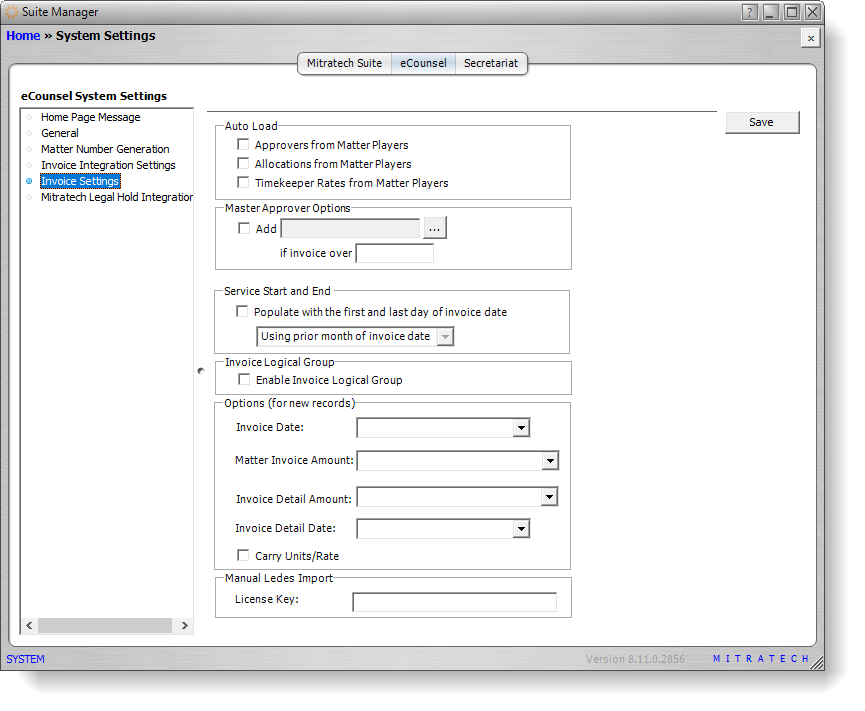
Invoice Settings
The Invoice Settings on the eCounsel tab of the System Settings window allow you to select options that control settings in the Invoices module of eCounsel.
Fields
Auto load – Contains options to autoload approvers and allocations from players assigned to a matter.
Approvers from Matter Players – An indication of whether players that have been identified for a matter automatically will be included as approvers for the invoice.
Allocations from Matter Players – An indication of whether the invoice allocation information for players that have been identified for a matter automatically will be used.
Timekeeper Rates from Matter Players – An indication of whether the timekeeper rates are automatically loaded.
Master Approver Options: Add – A person to be added as an invoice approver to all invoices.
Master Approver Options: if invoice over – An indication of whether the selected person is added to approve the invoice if the invoice is over the designated amount.
Service Start and End – Populate with the first and last day of invoice date – An indication of whether the start and end dates of work billed in the invoice will default to either the month prior to the invoice date or the same month as the invoice date.
Invoice Logical Group: Enable Invoice Logical Group – An indication of whether invoices are restricted from a certain user based on the matters to which the user is associated (i.e., a user cannot view an invoice that is for a matter for which the user does not have logical group access). If the invoice is split between matters and the user has access to one of the matters, the user can view the invoice but not the restricted matter name(s).
Invoices that have a portion allocated to a private matter will display “Restricted Data” in areas that pertain to the private matter. All other matter information will display.
If a user who does not have access to a matter is explicitly assigned to approve an invoice for that matter, the Approver E-mail Notification task will send the user an email from which he/she can access and approve the invoice. However, the invoice will display “Restricted Data” in areas that pertain to the matter.
Options – Allows you to make selections for defaults for new invoices.
Invoice Date – The default date (such as Use today’s date) to be used for a new invoice.
Matter Invoice Amount – The default amount (such as Carry amount from previous entry) to be used for a new invoice.
Invoice Detail Amount – The default amount (such as Fill amount with remaining portion) to be used in the detail area for a new invoice.
Invoice Detail Date – The default date (such as Leave date blank) to be used in the detail area for a new invoice.
Carry Units/Rate – An indication of whether the monetary units and rates should be propagated to a new invoice.
Manual LEDES Import: License Key – An alphanumeric code to allow users to import LEDES invoice files into eCounsel. This option activates the Import button on the Invoices List page in eCounsel.
Buttons
Save – Click to save changes to the window.
Secretariat Tab
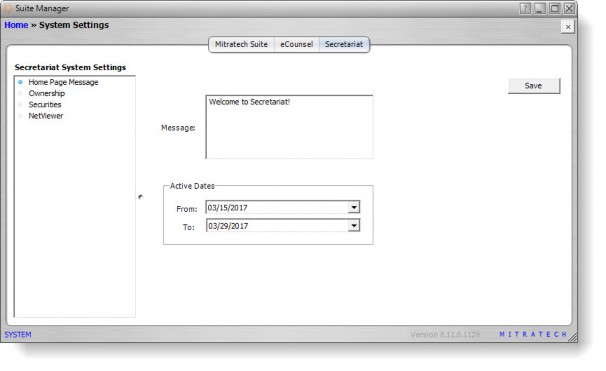
Home Page Message Settings
The Home Page Message settings on the eCounsel or Secretariat tab of the System Settings window allow you to specify a system-wide message that will appear in a popup message box when a user logs in to eCounsel or Secretariat.
Fields
Message – The text of the system-wide message.
Active Dates – The start and end dates for the message to be active.
Buttons
Save – Click to save changes to the window.
Ownership Settings
The Ownership settings on the Secretariat tab of the System Settings window allow you to configure settings for the Ownership tab in the Entities module in Secretariat.
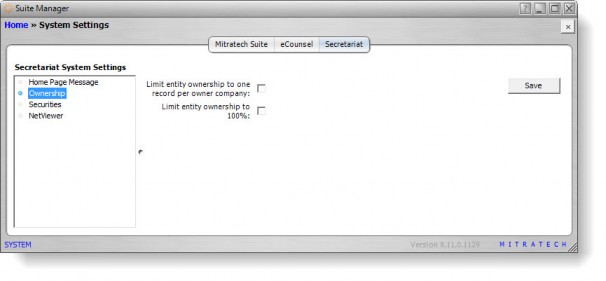
Fields
Limit entity ownership to one record per owner company – An indication of whether an entity’s (active) ownership record can only be listed once on the Ownership tab. In other words, only one owner record can be associated with an entity.
Limit entity ownership to 100% – An indication of whether a restriction is placed for all users across all entities that limits the total ownership percentage of an entity to 100%. On the Ownership tab of the Entities module, the percentage of ownership is tracked.
Buttons
Save – Click to save changes to the window.
NetViewer Settings
The NetViewer settings on the Secretariat tab of the System Settings window allow you to configure settings for NetViewer, an interface that facilitates the internal publication of corporate information via your corporate Intranet without the need for direct access to Secretariat.
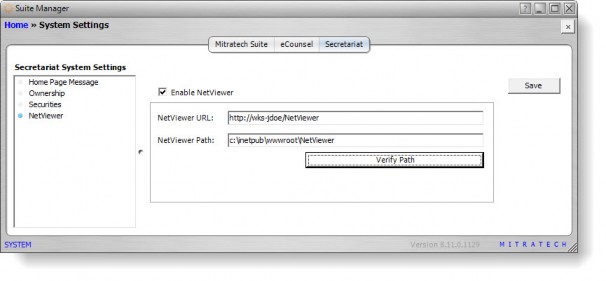
Fields
Enable NetViewer – An indication of whether NetViewer is available for Secretariat users.
NetViewer URL – The Uniform Resource Locator (URL) to access NetViewer (typically, http://<IISServer>/NetViewer, where <IISServer> is the name of the computer on which NetViewer was installed).
NetViewer Path – The location to the directory that was configured for NetViewer (typically, C:\inetpub\wwwroot\NetViewer\).
Buttons
Verify Path – Click to check that the path to the NetViewer files is available from the Suite server.
Save – Click to save changes to the window.