
The Search Module
This article describes the Search module functionality. The Search module lets you do advanced search, save a search, and run searches on a schedule.
The Search module adds more functionality to searches in Suite. You can create a search and perform the following actions:
- Run the search
- Create a report
- Save, edit, and delete the search.
- Create, edit, and delete search templates.

Open a Search
This procedure opens an existing search. To open a search:
-
On the Search module, select a module to which the saved search belongs. It can be any module within Secretariat:
- Entities
- People
- Jurisdictions
- Titles
- Calendar
-
Select the Select a Saved Search radio button and choose a search from the dropdown list. The queries from the saved search appear.

Create a Search
Create a search, save it and use it to create reports, schedule reports and run the search. To create a search:
-
On the Search module, select a module to search. It can be any module within Secretariat:
- Entities
- People
- Jurisdictions
- Titles
- Calendar
-
Select the Create a Search - Select Type radio button. Then choose an option from the Select a Type dropdown list or leave the default option All.

-
To add a search condition, click New. A new line appears. The first line has the entry And/Or grayed out.
Note: You can create up to 50 conditions in a single search.
-
Enter the following information:
-
Select And, OR (if not grayed out). And requires that all conditions yield results, Or only requires one condition to yield results.
-
Select the Tab/Page from the dropdown list.
-
Select the Field. The dropdown list autopopulates with the available fields for the tab, including userfields.
-
Select the operator. It can be any of the following values:
- Contains
- Includes
- Begins with
- Does not include
- Is equal to
- Is not empty
- Is empty
- Sounds Like
- Is greater than
- Is less than
-
Enter the Value to search or select Prompt to enter the value at the moment of running the search.
-
Select Case Sensitive if applicable.
-
-
Use the buttons to control the search.

| Button | Description |
|---|---|
| New | Adds a new line |
| Delete | Lets you delete a single line. Click the line (it appears blue), and select Delete. |
| Add “(” Remove “(” Add “)” Remove “)” |
Lets you group statements in different ways. For example: (Condition 1 OR Condition 2) AND (Condition 3 OR Condition 4) yields results if conditions (1,3) or (1,4) or (2,3) or (2,4) yield results. |
-
Click Save.
-
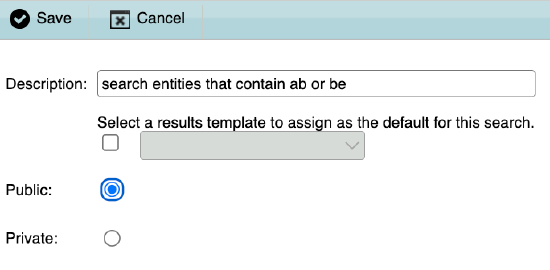
On the pop-up window, enter the following information:

-
Description: Enter a name.
-
Select a results template to assign as the default for this search: Select a saved search to assign the sorting order to the new search. This is an optional configuration.
-
Select Public to make the search available for all users, otherwise, select Private.
- On the pop-up window, click Save.
Note: Customized fields appear as options in the search if they have assigned the View Profile. Fields assigned as Type Profile don’t appear as options in the search. See View Profiles for more information or contact your system admin.
Note: Saving a search is optional. You can create a search and run it or create a report.
Now that you have created a search, you can run the search, create or schedule a report, or build another search based on your search.
Create a Search from an Existing Search
You can create a search that uses queries from a saved search. To create a search from an existing search:
-
On the Search module, select a module where the saved search belongs. It can be any module within Secretariat:
- Entities
- People
- Jurisdictions
- Titles
- Calendar
-
Select the Select a Saved Search radio button and choose a search from the dropdown list. The queries from the saved search appear.

-
To add a search condition, click New. A new line appears.
-
Enter the following information:
-
Select And, Or (if not grayed out).
Note: And requires that all conditions yield results, Or only requires one condition to yield results.
-
Select the Tab/Page from the dropdown list.
-
Select the Field. The dropdown list autopopulates with the available fields for the tab, including userfields.
-
Select the operator. It can be any of the following values:
- Contains
- Includes
- Begins with
- Does not include
- Is equal to
- Is not empty
- Is empty
- Sounds Like
- Is greater than
- Is less than
-
Enter the Value to search or select Prompt to enter the value at the moment of running the search.
-
Select Case Sensitive if applicable.
-
-
Use the buttons to control the search.
Button Description New Adds a new line. Delete Lets you delete a single line. Click on the line (it appears blue), and select Delete. Add “(”
Remove “(”
Add “)”
Remove “)”Lets you group statements in different ways, for example: (Condition 1 OR Condition 2) AND (Condition 3 OR Condition 4) yields results if conditions (1,3) or (1,4) or (2,3) or (2,4) yield results. -
Click Save.
-
On the pop-up window, enter the following information:
-
Description: Enter a name.
-
Select a results template to assign as the default for this search: Select a saved search to assign the same sorting order to the new search. This is an optional configuration.
-
Select Public to make the search available for all users, otherwise, select Private.
- On the pop-up window, click Save.
Delete a Search
The Delete command deletes an existing search or deletes all the lines entered in a new search.
- Create a search or open an existing search.
- Click Delete to delete an existing search or to delete all the lines entered in a new search.
Clear/New Search
The Clear/New command deletes all the lines entered if you are creating a new search, and it closes the search if you opened a search. To use the Clear/New command:
- Create a search or open an existing search.
- Click Clear/New to close an existing saved search or to delete all the lines entered in a new search.
Run a Search
The command Run executes the search and shows the results in a pop-up window. It also delivers the results as a CSV file. You can use a template. The search based on a template inherits the sort order of the template.
Templates are an integral part of the Run command. The Run command performs the following actions:
- Runs a search
- Creates templates
- Modifies templates
- Deletes templates
Note: A search template used in the Run command is different from the report template used in the Run to Report command.
To use the Run command:
-
Click Run. On the pop-up window, depending of the options that you choose, a different prompt appears.

| Options | Description | Instructions |
|---|---|---|
| Run search to an existing results template | This command opens a search template to base your search upon it. Use the template to inherit its sort order. If the template and the search don’t have fields in common, the Run command ignores the template and runs the search. | 1. Select the template from the dropdown list. 2. Click Continue. The search runs, displays the results in a pop-up window, and downloads a CSV file if Export search results to Excel is selected. |
| Run search to an existing results template + Revise the template | The two commands instruct to use a template to inherit its sort order on your search and open the search template for review. You can create a new template based on the original template or modify the template. If the template and the search don’t have fields in common, the Run command ignores the template and runs the search. | 1. Review the sort order. Change it if needed. 2. Optionally, select Export search results to Excel. 3. Click Continue to run the search. |
| Create a new results template | This command creates a new search template. If you want to run a search without using a template, select Create a new results template, leave the editing prompt as is and click Continue. | 1. Choose the Sort Order. 2. Optionally, you can change the search queries. |
| Export search results to Excel | Create a CSV file of your search for download. | Choose this option to create a CSV file for download. You can use Export search results to Excel with the Run search to an existing results template and Create a new results template commands. |
- The editing template prompt appears when you choose Revise the template or Create a new results template

The following table describes the editing template functionality:
| Step | Action | Description |
|---|---|---|
| 3.1 | Select Sort Order. | Select the field and then the sort order from the dropdown lists. You can sort by up to three fields. |
| 3.2 | Change the tabs and fields | Optionally, you can change the tab and the field in the Tab/Page section. |
| 3.3 | Click Save or click Save As. | Optionally, click Save to save the search template. Save As lets you save an existing template as another file. These actions take you to another prompt. Enter the following information: - Description: Enter the name. - Select the Public radio button to make the template visible for everyone, otherwise select the Private radio button. - Click Save. |
| 3.4 | Click Continue. | This action performs the search and displays the results in a pop-up window. |
- On the pop-up window, select Print or Save to save the search results. Note that not all browsers let you save your search results.
Run to Report
The Run to Report command runs a report. Note that although you need to open a search, it doesn’t use the search. The reports are predefined and are imported to Suite.
Note: A search template used in the Run command is different from the report template used in the Run to Report command. You can run reports in the Report module.
Note: Run To Report needs a report template imported and the report configured to be available in the tab where the search occurs. See Create a Search to create a search for a Tab/Page. See Importing Report Templates and Making a Report Available from a Tab to configure a template to use in Run To Report or contact your system admin.
To use the Run to Report command:
- Create a search or open an existing search.
- Click Run to Report.
- On the pop-up window, select the report.

- The search results are displayed in a pop-up window with the same layout as the report template.
Search on Documents
You can create a search based on documents. The documents must be stored in a database or a file server. For example, the eCounsel > People module has the option Documents in the Tab/Page dropdown list, as in the image.

Note: Full-text search must be configured to search on documents. See Specifying Document Indexing in the Suite Administration Guide or contact your system admin.
The following file extensions are supported:
| File Extension | Description |
|---|---|
| .TXT | text files |
| .EML | Message text files (including attachments) |
| .MSG | Message text files (including attachments) |
| .HTML | Web pages |
| .HTM | Web pages |
| Portable Document Format | |
| .DOC/.DOCX | Microsoft Word files |
| .RTF | Rich Text Format files |
| .LOG | Log text files |
| .JAVA | Java text files |
| .CS | C# text files |
| .CSS | Cascading Style Sheet text files |
| .JS | Java Script text files |
| .XLS | Microsoft Excel spreadsheets |
The following words are ignored by the search:
- a, an, are, as, at
- be, but, by
- for
- if, in ,into, is ,it
- no, not
- of, on, or
- such
- that, the, their, then, there, these, they, this, to
- was, will, with
To search for documents, also known as a full-text search:
-
Choose a module that has the option Documents in the Tab/Page dropdown list.
-
In Field, select Attachment File from the dropdown list and enter the search criteria.