
Lawtrac Installation Guide 4.3.6
Introduction
Securing your LAWTRAC.LTO File
Important Note: On-premise clients who are hosting their own Lawtrac instance will need to secure their file location and ensure that it is inaccessible to unauthorized users.
Depending on your web server application (IIS or Apache) you have different methods for taking steps to secure your LAWTRAC.LTO file (this should appear under the path C:\Inetpub\wwwroot, or C:\Program Files (x86)\Lawtrac).
IIS:
- Open the root folder.
- Locate the text template (this block of text contains a "
.template" tag). - Copy the template and paste it at the top of the file. Note: You must remove the ".
template" tag.
Apache:
- Open the root folder.
- Add the following block of text to either the vhosts.conf or httpd.conf files:
 <Files ~ LAWTRAC.LTO>

  Oder allow, deny

  Deny from all

  </Files>
Installation
Installing IIS 8.5
An IIS Server is required to be able to install the ColdFusion app server for Lawtrac.
Note: IIS 8 is the only version of IIS that can be installed on Windows Server 2012 and later.
Instructions
- Open the Control Panel.
- In Server 2012, this can be accomplished in one of two ways:
- Left click the Start button in the lower left and then locate and click on the square tile containing Control Panel.
- Right click the start button in the lower left, and left click the Control Panel option.
- In Server 2012, this can be accomplished in one of two ways:
- Start the Add Roles and Features Wizard. This option may be under Programs | Programs and Features.
- Select Turn Windows Features On or Off.
- Ensure the stated requirements are met, and then click Next to proceed to Installation Type section.
- Role-based or Feature-based Installation should be checked here. Click Next to proceed to the Server Selection section.
- Select a Server from the Server Pool should be selected, with the server on which IIS 8 is to be installed highlighted in the Server Pool box. Click Next to proceed to the Server Roles section.
- In the Roles box, scroll to Web Server (IIS) and a pop-up should appear, asking if you want to "Add features that are required for Web Server (IIS)". Ensure that Include Management Tools (if applicable) is checked before clicking Add Features. Click Next to proceed to the Features section.
- The default settings in the Features section are adequate, so click Next to proceed.
- Click Next in the Web Server Role (IIS) section to proceed to Role Services.
- In the Role Services box, Web Server should be checked, as well as a number of sub-sections. Not all of them need to be selected. Ensure that the following have check-marks next to them before clicking Next:
- Common HTTP Features
- Default Document
- Directory Browsing
- HTTP Errors
- Static Content
- Health and Diagnostics
- HTTP Logging
- Request Monitor
- Performance
- Static Content Compression
- Security
- Request Filtering
- Management Tools
- IIS Management Console
- Common HTTP Features
- On the Confirmation page, verify the role services and features that are selected. Select Restart the Destination Server Automatically if Required to restart the destination server if the settings need to take immediate effect.
- To save the configuration information to an XML-based file that you can use for unattended installations with Windows PowerShell, select Export Configuration Settings, move to the appropriate path in the Save as Dialog box, enter a file name of your preference, then click Save.
- When you are ready to start the installation process on the Confirmation page, click Install.
- After the installation is complete, it is safe to click Close. Confirm that the Web server works by opening a Web browser, and verify\ that a blue “Internet Information Services” Web page is displayed when you use the
http://localhostaddress.
- Return to the Add Roles and Features Wizard again using the first few points outlined in Step 2 above.
- Proceed back to the Server Roles section by continually pressing Next until Server Roles is highlighted on the left.
- Scroll down to Web Server (IIS) and expand it by clicking on the arrow to the left of the checkbox.
- Expand Web Server.
- Click the checkbox next to Application Development and then check the boxes for the features listed below. Note that for some of them, the “Add features that are required…” box will appear when the box is checked. Simply click on the Add Features button to continue each time one pops up:
- .NET Extensibility 4.5
- ASP
- ASP.NET 4.5
- CGI
- ISAPI Extensions
- ISAPI Filters
- When finished, keep clicking on Next until the confirmation.
- After the installation is complete, it is safe to click Close.
- To be able to show helpful error messages for errors within Lawtrac (rather than a "500 server error" page), a setting will need to be checked within the IIS Manager.
- Click the Start Menu.
- After the start screen appears, type "IIS" and a search entry for Internet Information Services (IIS) Manager should appear. Select that entry.
- In the navigational area to the left, in the Connections box, click the server name.
- The middle content pane should have a variety of icons displayed. Double-click the Error Pages icon.
- In the right Actions pane, select Edit Feature Settings...
- Select the Detailed Errors option in the middle and press OK. It is safe to dismiss any pop-up windows that appear asking for confirmation of this.
Technical Requirements
Lawtrac is a Web-based application. This application was developed using ColdFusion, an intuitive tag-based scripting language. It does not require the installation of any additional files on the local workstation. The back-end, ColdFusion software, along with the database and application files, must be installed on a server. ColdFusion is the Web server software that interprets and translates the Lawtrac application files.
If customers opt for Mitratech to host their company's database (Managed Service Provider-MSP), the Lawtrac Support department handles and maintains the application setup. However, customers hosting their company's application (Intranet) must ensure that additional components are acquired (i.e., ColdFusion, SQL Server, etc.) and that adequate hardware is available for each component outlined. In addition, in-house database and Web administrators are required to perform installations and maintain the database and Web servers.
Notes for on-premise clients: Lawtrac requires DNS Setup as well as an SSL Certificate prior to implementation. Lawtrac only works on SSL (https://) and requires that these steps are already completed to function.
Web & Application Server
- Windows 2019 Server
- 2 Intel® Pentium® 4 or AMD Athlon® processor (2.90GHz minimum each) 4 GB RAM
- 20 GB hard-disk space*
*Customers planning to use the Document Bank to store documents linked to matters must allocate a minimum of 80-200 GB of hard disk space. If your company already has documents that are to be linked to Lawtrac, the hard disk space should be increased to accommodate the current size of documents plus additional space (depending on how many documents users will be uploading).
Web Server Components
- IIS 10, only Coldfusion 2018 is supported in Lawtrac 4.3.6 and all later versions.
- Visit this site to see further detail on system requirements for ColdFusion Standard.
Database Server
- Windows 2012 Server, Windows 2012R2 Server, Windows 2016
- AMD Opteron, AMD Athlon 64, Intel Xeon with Intel EM64T support, Intel Pentium IV with EM64T support (2.90GHz minimum each)
- 4 GB RAM
- 50 GB hard-disk space
Database Software
- Microsoft SQL Server 2016
- Reference the Microsoft websites below for further detail on requirements for installing the 2016 Microsoft SQL servers.
- · 2016 Hardware and Software Requirements
For questions, contact the Lawtrac Support Department at lawtracsupport@mitratech.com or call +1 888 784 7224, then press 3.
User Workstation
- Internet Browser
- Latest versions of Microsoft Internet Explorer 11, Mozilla Firefox, Google Chrome
- System Specs
- Minimum Requirements—512 MB RAM (1 GB RAM recommended)
- Email Integration (optional)
- Microsoft Outlook 2013 and 2016
Setting up the Lawtrac Application
Requirements prior to setting up the Lawtrac application.
The following is required prior to installing the Lawtrac application:
- Web server has been installed with a successful HTTP connection
- ColdFusion has been installed with the ability to successfully log in to ColdFusion administrator
- ColdFusion has been connected to an SMTP (Send Mail) server (via ColdFusion Administrator | Server Settings | Mail)
- SQL Server has been installed on the database server
- Database and Web servers have been set up to allow for communication between both servers
In addition to documentation, the items sent to you contains one of two packages depending on your company’s preference:
- Conversion Database Setup
- Custom Tags (Supporting DLL & Java Files)
- Application
- Lawtrac.LT file
- Converted Database
- Currency Database
- Client Storage Database
- Activity Database
- Blank Database Setup
- Custom Tags (Supporting DLL & Java Files)
- Application
- LAWTRAC.LTO file
- Blank Database
- Currency Database
- Client Storage Database
- Activity Database (optional)
Installing Lawtrac
- Create a backup of your Web server files, renaming the file to refer to the current version, if applicable.
- Unzip the
Lawtrac<version>.exeinstallation file into a temporary folder on the web server (i.e.,Lawtrac4.3_2017)and then run the executableLawtrac4.x.exe
The setup screen appears. - Click Next.

- The Select Application Folder screen appears.
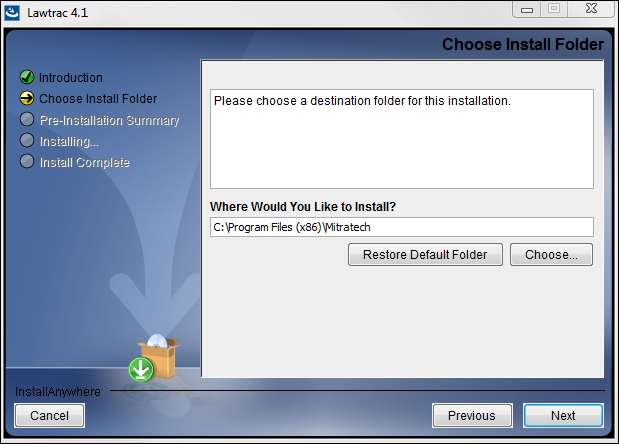
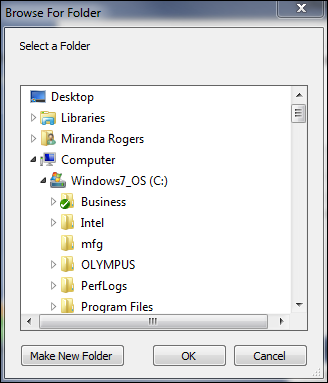
- Click Choose.
- Browse to
PATH:\inetpub\wwwrootfolder and click on Make New Folder.
The name of the folder should be the same as your existing Lawtrac application folder name.
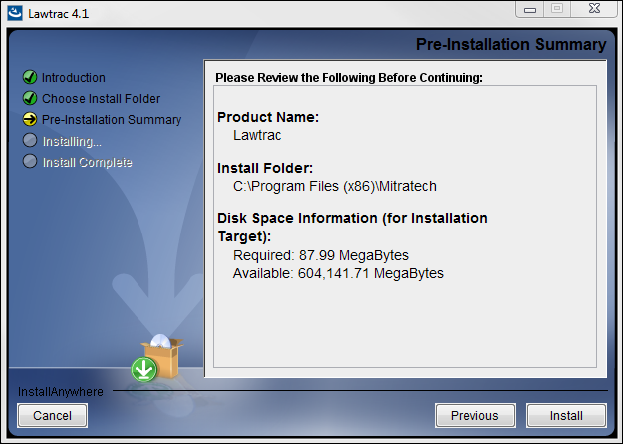
- Click Next.
The application is now ready to be installed. - Click Install.
The installation process commences.
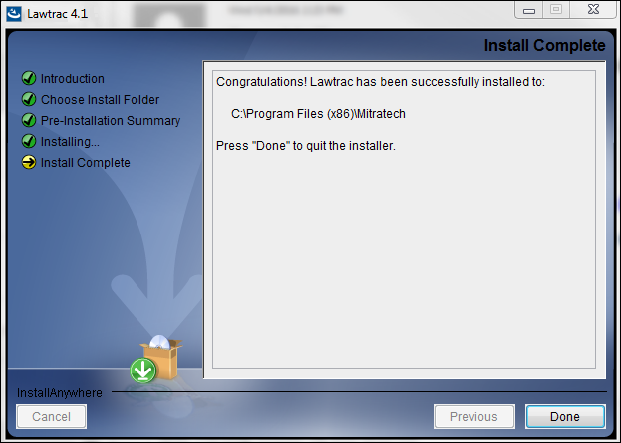
The installation is completed once the Completing the Lawtrac Online Setup Wizard appears. - Click Done.
Application Files
Once the installation is complete, the following application file structure should appear under the path C:\Inetpub\wwwroot, or C:\Program Files (x86)\Lawtrac.
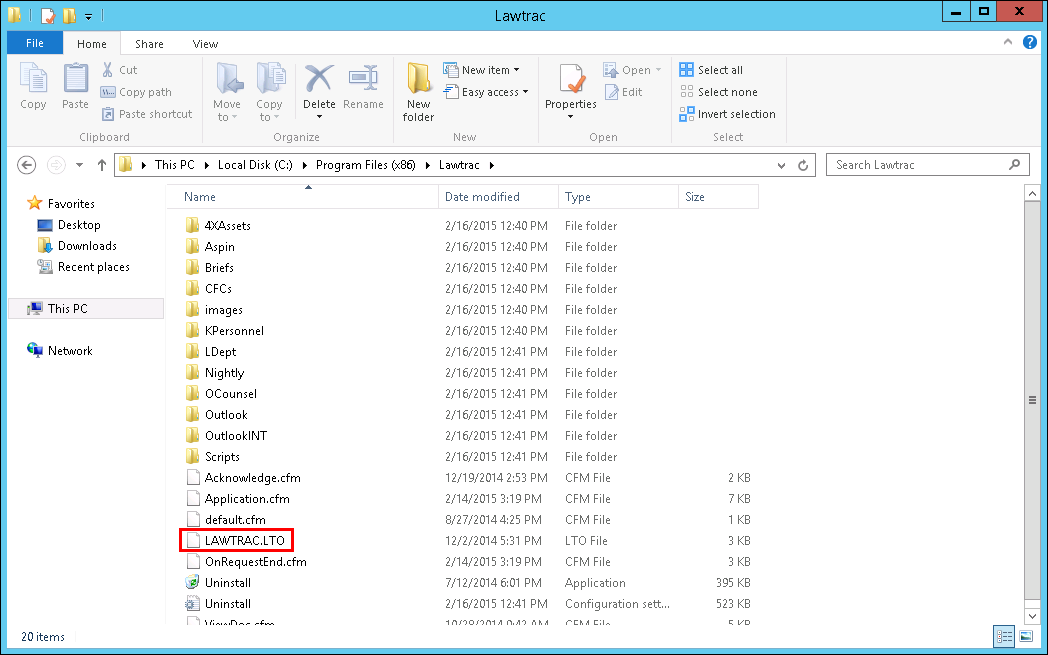
Application Configuration File
The configuration file, Lawtrac.LTO (highlighted above), runs with every page request and controls locations, data source names and application permissions. It must be configured to reflect the settings within your environment prior to launching the application.
Use any text editor (i.e., Notepad or Word) to edit the configuration file. Ensure the original file name is retained when saving any changes. Some editors may place a “.txt” or “.doc” extension. The file must be named Lawtrac.LTO.
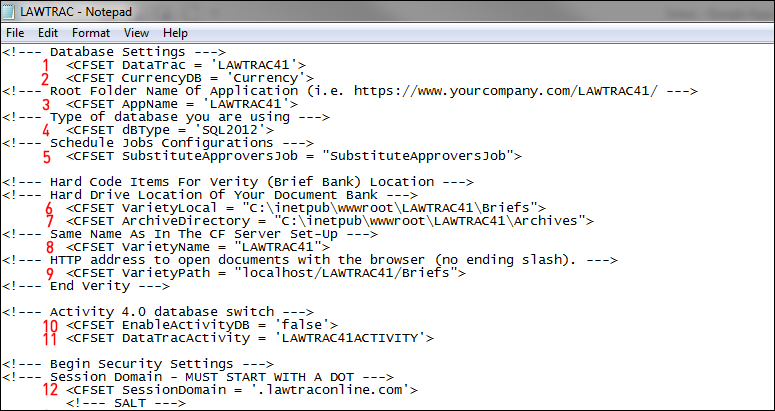
- – DataTrac: Data Source for the Lawtrac application within ColdFusion Administrator (i.e. DataTrac = LAWTRAC43).
- – CurrencyDB: Data Source for the Currency database within ColdFusion Administrator.
- – AppName: The name of the directory where the Lawtrac application resides (i.e. LAWTRAC43).
- – dBType = The abbreviation for the database being used.
SQL Server 2012 dBType = ‘SQL2012’ - – SubstituteApproversJob: The name of a scheduled job that checks for invoice approver substitutions and their expiration dates.
- – VarietyLocal: The hard drive location where files are uploaded for the Document Bank. This location must be mapped to the web server. The default directory is
“PATH: \inetpub\wwwroot\LAWTRAC43\Briefs”. - – ArchiveDirectory: The hard drive location where archived files are saved. This location must be mapped to the Web server. The default directory is
“PATH: \inetpub\wwwroot\LAWTRAC43\Archives”. - – VarietyName: The name of the ColdFusion Collection in the ColdFusion Administrator (i.e. LAWTRAC43).
- – VarietyPath: The HTTP or FILE request path to open documents in a Web browser.
- – EnableActivityDB: The switch that enables the Activity Database Data Source.
- – DataTracActivity: The switch that enables the Data Source for the Lawtrac application within ColdFusion Administrator.
- – SessionDomain: The domain name of the main Lawtrac application session.
Lawtrac Database
IMPORTANT NOTE: There are several required processes listed in this section.
Lawtrac Application Database
SQL Server Management Studio should be utilized to create the databases. Once the database has been configured, the scripts must be run against each database being created.
Client Storage Database
To facilitate the storage of client variables created from the day-to-day use of the Lawtrac application, the Client Storage database must be created as the repository.
Setting Up the Client Storage Database
- Open the Lawtrac Installation Directory and run
Create_1_Database_Tables.sql, Create_2_Constraints.sql, Create_3_Default_Data.sql,Create_4_Upgrade_Data.sql,andCreate_5_BankersRounding.sql.on the recently created Client Storage database.
Currency Database
The currency database must be created to enter invoices into Lawtrac. This database is not used to store data entered through the application; the Lawtrac application reads the tables in the Currency database to obtain exchange rates.
Setting Up the Currency Database
- Open the Lawtrac Installation Directory and run
Create_Currency_Databases.sqlon the recently created Currency database.
If foreign currency invoices will be entered, a nightly XML data feed is required to populate the Currency database with current exchange rates. Additional code is available to send an HTTP request to receive exchange rate data. Note that firewall settings may require an adjustment. If your company is interested in receiving a daily exchange feed, please refer to the Setting-up International Currency Exchange Feed section of this document.
Activity Database
**This process is required
To facilitate the user activity audit tracking feature incorporated in the application, the Activity database must be created to store this information.
Setting Up the Activity Database
- Open the Lawtrac Installation Directory and run
Create_Optional_Activity.sqlon the recently created Activity database.
Point Database to Codebase
**This process is required
Execute the following query in New/Upgraded Lawtrac database to customize the Login URL and Company Logo URL.
Update CorpInfo
Execute the following query in New/Upgraded Lawtrac database to customize the Login URL and Company Logo URL.
- SET INTUrl = "http://localhost:8500/YourLawtracVersion/". For example, a Lawtrac 4.3 user would enter: http://localhost:8500/Lawtrac43/
- CorpLogoURL = "http://localhost:8500/YourLawtracVer...s/Corplogo.gif" // or a client default image. For For example, a Lawtrac 4.3 user would enter: "http://localhost:8500/Lawtrac43/ima...s/Corplogo.gif
WHERE TableID = 1
Lawtrac Database Data Source Setup
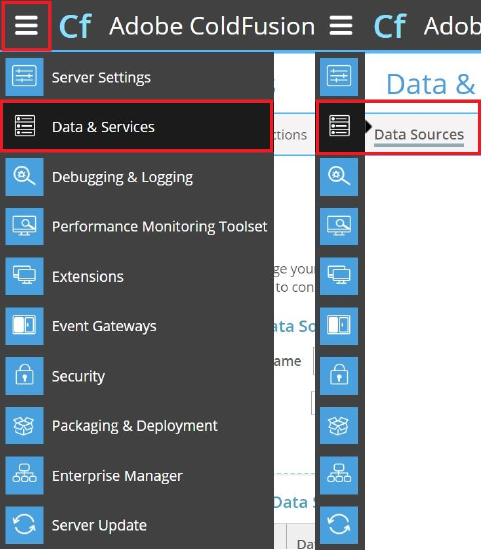
Once the Lawtrac database has been restored, a data source must be created in ColdFusion Administrator for the application to communicate with the database.
Lawtrac Application Database Data Source
- In ColdFusion Administrator, go to Data & Services | Data Sources.
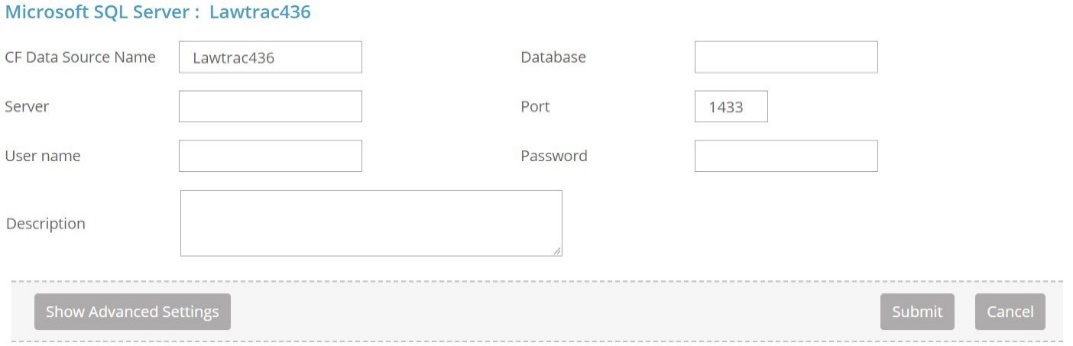
- In the Add New Data Source dialog box, enter the Data Source Name as "LAWTRAC43" (this name should match the name of the root directory for the application files and the DataTrac indicated in the Lawtrac.LTO file).
- Select the Microsoft SQL Server driver and click Add.

- Enter the database name (LAWTRAC43), the database server name, and the SQL Server Administrator username and password.
- Click Submit.
- Ensure the new data source displays a status of "OK".
Currency Database Data Source
- In the ColdFusion Administrator, go to Data & Services | Data Sources.

- In the "Add New Data Source" dialog box, enter the Data Source Name as "Currency". This name should match the name of the Currency database and the CurrencyDB indicated in the
Lawtrac.LTOfile (item B in Application Files). - Select the Microsoft SQL Server driver and click Add.
- Enter the database name (Currency), the database server name, and the SQL Server Administrator user name and password.
- Click Submit.
- Ensure the new data source displays a status of "OK".

Client Storage Database Data Source
- In the ColdFusion Administrator, go to Data & Services | Data Sources.

- In the "Add New Data Source" dialog box, enter the Data Source Name as "ClientStorage".
- Select the Microsoft SQL Server driver and click Add.
- Enter the database name (ClientStorage), the database server name, and the SQL Server Administrator user name and password.
- Click Submit.
- Ensure the new data source displays a status of "OK".

Activity Database Data Source Setup
- In ColdFusion Administrator, go to Data & Services | Data Sources.

- In the "Add New Data Source" dialog box, enter "Activity" in the CF Data Source Name field.
- Select the Microsoft SQL Server driver and click Add.
- Enter "Activity" in the database name field, the database server name, and the SQL Server Administrator user name and password.
- Click Submit.
- Ensure the new data source displays a status of "OK".

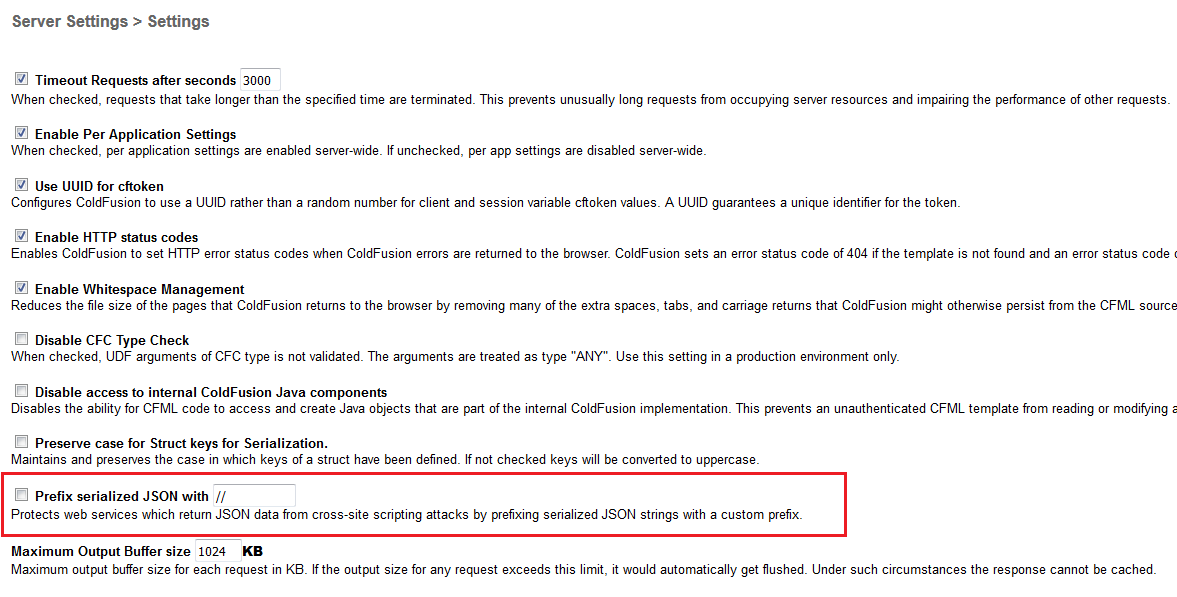
Server Setting Upload Limits
This setting specifies the maximum upload file size for documents in the Lawtrac application. While the site administrator and super user can adjust upload limits within Lawtrac via Application Administration | Document Bank | Upload Limits, those limits cannot exceed the limits set in Adobe ColdFusion. It is recommended to set a maximum post data size that is generous enough to suit your matter management needs without the necessity of returning to ColdFusion Administration.
- In ColdFusion Administrator, go to Server Settings | Settings.
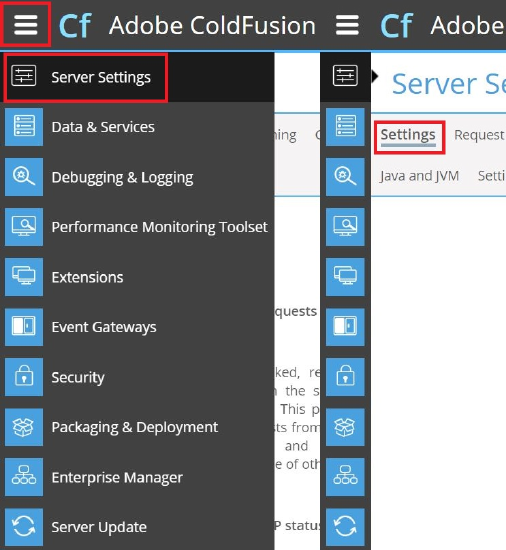
- In the Request Size Limits section, located at the bottom of the page, type an upload limit into the text field.
You can set this number to any size, then regulate a new upload limit when adjusting application settings in Lawtrac. Mitratech recommends setting the maximum number of POST request parameters to 500, and the maximum number of post data to 105.
For Collaborati users, it is suggested that the POST request parameters be set to 2,000.
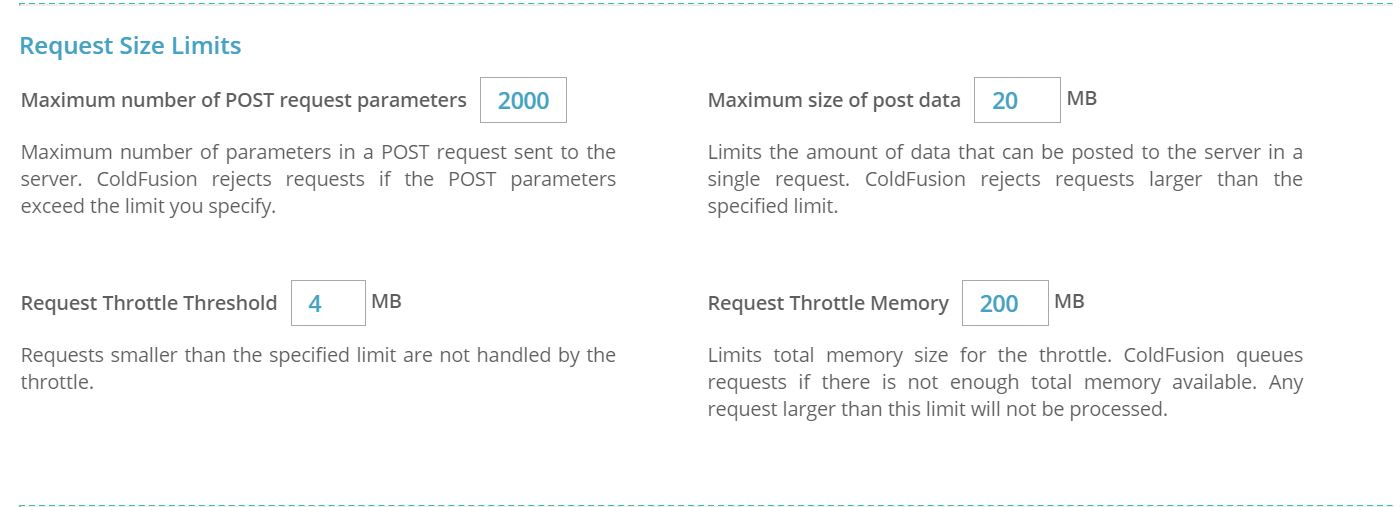
- Click Submit Changes to confirm.
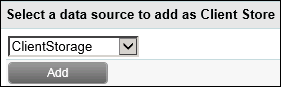
Client Storage Client Variables Setup
- In ColdFusion Administrator, go to Server Settings | Client Variables.

- Under Select Data Source to Add as Client Store select ClientStorage.
- Click Add.
You are taken to the client data source creation screen. - If desired, type in a description.
- Change the default "Purge Data Setting" to 1 day.
- Click Submit Changes.
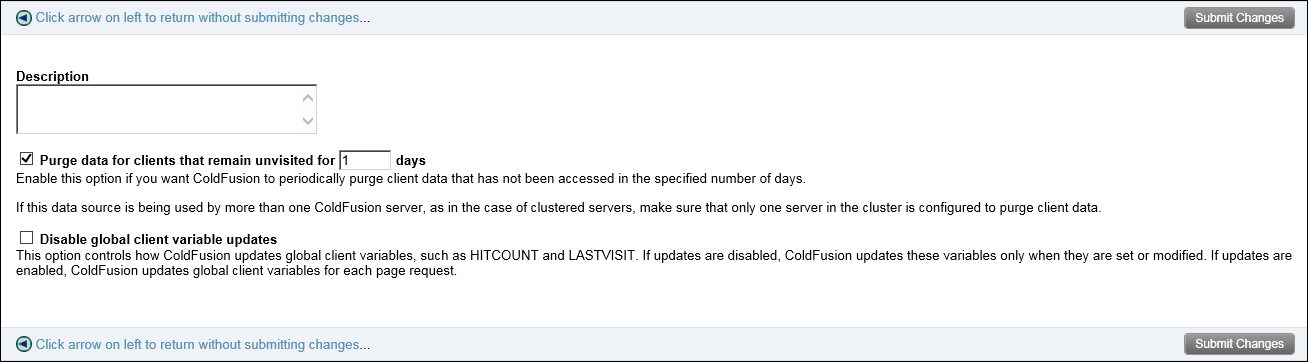
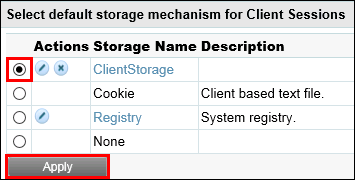
- In the area entitled Select Default Storage Mechanism for Client Sessions, select ClientStorage.
- Click Apply.
Activity Scheduled Task Setup
A scheduled task is required to clean up the data stored in the Activity database. Refer to the steps below to create this task.
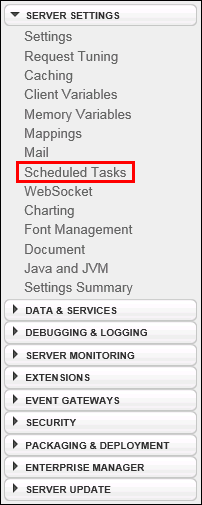
- In ColdFusion Administrator, select Server Settings | Scheduled Tasks.
- Select Schedule New Task.
- In the Task Name field, input "Activity".
- Under Frequency, select the radio button for "Recurring". Select "Daily" from the drop-down and input the time you want the task to run (we recommend running the task when you know users will not be working in the application).
- In the URL field, input the URL for your Lawtrac application with the suffix:
/activity/activity_backup.cfm(for example,https://www.url.com/activity/activity_backup.cfm)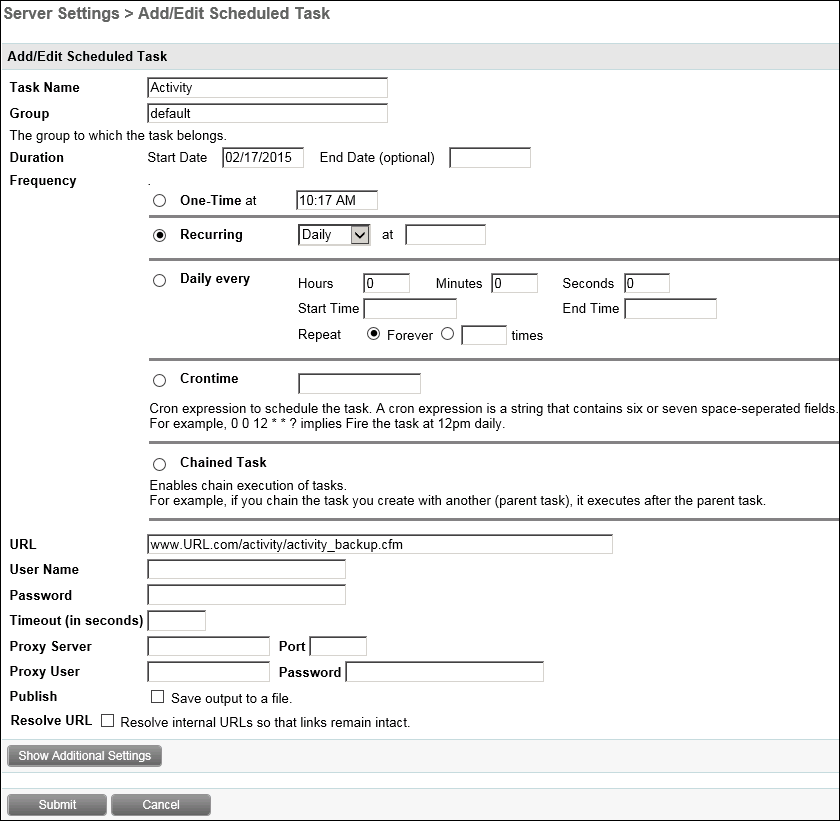
- Click Submit
Document Bank Solr Setup
Solr is a collection of documents that the ColdFusion server indexes to allow you to use search tools for the document.
Note: A scheduled task must be created within the Lawtrac application to automate this process. Contact your company’s project manager or the LT Online Help Desk at Support@lawtrac.com for instructions on setting up a scheduled task.
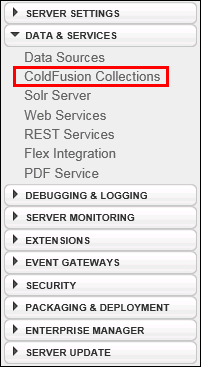
- In ColdFusion Administrator, go to Data & Services | ColdFusion Collections.
- Input the collection name in the Name field. The name must match the VarietyName indicated in the
Lawtrac.LTO(item G in the Application Files section of the guide). - Keep the default Path.
- Click Create Collection.

Collaborati Setup
To ensure a successful synchronization between Collaborati and Lawtrac 4.3, users must ensure certain property values within ColdFusion Administrator. New Collaborati clients will need to manually configure their scheduled task URL. See Scheduled Task URL Setup for more information.
Follow the steps below to run a change directory command for both Collaborati certificates.
- In the ColdFusion Administrator sidebar, select Server Settings.
- Select Settings.
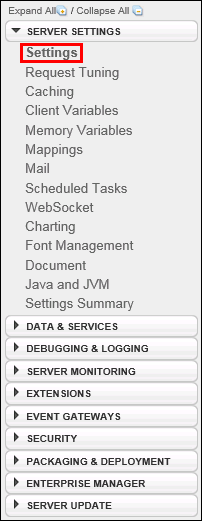
- Locate the property titled "Prefix serialized JSON with" and make sure the box is not checked.
- Open a command prompt and use the cd command (change directory) into the
\jre\binfolder located in your ColdFusion installation directory. - Click Submit Changes to confirm.
The next portion of the set-up covers how to download the Collaborati certificates and use a key tool to import CACERTS within the ColdFusion installation.
The default password for the CACERTS keystore is "changeit".
- In an open Internet browser, go to https://help.teamconnect.com/SSL.
- Click the link provided in Step 1 on the CSM Administrators: SSL Certifications form.
- Open the
wildcard.collaborati.net.zipand download all files contained within, starting withgd_bundle-g2-g1.crt. - Open the command prompt located in
coldfusion/jre/binand run the following command:
keytool -import -v -trustcacerts -alias collaborati -file C:\path\to\your\cert.cer -

    keystore F:\coldfusion\jre\lib\security\cacerts
The command prompt transfers thewildcard.collaborati.net.zipfiles to the application server where your ColdFusion application is stored. The files will be kept in thejre/lib/securityfolder. - Type
"Y"to trust both certificates and add them to the keystore. Press [Enter] on your keyboard. - Restart the ColdFusion Administrator.
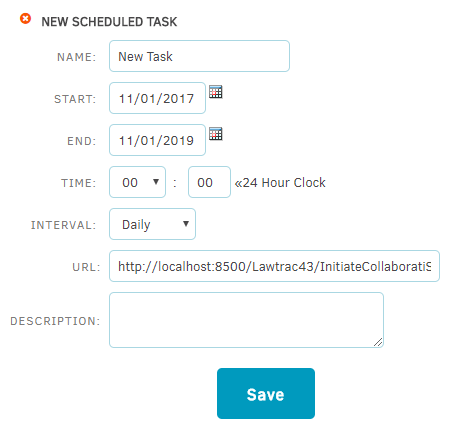
Scheduled Task URL Setup
For new Collaborati clients, Scheduled Task URL must be manually set following these steps:
- Log into Lawtrac and navigate to My Lawtrac > Application Administration > Application & Database > Scheduled Tasks.
- Click Add New Scheduled Task.
- Add a New Scheduled Task, by providing a name, start and end date, time, interval and set the URL to: 'http://localhost:8500/YourLawtracVer...boratiSync.cfm’. For example, a Lawtrac 4.3 user would enter: http://localhost:8500/Lawtrac43/Init...boratiSync.cfm.
- Click on the Save button and test the Collaborati Sync by clicking the Run Now button.
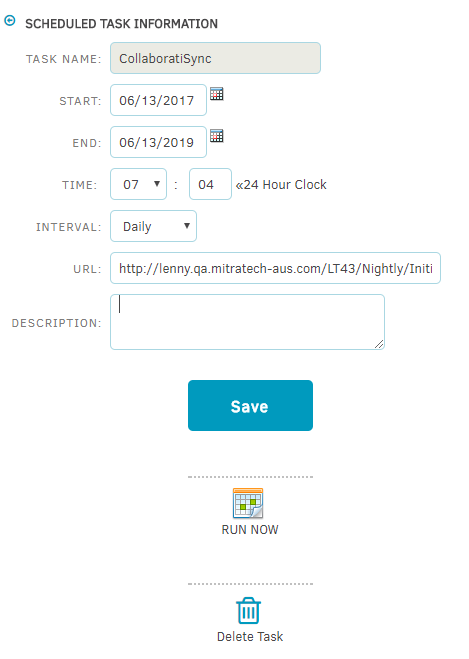
For existing Collaborati clients, Scheduled task URL must be manually updated to a new URL.
- Log into Lawtrac. Navigate to My Lawtrac > Application Administration > Application & Database > Scheduled Tasks.
- Update the existing Collaborati Sync to http://localhost:8500/YourLawtracVer...boratiSync.cfm in the URL field. For example, a Lawtrac 4.3 user would enter http://localhost:8500/43/Nightly/Ini...boratiSync.cfm.
- Click on the Save button and test the Collaborati Sync by clicking on the Run Now button.
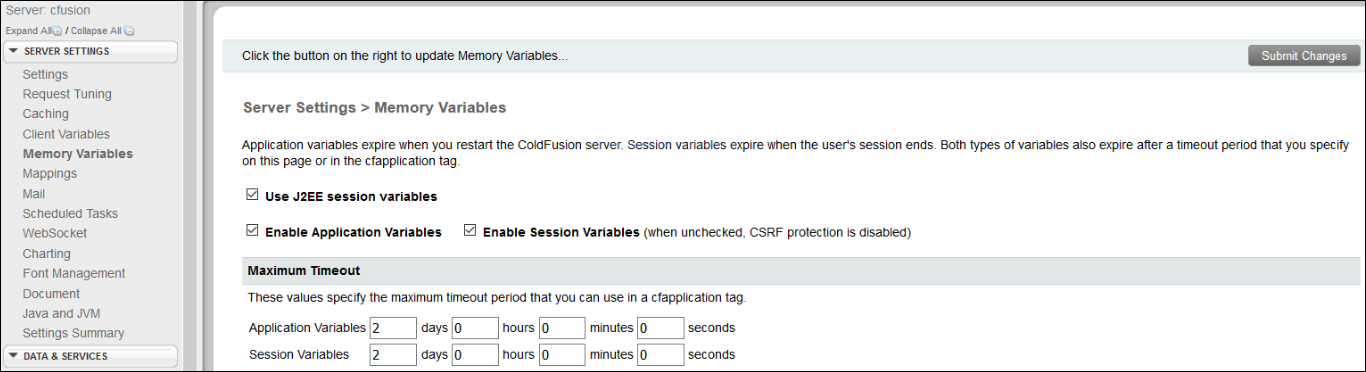
"Sticky Sessions" & J2EE Session Variables
To ensure the successful synchronization of invoices between Collaborati and Lawtrac 4.2, users must enable "sticky sessions" within their browser. If sticky sessions are unacceptable for a client's hosting environment, each environment must be checked to ensure that J2EE session variables are enabled.
Follow the steps below enable the J2EE session variables within ColdFusion Administrator.
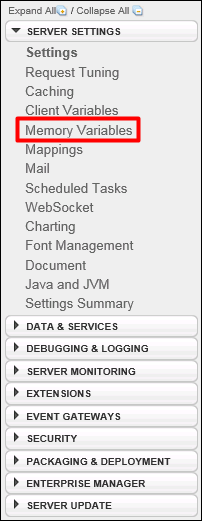
- In the ColdFusion Administrator sidebar, select Server Settings.
- Select Memory Variables.
- Ensure the following checkboxes are marked.
- Use J2EE Session Variables
- Enable Application Variables
- Enable Session Variables
Logging into the Application
Use a Web browser to access the application. The following is a sample URL:http://ServerName/LAWTRAC43/.
Enter your application URL to display the Lawtrac sign-in screen.
Note: For security purposes, please contact lawtracsupport@mitratech.com for your credentials.
The following steps are required to complete the application setup:
- Select Application Administration.
- Select Application & Database.
- Select Database Administration and click Run Upgrade Scripts.
- Select Data Locations.
- Update the Corporate Logo URL to reflect the location of your corporate logo file.
Note: The URL should be the application URL with the file name as the suffix. - In the "Log-Out URL" field, input the URL of the re-direct site that is to be displayed after users log out of the application.
Data settings save automatically when you click outside of the text box or press [Tab] on your keyboard.
Setting up International Currency Exchange Feed
To use the international currency interface and receive daily rate updates, create an internal process to perform this task or go to www.XE.com to create an account for the receipt of a daily exchange feed. The Lawtrac application is already configured to work with the XE interface. Setup outside of Lawtrac will be required. XE will provide assistance with the required configuration to obtain the daily feed from their site.
Note: When setting up the feed with XE, ensure that the file type is .CSV. This ensures that the exchange rates can be read and populated in the Dailies table (contained in the CURRENCY database). In addition, the data feed must be directed to and return from your company’s IP address.
Once your company’s XE account is set up, refer to the steps below to configure Lawtrac for the receipt of the daily feed:
- Copy the CurrencyWork directory from the CurrencyWork.zip file into the INETPUB\WWWROOT folder on the web server.
- Open the currency.cfm file and update the sections highlighted in red to reflect your company’s Lawtrac and XE settings:
<CFPARAM name="filesave" default="C#dateformat(now(),'dd-mm-yy')#">

    <CFPARAM name="filepath" default="D:\inetpub\wwwroot\CurrencyWork">

    <CFPARAM name="urlpath" default="https://www.lawtraconline.com/CurrencyWork/">

    <!---  saves the file in its original form from the website    --->

    <CFHTTP method="Get" url="http://www.xe.com/dfs/datafeed2.cgi"* path="#filepath#" file="#filesave#.csv">
*This URL is provided by XE once your account is set up. - You can also update the section below if you are interested in getting an email once the exchange rates have been updated. Refer to the following example:
<CFMAIL to="Ksacky@Lawtrac.com" from="CHolden@Lawtrac.com" cc="support@lawtrac.com, cholden@lawtrac.com" subject="Daily Exchange Rates Updated">


         Added Currencies


</CFMAIL> - Save the file.
Proceed with creating a scheduled task to populate the Currency database:
- Log into ColdFusion Administrator.
- Select Debugging & Logging | Scheduled Tasks.
- Input the Task name of "Currency Feed".
- The default Start date should be the current day.
- Click the Recurring radio button and select "Daily" from the drop-down.
- Enter the desired time you want the exchange rates to be updated.
- In the "URL" field input your server URL or IP address with the suffix “
currencywork/currency.cfm” (for example, http://yourURL/currencywork/currency.cfm). - Check Publish–Save output to file.
- Specify a valid path and file name for an output file (i.e.,
D:\ColdFusion9\logs\currency.log). - Click Submit.
Additional Scripts Required for Backwards Compatibility
Lawtrac uses certain scripts that Coldfusion no longer comes packaged with but does provide for applications. You must download the YUI libraries from Adobe and place them here:
- [cfusion root]\cfscripts\scripts\ajax\yui
- [cfusion root]\cfscripts\scripts\ajax\resources\yui
The files and additional instructions are located at:
https://helpx.adobe.com/coldfusion/deprecated-features.html
Support
Contact our Support Team
If you have any questions or require assistance with the installation process, feel free to contact the Lawtrac Support department at lawtracsupport@mitratech.com or call us at +1 888 784 7224, then press 3.
For further information on Lawtrac, please visit the Mitratech Lawtrac page.
Support Lifetime Matrix (by Version)
|
Major Release |
Current Lawtrac Version |
Support Lifetime |
| 4.0 | 4.3.1 | Full Support |
| 4.0 | 4.3 | Full Support |
| 4.0 | 4.2.2.13 | Full Support |
| 4.0 | 4.1.2 | Full Support |
| 4.0 | 4.0.9 | Extended Support |
| 3.0 | 3.7.5 | Extended Support |
Full Support is provided for whichever scenario provides greater support to the client:
- the current and major release version
- 2 years following the purchase date of any product
Extended Support is provided for clients whose product is no longer eligible for Full Support, provided that they have paid the annual maintenance contract and the product has not reached End of Life.