Need help? Click a product group below to select your application and get access to knowledge articles, webinars, training content, and release notes or to contact our support team.
Authorized users - log in to create a ticket, view tickets status and check your success plan details.
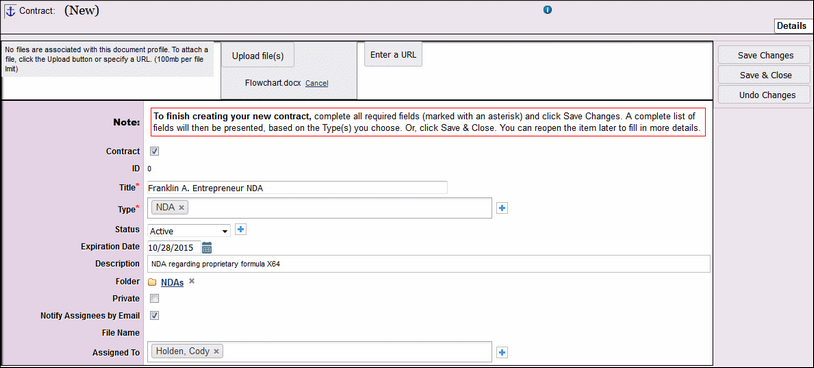
This how-to article explains the creation process and details for contracts and documents.
Contracts can be easily created, flagged for reporting, and organized within GCD. After clicking the Create Contract icon in the top navigation bar
Create Interface, fill out the desired fields as demonstrated in the example below. Clicking Save Changes from the right navigation bar will provide more detailed options after the first required fields are saved. After the contract has been created, it can be viewed, edited, and updated on the Contracts tab. Administrators are also able to designate templates that can be used by their GCD teams as described in Document and Contract Templates.
Note: Creating a document follows the same procedure and encompasses the same options as detailed in Creating a Contract. However, in order to ensure that the document retains its Document status for reporting, do not click the Contract checkbox.
Contracts and documents can also be imported from outside of the application. For more information, see Working with
Contracts and Documents.
Contract Options Prior to Initial Save
Contract
This checkbox applies the Contract status in GCD. Checking this box will thereby allow this contract to be included in contract-only reporting. Users can, if desired, leave this box unchecked and go back to change it later once the contract becomes active or is officially agreed upon.
Creating a document follows the same procedure and encompasses the same options as detailed in Creating a Contract. The only difference between the two types is the status of the Contract checkbox here, which will determine whether the item is filtered as a contract or document.
ID
The ID number will be auto-generated after saving.
Title
Enter in the name of the contract. This is a required field.
Type
Enter in the type of contract. Existing contract types can be selected by double-clicking the entry field or entering the first letters of the type for faster filtering. New types can be created by clicking the and filling in the Add Item field in the resulting Type pop-up window. This is a required field. Multiple types can be added.
Status
The current status of the contract. This field can be changed later. Available choices are:
Active
Draft
Expired
Final
Fully Executed
In Review
Legal Hold
Paid
Pending
Redline
Sent for Signature
Uploading
Expiration Date
Select the date that the contract expires.
Description
Enter in any comments or additional detail for the contract.
Folder
Select the Folder (if desired) for the contract. Only one can be selected. To add a new folder from this screen, click the link and select the icon from the resulting pop-up window.
Private
This checkbox, when checked, makes this contract only visible to the user who created it.
Notify Assignees by Email
This checkbox, when checked, will automatically send an email to the users or groups assigned to this contract after the contract is saved.
File Name
This auto-populated field will include the names of files attached after the files have been attached and saved.
Assigned To
Click the entry field or begin typing to enter in the assignee(s) for the project. Multiple assignees can be added; however, unlike the Type and Folder fields, assignees cannot be added from this screen. To add players to be assigned to contracts, see
Creating a Player.
Mark as Template
Allows document/contract to be set as a template for expedited contract management. More details can be found on the
Document and Contract Templates page.
Additional Detail Fields
Other options will be present after the initial save. These options provide for easier filtering, reporting, and searching.
Currency
This is a read-only field that will be set by your team administrator. More information for admins can be found on the
Team Settings help page.
Value
Enter in the numeric value of the contract.
Value Note
Add additional detail for that value, if desired.
Term
Select the Term of the contract (e.g., 2 years, Annual, Month-to-Month). Click the icon to add a new Term type from this screen.
Effective Date
Enter in the date that the contract will go into effect.
Expiration Date
Enter in the expiration date of the contract.
Tags
Enter any desired tags to improve filtering, searching, or organization.
Closed
This checkbox, when checked, shows if the contract has closed. This can be selected at any time (after save) by the user.
Agendas
Click the folder icon to add this item to a pre-existing
Agenda. Agendas cannot be created from the pop-up window.
Closed Date
Enter the date that the contract closed. This should be used in tandem with the Closed checkbox referenced above.
Priority
Mark this item as priority by checking the box. Marking an item as a priority may help with organization or reporting.
Notify Me of Updates
This checkbox, when checked, will enable GCD to send notifications any time the contract is edited or changes.