
Reviewing Invoices
Invoice Features
Acuity organizes each invoice within a series of tabbed sections, much like a file folder. Those sections include:
-
Details- invoice totals, history, and attachments
-
Line Items
-
TK Summary
-
Code Summary
Each of these areas is helpful in the invoice review process. Other tabbed sections include Inquiry, Exceptions, and Adjustment Report.
For video instructions on Invoice Review, see How to Review Compliance and How to Review Exceptions
Details Tab
-
Totals – financial summary, by fees and expenses, including adjustments.
-
Amount/Adjustment History
-
Invoice Attachments
-
Invoice Audit History
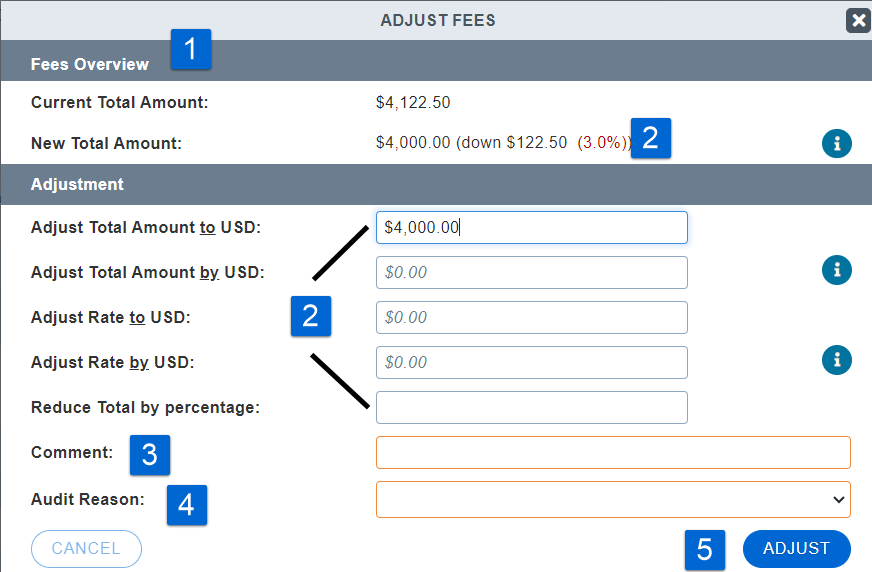
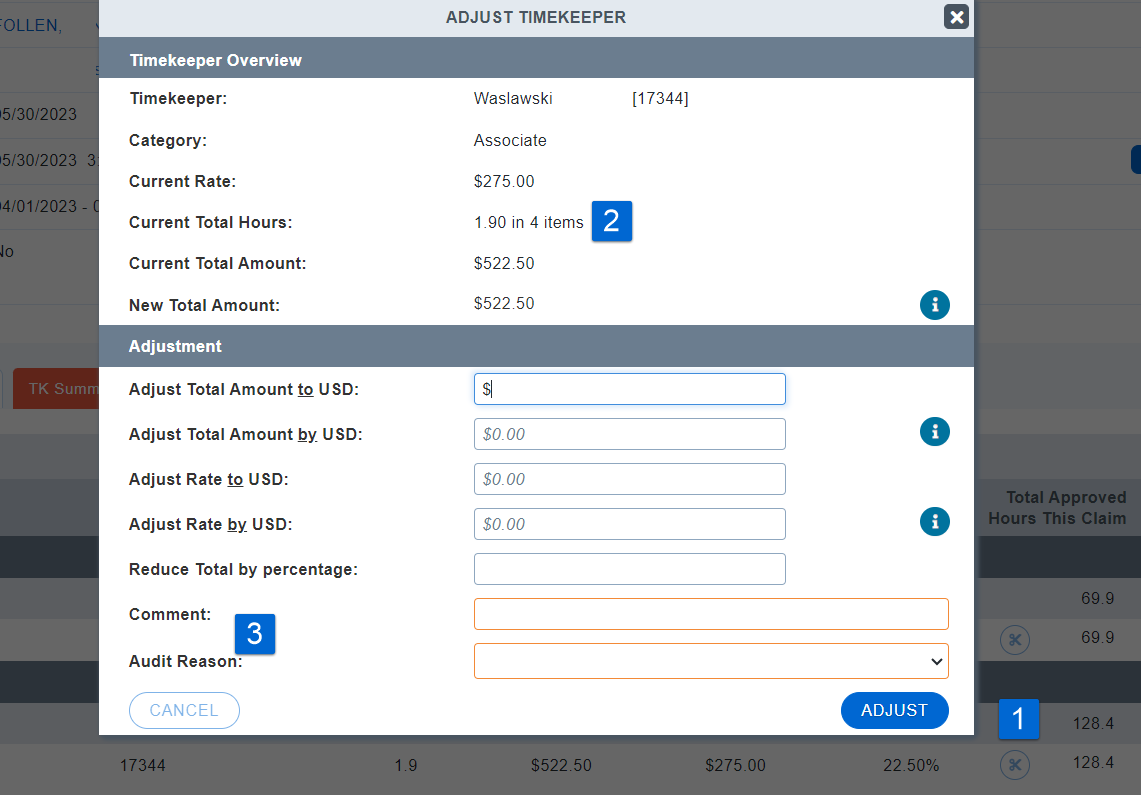
Global Adjustments
Use  to make global adjustments against an invoice. Adjustments may be positive or negative.
-
Fees Overview provides the current amount of fees billed on the invoice and a running total after your adjustments.
-
Use one of these five calculators to adjust the invoice. Note: The Fees Overview section displays the predicted adjustment amount before you save the change.
-
All adjustments require a comment.
-
All adjustments require an audit reasons. Audit Reasons are a finite set of categories that enable consistent reporting.
-
Click ADJUST.
The adjusted fee amount now appears on the Totals summary.
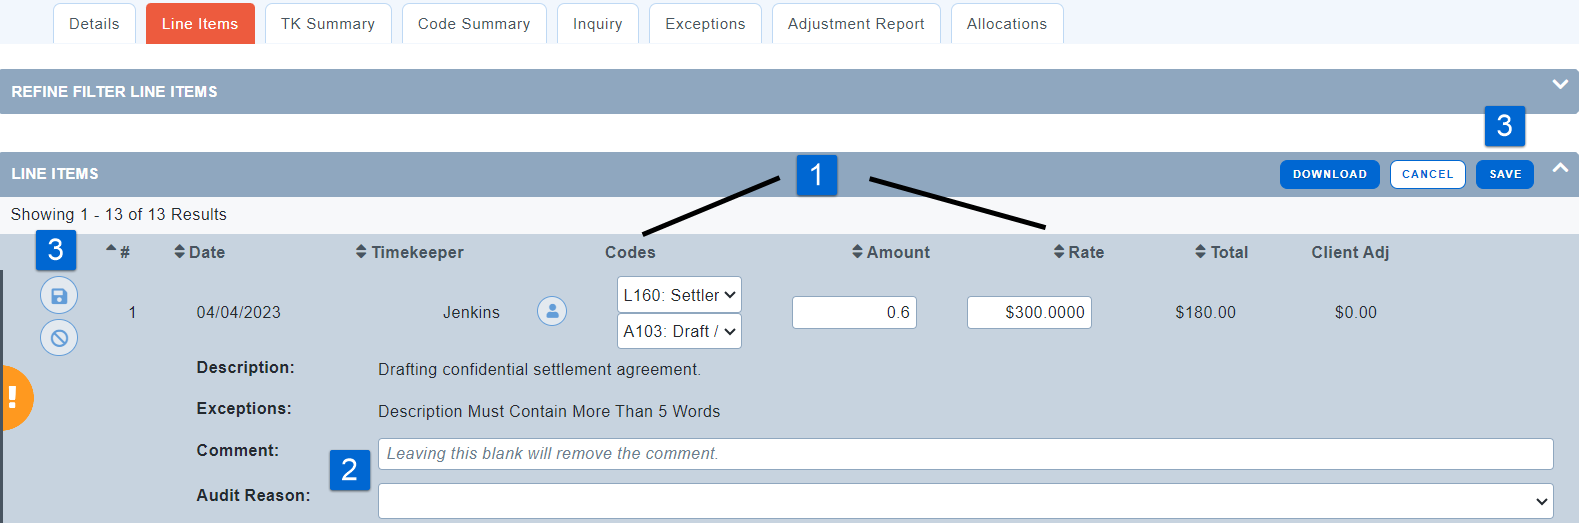
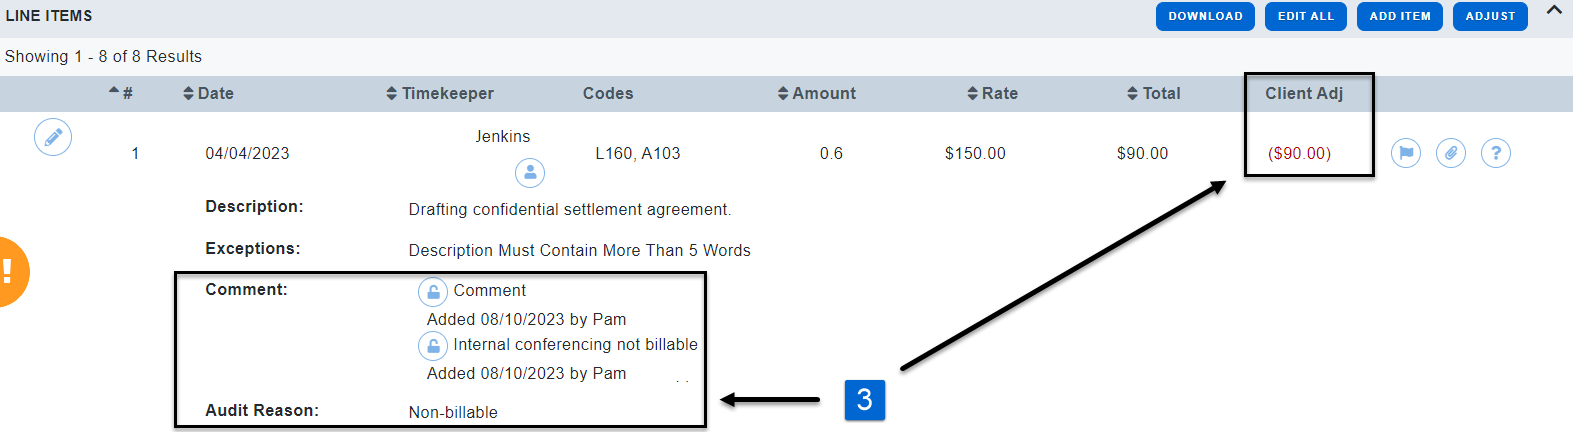
Line Item Adjustments
Line items appear in sequence in Acuity just as they would appear on a paper invoice. Use the column headers and filter window to optimize your review.
-
Sort Line Item column headers with a single click.
-
Use the pencil icon
 button to edit a single line item. Use the
  button to put all line items into edit mode.
Edit Mode
-
Reviewers may edit the following line item properties
-
Billing Codes
-
Unit Amount (usually hours)
-
Rate
-
All adjustments will require a comment and an audit reason.
-
Note: Comments will be visible to all users unless the lock icon
 button is clicked to ‘lock’ the comment from firm users.
 -
If the lock is blue, the comment is only visible to client users with access to the matter and invoice.
-
Click the Same icon to save your changes (Disk to save a single line, Save button to save all lines)
Filter Line Items
The Line Items Filter allows you to search and filter the invoice line items by any of the selected criteria.
-
Select desired search criteria and click FILTER.
-
Line items now display subset based on filter.
-
Use multiple filters to further narrow your results.
-
Remove your filters with the CLEAR ALL button.
Note: The filter defaults to collapsed. Click the Filter Line Items bar to expand the window.
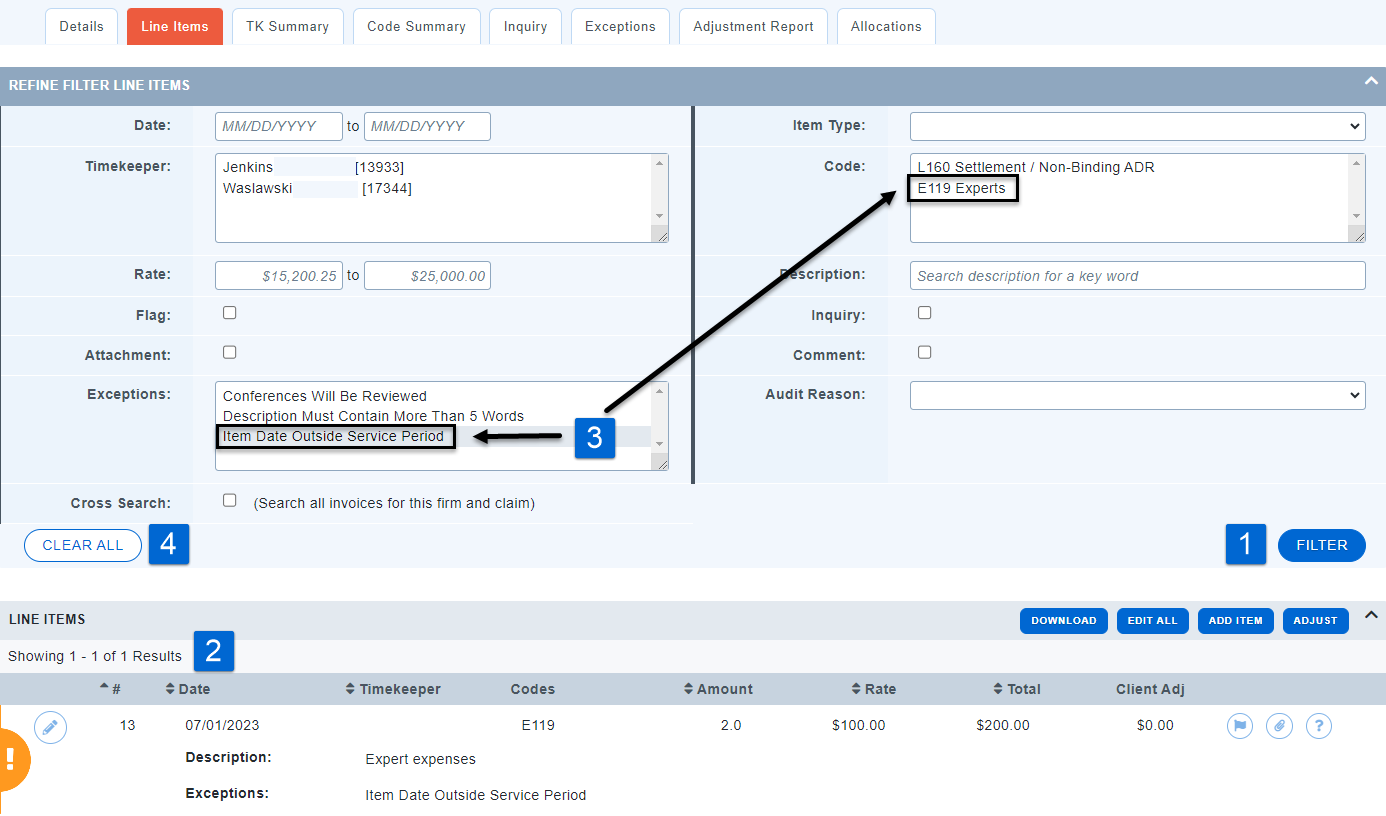
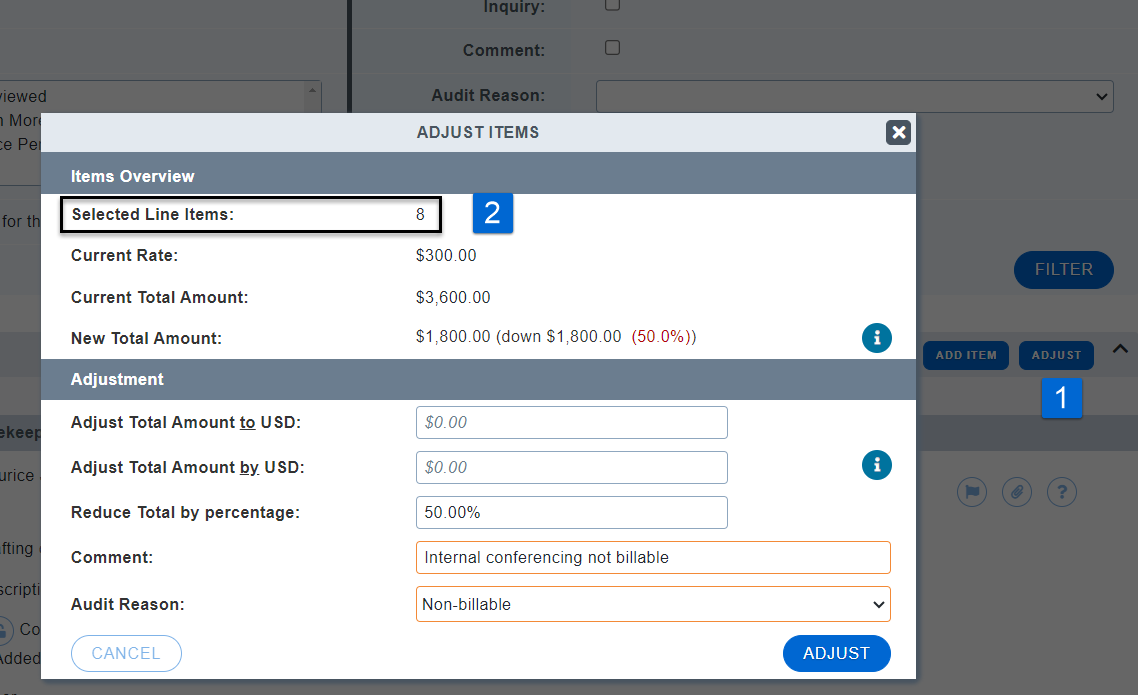
Adjust Filtered Line Items
-
Click the ADJUST button to simultaneously adjust all filtered line items.
-
Note the # of selected line items matches your filtered results.
-
Adjustments display immediately on each line item.
TK and Code Summaries
The TK Summary and Code Summary tabs have the same functionality, but are organized to display work effort by timekeeper category or type of work.
-
Make a global adjustment to a TK or Code category by clicking the scissors icon
 button.
 -
The # of selected line items is limited to only that specific TK or Code.
-
All adjustments require a comment and an audit reason.
4. Adjustments display immediately on each summary tab and the adjusted line items.
Approving an Invoice
Once the invoice has been reviewed, the status of the invoice can be updated to approved, rejected, or deleted. For more information on what the different status options mean, see Invoice Statuses .
If an invoice is ready to be Approved, select the  button at the top of the Invoice Profile. Note: If the exceptions read "expired", please select the "Re Audit Exceptions" button first to refresh the invoice.
After selecting the Change Status button, select "Approved" in the new status drop down menu.
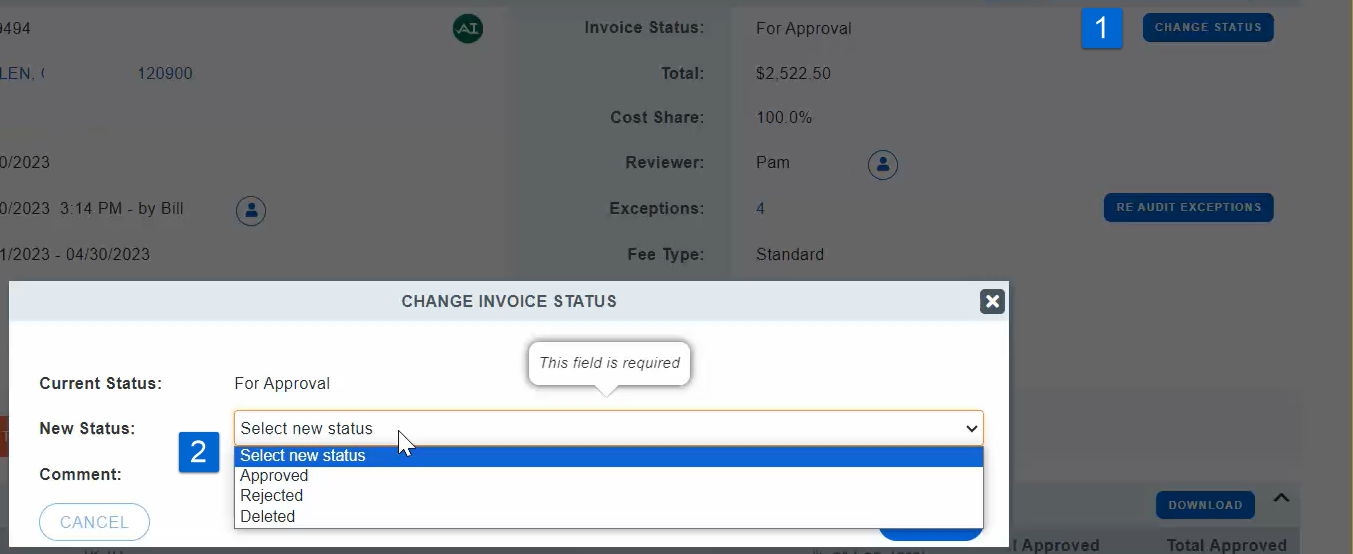
Beneath the new status, a note will appear letting you know that the invoice will be final approved, or, if additional approval is needed, and who the invoice will route to next.
To apply the status change, select "Submit".
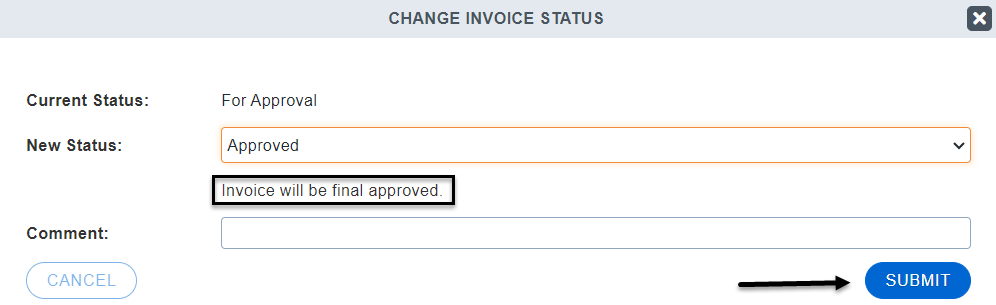
When the invoice is marked as Final Approved, Acuity will send the original invoice Uploader a notification of the approval. The invoice will stay in "Approved" status until the invoice is sent for payment.