
Scheduled Custom Report Feature Guide
This document provides a high-level overview of the “Scheduled Custom Reports” Feature.
Introduction
The purpose of this guide is to help educate Tracker I-9 clients about our new Scheduled Custom Reporting feature. This document provides a high-level overview of the feature, including a description of its functionality and instructions on how to start using it. Continue reading to learn more.
Scheduled Custom Reports
Introducing the Scheduled Custom Reporting feature in the Tracker I-9 application! This enhancement streamlines report generation by automating recurring tasks. Instead of manually generating reports on a daily, weekly, or monthly basis, I-9 Managers can now schedule reports to run automatically saving time and improving efficiency. By adding this highly requested feature, Tracker I-9 becomes even more competitive, meeting the expectations of both clients and prospective buyers.
Pre-requisite: Enabling I-9 Custom Reports
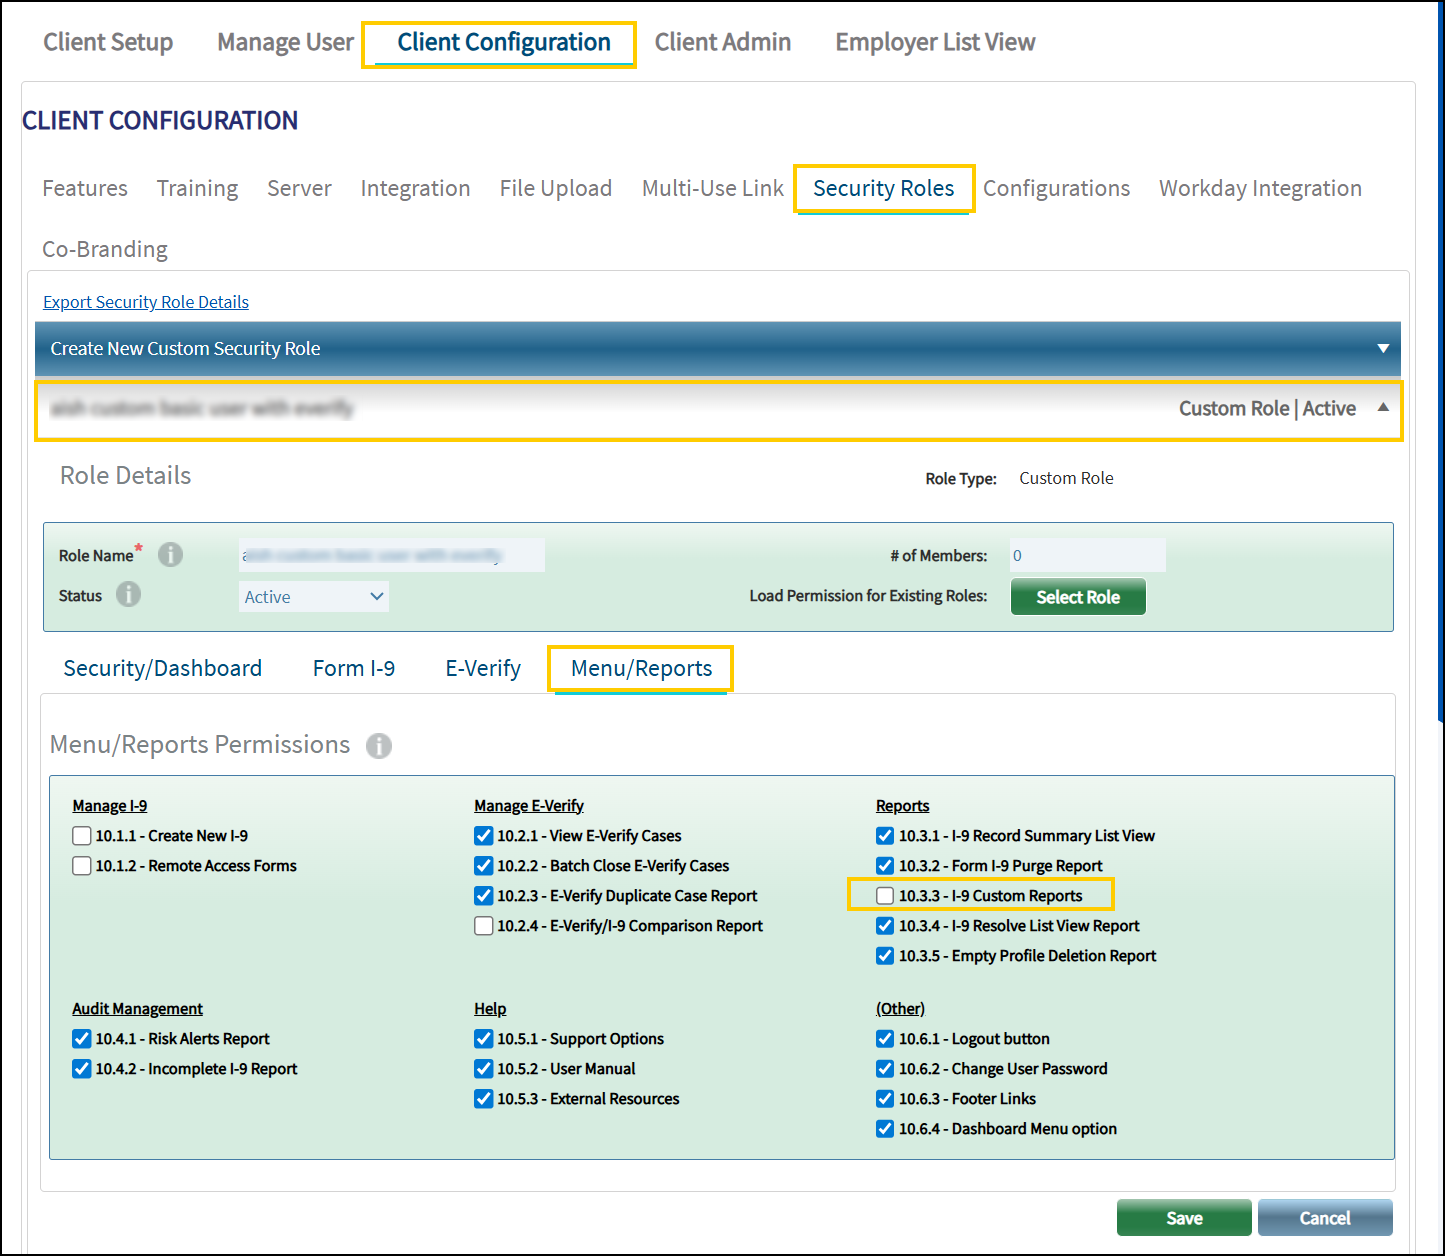
System Level Enablement
The Scheduled Custom Reports functionality is an enhancement to the existing I-9 Custom Reports feature. To utilize this enhancement, administrators must ensure that I-9 Custom Reports is enabled and properly configured at the system, client, and distributor levels.
Navigation: Client Configuration > Security Roles > I-9 Manager > Menu/Reports > Enable "10.3.3 - I-9 Custom Reports" > Save.
Client Level Enablement
Navigation: Admin Control Panel > Manage Users > Security Roles > Select the Custom Role > Menu/Reports > Enable the "10.3.3 - I-9 Custom Reports" > Save.
Distributor Level Enablement
Navigation: Client Configuration > Security Roles > Distributor Role > Menu/Reports > Enable the "10.3.3 - I-9 Custom Reports" > Save.
Enhanced I-9 Custom Report
Using the enhanced I-9 Custom reports, the I-9 Managers can now create and define schedules for previously defined custom reports to be generated at specified intervals.
Follow these steps to access the “I-9 Custom Report”:
- Log in as an I-9 Manager.
- Hover over the Reports menu dropdown.
- Select I-9 Custom Report from the list.

Landing Page
The enhanced landing page introduces a more structured layout, allowing I-9 Manager to easily view, navigate, and manage their My Reports and Shared Reports with improved accessibility and efficiency.
The Report Table provides an organized view to manage all the saved/ scheduled custom reports with their details. It includes the following columns:

- Create Report: Allows I-9 Manager to generate a new custom report. For more details, refer to the Create Report section.
- Filter by Report Name: Use the “Filter by Report Name” option to search for reports by typing keywords. The results will update dynamically based on the input.
- Select/Select All: Allows you to choose one or multiple reports using the “Select” option or select all reports at once with the “Select All” checkbox for deletion. After selection, the Delete Selected button will appear.
- Report Name: Displays the name of the report, sorted in ascending order (A to Z) by default. Clicking on a “Report Name” opens the Edit Existing Custom Reports modal, which includes:
- Report Filters
- Report Fields
- Report Type: Indicates the report type selected by the I-9 Manager when saving it as “My Report” or “Shared Report” on the report results screen.
- Frequency: Specifies the defined intervals of how a scheduled custom report is generated. This applies only to scheduled custom reports and displays either Scheduled (Daily/Weekly/Monthly) or Not Scheduled.
- Last Run Date: Displays the most recent run date of the scheduled report in MM/DD/YYYY format.
- Actions:
- Edit Icon (Pencil): Click on the pencil icon to edit the Existing Custom Reports modal.
- Kebab Menu (Ellipses): Click on the kebab menu to view the actions a I-9 Manager can take against a report such as Export to Excel, Historical Reports, Schedule Report / Edit Schedule, and Delete Report.
- Export to Excel - This option allows the I-9 Manager to export the report data to an excel file.
- Historical Reports - This option is available only if the scheduled report has generated any reports based on the configured frequency. Selecting it opens a modal where I-9 Manager can view past generated scheduled reports. If an I-9 Manager has access to one or more saved custom reports, they will be displayed in a reports table within the Historical Reports modal.
- Schedule Report/Edit Schedule:
- Schedule Report is displayed if the report has not been scheduled (See Schedule Report for more details).
- Edit Schedule is displayed if the report has already been scheduled.

- Delete Report: Selecting this option displays “Are you sure you want to delete this report? Click Okay to continue.” to proceed with deleting the report.
- Okay: Clicking Okay will delete the report permanently along with the schedule and its historical generated data.
The page refreshes on clicking OK, removing the report from the table. - No: Closes the pop-up without deleting the report.
- Okay: Clicking Okay will delete the report permanently along with the schedule and its historical generated data.
-
Bulk Delete Reports:
-
A Select All checkbox is available to select multiple reports.
-
When checked, a Delete Selected button appears.
-
Unchecking the checkbox hides the Delete Selected button.
-
Clicking “Delete Selected” triggers a confirmation pop-up.
-
Okay: Clicking “Okay” will delete the report permanently along with the schedule and its historical generated data.
The page refreshes on clicking “Okay”, removing the report from the table. -
No: Closes the pop-up without deleting the report.
-
-
-


Start Fresh: Create Your First Report
If there are no custom reports created, the I-9 Managers can click on Create Report to start fresh and create their first custom report.

Create Report
The “Create Report” modal allows I-9 Manager to create and save custom reports, export data results to Excel, and schedule reports. This modal appears in the following scenarios:
-
First Time Access: When an I-9 Manager accesses I-9 Custom Reports for the first time and has no saved My Reports or Shared Reports, the Create Report modal will automatically launch.
-
Dismissed Modal: If an I-9 Manager dismisses the “Create Report” modal, a message will display indicating that no saved reports are available, along with a Create Report button. Selecting this button will reopen the create report modal.
-
Existing Reports: If an I-9 Manager has saved My Reports or Shared Reports, those reports will be displayed in the table, along with a “Create Report” button.
The Create Report modal has been redesigned with an intuitive layout and additional features to enhance the report creation process. The modal is structured into distinct sections, allowing I-9 Manager to efficiently configure and customize I-9 reports.

Editing an Existing Saved Report
I-9 Managers can modify any parameters within these sections. Each section displays the existing parameters associated with the report, allowing for adjustments as needed. If an I-9 Manager modifies any parameters, they must save the changes to apply them.

If the I-9 Manager attempts to close the report without saving after making edits, a pop-up message will appear with the alert: “You have unsaved changes to the report. Are you sure you want to exit without saving?”.

Report Filters
The first section of the Create Report focuses on configuring “Report Filters”, allowing I-9 Manager to define specific criteria for the report. The available filter options include:
Select I-9 Information:
- Search by Worksite or Search by I-9 ID: Enables I-9 Manager to filter data based on worksite locations or specific I-9 IDs.
- Next Action: Filters the report based on the next required action for I-9 processing.
- Citizenship Status: Allows I-9 Manager to include employees in the report based on their citizenship status.
- Date Type: Provides the option to filter reports by a specific date type. Available selections include:
- Create Date
- Start Date
- Section 2 Signature Date
- Next Action Due Date
A new checkbox labeled Use Current Date with Offset has been introduced to enhance scheduled reports. This feature runs the report with dynamically updated date ranges, automatically adding or subtracting days from the selected date type for real-time data every time.
A tooltip provides guidance: “The Current Date with Offset option is used in conjunction with scheduling your I-9 Custom Report. With this option the application will dynamically calculate your From and To dates based on the date when your scheduled I-9 Custom Report runs.”
I-9 Manager can enter dates manually (MM/DD/YYYY format) or select them using the calendar.
If an invalid date format is entered or if the To Date is earlier than the From Date, an error message will be displayed.


Offset Configuration
When the “Use Current Date with Offset” checkbox is selected, the From Date Offset and To Date Offset fields appear with the following options and tooltips:

From Date Offset tooltip: “Your From Date value will be calculated as the date when your scheduled I-9 Custom Report runs, adding or subtracting to that date the number of days that are entered in the Value field below.”
To Date Offset tooltip: “Your To Date value will be calculated as the date when your scheduled I-9 Custom Report runs, adding or subtracting to that date the number of days that are entered in the Value field below.”
- The Offset Type dropdown allows I-9 Manager to select Add (+) or Subtract (-).
- The Value field lets I-9 Managers enter a numeric offset to set the report’s start or end date, enabling reports for both past and future dates with respect to the current date.
- The Calculated Date field dynamically displays the calculated date based on the current date, the selected offset type, and the offset numeric value.

Note: An error message will be displayed if the “To Date” occurs before “From Date”.

Additional Checkboxes Based on Date Type
Depending on the selected Date Type, additional checkboxes will be displayed:
- Create Date: No additional checkbox appears.
-
Start Date: When selected, the “Include records without a Start Date” checkbox will appear. Selecting this option allows I-9 Manager to include records in the report that do not have a Start Date.
-
Section 2 Signature Date: When selected, the “Include records without a Section 2 Signature Date” checkbox will appear. Selecting this option allows I-9 Manager to include records in the report that do not have a Section 2 Signature Date.
-
Next Action Due Date: When selected, the “Include records without a Next Action Due Date” checkbox will appear. Selecting this option allows I-9 Manager to include records in the report that do not have a Next Action Due Date.


The Next button remains disabled until at least one Worksite is selected under Search by Worksite or one I-9 ID is selected under “Search by I-9 ID”.

Clicking the Reset All button will revert the Report Filters page to its original state.
After selecting the filter criteria, I-9 information and date type, click on the Next button to navigate to the next section.

Report Fields
The second section on the create report modal is the 'Report Fields' with a redesigned layout and organized fields making it easier to add them to the reports.

- The Choose Report Fields section displays all available export fields alphabetically across two or three columns.
- I-9 Manager can Drag & Drop fields within this section and adjust their order for report results.
- The Selected Fields section is labeled Selected Fields (Drag to change positions) to indicate that I-9 Manager can reorder fields by dragging and dropping them.
- A numeric count indicates the total number of selected exportable fields.
- By default, the following fields will be displayed: Employee Name, Employee Profile Worksite, Next Action, and Start Date.
- The Previous button navigates back to the “Report Filters” page.
- The Run Report button generates the report.
The following options will be displayed alongside the Tabular format:
- Schedule Report: Used for scheduling the report.
- Export to Excel: Downloads the report in Excel format.
- Edit Report: Navigates back to the Report Filters and Fields page for modifications.
- Save As New Report: Saves the report with a new name using the Save New Report pop-up, which includes a Name text field and a Report Type dropdown.

The generated report table displays the columns selected on the Report Fields page.
Pre-requisite for Scheduling the Custom Report
To schedule a custom report, it must be saved first. If an I-9 Manager tries to schedule an unsaved report, a pop-up will prompt them to save it.

- Selecting Yes opens the Save New Report pop-up.
- Enter the Report Name and choose the Report Type (My Report or Shared Report).
- Click Cancel to dismiss the pop-up or Continue to save the report.
- A confirmation pop-up appears. Selecting OK proceeds to the Schedule Report modal.


Schedule Report Modal
The I-9 Managers can access the schedule report in two ways:
-
If the custom report is not scheduled, click on the kebab menu and select the 'Schedule Report' option or click on the Report name and after running the report, click on the 'Schedule Report' button on the results page.
-
For existing scheduled reports, click on the kebab menu and select the 'Edit Schedule' option or click on the Report name and after running the report, click on the 'Edit Schedule' button on the results page.
The Schedule Report modal allows I-9 Manager to define a new schedule to a custom report, edit an existing schedule, remove a schedule, and manage report preferences. To schedule a report, click the Schedule Report button.

Click Cancel to close the modal without saving changes.
The Save Changes button remains disabled when scheduling a report for the first time and becomes enabled only after all required configurations are selected. If editing an existing schedule, the button remains disabled until a change is detected.
Schedule Report
To open the modal, select the Schedule Report button. The following options are displayed:

- Retention Limit (Required): Specifies how many reports should be retained before automatic deletion. This numeric input field accepts values between 1 and 30, is required, and is pre-populated with a default value of 1. The application retains a maximum of 30 reports. Enter a value manually or by using the arrows.
Note: The application will save up to a maximum of 30 reports. - Start Date (Required): Allows I-9 Manager to enter a date manually or select one using the calendar. By default, it is pre-populated by the next calendar day. A tooltip provides additional guidance: “Providing a Start Date is required and must be in the future. Reports run during the early morning hours. The Start Date will be used in conjunction with the settings below to determine when your first report will be available.”
- End Date (Optional): Allows I-9 Manager to specify when report generation should stop. If no End Date is provided, reports will continue running indefinitely unless the “Remove Schedule” option is selected later. A tooltip provides additional guidance: “Providing an End Date is optional. Reports will run indefinitely unless an End Date is designated, or you later select the Remove Schedule option.”
- Generate Report (Required): A drop-down that allows I-9 Manager to select the frequency at which the scheduled I-9 Custom Report should run the reports. The available options include:
- Daily
- Weekly
- Monthly

A tooltip provides additional guidance: “Select the frequency that your scheduled I-9 Custom Report should run. Please note that if the Weekly option is selected, the Tracker I-9 application defines a week as beginning on a Monday and ending on a Sunday.”
- Daily: Runs the report daily from the start date. An Exclude Weekends checkbox appears. When selected, reports will not be generated on Saturdays and Sundays.
-
Weekly: Runs the report weekly from the start date based on the repeat frequency. If selected, an additional scheduling options are displayed:
-
Repeat Every: Specifies how often the report should run (e.g., entering 1 runs the report every week, while entering 2 runs it every other week).
-
Repeat On: Specifies on which day of the week the first report should be generated. Displays checkboxes for each day of the week (Monday - Sunday). At least one checkbox must be selected before the Save Changes button is enabled.
-


A tooltip provides guidance for selecting days: “Select one or more days of the week when you want your weekly scheduled I-9 Custom Report to run.”
-
Monthly: Runs the report monthly from the start date based on the repeat frequency. If selected, additional scheduling options appear.
-
Select Repeat: Specify on which day of the month or specific date of the month or custom frequency, the first report should be generated. Choose from the following options:
-


- First of the Month: The report runs on the first day of the month based on the Repeat Every value.
- End of the Month: The report runs on the last day of the month based on the Repeat Every value.
- Specific Date of the Month: I-9 Manager can select a specific date (1 - 31) for the report to run.
- Select Date: I-9 Manager can manually enter a value between 1 and 31 or select a date using the date picker.
The tooltip provides guidance: “Please select the date in the month when you want your scheduled I-9 Custom Report to run. Please note that if you select either the 29th, 30th or 31st then your report may not run on months that do not contain those many days. Consider choosing a different date or selecting the End of Month setting.”
- Select Date: I-9 Manager can manually enter a value between 1 and 31 or select a date using the date picker.
-
Custom: This option allows the I-9 Managers to specify a custom frequency the first report should be generated. If selected, the following scheduling options appear:
-
Select Week: Specifies on which week of the month the first report should be generated. I-9 Manager can choose 1, 2, 3, or 4 from a drop-down menu, representing the week of the month.
-
Select Day: Specifies on which day of the week the first report should be generated. I-9 Manager can select a specific day of the week (Monday - Sunday) from a drop-down menu.
-


The I-9 Manager can edit the previously scheduled report from the landing page or the report results page and an 'Edit Schedule' modal is displayed.

The I-9 Manager can either edit and define a new scheduling frequency or remove the schedule using “Remove Schedule” button.

-
Selecting Remove Schedule triggers a confirmation pop-up: “Are you sure you want to remove the scheduler from this report?”
-
Selecting Yes, Remove will unscheduled the report, closes the modal, and display a confirmation message: "You have successfully unscheduled the report. Any historical reports will be available for 30-days. After 30-days the historical reports will be automatically deleted. If you haven't done so already, please export and save your historical reports before they are deleted."
-
When a report is unscheduled, all historical reports remain available for 30 days before automatic deletion.
-
Click “Okay” to dismiss the alert.
-
Click “Cancel” to close the pop-up without making changes and keeping the Schedule Report modal open.
-
-

Validations on date field
If incorrect values are entered, the following error messages are displayed:
- The Start Date or End Date is in an incorrect format.
- The End Date is earlier than the Start Date.
- The Start Date is not in the future.
- The Start Date and End Date are the same.
- If only a Start Date is provided, the report will run indefinitely from that date.
Schedule Summary
Once all required fields are entered, a summary appears at the bottom explaining that the custom report is automatically generated according to the defined scheduling frequency(daily, weekly, or monthly), ensuring timely delivery of updated insights:
Based on the settings above, your first scheduled report is estimated to be available on [Day, Date]. Your second scheduled report is estimated to be available on [Day, Date].

Click “Cancel” to close the window without saving changes.
Click “Save Changes” to confirm the schedule. A confirmation pop-up appears.

Click “OK” to dismiss the pop-up.
Historical Reports
After the I-9 Manager schedules a report, the generated reports will be displayed in the historical reports for a maximum of 30 days. After 30-days the historical reports will be automatically deleted.

- Select - The Delete Selected and Export Selected buttons are initially disabled. These buttons become active when one or more reports are selected using the individual checkboxes or the Select All checkbox.
- Run Date - Displays the date when the scheduled custom report was generated in the MM/DD/YYYY format.
- Actions:
- Delete – Select the Delete icon to remove an individual report.
- Export – Select the Export icon to download an individual report.
Note: The historical reports would display only a maximum of 30 generated reports for a scheduled custom report.
- Click Delete Selected to remove multiple selected reports.
- Click Export Selected to download multiple selected reports in a compressed zip file. It is advised to export and save the historical reports before they are deleted.
If the report is Not Scheduled, this option will be disabled, displaying the following hover text: “There are no historical reports available as this report isn't currently scheduled. Click on the Schedule Report link to schedule this report if you haven’t already done so.”
Managing I-9 Custom Reports When Security Roles Change
| Scenario | Actions | |
|---|---|---|
| Security Role Loses Access to I-9 Custom Reports | Scheduled reports | Scheduler is removed |
| Historical reports | Retained for 30 days, then permanently deleted | |
| Security Role Regains Access Within 30 Days | Historical reports | Remain available (not deleted) |
| Report scheduler | Must be manually reconfigured if needed | |
| I-9 Manager’s Account Becomes Inactive | Scheduled reports | Continue running for 30 days |
| After 30 days | Schedule stops, and all historical reports are deleted | |
| Managing I-9 Manager Accounts and Schedules | I-9 Manager’s account is deleted | All historical reports are deleted, and schedule is stopped |
| I-9 Manager stops the schedule | Schedule stops, and historical reports are deleted after 30 days | |
| Client becomes inactive | All schedules for that client’s I-9 Managers are stopped, and historical reports are deleted | |