How to Complete a Supplement B Rehire (Formerly Section 3)
Goal
This section of the guide outlines the workflow for the Rehire option in Section 3.
Eligibility Criteria
As per USCIS, if you rehire your employee within 3 years of the date that a previous Form I-9 was completed, you may either complete a new Form I-9 for your employee or complete Section 3 of the previously completed Form I-9. If it's been more than three years, you must complete a new Form I-9 for the rehires.
Steps
1. When navigating to the Section 3 tab of an I-9 record, users will be presented with the main Section 3 wizard page. When the I-9 Manager selects the Rehire option and clicks continue, the I-9 Manager will be navigated to the new name question page. On this page, the I-9 Manager will be asked if the employee’s name has changed. If the user selects "Yes", the application will navigate the user to the new name workflow.
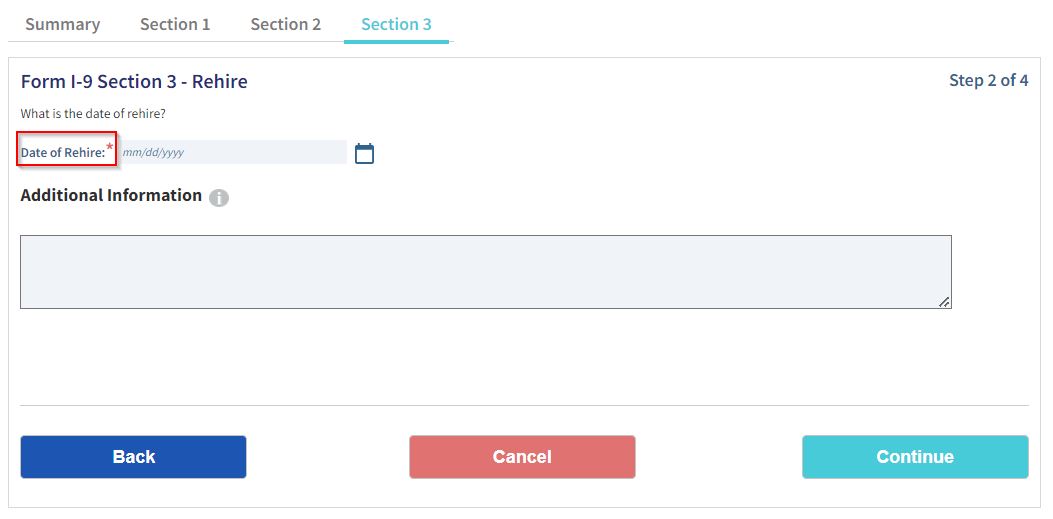
2. If the user selects No, the user will skip the new name entry page and will be navigated to the next page and on this page, the I-9 Manager will be asked for the Date of Rehire.

3. If the Remote Section 3 feature is enabled and reverification is needed based on the employment status, the I-9 Manager will be presented with options to perform the reverification onsite or remotely through an Authorized Representative. If reverification is not required, the system will skip to the Employer Electronic Verification page, see the Onsite Rehire steps below.

Onsite Rehire
- If the I-9 Manager selects the onsite workflow, the application will navigate him or her to the Employment Verification documents page if reverification is required.

- When the I-9 Manager clicks the drop-down menu associated with the Document Type field, the application will display the document selector.

- The document selector will display all applicable document options. Once the I-9 Manager selects from among the options and clicks, “Continue with Selected Document(s)”, the Employment Verification Document form page will display.
- On this page, the I-9 Manager must fill in all required fields, click the “I Agree” checkbox, and click the “Sign Form I-9 Electronically" button to complete the Section 3.

Remote Rehire
NOTE: This is only available and applicable if the rehire is also subject to Section 3 reverification
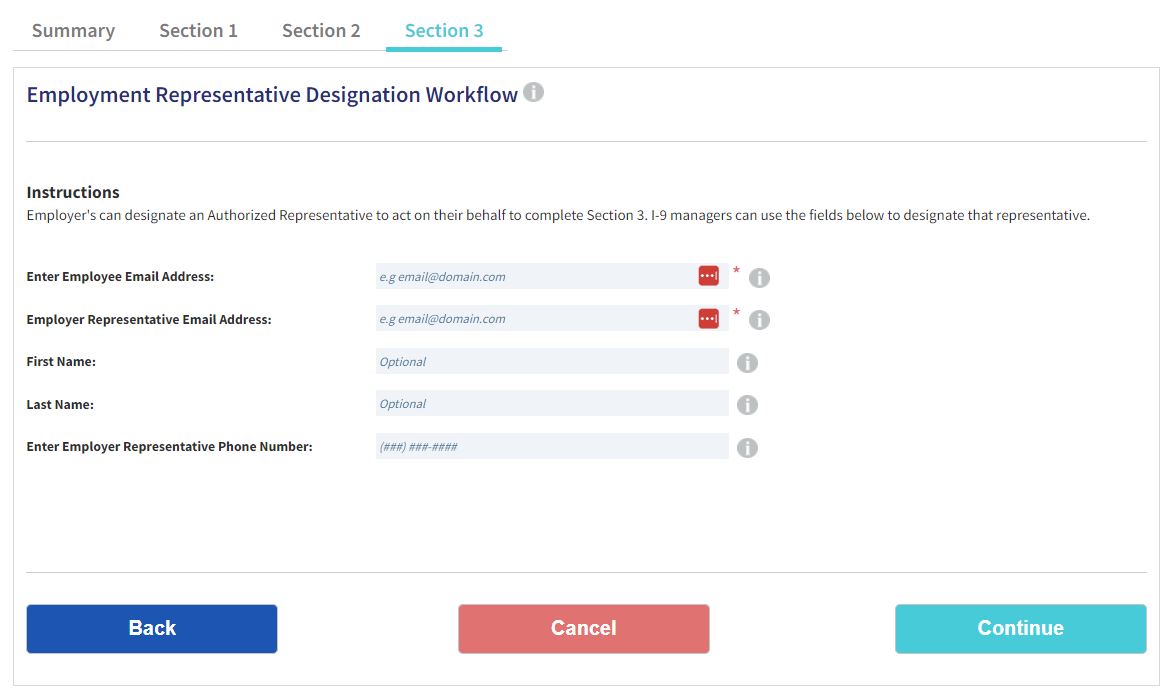
- If the I-9 Manager selects the remote option to complete the rehire and reverification of Section 3, the I-9 Manager will be navigated to the Authorized Representative Designation Workflow page.

- Once the I-9 Manager clicks continue, an email will be sent to the Authorized Representative.

- When the Authorized Representative clicks the Form I-9 Section 3 link, he or she will be navigated to the Remote Section 3 Authorized Representative instructions page.
- On this page, the Authorized Representative can choose to accept or decline the Employer’s request to complete Section 3. If he or she declines, a notification will be sent to the employer indicating such. If the Authorized Representative accepts, the application will navigate the him or her to the Remote Section 3 form page. The Authorized Representative will be presented with instructions, the employee Section 1 information, the option to update the employee’s name, the employment verification section, the electronic signature, and if configured, the employer help info section.
Employer Help Info
If Remote Section 3 Access configurations are set by the Administrator, the Employer Help Info section will appear with the configured settings.
Other Tracker I-9 Supplement B (Formerly Section 3) Resources
- How to Complete a Supplement B Reverification (Formerly Section 3)
- How To Amend Supplement B (Formerly Section 3)
- How to Delete Supplement B (Formerly Section 3)
USCIS Guidelines
- Completing Section 3, Reverification and Rehires (https://www.uscis.gov/i-9-central/complete-correct-form-i-9/completing-section-3-reverification-and-rehires)
- M-274 Handbook for Employers 5.2 Reverifying or Updating Employment Authorization for Rehired Employees (https://www.uscis.gov/i-9-central/form-i-9-resources/handbook-for-employers-m-274/50-completing-section-3-of-form-i-9/52-reverifying-or-updating-employment-authorization-for-rehired-employees)

