
How to Complete a Supplement B Reverification (Formerly Section 3)
Goal
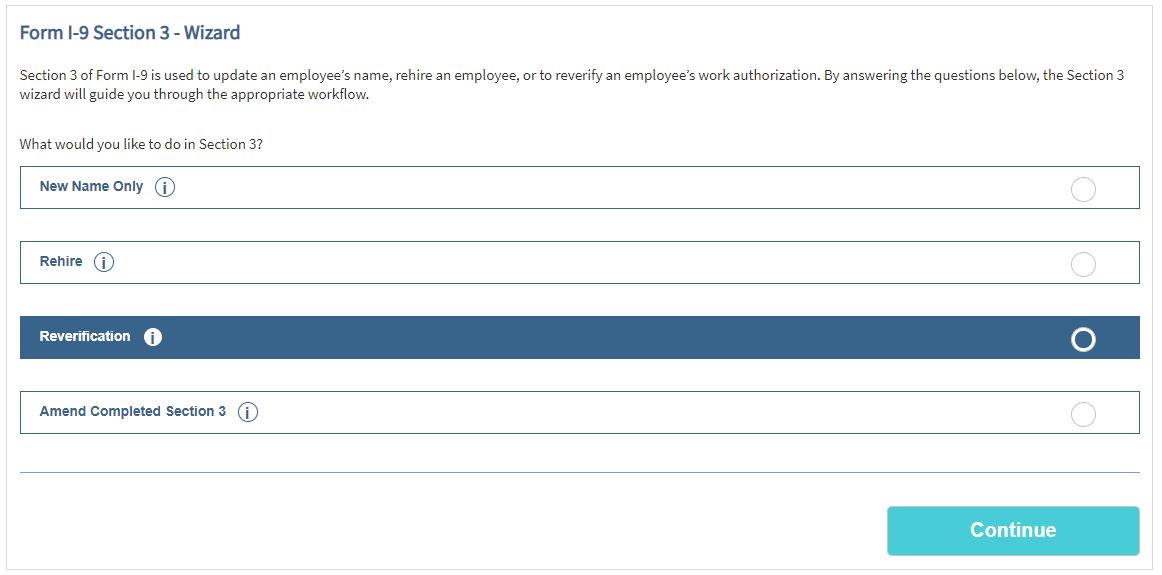
I-9 managers can complete reverification using the Section 3 wizard Reverification option.
Reverification is needed for I-9s with the next action of "Reverification Due". In cases where reverifications are not applicable, the application will indicate such on the Reverification option.
Steps
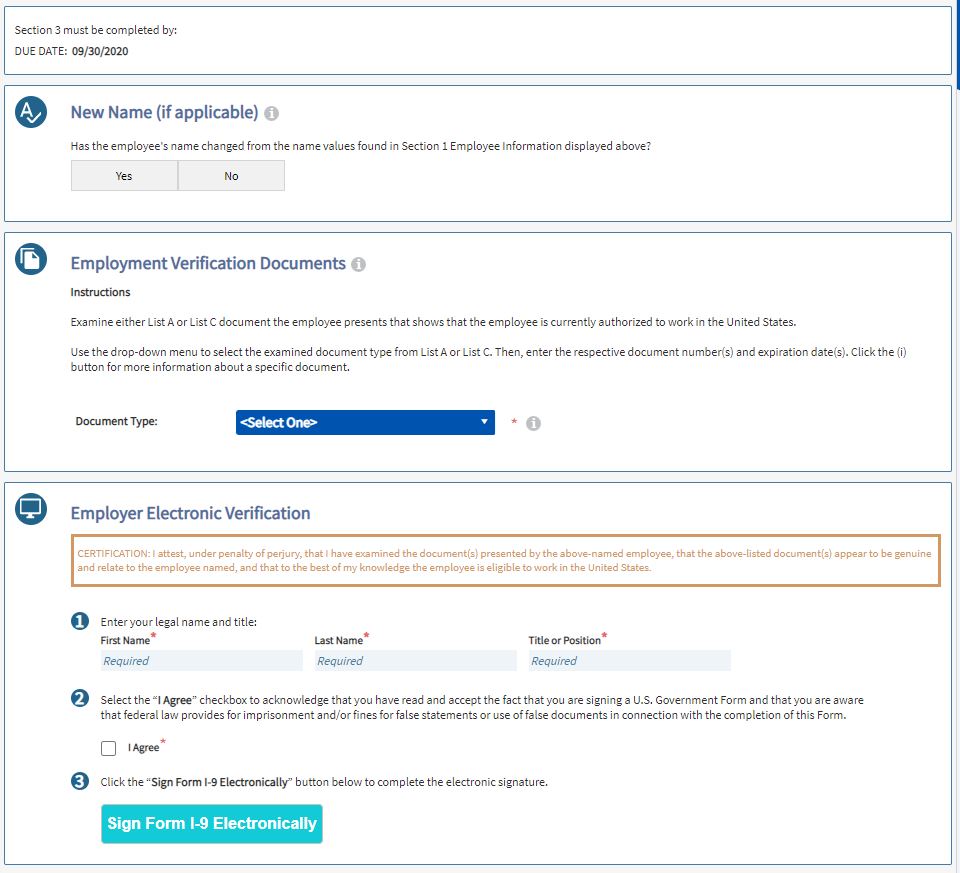
- Navigate to the Section 3 tab of the I-9.
- After the I-9 manager selects the Reverification option and clicks continue, the I-9 manager will be navigated to the new name question page. See this link for more information: How to Record New Names in Section 3
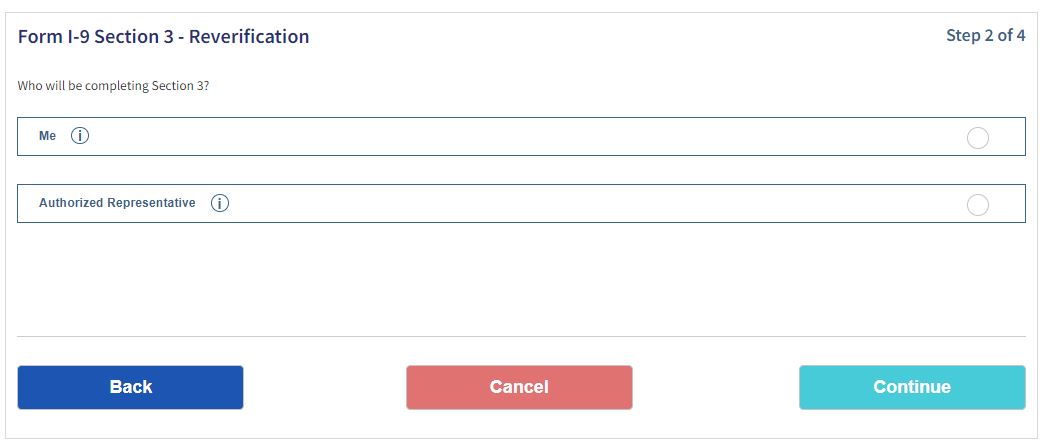
- The I-9 manager will be asked whether they will complete Section 3 (Onsite) or if they will have an authorized representative (Remote third party) complete is.
- The option of Me will take I-9 Manager into Section 3 where they can complete and sign it.
- The Authorized Representative option will create a remote Section 3 and on the the individual they designate to complete Section 3 on thier behalf will be able to populate and sign the remote Section 3.
Onsite (Me)
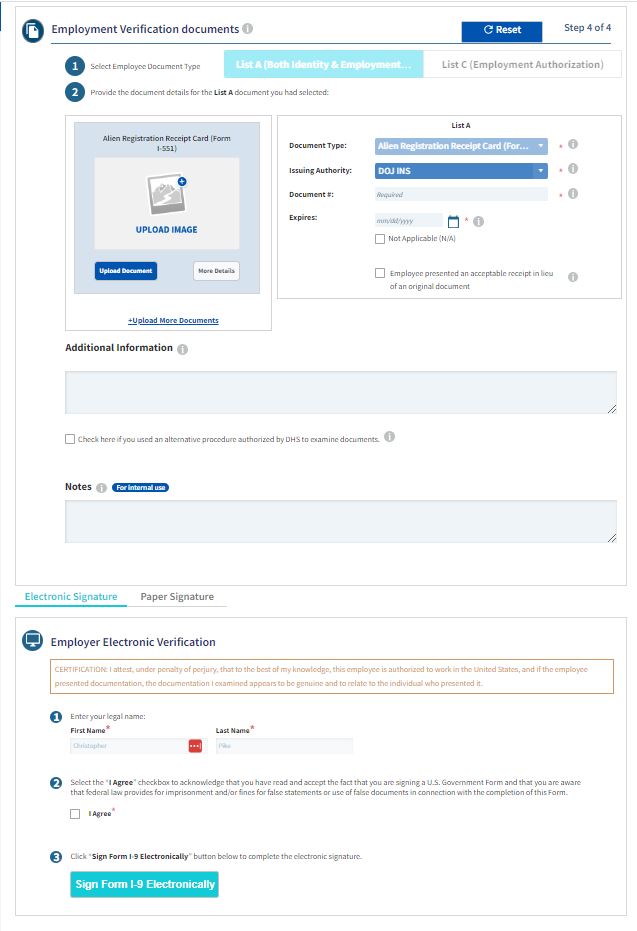
- If the user selects the "Me" to initiate the Onsite Section 3 workflow, the application will navigate the I-9 Manager to the Employment Verification documents page.

- The I-9 Manager may select List A or List C document categories, and select the appropriate Document Type in that category. Once they have selected the appropriate document type and click “Continue with Selected Document(s)”, the Employment Verification Document form page will display.
- The I-9 manager must fill in all required fields, click the “I Agree” checkbox, and click the “Sign Form I-9 Electronically button to complete the Section 3.
Remote (Authorized Representative)
*Note: If you select "Authorized Representative" you will initiate a Remote Section 3 Reverification and only the remote representative you designate will be able to access and complete the remote Section 3. If you initiated a Remote Section 3 in error, you may stop and delete the incorrectly initiated Remote Section 3 Reverification, you may select the Stop Remote Access and Delete Section 3 option under Stop or Reject Form I-9 in the Administrative Option menu for the Remote Section 3 to delete it and then initiate a new Section 3 following the Onsite (Me) workflow.
- If the I-9 manager selects the remote option to complete the reverification of Section 3, the I-9 manager will be navigated to the Employer Representative Designation Workflow page.
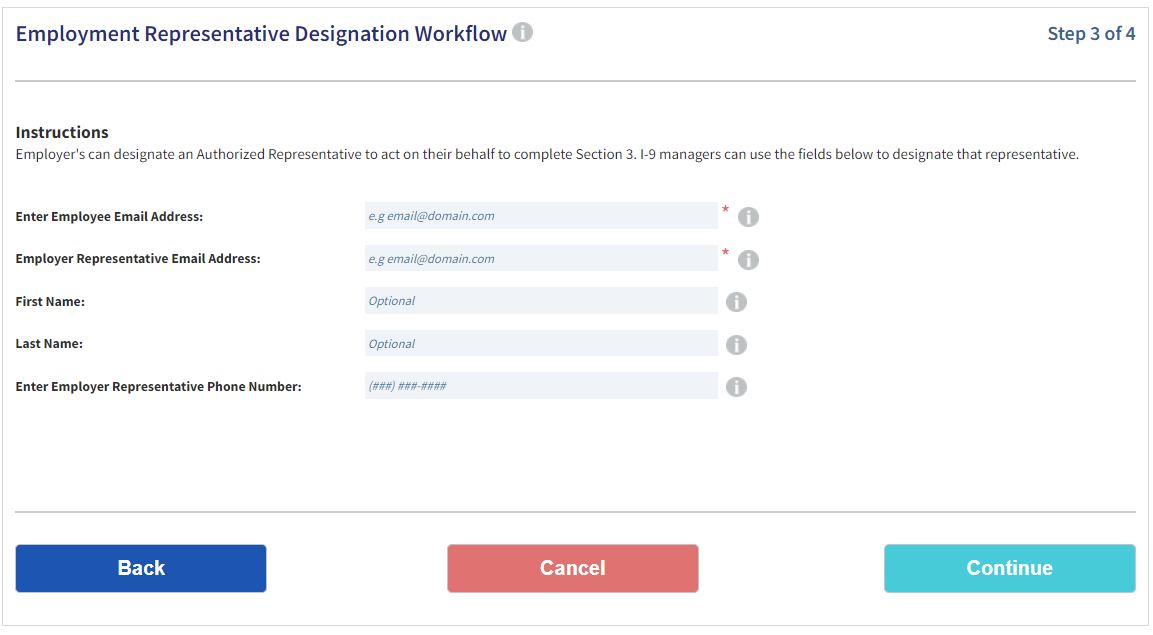
- Once the I-9 manager enters the information and clicks continue, an email will be sent to the Authorized Representative. This changes the next action of the I-9 to "Complete Section 3".
- The email will contain instructions to the Authorized Representative explaining why they are receiving the email and the request to act on the Employer’s behalf. When the Authorized Representative clicks the Form I-9 Section 3 link, he or she will be navigated to the Remote Section 3 Authorized Representative instructions page.
- The Authorized Representative can choose to accept or decline the Employer’s request to complete Section 3. If he or she declines, a notification will be sent to the employer indicating such. If he or she accepts, the application will navigate the I-9 manager to the Remote Section 3 form page.
- The Authorized Representative will be presented with instructions, the employee Section 1 information, the option to update the employee’s name, the Employment Verification section, the Electronic Signature section, and if configured, the Employer Help info section.
- New Name: If the user selects Yes, in the New Name section indicating the employee’s name has changed, three fields will appear with button selections for each part of the name. The Authorized Representative will then be prompted to select the parts of the employee’s name which has changed. When an option is selected, a field will display beneath the associated option, allowing the entry of the new name value.
- Employment Verification Documents: The Employment Verification Documents section will display a Document Type field with an associated drop-down. When the Authorized Representative clicks the drop-down menu, the document selector will appear. The document selector presents the Authorized Representative with all eligible documents for the reverification. Once the Authorized Representative selects the document the employee has presented and clicks, “Continue with Selected Document(s)”, the document selector will close. The Authorized Representative will then be presented with the Section 3 document form. From here, he or she can enter the field values related to the documents the employee has presented.
- Employer Electronic Verification: After all applicable fields have been entered, the Authorized Representative can electronically sign the document by clicking the, “I Agree” checkbox and then clicking, “Sign Form I-9 Electronically”.
Notes:
-
Per USCIS, Employers should not reverify:
-
U.S. citizens and noncitizen nationals;
-
Lawful permanent residents who presented a Form I-551, Permanent Resident or Alien Registration Receipt card for Section 2, including conditional residents; or
-
List B documents
-
-
Per USCIS and E-Verify, Supplement B/Section 3 Reverifications are NOT subject to E-Verify, and employers would NOT open a new E-Verify case when reverifying an existing employee.
-
-
"E-Verify MAY NOT be used to reverify expired employment authorization".
-
-
USCIS: Employee Rights and Responsibilities
-
"An employer that participates in E-Verify MUST NOT: Use E-Verify for reverification if you are an existing employee whose temporary employment authorization has expired. Your employer must complete Supplement B, Reverification and Rehire, of Form I-9 when reverification is required."
-
-
EAD Revocation Guidance For E-Verify Employers
-
"Reverification on Form I-9: Do not create a new E-Verify case."
-
-
Other Tracker I-9 Supplement B (Formerly Section 3) Resources
USCIS Guidelines
- Completing Section 3, Reverification and Rehires (https://www.uscis.gov/i-9-central/complete-correct-form-i-9/completing-section-3-reverification-and-rehires)
- M-274 Handbook for Employers 5.1 Reverifying Employment Authorization for Current Employees (https://www.uscis.gov/i-9-central/handbook-for-employers-m-274/50-completing-section-3-of-form-i-9/51-reverifying-employment-authorization-for-current-employees)