
Distributor Facing Data Export Feature Guide
Background and Introduction
The Data Export Tool in the Tracker I-9 application supports exporting and securely delivering Form I-9 and E-Verify data to clients in response to government audits and client terminations. Earlier, these exports were managed internally by Mitratech team members and delivered to clients via Egnyte, a secure file share application. This feature has been enhanced and now allows Distributors to self-manage the data export process for their clients and securely deliver those exports directly to the Distributor via sFTP or FTPs or Amazon Simple Storage Service (Amazon S3). Amazon S3 offers a cloud-native delivery option that supports scalable, secure, and automated data transfers. This documentation outlines how Distributor Admin – All Access users can leverage the enhanced functionality in accordance with their contractual terms.
Data Export Tool
The Data Export Tool is a built-in feature that allows for the secure extraction and compilation of I-9 forms, supporting documents, and audit trail data for clients in a downloadable format. It serves two main purposes:
- Government Audits: When a client is audited, the tool is used to quickly export relevant I-9 data to comply with the typical 72-hour response window to a Notice of Inspection (NOI).
- Client Termination: When a client leaves the Tracker I-9 platform, they may request a full export of their data.
Exported data can be delivered through secure channels, including sFTP, FTPs, or Amazon S3, depending on the recipient’s configuration and access level.
System Level Enablement
Feature Activation
Before Distributors can access the Data Export Tool, the feature must be enabled by a member of the Mitratech Professional Services team. Please reach out to the assigned Implementation Project Manager for assistance with enabling this feature.
Protocol Selection
After the feature is activated, the Implementation Project Manager will select the appropriate Protocol Type from the dropdown menu. Supported options include FTPs, sFTP, and Amazon S3.

Export Delivery Configuration
The Implementation Project Manager will configure the export delivery settings required to automate the transfer of exported data. The configuration fields listed below are necessary to establish a secure connection between the Tracker I-9 system and the selected delivery endpoint (FTPs, sFTP, or Amazon S3).
Field visibility and requirements will dynamically adjust based on the selected protocol as, explained below:
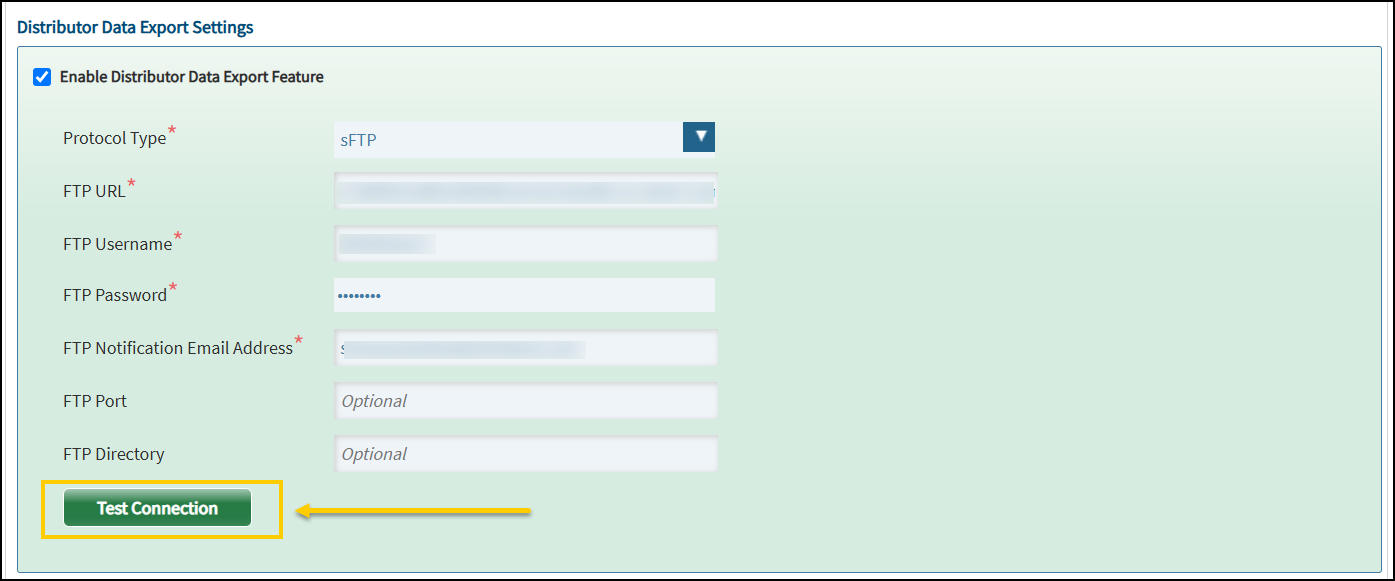
FTPs / sFTP Configuration Fields
| Field | Required | Description |
|---|---|---|
| FTP URL | Yes | Enter the full FTP server Uniform Resource Locator (URL). |
| FTP Username | Yes | Provide the username required to authenticate with the FTP server. |
| FTP Password | Yes | Provide the corresponding password for the FTP username. |
| FTP Port | No | Leave this blank unless your server uses a special port. |
| FTP Directory | No | Enter the folder where files should go (e.g., /exports). If you leave this blank, files will go to your server's default folder. |
| FTP Notification Email Address | Yes | Email addresses to receive status notifications about export delivery. |

Amazon S3 Configuration Fields
| Field | Required | Description |
|---|---|---|
| S3 Bucket Name | Yes | Enter the name of the Amazon S3 bucket where exported files should be delivered. |
| Access Key ID | Yes | Provide the username required to authenticate with the FTP server. |
| Secret Access Key | Yes | Provide the corresponding AWS Secret Access Key. |
| S3 Region | No | Select the AWS region where the S3 bucket is hosted. |
| Notification Email Address | Yes | Email addresses to receive status notifications about export delivery. |

Saving and Testing FTP Configuration
Once all required details have been gathered and entered, the Implementation Project Manager can test the connection to validate the configuration by using the “Test Connection” button. The testing process and outcomes may vary depending on the selected protocol:
- Successful Connection: A confirmation message will appear, indicating that the connection has been established successfully.
- Failed Connection: An error message will be displayed with relevant details. The Implementation Project Manager will review the entered settings and make any necessary corrections. In some cases, assistance from your IT team may be required to resolve configuration or access issues.
Distributor Level Settings
To configure and access the Data Export Tool at the distributor level, follow the steps below:
- Access the Tracker I-9 application as a Distributor Admin – All Access user.
- Go to the “Admin Control Panel” and click “System Settings”.
- Select the “Distributors” tab.
- Select the "Distributor Name".

- Scroll down to the “Distributor Data Export Settings” section.
- The "Enable Distributor Data Export Feature" checkbox appears checked and disabled by default.
- Only a Mitratech System Administrator has permission to enable or disable this feature.
- While the feature toggle is managed by the System Administrator, Distributors retain the ability to edit the Data Export configuration fields as needed. Please be sure and click the green “Save” button at the top of the page after editing. Afterwards, click the green Test Connection button to confirm that the Tracker I-9 application can successfully connect to the configured delivery endpoint.
Data Export
To access the “Data Export Tool”, navigate to “Admin Tools” and select “Data Export”.
This tool allows users to define a set of I-9 records for a client, choose which I-9 and E-Verify assets to extract, and initiate the export process. Assets are first extracted to the Tracker host server and then securely transmitted to the configured delivery endpoint.
The following menus will be displayed:
- Data Export Tool - The interface to configure and initiate data exports.
- Data Export Log - A history of previously run exports for tracking and auditing.

Data Export Tool
Once the Distributor selects the “Data Export” tab, the “Data Export Tool” interface is displayed with the following options:

A. General Info
- Export Description (Required): Add a brief description of the export process. The Export Description will also appear on the “Data Export Log” page.
- Add Note to Employee Profile (Optional): Adds entered text to the Notes section of all Employee Profile records associated with the export.
B. Define the record set
Client Data:
Client - Search for a client using the Client Search link next to the disabled Client dropdown. Once a client is selected through the search window, the dropdown becomes enabled and displays the selected client.

To find a client, enter at least one of the following search filters:
- Client Name
- External Client ID
- Tracker Client ID
After entering one or more filters, click “Search” to view the results. Select the appropriate client from the list to populate the “Client” field on the form.
Search Checkboxes:
- Contains: Returns results based on values which contain the values specified, i.e. returns similar but non-exact matches, as opposed to the default search which will only return records which match exactly. The contains option only applies to Client Name and Employer Name fields.
- Return All Results: Displays full list of matching records.
Note: The following radio buttons will be enabled only after a client is selected using Client Search.
Employer: Select the “ALL EMPLOYERS” option to export all data associated with the selected client. You may also select an employer associated with the selected client from the “Employer” dropdown list.
Worksite(s): If an individual employer is selected from the “Employer” drop-down, you can select either “ALL WORKSITES” from the “Worksite(s)” drop-down or one or more worksites to narrow down the records by physical location(s).
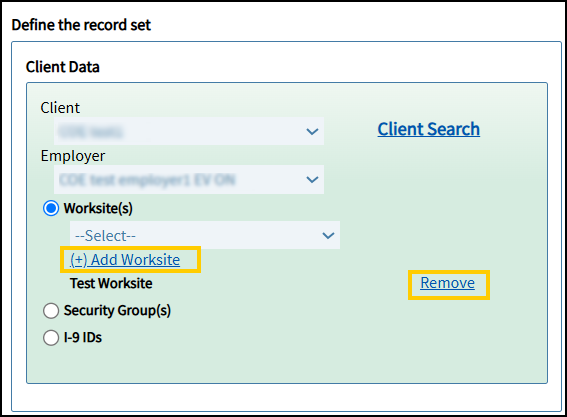
- To include all available worksites, select ALL WORKSITES from the list. When this option is selected, individual worksite selection options will not be displayed, as all worksites are already included.
- To select one or more worksites, click “(+) Add Worksite”.
- To remove a worksite, click the “Remove” option next to the selected entry.
- If you click “(+) Add Worksite” without selecting a worksite, a pop-up message will appear prompting you to make a selection.

Security Group(s): Apply this filter to limit the export to records associated with specific Security Groups of an Employer, if applicable. Please note that most clients do not use Security Groups.
I-9 IDs: Enter specific I-9 IDs to export only those records. The IDs must be entered as a comma-separated list (e.g., 12345,67890,11223). When this option is selected, the system disables the Record Status and Subset of Records filters, as the export is limited strictly to the specified records.
Note: Distributors can select only one of these filters: Worksite(s), Security Group(s), or I-9 IDs if an employer is selected from the “Employer” drop-down list.
C. Record Status
This section is used to define which records are included in the export based on their status.
Note: These options are disabled when the “I-9 IDs” selection is made in the Define the Record Set section.
Select one of the following options:
- All Records: Includes both active and terminated records without applying any status filters.
- Subset of Records: Provides filtering options based on record status and date ranges.
The following filters are available under Subset of Records and are enabled once the option is selected.
Active Records
Select one of the following to filter active employee records:
- All Active Records: Includes all current active records.
- No Active Records: Excludes all active records from the export.
- Active Records within a Start Date range: Includes only active records with a start date within the specified range.
- Active Records within a Created On Date range: Includes only active records created within the specified date range.
Terminated Records
Select one of the following to filter terminated employee records:
- All Terminated Records: Includes all records marked as terminated.
- No Terminated Records: Excludes all terminated records of the export.
- Terminated Records within a Start Date range: Includes terminated records with a start date within the specified range. Enter the date range (start and end date) in the From and To fields.
- Terminated Records within a Termination Date range: Includes terminated records with a termination date within the specified range. Enter both start and end dates to define the range.
- Terminated Records within a Created On Date range: Includes terminated records created within the specified date range.
D. Export Assets
This section allows users to select which I-9 and E-Verify assets to include in the data export. Each option is presented with a checkbox, and users can select one, several, or all assets based on their requirements. Assets are grouped into two categories:
I-9 Record Assets
The following I-9-related assets are available for export:
- PDF Filing History
- Most Recent Filing History
- All Filing Histories
- Electronic I-9 Audit Trail (PDF)
- Electronic I-9 Audit Trail (Excel)
- Audit History Report
- Signature History Report
- I-9 Summary Tab Notes
- Audit Notes
- All Audit Notes
- Only Recommended Notes
- Only Custom Notes
- E-Verify Assets
- I-9 Record Attachments
- I-9 Data File
E-Verify Assets
The following E-Verify-related assets can also be included in the export along with the I-9 Record Assets:
- E-Verify History
- Most Recent E-Verify History
- All E-Verify Histories
- E-Verify Attachments
E. Submit or Cancel
Once all required information is provided and export options are selected:
- Click Submit to proceed with the export.
- Click Cancel to discard your inputs and exit the screen.
Note: After submission, the export request will begin processing and appear in the Data Export Log.
Data Export Log
The Data Export Log displays key details for each export entry. The following columns are available:


- Export All Records to Excel: Allows users to download the full export log in Excel (.xlsx) format for offline review and recordkeeping.
- Actions: Displays available actions for managing or reviewing an export entry in the Data Export Log:
- More Actions (…): The horizontal ellipsis icon opens a menu with additional actions for the export entry. The available options include:
- Run: Initiates the export process using the current configuration. This option is only available to Mitratech System Administrators. Distributor Admin – All Access users will see the Run button, but it will be disabled. When executed, the Run action prioritizes the job ahead of others that are either in progress or in a requested state.
- Cancel: Cancels a job that is currently In Progress or in a Requested status. When a Cancel action is taken, the initial status of the job will be Cancel Requested. Once the job has been completed cancelled, the status will change to Cancelled in the log.
- Export Errors: Generates and downloads an Excel file listing all errors related to the selected export job. This applies to all previously completed jobs with a status of Completed with Errors and any new jobs with that same status.

- More Actions (…): The horizontal ellipsis icon opens a menu with additional actions for the export entry. The available options include:
- Extraction Status: Indicates the current state of the extraction process (e.g., Requested, In Progress, Completed, Completed with Error, Failed, Unprocessed, In Progress (processed/total), Requested (On Demand), In Progress (processed/total), Cancel Requested, and Cancelled).
- Transfer Status: Displays the current status of the data transfer to the Distributor. If the Distributor is not configured for automatic transfer, the value will be N/A. If automatic transfer is enabled, the status will reflect the delivery progress (e.g., Pending, Transfer In Progress, Transfer Completed, Transfer Failed). For failed transfers, retry attempts are shown (e.g., Transfer Failed - 2nd of 5 Attempts).
Note: Status values on the Data Export Log page do not update automatically. To see the latest status, refresh your browser. Status updates typically occur every 5 minutes. - Extraction Date/Time: The timestamp when the extraction was completed.
- Client Name: The name of the client associated with the export.
- Distributor Name: The name of the distributor associated with the export.
- Record Count: The total number of records included in the export.
- I-9 Complete Count: The number of exported records with completed I-9s.
- Historical Count: The number of historical records included in the export, if applicable.
- Requested/Cancelled By: The name of the user who requested or cancelled the export.
- Export Settings: Displays the configuration used for the export. Click Load Settings to view the selected options in the Data Export Tool.
- Export Description: A brief description or label added to the export request.
Use the Export All Records to Excel option to download the entire export log for offline review or recordkeeping.
Data Export Process
When an export is initiated via the Data Export Tool, the job will appear on the Data Export Log page with a status of Requested. All requested jobs are queued and prioritized across other jobs, whether initiated by the current Distributor, another Distributor, or Mitratech. Once the job is picked up for processing, the status will update to In Progress. Alongside the status, an indicator will display the number of records processed compared to the total number of records in the job. For example, if the job contains 500 records and 100 have been processed, the status will show as In Progress (100 / 500). The Data Export Tool can extract ~4,500 records per hour.
After extraction is complete, the data is securely transmitted to the configured delivery endpoint (FTPs, sFTP, or Amazon S3) based on the Distributor’s protocol settings. The Transfer Status will update to Transfer In Progress. Once transmission is complete, the status will change to Transfer Complete. If transmission fails, the system will be retried once per day for four additional days. After five unsuccessful attempts, the status will update to Transfer Failed, and no further attempts will be made.
An automated delivery confirmation email is sent to the Notification Email Addresses configured on the Distributor page. This email confirms the outcome of the file delivery, including a success message if the transfer was successful or a failure message with relevant error details if the transfer was unsuccessful.
Tracker I-9 Data Export Status Update – Success

Tracker I-9 Data Export Status Update – Failure
