
Unified User Account Feature Guide
Bckground and Introduction
Tracker I-9 introduces the Unified User Account feature to simplify user access and account management. Unified User Accounts allow organizations to assign both Client Administrator and I-9 Manager access to a single user account, enabling users to access both experiences through a single authenticated session and switch between views without maintaining separate accounts or credentials.
The Unified User Account feature also enables organizations to manage Client Administrator accounts directly within Tracker I-9, including assigning I-9 Manager access, configuring permissions, and managing Client Administrator authority.
This guide explains how to create and manage Unified User Accounts, assign I-9 Manager access, configure permissions and administrative authority, and switch between Client Admin and I-9 Manager views.
Unified User Account Feature Summary
The Unified User Account feature enables organizations to consolidate Client Administrator and I-9 Manager access into a single user account. Administrators can assign I-9 Manager roles, configure permissions, manage Client Administrator authority, and maintain user access through a centralized account management experience.
Unified User Account – Client Admin
To access the Unified User Account functionality, navigate to the Manage Client Admin page.
- Log in to the Tracker as a Client Administrator.

- Navigate to Admin Control Panel.
- Select Manage Client Admins.

- The Client Admins page displays.

Manage Client Administrators
The Client Admins tab displays Client Administrator accounts associated with the selected client. Accounts are displayed as expandable accordion sections and are listed in alphabetical order by last name and first name.
Administrators with permissions can create and manage accounts, including editing account details, activating or inactivating accounts, deleting accounts, resetting passwords, and sending login credentials.
The following options are available:

- Filter by User Last Name: Allows administrators to narrow the list of displayed Client Administrator records by entering all or part of a user's last name. The system displays records that match the entered search criteria.

- Hide Inactive Users: Allows administrators to display only active Client Administrator records by default. Clear this checkbox to include inactive Client Administrator records in the displayed results. The system updates the list to reflect the selected filter setting.

- Export All Records to Excel: Allows administrators to export Client Administrator records to an Excel (.xlsx) file for offline review, auditing, and recordkeeping. The system generates and downloads an Excel report containing the selected Client Administrator records. The exported file is downloaded as Manage Users Report.xlsx.
Note: The exported report reflects the current Filter by User Last Name and Hide Inactive Users settings. - Create New Client Admin: The Create New Client Admin section allows administrators with permissions to create a new Client Administrator account by entering profile information, assigning administrative permissions, and configuring role-based access settings.
Click the Create New Client Admin accordion to expand the section.

The following options are available:

- Profile Information
| Field | Description |
| Active | Indicates whether the Client Administrator account is active or inactive. |
| Username | Specifies the unique username used to sign in to Tracker. |
| Title | Specifies the Client Administrator's job title. |
| First Name | Specifies the Client Administrator's first name. |
| Email Address | Specifies the email address associated with the Client Administrator account. |
| Last Name | Specifies the Client Administrator's last name. |
| External Client Admin User ID | Specifies an external identifier used to associate the Client Administrator account with records in external systems. |
| Password | Specifies the password for the Client Administrator account. |
| Confirm Password | Confirms the password entered for the Client Administrator account. |
| Generate Random Password | Automatically generates a password that meets Tracker password requirements. |
-
I-9 Manager Configuration:
Can Manage Client Admins
Determines whether the Client Administrator can manage Client Administrator accounts associated with the selected client.
- True: The user can create, edit, activate, inactivate, and delete Client Administrator accounts, reset passwords, and send login credentials.
- False: The user has read-only access to the Client Admins page and cannot make changes to Client Administrator accounts.
I-9 Manager Role
Specifies the I-9 Manager security role assigned to the Client Administrator account. Selecting a role other than None grants the user access to I-9 Manager functionality using the same account.
Selecting an I-9 Manager Role displays additional configuration options, including Time Zone and user permissions. If the selected role includes E-Verify permissions, a Training section becomes available after the account is saved.
Note: Client Administrator accounts assigned to an I-9 Manager Role can receive Email Alerts based on their assigned role and permissions. If a user qualifies for the same Email Alert through multiple recipient configurations, only one email notification is delivered.
Time Zone
Specifies the time zone used when the user operates in the I-9 Manager experience.
Note: This field is displayed only when an I-9 Manager Role is assigned.
-
Training
The Training section displays training assignments and completion information for Client Administrator accounts assigned an I-9 Manager role with E-Verify permissions.
-
Permissions
The Permissions section allows administrators to configure employer and worksite access for Client Administrator accounts assigned an I-9 Manager role.
- Employers: Displays the employers available for assignment to the selected user.
- Worksites: Displays the worksites available for assignment to the selected user.
- Permission: Opens the User Permission window, allowing administrators to assign employer and worksite permissions.

-
Grant Access to all Employers and Worksites: Grants the user access to all available employers and worksites associated with the selected client.
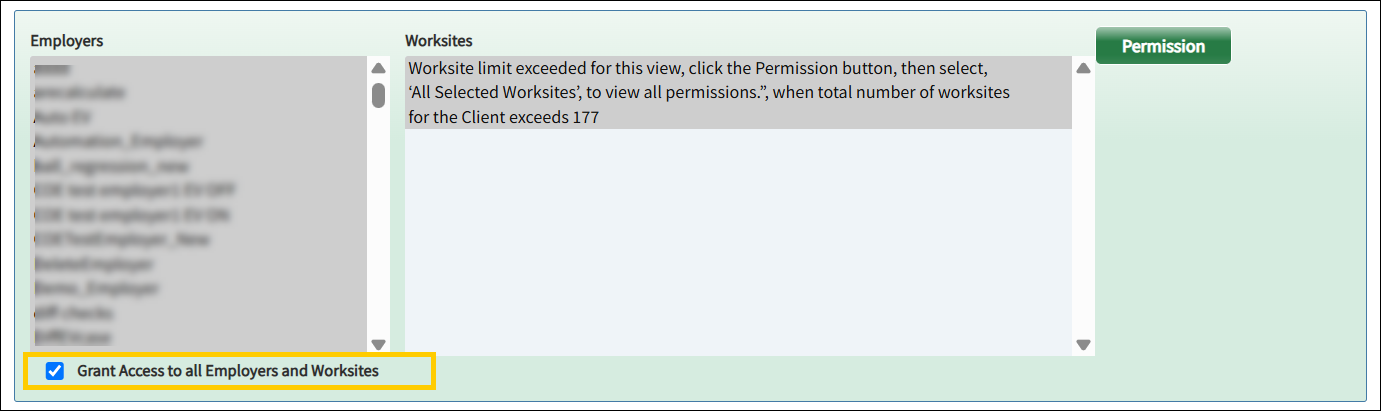
Note: The Permissions section is displayed only when an I-9 Manager Role other than None is assigned to the Client Administrator account.
Credentials Sent: Displays the most recent date and time that login credentials were sent to the Client Administrator.

-
Actions:
The following actions are available when creating a new Client Administrator account:

- Save & Send Email: Saves the Client Administrator account and sends the account credentials to the email address associated with the account.

Note: Account creation, login credential, and credential recovery email notifications display information based on the user's assigned access. Users assigned an I-9 Manager Role may also see their assigned I-9 Manager Security Role in the email notification. - Save: Saves the Client Administrator account and any changes made to the account configuration.
- Cancel: Closes the current page without saving any changes.
Available Actions for Existing Client Administrator Accounts
The following actions are available for existing Client Administrator accounts:
-
Reset Password: Allows administrators to reset the password for the selected Client Administrator account. Selecting Reset Password clears the Password and Confirm Password fields, allowing a new password to be entered. The Generate Random Password option becomes available, and the generated password can be sent to the user's email address using Save & Send Email.


- Save: Saves the changes made to the Client Administrator account.
- Cancel: Discards any unsaved changes and returns the account to its previous state.
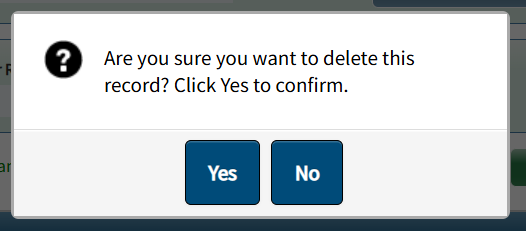
- Delete: Permanently removes the Client Administrator account from Tracker.
Switching Between Client Admin and I-9 Manager Views
Client Administrators who have been assigned an I-9 Manager Role can switch between the Client Admin and I-9 Manager application experiences using a single account. This allows users to perform Client Administrator and I-9 Manager functions without signing out and signing back in.
Switch to I-9 Manager View
If a Client Administrator account has an assigned I-9 Manager Role, the Switch to I-9 Manager View option is available from the user menu.
- Click the user menu next to your name.
- Select Switch to I-9 Manager View.

Tracker evaluates the user's assigned I-9 Manager role, permissions, and training requirements before opening the I-9 Manager experience.
If required E-Verify training has not been completed, the user is directed to the Required Training Notification page. Otherwise, the user will be directed to the I-9 Manager Dashboard.

Switch to Client Admin View
While operating in the I-9 Manager experience, users can return to the Client Admin experience without signing out.
- Click the user menu next to your name.
- Select Switch to Client Admin.

The system returns the user to the Client Admin experience.
Note: The available switch option depends on the current application view. Only one switch option is displayed at a time, and the role shown in the user menu reflects the active view. Refreshing the browser does not change the current application view, and users remain in their active Client Admin or I-9 Manager view after a page refresh.
User Training Report
The User Training Report provides administrators with visibility into E-Verify training assignments and completion status for users with E-Verify permissions.
Client Administrator accounts assigned to I-9 Manager Roles with E-Verify permissions are included in the User Training Report. These accounts appear alongside standalone I-9 Manager accounts and are included in report filtering and export functionality.

Note: Selecting a User Name from the report opens the associated user record on the Client Admins/ Users tab.
Security Role Management
For organizations using Custom Security Roles, Client Administrator accounts assigned to an I-9 Manager Role are included in Security Role member counts and Security Role reassignment workflows. When a Security Role is inactivated and reassigned, affected Client Administrator accounts are automatically updated to the newly assigned Security Role.
Unified User Account API Support
The Create Client Admin User Account and Update Client Admin User Account APIs support Unified User Account functionality. API users can create and update Client Administrator accounts with optional I-9 Manager access and Client Administrator management authority through the existing Client Admin API endpoints.
When I-9 Manager access is assigned, the APIs support configuration of the user's I-9 Manager role, time zone, employer permissions, worksite permissions, security group permissions, and client-wide access settings. Client Administrator accounts can also be configured with Client Administrator management authority using the CanManageClientAdmins argument.