
How do I create a new contact card?
Introduction
What are Contacts? There are two types of contacts, Person and Company. Common contact cards are users of TeamConnect or involved parties on matters like outside counsel, witnesses, experts, etc.
A Contact Card stores information such as phone numbers, email address, address, job title, and company.
Different Types of Contacts
Below is a brief overview of the various types of contact records that are available in TeamConnect Essentials.
- Person Contacts—Attorneys, Paralegals, Legal Admins, Experts, Timekeepers
- Internal Contacts are people within your company. A contact card does not equal a new user for the system. Every user has to have a contact card, but not every contact card is a TeamConnect Essentials user.
- External Contacts are people outside of your company.
- Instructions for creating a New Person are listed below
- Company Contacts —Outside counsel firms, vendors, and other outside businesses are added as a Company Contact. The information stored for external businesses and vendors is important to keep track of for eBilling and reporting purposes.
- Instructions for creating a New Company are listed below.
How do I add New Contacts to TeamConnect?
- Entering new contact information from the Contacts page— Click New and enter the contact record information, as shown in the following procedure.
- Copying an existing contact—TeamConnect Essentials allows you to create a contact by copying an existing contact, which is useful if you have contact records that may have different names, but similar properties. See Copying Contacts for more information.
To add a New Person
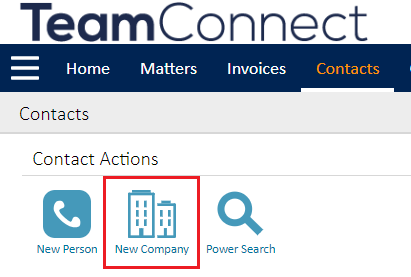
- Click the Contacts tab, then select the New Person button.

- On the Profile page, enter or edit the appropriate information.
Fields with an asterisk are required and must be completed before you can save this record.
When selecting a Contact Type, you have the option to select between an internal contact and an external contact.
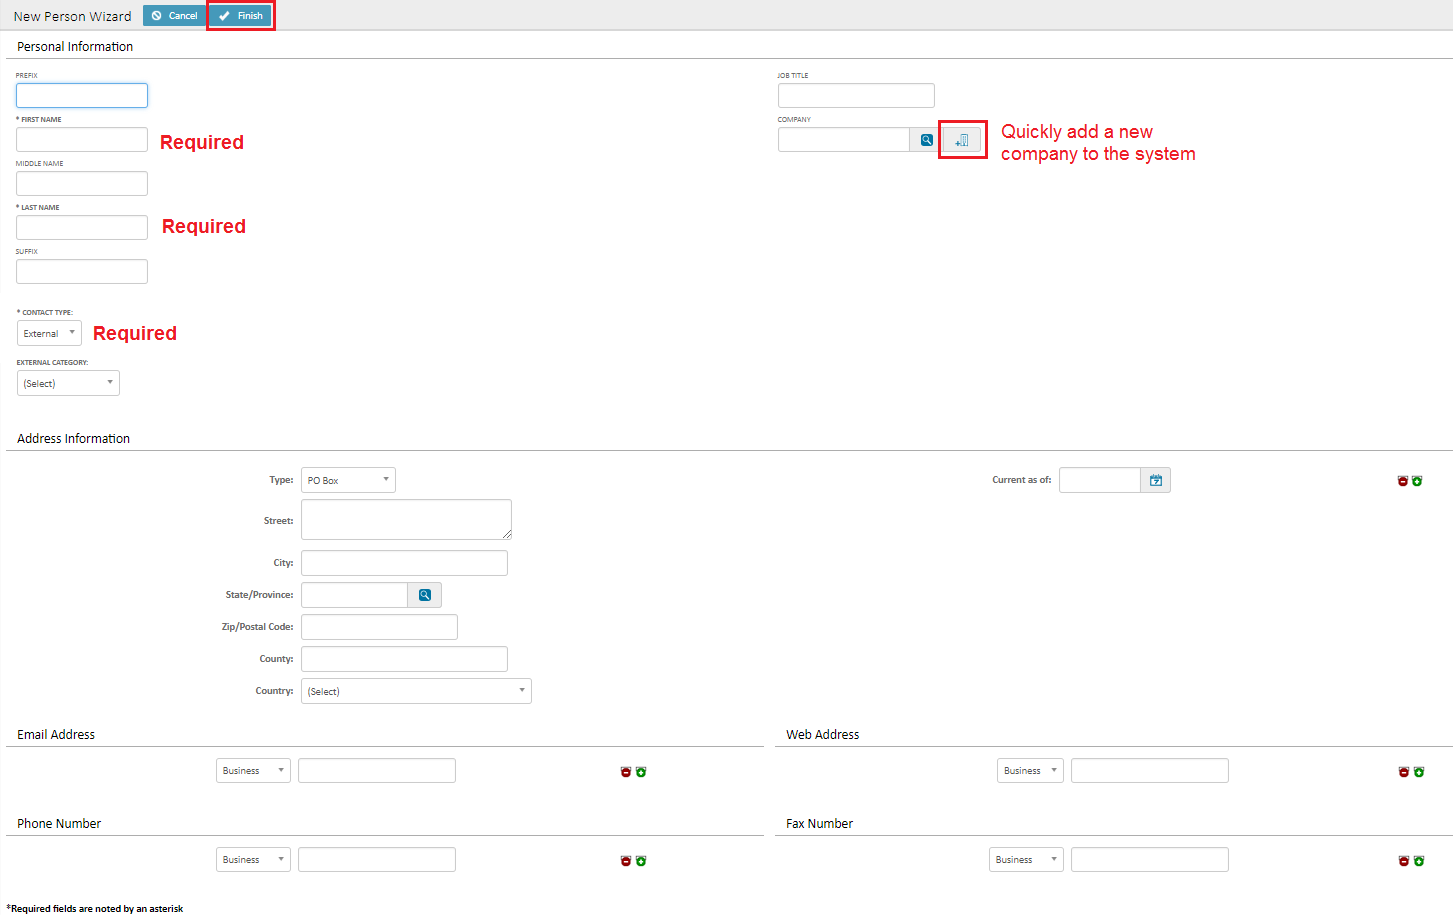
- To enter multiple addresses, phone, fax, web, and email addresses, select the + sign in the appropriate information block, and then enter the appropriate information.
If you are entering multiple addresses, phone, fax, web and email addresses, a Primary radio button appears. Click the radio button that indicates the main information for this contact. - Click the Finish button to save this information. Additional menu options will appear on the left side of the screen - use these pages to associate additional details to the user.
- Use the links in the left pane to access the contact-specific pages:
- General—[Contact Card information] Enter or edit basic personal information such as name, job title, contact type, address, phone numbers, and email address.
- Details—Enter or edit additional identification information, such as an employee ID, or social security number.
- Documents—Upload and attach documents that are specific to that contact.
- Rates—For outside counsel timekeepers, their default and matter level rates and will be stored here.
- Involvement/Relations—View a contact's role in a matter, such as respondent, claimant, or witness or edit/view a contact's relation to other contacts. Involvements are set within specific matters, not from the contacts page.
- Select a Save
To Add a Company Contact
There are two ways to add a new company to TeamConnect Essentials:
|
1. By navigating to the Contacts page and selecting the New Company button.
|
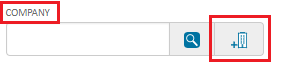
2. By clicking the New Company button directly from a field on a matter.
|
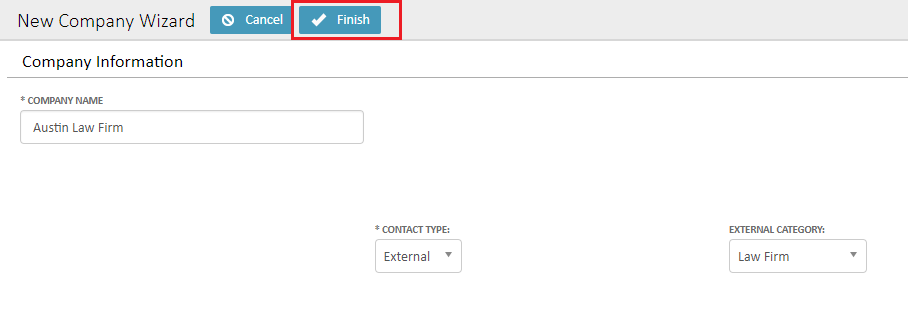
Enter Company Information
After the New Company screen appears, fill in the required Company Name and Contact Type fields then click Finish to fill in additional details.
Fill in additional details about the company
Use the left sidebar menu to fill in additional details such as documents, involvement or relations, and employees. Click Save & View when finished.
Copying Contacts
Copying a record is recommended when the new record is very similar to an existing one, and you will not have to change many of the values that are automatically populated.
To copy a record, on the record toolbar, click the Create a Copy button. The new record opens and some of the information is identical to the record you copied. You can now edit and save the new record.

Note: Not every piece of information will be copied from the old record to the new record. Each record type has its own set of excluded information. Generally, child records (such as Involved records for a Matter or a custom record type) are never copied to the new record. In addition, any piece of information that displayed as "SECURED" in the old record will not be copied, and that field in the new record is blank. Likewise, in the case that multiple items are selected and one (or more) are deactivated, the inactive items will not be copied.
| What is Copied | What is NOT Copied |
|
|