
Getting Started with Custom Classes
If the user interface does not offer the type of customization you want, you use the API classes to create custom code and upload the code to TeamConnect. The TeamConnect API allows you to create the following types of custom code:
- Conditions—You add conditions to the Qualifier page of a rule or the General tab of a condition. Custom conditions are also known as automated qualifiers.
- Actions—You add actions to the Action page of a rule and the Actions page of a wizard. Custom action are also known as automated actions.
- Blocks—You upload custom blocks to the Screens directory under the Documents tab and select them from the Blocks tab to add them to a specific object definition. Custom blocks are also known as custom screens.
- Wizard blocks—You upload custom blocks to the Screens directory under the Documents tab and select them from the wizard's Page Components tab. Wizard blocks are also known as wizard custom screens.
- Scheduled actions—You upload scheduled actions to the Scheduled Actions directory under the Documents tab and select them from the Scheduled Actions tool under the All tab.
- Tools—You upload custom tools to the Tools directory under the Documents tab and select them from the Administer Custom Tools page.
Use the sample code in this topic as a starting place for each previously mentioned code type.
Custom Action
This code provides a sample for a custom action on a contact rule. It also includes code for logging Debug messages.
import com.mitratech.teamconnect.enterprise.api.custom.CustomAction;
import com.mitratech.teamconnect.enterprise.api.model.Contact;

public class ContactCustomAction extends CustomAction<Contact> {

    @Override
    public void action(final Contact contact) {
        logDebug("contact="+contact);
        }
}
Custom Action with Parameters
This code provides a sample for a custom action with parameters on a contact rule.
import com.mitratech.teamconnect.enterprise.api.custom.CustomAction;
import com.mitratech.teamconnect.enterprise.api.model.Contact;

public class ContactCustomAction extends CustomAction<Contact> {

    @Override
    public void action(final Contact contact) { logDebug("Parameter="+getParameters().getTextParameterValue("name"));
    }
}
Custom Condition
This code provides a sample for a custom condition on a contact rule or condition. It also includes code for logging Debug messages.
import com.mitratech.teamconnect.enterprise.api.custom.CustomAction;
import com.mitratech.teamconnect.enterprise.api.model.Contact;

public class ContactCustomAction extends CustomAction<Contact> {

    @Override
    public void declareParameters() {
        getParameters().addTextParameter("name", "Label", "Default Value");
            }

    @Override
    public void action(final Contact contact) {
        logDebug("Parameter="+getParameters().getTextParameterValue("name"));
        }
}
Custom Block
This code provides a sample for a custom block for a contact record. It also includes code for custom initialization.
import com.mitratech.teamconnect.enterprise.api.custom.CustomBlock; import com.mitratech.teamconnect.enterprise.api.model.Contact;
public class MyCustomBlock extends CustomBlock<Contact>
{
@Override
public void initialize(java.util.Map<String, String> pageArgs) {
// Perform some custom initialization
}
public String getText() {
Contact contact = getRecord();
// Display something on screen
return contact.getDisplayString();
}
}
Wizard Custom Block
This code provides a sample for a custom block for a contact wizard. It also includes code for parameters and custom initialization.
import com.mitratech.teamconnect.enterprise.api.custom.WizardCustomBlock; import com.mitratech.teamconnect.enterprise.api.model.Contact;
import com.mitratech.teamconnect.enterprise.api.custom.WizardCustomBlock; import com.mitratech.teamconnect.enterprise.api.model.Contact;

public class MyCustomBlock extends WizardCustomBlock<Contact> {

    @Override
    public void initialize(java.util.Map<String, String> pageArgs) {
    // Perform some custom initialization getParameters().addTextParameter("name", "Label", "Default Value");

    }

  public String getText() {
Contact contact = getRecord(); // Display something on screen
return contact.getDisplayString(); }
}
Scheduled Custom Action
This code provides a sample for a scheduled custom action for a contact. It also includes code for logging Debug messages.
import com.mitratech.teamconnect.enterprise.api.model.Contact;
import com.mitratech.teamconnect.enterprise.api.custom.ScheduledCustomAction;
public class SampleActionClass extends ScheduledCustomAction {
@Override
public void action() { logDebug("message");
}
}
Custom Tool
This code provides a sample for a custom tool. It also includes code for logging Debug messages.
import com.mitratech.teamconnect.enterprise.api.custom.CustomTool; import com.mitratech.teamconnect.enterprise.api.model.Contact;
public class MyCustomTool extends CustomTool {
@Override
public void initialize(java.util.Map<String, String> pageArgs) {
// Perform some custom initialization
}
Automated Qualifiers and Actions
Automated qualifiers are files that you create to add conditional expressions to TeamConnect rules and conditions. Automated actions are files that you create to add actions to rules and wizards.
Automated qualifiers and actions display in one of the following two states:
- Current Object State—Object data displayed on the screen at the time when the user attempts a specified operation. In existing records, this data may include previously saved values from the database, as well as the values entered by the user before updating the record.
In new records that are being created, this data includes only the values entered by the user and automatically populated by the system. All rule types, except security, typically use the current object data. Post commit rules only use the current object state. - Old Object State—Object data stored in the database at the time when the user attempts a specified operation. This applies only to existing records and excludes the values that the user may have entered before saving the record.
Security rules are the only rule type that uses exclusively the old object state. However, sometimes, other rule types may use the old object state to check if any changes have been made to the current object.
Rule Types and Execution Order
The following table indicates which rules may have custom or automated qualifiers and actions.
Rule Types
|
Rule Type |
Can Have Automated: |
Execution Order |
|
|---|---|---|---|
| Qualifier | Action | ||
|
Security |
x |
1 |
|
|
Pre-population |
x |
x |
2 |
|
Validation |
x |
3 |
|
|
Approval |
x |
4 |
|
|
Custom Action |
x |
x |
5 |
|
Scheduled Action |
x |
x |
6 |
|
Audit |
x |
x |
7 |
|
Post Commit |
x |
x |
8 |
When a user attempts an operation in TeamConnect, multiple rules may trigger. If rules of different types apply to that operation, the rules execute according to the predefined order indicated in the Rule Types table. You cannot modify the predefined order in which multiple rules execute.
If several rules of the same type trigger, they execute according to the order number of the rule in the user interface (for example, see the General Tab on Rule Screens image). You can change this order.
Parameters
Parameters are arguments passed to the rule through fields in the user interface. The Java file defines how parameters appear as fields in the user interface. The user specifies parameter values in the rule interface rather than in the file. As a result, you can maintain the rule components without modifying the actual code.
Automated Qualifiers
You add qualifiers to the Qualifier page of a rule and the General page of a condition. All qualifiers return a Boolean to determine whether the qualifier conditions are true or false.
When qualifiers are automated, they use Java files to create the qualifier. Automated qualifiers for rules define whether the associated action executes; the action executes if the qualifier is true. Automated qualifiers for conditions define whether the condition is true.
After you create an automated qualifier, upload the file to the Automated Qualifiers folder in the appropriate object definition. For more details, see Uploading Rule Component Files.
When to Create Automated Qualifiers
You create an automated qualifier when you cannot create the qualifier through the user interface. Create an automated qualifier in the following situations:
- You need access to more methods than those methods available through the TeamConnect object model.
For example, a rule may require that an action executes if a project has a related involved party record with a specific role. Because projects have no one-to-many relationship with involved parties, creating this rule requires an API method to return the list of the associated involved party records.
For a sample in Java, see Checking Category List in Related Records. - You need to use Boolean operators, such as NOT, XOR, NOR, XNOR. For more automated qualifier samples, see Automated Qualifiers.
Wizard Page Transition Rules
Page transition rules are similar to the TeamConnect rule types in the Rule Types table, especially validation rules. They determine the sequence of the wizard pages by performing actions based on conditions met in the qualifier. Along with values of the main object, automated qualifiers in page transition rules may use wizard parameters and values from related objects and sub-objects defined in the templates associated with the wizard.
You cannot customize actions in page transition rules because they have a predefined transition to a specific page in the wizard. All page transition rules also have the same predefined trigger, which you do not need to define. The trigger is the transition between pages that occurs when you click the next button on the wizard page for the rule.
For example, if the wizard identifies a claimant, a page transition rule may use the provided information to search the database for the contact. If the system finds a matching contact, the wizard goes to the page that verifies the available contact information. If not, the wizard goes to the page that collects the contact information for a new contact record.
Automated Actions
You add actions to the Action page of a rule and the Actions page of a wizard. Rule actions specify what occurs if the rules meet the conditions in rule qualifiers. Wizard actions specify the actions for each wizard page. Unlike automated qualifiers that must return a boolean value, actions do NOT return values.
Automated actions files for both rules and wizards must be uploaded to the Automated Actions folder in the appropriate object definition. For more details, see Uploading Rule Component Files.
Rule Automated Actions
Rule actions execute when qualifiers return true. With automated rule actions, you can create new records and compare, calculate, and insert values. You use automated actions for custom and scheduled action rules.
For example, a rule may require that if a contact name changes, a history record for the contact saves with the date when the name changed and the ID of the user who made the change. For rule action samples in Java, see Rule Actions.
You do not create automated actions in the following situations:
- To deny the operation that triggers a rule.
- To approve the operation that triggers a rule and its route.
- To define actions with a template, such as populating fields with defined values.
Wizard Automated Actions
Wizard actions execute when the user clicks next on the wizard page with the action, moving the wizard to the next page. Like rule actions, automated wizard actions create new records and compare, calculate, and insert values.
For example, in a wizard, you may want to assign a value to a custom field of the object. Or, instead of assigning values you may want to calculate values, display additional entry fields, overwrite values in the associated templates, validate the entered data, or create a new record. For examples of wizard page actions in Java, see Wizard Page Actions.
When writing automated page actions, make sure they will not duplicate custom action rules with the Create trigger. Custom action rules execute when the wizard finishes and the rule qualifiers are met.
You do not need to create automated actions in wizards when you need to assign a value to a system field of the main object, its sub-objects, and related objects.
Important: In wizards, do not confuse page actions with rule actions in page transition rules because you cannot automate actions in page transition rules.
Qualifier and Action Code
When creating automated qualifiers and automated actions, you use the following subclasses of CustomItem:
CustomCondition—Use when creating automated qualifiers for rules and conditions.CustomAction—Use when creating automated actions for rules and wizards. The following table provides the basic differences between qualifiers and actions. Qualifiers and Actions
|
Qualifiers |
Actions |
|---|---|
|
Extend |
Extend |
|
Implement the abstract method |
Implement the abstract method |
|
Define your logic in the |
Define your logic in the |
You call the condition(M) and action(M) methods when the qualifiers and actions run. Override these methods to access an instance of the object.
The following code snippet demonstrates the basic structure of a qualifier in Java. You must determine what else to import for your qualifier.
import com.mitratech.teamconnect.enterprise.api.model.Project;
import com.mitratech.teamconnect.enterprise.api.model.rule.CustomCondition;

public class MyCustomCondition extends CustomCondition<Project>
{
@Override
public boolean condition (final Project record){
// Put your code here
}
}
The following code snippet demonstrates the basic structure of an action in Java. You must determine what else to import for your action.
import com.mitratech.teamconnect.enterprise.api.model.Project;
import com.mitratech.teamconnect.enterprise.api.model.rule.CustomAction; public class MyCustomAction extends CustomAction<Project>
{
@Override
public boolean action (final Project record) {
// Put your code here
}
}
Parameters in Qualifiers and Actions
Parameters in actions and qualifiers are values that the Java file displays as fields in the user interface, as shown in the following image.
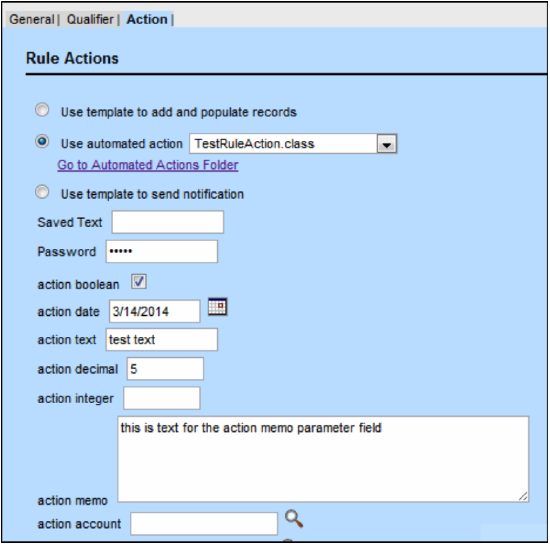
Parameters Added from an Automated Action
If values in a qualifier or an action might change, use parameters so that the solution developer can change the value without modifying the action or qualifier file. In addition, when you use parameters in rules, you are sometimes able to use the same file for multiple rules that require different values.
For example, when an automated action creates a task with the due date based on a date in a project, the solution developer can set the number of days before the task is due through the user interface. You can also use an automated action to create new accounts for budgets that a solution developer sets from a parameter.
Set or get parameter values using the methods from the Parameters class.
For code samples, see Parameterized Actions.
About Parameters in Wizards
Wizard page actions use the following types of parameters:
- Wizard parameters that are transient values of different types that the wizard creates, uses, and discards afterwards. The user who designs the wizard through the user interface defines the wizard parameter name within the wizard.
- All sub-objects and related objects defined in the template, which the wizard treats as parameters. The system within the template automatically defines the names of these parameters, using the name of the object and a sequential number. For example, Account 1, History 1, Assignee 1, and Assignee 2.
- Parameters that you use in any automated action or qualifier.
Adding and Using Parameters
Qualifiers and actions both accept parameters. Parameters are fields that appear on the Qualifier, General, and Action pages that someone working in the Setup can update. When adding, getting, or setting parameters, use the Parameters class.
You define parameters in rules in the following way:
- The
CustomCondition.declareParameters()orCustomAction.declareParameters()methods, which accept methods from theParametersclass. - The add methods in the
Parametersclass, which create the parameters. The class includes a parameter for each data type and certain system objects. For example, if you want to add a project field to the Qualifier or Action page, use theaddProjectParameter()method.
After you define parameters, you include the code for the qualifier or action using the condition(M) or action(M) methods. As part of this code, you can retrieve the value entered for a parameter in the Setup. In the case of the project parameter example, you use the getProjectParameterValue() method to retrieve the project. If you need to update the value an existing parameter within the condition(M) or action(M) methods, you can use the set methods. For example, setProjectParameterValue().
If no one enters a value for the parameter, the qualifier or action uses the default value for the parameter. When someone enters a value in the Setup for the parameter field, the entered value overrides the default value.
The following code sample demonstrates how to add parameters to the Action page of a rule. The action code retrieves the value of the parameter text field with the name "text" and updates the name of a project with the value.
public class TestRuleAction extends CustomAction<Project> {
@Override
public void declareParameters() { parameters.addTextParameter("text", "Text", "default value");
parameters.addPasswordParameter("password", "Password", "default password");
parameters.addBooleanParameter("action boolean", "action boolean", false);
Date date = new Date();
parameters.addDateParameter("new action date", "new action date", new Date());
parameters.addDecimalParameter("action decimal", "action decimal", BigDecimal.valueOf(.5));
parameters.addNumberParameter("action number", "action number", Long.valueOf(5));
parameters.addMemoParameter("action memo", "action memo", "This is memo text field content");
Account account = platform.getAccountService().read(Long.valueOf(503)); addAccountParameter("action account", "action account", account);
}
@Override
public void action(final Project dispute) { dispute.setName(parameters.getTextParameterValue("text"));
Account newAccount = platform.getAccountService().newAccount("Test Account", BigDecimal.valueOf(1000), new Date(), new Date());
newAccount.setNote("Here is a note that has been set");
}
}
Automated Qualifier Example
The sample code in this topic is for a qualifier that checks whether the policy holder of a Policy changed. An Involved custom field in the Policy custom object definition specifies the policy holder. If the primary key of the policy holder is the same as the primary key of the policy holder in the previous state of the record, the qualifier returns true, and the action runs. Otherwise, the qualifier returns false.
Before attempting to run this rule, you must create a custom field of type Involved in the root of the Policy custom object definition. Then, you specify this custom field as a parameter for the qualifier.
Defining the Parameter
As explained in Parameters in Qualifiers and Actions, all rule parameters use the Parameters class and the declareParameter() method of a rule condition or action. Because the example rule compares the contents of an involved custom field in two states of a record, we need to be able to locate that custom field. The Parameter.addTextParameter() method in the example locates the field by taking three arguments:
- The label of the parameter. This text describes the custom field.
- The name of the parameter. This text identifies the custom field.
- The default value of the parameter.
Specifying this parameter results in a text box with the appropriate label in the Qualifiers tab of the rule. The following code sample shows how to define this text box using a parameter.
import com.mitratech.teamconnect.enterprise.api.custom.CustomCondition; public class MyParameterizedCustomCondition extends CustomCondition<Project>
{
@Override
public void declareParameters() {
parameters.addTextParameter("My Parameter Label", "myParameter", "defaultValue");
}
@Override
public boolean condition(final Project dispute) {
// Place code for all conditions here.
}
}
Checking the Condition
After defining the parameter, the rule must be able to compare the policy holder in the previous version of the policy with the policy holder in the new version. The rule should return true if the primary keys of the custom fields' contents are the same. When writing the code, the rule must perform the following actions:
- Retrieve the associated project.
- Retrieve the old state of the record from the database.
- Retrieve the parameter using the name of the parameter, which is
fieldKeyfor this sample.
Use the getTextParameterValue() method to retrieve the value: String fieldKey = parameters.getTextParameterValue("fieldKey");
Completing the Qualifier
The following code sample includes the parameter and conditions:
import com.mitratech.teamconnect.enterprise.api.custom.CustomCondition; import com.mitratech.teamconnect.enterprise.api.model.Contact;
import com.mitratech.teamconnect.enterprise.api.model.Project;
public class CheckingWhetherPolicyHolderWasChanged extends CustomCondition<Project>
{
@Override
public void declareParameters() {
parameters.addTextParameter("Policy custom field name", "policyCustomFieldName", "policyHolder");
}
@Override
public boolean condition(final Project dispute) {
// Getting the old object.
Project oldDispute = platform.getProjectService().read(dispute);
// Getting parameter value that indicates custom field key
String policyCustomFieldName = parameters.getTextParameterValue("policyCustomFieldName");
// Getting policy holder from the old object's custom field.
Contact oldPolicyHolder = oldDispute.getInvolvedFieldValue(policyCustomFieldName).getContact();
// Getting policy holder from the current object's custom field.
Contact currentPolicyHolder = dispute.getInvolvedFieldValue(policyCustomFieldName).getContact();
// If the policy holder in the old object is not the policy holder in the current object, return true.
return
!oldPolicyHolder.getPrimaryKey().equals(currentPolicyHolder.getPrimaryKey ());
}
}
Custom Pages
Use XML files to create custom screens and tools. The XML file includes the structure, layout, and contents of a custom block. If the screen or tool has complex business requirements or if data is pulled from related records, you can use a Custom Java Block (CJB). The CJB uses the TeamConnect API to specify actions and properties for the custom block.
Note: You do not need a CJB if the page is only referencing system fields or existing custom fields or you just want to display plain HTML.
When implementing a CJB, stay within the following JavaBean conventions:
- The get method signature—
public PropertyType getPropertyName() or public boolean isPropertyName()
For example:
public String getName();
public boolean isActive(); - The set method signature—
public void setPropertyName(PropertyType value)
For example:
public void setName(String name);
public void setActive(boolean isActive);
Service and Model Classes
When you add a custom screen or tool to an object, you create page sections. When custom page requires information, access the associated service classes and call specific model methods in the CJB.
For custom screens only, because the underlying record is already available to the CJB because of the getRecord() method, you do not need to use the read() method in the record service class to access the record. If you need to access a different record of the same type, then you access the service class. For example, if you create a contact record as part of the screen, access ContactService in the code to use the create() method.
Note: If you want to perform some initialization when TeamConnect first loads a screen or tool, you must override the initialize() method. For example, if you want to access the page arguments that launch a wizard, you can use the initialize() method to access them.
OnClick and OnChange Functions
If the custom block includes a CJB, you execute actions in the CJB from the XML file using the following functions:
- invokeCustomAction—Use in custom screen XML files.
- invokeToolAction—Use in custom tool XML files.
Use these functions for onClick and onChange events. For example, you can use the invokeCustomAction function to execute an action when a user clicks a button in a screen, as shown in the following sample:
<input type="button" value="Execute action1" onClick="invokeCustomAction(this,
'cjb', 'action1', 'hi', 1, true)" />
In the previous sample, invokeCustomAction takes the following parameters:
this—The first parameter of these functions in all custom XML files.- '
cjb'—The ID of the CJB defined in the XML file. - '
action1'—The name of the Java method in the CJB. - '
hi',1,true—Arguments that the action uses.
If this button was in a custom tool, the parameters of the invokeToolAction function would include the following two parameters:
- '
action1'—The name of the Java method in the CJB. - '
hi',1,true—Arguments that the action uses.
Custom Screens
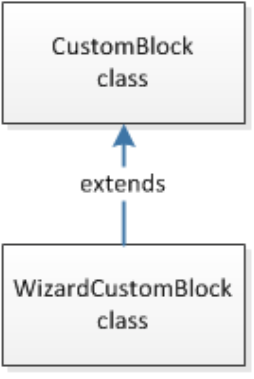
Custom screens extend the CustomBlock class and are made up of custom blocks. Any block that is not part of the original functionality of TeamConnect is a custom block. Wizard custom blocks are a type of custom block that you create for wizards.
The following diagram illustrates how custom screens work in the API.
Refer to the code sample for an example of a custom screen.
Wizard Custom Screens
As shown in the previous diagram, the WizardCustomBlock class extends the CustomBlock class when you are creating a screen for a wizard. As a result, any custom block can be a wizard custom block. However, you cannot use a wizard custom block for a custom screen because wizard blocks may contain wizard parameters.
You can use wizard parameters in two ways:
- To pass data from one page to another.
When you add a wizard parameter to pass data, the parameter does not automatically appear in the wizard block.
To add a wizard parameter, use the Parameters object method for adding the specific type of parameter. For example, the following code adds text and boolean parameters.
getParameters().addTextParameter("text", "Text", "default value");
getParameters().addBooleanParameter("action boolean", "action boolean", false);
After you add the parameter to the code, you can refer to it on any other wizard page by the String name of the parameter. Retrieve the parameter using the get method for the parameter type. In the case of the previous two parameters, use the following code to retrieve the parameters.
getParameters().getTextParameterValue("text"); getParameters().getBooleanParameterValue("action boolean");
- To display a parameter field on a wizard custom screen.
To add a parameter to the wizard screen, you must define it on the Page Components page in the Setup. From the XML file, you can use the tc:WizardParameter tag to display the parameter on the wizard custom screen.
The code samples in this section provide an example of how to use CJB files to display the following block in a contact object. When you click one of the buttons in the screen, the system creates or updates a history entry.
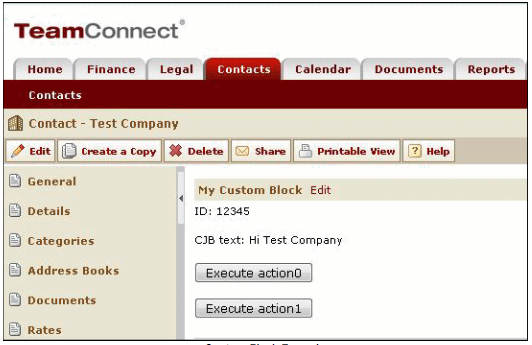
CJB File
The following code sample provides the CJB file for the custom block example.
import com.mitratech.teamconnect.enterprise.api.custom.CustomBlock; import com.mitratech.teamconnect.enterprise.api.model.Company;
import com.mitratech.teamconnect.enterprise.api.model.Contact;
import com.mitratech.teamconnect.enterprise.api.model.History;
import com.mitratech.teamconnect.enterprise.api.model.Person;
import com.mitratech.teamconnect.enterprise.api.service.HistoryService;
// Contact CJB example
public class MyCustomBlock extends CustomBlock<Contact> {
@Override
public void initialize(java.util.Map<String, String> pageArgs) {
// Perform some custom initialization }
// Display something on the screen (see XML) public String getText() {
Contact contact = getRecord(); if (contact instanceof Person) {
return "Hi " + ((Person) contact).getFirstName(); } else {
return "Hi " + ((Company) contact).getName(); }
}
// Execute a user action (see XML) public void action0() {
if (isDebug()) { logDebug("action0 executed");
}
// Create a History
HistoryService historyService = platform.getHistoryService();
History newHistory = historyService.newHistory("Action0 button was clicked by " + platform.getUtilityService().getCurrentUser().getDisplayName(), getRecord());
historyService.create(newHistory); }
// Execute a user action with arguments (see XML)
public void action1(String arg1, int arg2, boolean arg3) {
try {
// Update History
History lastHistory = platform.getHistoryService().getLastHistory(getRecord());
lastHistory.setNote(String.format("Arguments passed to method were arg1=%s, arg2=%d, arg3=%b", arg1, arg2, arg3));
platform.getHistoryService().update(lastHistory); } catch (Exception e) {
logError("Error in action1", e); }
}
)
)
Here's how the previous CJB sample works:
- The beginning of the code extends
CustomBlock. When you extendCustomBlock, the object type must match the object for which you are defining the CJB file. Because the code in this sample is for the contact object, the CJB file extendsCustomBlock<Contact>with the following code.
public class MyCustomBlock extends CustomBlock<Contact>
- The body of the
initialize()method includes any initial processing. The sample overrides theinitialize()method to access the page arguments that launch the screen.
@Override
public void initialize(java.util.Map<String, String> pageArgs)
- The sample retrieves the contact record with the custom block.
Contact contact = getRecord();
Note: Because the CJB retrieves the contact record with this code, it does not need to performing a ResourceService read() action.
- The following code displays the contact name fields on the screen after retrieving the object.
public String getText() {
Contact contact = getRecord(); if (contact instanceof Person) {
return "Hi " + ((Person) contact).getFirstName();
} else {
return "Hi " + ((Company) contact).getName();
}
}
- When the user clicks the action0 button, the following code executes in response to the user action:
- The system checks if the logger for the custom code is enabled for the Debug level. If true, the system logs a message.
if (isDebug()) { logDebug("action0 executed");
}
- The code accesses the HistoryService class using the
Platformclass.
HistoryService historyService = platform.getHistoryService();
- The system creates a new history entry with the name of the user who clicked the button.
History newHistory = historyService.newHistory("Action0 button was
clicked by " +
platform.getUtilityService().getCurrentUser().getDisplayName(), getRecord());
historyService.create(newHistory);
- When the user clicks the action1 button, the following code executes with arguments in response to the user action:
- The action lists the three arguments.
public void action1(String arg1, int arg2, boolean arg3) {
- The system tries retrieves the most recent history and updates the note of the entry.
try {
// Update History History lastHistory =
platform.getHistoryService().getLastHistory(getRecord());
lastHistory.setNote(String.format("Arguments passed to method were arg1=%s, arg2=%d, arg3=%b", arg1, arg2, arg3));
platform.getHistoryService().update(lastHistory);
}
- If the system cannot perform an update, the code logs an error.
catch (Exception e) { logError("Error in action1", e);
}
}
XML File
The following code sample provides the XML file for the custom block example. See Creating Block XML Files for more information about creating XML files.
<?xml version="1.0" encoding="UTF-8"?>
<tc:transform version="4.0" xmlns:tc="http://www/w2.prg/1999/XSL/Transform">
<tc:blockTemplate>
<tc:useClass id="cjb" name="MyCustomBlock"/>
<!-- Display a system field -->
ID: <tc:field name="enterpriseEntity.idNumber" />
<br/><br/>
<!-- Display a dynamic value -->
CJB text: <tc:out value="${cjb.text}" />
<br/><br/>
<!-- Execute a cjb action without arguments -->
<input type="button" value="Execute action0" onClick="invokeCustomAction(this, 'cjb', 'action0')" />
<br/><br/>
<!-- Execute a cjb action with arguments -->
<input type="button" value="Execute action1" onClick="invokeCustomAction(this, 'cjb', 'action1', 'hi', 1, true)" />
</tc:blockTemplate>
</tc:transform>
Here's how the previous XML file works:
- The tc:useClass tag references the Java class, as shown in the following code.
<tc:useClass id="cjb" name="MyCustomBlock"/>
This tag includes the following attributes:
name—The name of the Java class.id—An alias for the Java class. The invokeCustomAction function refers to the Java class using this alias.- The following code displays a number system field and a text field with a dynamic value.
ID: <tc:field name="enterpriseEntity.idNumber" /> CJB text: <tc:out value="${cjb.text}" />
- The following code executes an action without arguments and an action with arguments. This code provides an example of how to use the invokeCustomAction function. When you click a button, you call invokeCustomAction, which submits the page and causes the method in the Java class to execute. Methods can also execute with arguments, as shown in the second invokeCustomAction function.
<input type="button" value="Execute action0" onClick="invokeCustomAction(this, 'cjb', 'action0')" /><input type="button" value="Execute action1" onClick="invokeCustomAction(this, 'cjb', 'action1', 'hi', 1, true)" />
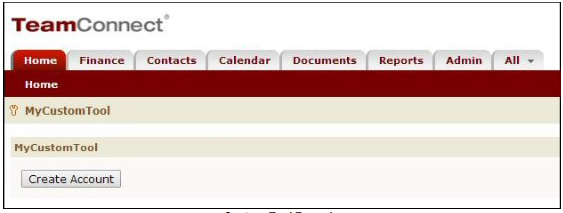
Custom Tools
Custom tools extend the CustomTool class. Code for custom tools is similar to code for custom screens.
Refer to the code sample for an example of a custom tool.
The code samples in this section provide an example of how to use CJB files to display the following block in a custom tool.
Java File
The following code sample provides the CJB file for the custom block example.
import com.mitratech.teamconnect.enterprise.api.custom.CustomTool; import com.mitratech.teamconnect.enterprise.api.model.Account;
public class MyCustomTool extends CustomTool
{
public void createAccount() {
String accountName = "New Account";
BigDecimal allocationLimit = new BigDecimal(1000); Date startDate = new Date();
Date endDate = DateUtils.addYears(startDate, 1);
Account newAccount = platform.getAccountService().newAccount(accountName, allocationLimit, startDate, endDate);
platform.getAccountService().create(newAccount);
}
}
Here's how the previous CJB sample works:
- The beginning of the code extends
CustomTool, as shown in the following code.
public class MyCustomTool extends CustomTool
- The sample accesses the AccountService class using the
Platformclass and creates a new account object called New Account.
String accountName = "New Account";
BigDecimal allocationLimit = new BigDecimal(1000); Date startDate = new Date();
Date endDate = DateUtils.addYears(startDate, 1);
Account newAccount = platform.getAccountService().newAccount(accountName, allocationLimit, startDate, endDate)
- The sample executes the create() method to create a new account from the tool.
platform.getAccountService().create(newAccount);
XML File
The following code sample provides the XML file for the custom tool example. See Creating Block XML Files for more information about creating XML files.
<?xml version="1.0" encoding="UTF-8"?>
<tc:transform version="1.0" xmlns:tc="http://www.w3.org/1999/XSL/Transform">
<input id="createAccount" name="createAccount" type="button" onclick="invokeToolAction('createAccount', 'createAccount');" title="<teamconnect:message key='button.yes'/>" value="<teamconnect:message key='button.yes'/>" />
</tc:transform>
Here's how the previous XML sample works:
- When you save this XML file, you give it the same name as the Java file. The system knows that the XML file refers to the Java file of the same name.
- The <input> tag includes the following parts:
- The ID, the name, and the type of
<input>tag.
id="createAccount" name="createAccount" type="button"
- The onClick event with the invokeToolAction function. When you click the button, you call
invokeToolAction, which submits the page and causes the method in the Java class to execute.
onclick="invokeToolAction('createAccount', 'createAccount');
- The title and value of the button with a custom key that you can internationalize. To use this code, replace button.yes with a custom internationalization key for this button.
title="<teamconnect:message key='button.yes'/>" value="<teamconnect:message key='button.yes'/>"
Scheduled Actions
The Scheduled Actions tool controls actions that are scheduled to execute at specific times in the future. When you add a new scheduled action from the tool, you can select a Java class from the Action drop-down.
All scheduled actions that you create through the API automatically save to the Scheduled Actions tool.
In the API, the following interfaces represent scheduled actions:
ScheduledActionService—Includes methods that you use to create, delete, activate, and retrieve scheduled actions.ScheduledActionStatus—Includes methods that you use to return information about each scheduled action.Parameter—Includes methods that you use to return information about parameter fields for the scheduled action.Schedule—Includes methods that you use to return information about the start date, end date, and how often the scheduled action occurs.
Adding Java Classes for Scheduled Actions
You use the API to create a Java class for the scheduled action. After you have a file for the Java class, you can add it to the Scheduled Actions folder in TeamConnect and select it from the Actions drop-down list.
The action in the following code sample retrieves a text parameter, creates a new person contact, and adds an address to the contact.
import com.mitratech.teamconnect.enterprise.api.model.Contact; import com.mitratech.teamconnect.enterprise.api.model.Address;
import com.mitratech.teamconnect.enterprise.api.service.ContactService; import com.mitratech.teamconnect.enterprise.api.custom.ScheduledCustomAction;
public class SampleActionClass extends ScheduledCustomAction {
@Override
public void action() {
//Retrieve the contact service from platform.
final ContactService contactService = platform.getContactService();
//retrieves a text parameter
String paramCity = getParameters().getTextParameterValue("city");
//create a new contact of type person.
Contact cont = contactService.newPerson("firstName", "lastName");
//add a business address to the new contact.
Address address = cont.addAddress("BUS1").setCity(paramCity).setState("TX");
//create new contact
Contact createdContact = contactService.create(cont);
}
}
Using the API with Scheduled Actions
You can use ScheduledActionService to do most of the actions you can do on the Scheduled Actions tool page. Also like the tool, you cannot update scheduled actions. You can only delete or deactivate existing actions.
When you create a scheduled action using the API, you reference a Java class in the Scheduled Actions folder. If the Java class is not in the folder, you can add it through the API using DocumentService. The name of the Java class in the following code sample is ActionClass.
public class MyRule extends CustomAction<Project> {
@Override
public void action(Project project) {
//the action class for the scheduled action. Class<ActionClass> actionClass = ActionClass.class;
// Retrieve the service
ScheduledActionService scheduledActionService = platform.getScheduledActionService();
// Build parameters
Parameters parameters = scheduledActionService.newParameters(); parameters.addBooleanParameter("isAThing", "This is a thing", false);
parameters.addProjectParameter("triggeringProject", "Project responsible for the action", project);
//create a new weekly schedule. Calendar cal = Calendar.getInstance(); cal.set(2014, 06, 19);
Schedule schedule = Schedule.createWeekly(cal.getTime(), 2);
ScheduledActionStatus generatedUniqueId = scheduledActionService.scheduleAction(actionClass, parameters, schedule);
}
}
public class ActionClass extends ScheduledCustomAction {
@Override
public void action() {
// Repeated action code
}
}
If you want to get a scheduled action from the tool, you can use the getScheduledAction() method, as shown in the following sample.
ScheduledActionStatus scheduledActionStatus = scheduledActionService.getScheduledAction("uniqueName");
If you want to deactivate a scheduled action using the API, you can use the deactivate() method, as shown in the following sample.
scheduledActionService.deactivate("uniqueName");