
TeamConnect Tasks and Appointments in Outlook
Calendar appointments and tasks have a bi-directional sync with TeamConnect and can be created either in TeamConnect or in Outlook.
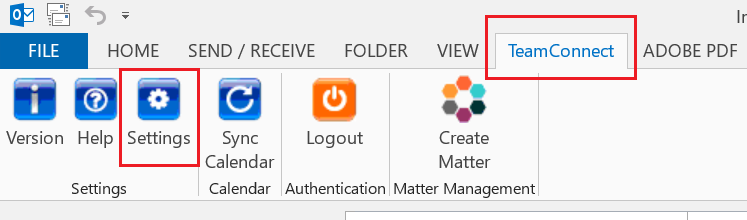
Turn the TeamConnect Email Pane off/on
This new checkbox setting allows users to enable/disable the TeamConnect pane in Outlook.
- To find this setting, open Outlook and select the TeamConnect tab at the top of your Outlook screen then select the Settings button.
- Navigate to the Options tab.
- Check the Email Pane setting to show the TeamConnect pane. Uncheck the setting to disable the TeamConnect Pane.
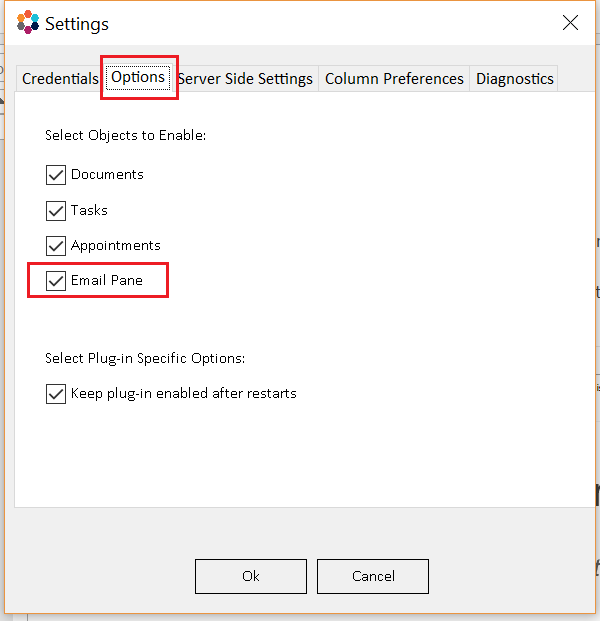
- Click OK and resart Outlook.
Note: This setting does not uninstall Office Suite, it simply hides the TeamConnect settings in Outlook.
Tasks
TeamConnect tasks displayed in Outlook include the name of the project associated with the task. To locate your tasks, go to the bottom of your Outlook window and select Tasks. Your task window will initially display your To-Do List arranged by due date. To view your tasks, click on Tasks on the left-hand side of the screen.

Note: This add-in works with Tasks and Appointments based on the user's primary email address. Users will need to have their emails set up properly in order to sync Tasks and Appointments to TeamConnect or do reassignments and add attendees. Additionally, email addresses per users should be unique. If they are not unique, the behavior can manifest in not being able to sync appointments.
Opening Tasks
Tasks can be opened through Outlook without logging in to the TeamConnect website. This keeps users from having to switch between applications and saves time.
To open a task, first select Tasks at the bottom of the page in Outlook. Under My Tasks, click on
Tasks. Double-click any task to open it in a new window.
Updating Information
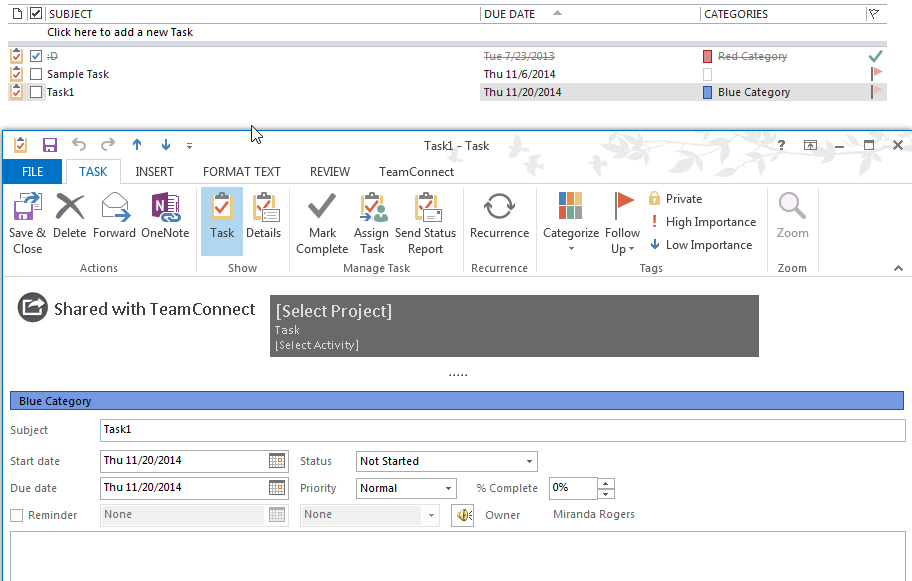
It will be necessary, at times, to update information on a task, like changing the due date or status of the project. All changes can be done through Tasks in Outlook and the changes will automatically be sent back to TeamConnect.
Double-click on a task to open it. From the pop-up window, all data fields can be changed to reflect the updated task. Click on Save & Close.
If you have the correct user permissions, the following fields can be updated in Outlook and sent back to TeamConnect: Subject, Completed Date, Project Name, Start & End Date, % Complete, Status, Activity, and Category. You will receive an error message if your permissions don't allow you to edit these fields.
 |
From outlook, Tasks Owners can assign tasks to other TeamConnect users. The new Assignee will be updated in their TeamConnect site. Ensure the new Assignee's email address is correct, otherwise the task will be assigned to the current user. |
Updating Task Activities
- Double-click a task to open it in a new window for updating. Click [Select Activity] and select or deselect the check-box(es) in the pop-up window.
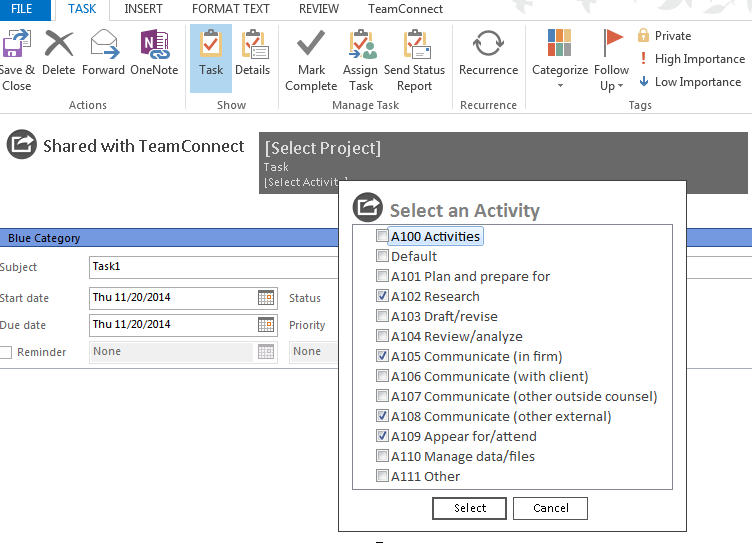
- Click on Save & Close.
Creating Tasks
Tasks can be created through Outlook without logging in to the TeamConnect website. This keeps users from having to switch between applications and saves time.
|
Creating a new task The instructions below detail how to create a new calendar task in Outlook, assign it to a TeamConnect project, and send it back to TeamConnect.
The task will be assigned to the user who created it, unless directly assigned to another person.. Click on the Considerations:
|
 |
 next to reminder time to choose a time from the drop-down box. Note: Setting a start date will auto-create a due date and reminder date (if the reminder check-box has been selected). Click on
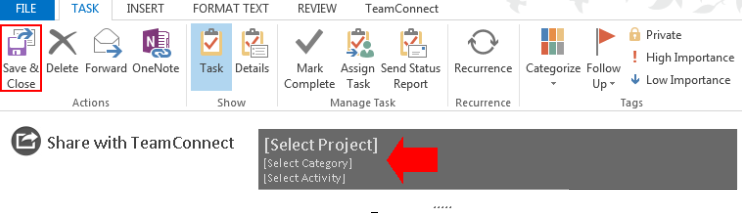
To sync the new task with the TeamConnect application:
- Click
 next to Share with TeamConnect and choose Update in TeamConnect.
 - Click [Select Project] to assign the task to a dispute.
- Click [Select Category] and select Internal Tasks, Other Vendor Fees, Outside Counsel Fees, or Task.
- Click [Select Activity] to select a description of the type of task you are creating.
- Click Save & Close.
TeamConnect Appointments in Outlook
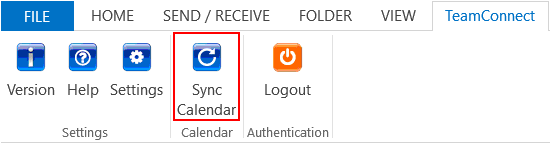
You can sync appointments in TeamConnect into Outlook with the add-in. You simply need to go to the TeamConnect tab in the ribbon and select the Sync Calendar button.
New Appointments
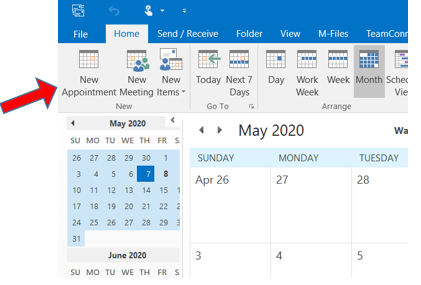
Navigate to the Calendar in Outlook
Click on either the appointment slot on the calendar where you wish to create an appointment or on the New Appointment icon in the top ribbon
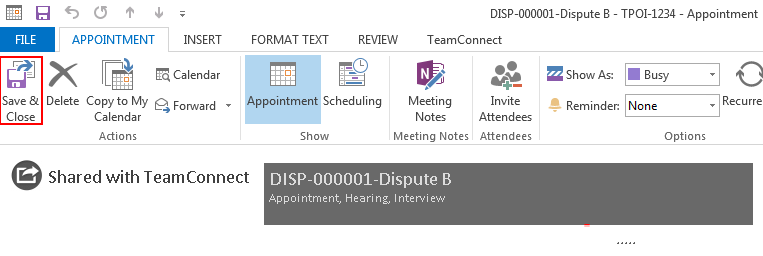
At the top of the appointment window, click on the button that says Share as seen below. A box will appear that allows you to select a project to share this appointment with in TeamConnect.
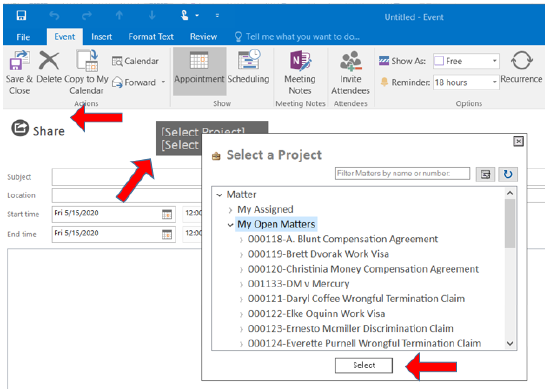
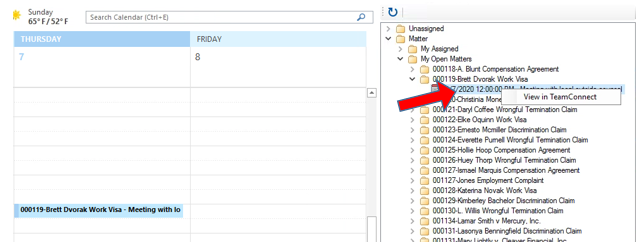
Select a project, provide any other appointment details as you normally would, and hit save. The appointment will automatically sync with TeamConnect and can be found in TeamConnect, or in Outlook as seen below:
Updating Categories
TeamConnect categories can be updated by opening the appointment from Outlook without having to log in to the TeamConnect application.
Double-click an appointment from the Calendar to make adjustments. The category title is located under dispute title, and will display any category that was selected when first created. Click the category title (Appointment). Add new categories or deselect the current category to change the visible data and press Select to confirm. Note: If more than one categories are selected, all categories will be displayed, separated by commas.
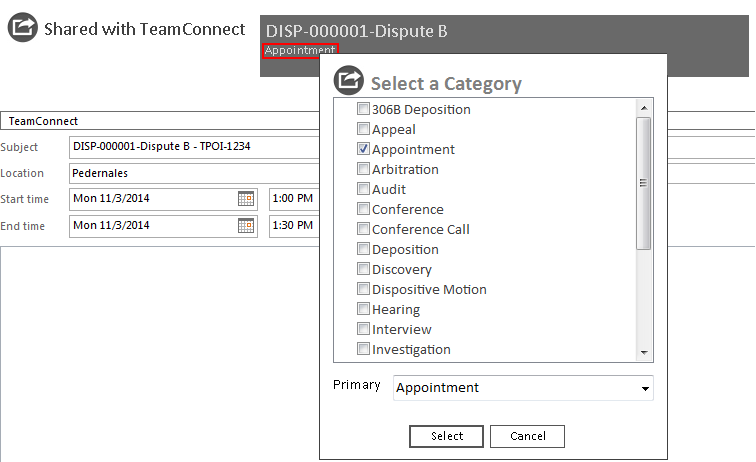
Click Save & Close.
Opening Appointments
TeamConnect appointments are displayed in the TeamConnect plug-in located on the right-hand side of Outlook Calendars. To open an appointment, double-click the blue appointment box within the calendar, or double-click the ![]() icon in the TeamConnect plug-in pane.
icon in the TeamConnect plug-in pane.
Note: Appointment details can be expanded by hovering your mouse over an appointment within the Outlook calendar.

Deleting Appointments and Syncing
For nearly all users, the important takeaway is that removal of users from appointments or removal of entire appointments in TeamConnect will be reflected in Outlook. However, if an appointment is deleted in Outlook, it will NOT be deleted in TeamConnect. These are some example user scenarios to show how the delete appointment functionality works between Outlook and TeamConnect.
Scenario 1
i) Create an appointment in your Outlook calendar with yourself as the only attendee and sync.
ii) In TeamConnect, you will see the appointment, your name as the attendee and "Will Attend".
iiI) Delete / Cancel the appointment in the Outlook calendar and sync.
iv) In TeamConnect, the appointment is not deleted and the assignee is marked as "Will Not attend".
v) The appointment must be deleted in TeamConnect to be deleted from the appointment list.
Scenario 2
i) Create an appointment in the Outlook calendar with two attendees - User A and User B - and sync.
ii) In TeamConnect, the appointment appears with both User A and User B showing as "Will Attend".
iii) User B deletes/declines the appointment in their Outlook calendar.
iv) IAfter a sync, in TeamConnect, User B shows as "Will Not Attend" for that appointment.
Scenario 3
i) Create an appointment in the Outlook calendar with User A and User B.
ii) User B marks tentative for the appointment in the Outlook calendar.
iii) In TeamConnect, User B shows as "Tentative" for the appointment.
Scenario 4
i) Create an appointment in the Outlook calendar with multiple attendees and sync.
ii) In TeamConnect, the appointment appears and all attendees show as "Will attend".
iii) Delete the appointment in Outlook and sync.
iv) In TeamConnect, the appointment shows "Will Not attend" for all attendees but the appointment is not deleted.
Scenario 5
i) Create an appointment in the TeamConnect and sync in Outlook.
ii) Delete the appointment from TeamConnect.
iii) After sync, the appointment will be removed from Outlook.
Note: GSuite sync deletes tasks and appointments.
TeamConnect Instructions for Appointments and Tasks
Log into TeamConnect and click on the Matters module in the top ribbon:
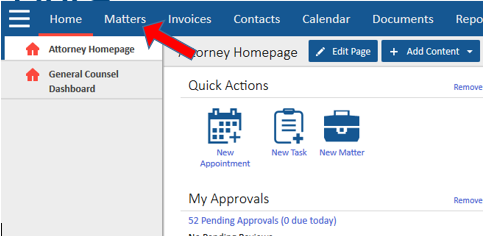
Select a matter from the My Open Matters table by clicking on the highlighted name of the matter.
The record will open up and a sub-menu will be available on the
left-hand side. Find and click on the Events sub-tab. 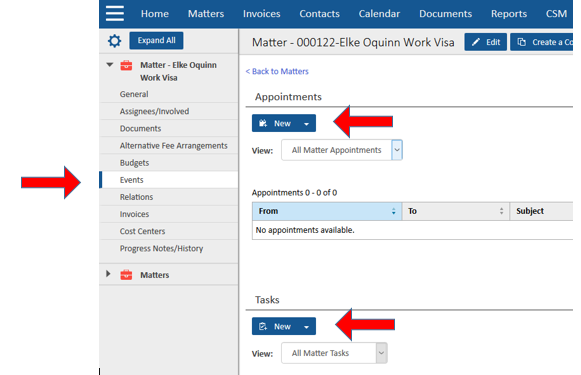
The “New” button prompts a wizard to guide you through appointment or task creation. Assignment of contacts to the record, dates and times and other options are available to capture information about the appointment and task.
Save and View will create the appointment/task, and make it visible both from within TeamConnect as well as Outlook.