
Creating and Updating Deadlines
When you create deadlines, you create a table with two types of deadlines. The table has rows of deadline dates for the trigger events as well as deadlines for events associated with the trigger event.
Note: Tables and buttons aside from the Create Deadlines button will be hidden when viewing Deadlines on a matter for the first time.
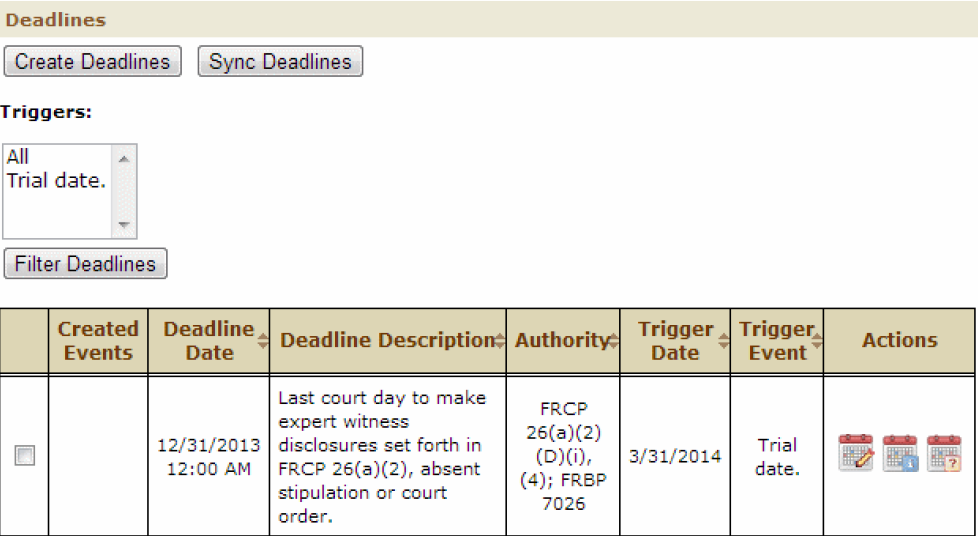
Example of the Deadlines Page
The following table includes descriptions of the columns in the deadlines table.
Deadlines Table
|
Column Name |
Description |
|---|---|
|
Created Events |
Indicates whether a task or appointment has been created for the deadline. This column includes the following icons:
Click an icon to open the task or appointment. |
|
Deadline Date |
The date that the trigger event or deadline associated with the trigger event must be complete. Click the column name to sort the column by date. |
|
Deadline Description |
The description of the event or deadline. Click the column name to sort the column alphabetically. |
|
Authority |
The name and number of the court rule for the deadline. Click the column name to sort the column alphabetically. |
|
Trigger Date |
The date of the trigger event associated with deadline. This field is empty if the deadline is a trigger event. Click the column name to move all trigger events to the first rows in the table. |
|
Trigger Event |
The name of the trigger event associated with deadline. This field is empty if the deadline is a trigger event. Click the column name to move all trigger events to the first rows in the table. |
|
Actions |
Includes actions that you can perform for the deadline. Click the following icons to use them:
|
 —Task exists for deadline.
 —Appointment exists for deadline.
 —Changes the date for a deadline.
 —Lists deadline changes.
 —Opens a page for submitting a support request.
To create deadlines
- From the matter or project with the Deadlines page, click Deadlines in the left pane.
- From the Deadlines page, click the Create Deadlines button.
- From the Select Event page, select a trigger event associated with the case. You can select a trigger event in one of the following ways:
- Enter a search term in the Search all events field to select an event from a list of Search Results.
- Select an event from a list of common Quick Links.
- Navigate through the list of Categories, and click one of the events in blue. After you click a trigger event, you continue to the next page.
- From the Date & Time page, enter the Event Date of the trigger event. Click the Event Date text field for a calendar where you can select the date.
- (Optional) Enter a Time. If you do not enter AM or PM, the time defaults to PM.
- Click Next.
- From the Deadlines page, place a check-mark in the check-boxes of any deadlines for the trigger event that you want to exclude from the deadlines table.
- Click Submit.
To view all deadlines for one trigger event
- From the Deadlines page, select a trigger in the Triggers list above the deadlines table.
- Click the Filter Deadline by Triggers button.
The table updates with the deadlines for the trigger you selected. Click All in the list, and click Filter Deadline by Triggers to view all triggers events again.
To change the date for a deadline
- For the deadline you want to update, click the
 icon in the Action column.
 - Click the New date field to select a different date.
- Click Submit.
Note: If an appointment or task exists for a deadline and you change the deadline date, the date of the appointment or task updates as well.
Note: Action Events are not tied to the check box, they are specific to individual task or appointments.
If the new date does not appear in the Deadline Date field, refresh your browser. To review all the changes you have made for a deadline, click the  symbol.
To change the date for a trigger deadline
- For the trigger deadline you want to update, click the icon in the Action column.
- Click the New date field to select a different date.
- To update all the associated deadlines according to the new trigger date, do not make any changes.
To keep one or more dates the same place a check-mark in the check-boxes of any of the deadlines. Place a check-mark in Select All to change none of the deadlines associated with the trigger event. - Click Submit.
Note: If the new date does not appear in the Deadline Date and Trigger Date fields, refresh your browser.
To make a support request
If you have questions about a deadline, you can make a support request to receive a response from Aderant. Whether or not you can make a support request from Aderant depends on your contract with Mitratech.
Note: Sending a support request to Aderant is different from contacting Mitratech support.
- From the Deadlines table, click the
 symbol in the Action column for the deadline.
 - Enter a description of your question regarding the deadline in the Your question regarding this deadline is field.
- Enter your name and email address to receive a response to your question in the To whom would you like us to respond? field.
- Click Submit.