
TAP User Import Utility
Overview
The TAP User Import Utility is a tool which can be used to create, update and remove users from TAP via script, rather than having to do so manually through the administrative interface. This utility is runs through Windows PowerShell, and must be run from a windows computer or server that has HTTPS access to the TAP Application in order to run properly. This utility can be run ad-hoc as needed, or can be called by the windows scheduler or any other scheduling utility to run user-management tasks on a regular basis.
This utility requires user information to be submitted in the CSV (Comma-Separated Value) format. A typical use case for this utility is to export user information from your user management system (Active Directory, Workday, etc.) as a CSV, and then import that information into TAP using this utility. The utility also requires a valid TAP administrator account in order to login to TAP and perform the user administration.
A detailed description of the features, usage, and best-practices of this tool follow.
Setup and Configuration
This utility is distributed as a zip archive, "TAP_User_Import_Utility.zip", which can be downloaded by clicking on the following link:
Download the TAP User Import Utility
Extracting this .ZIP file will yield a TAP_User_Import_Utility directory which contains several scripts, files, and directories. This is the base directory of the utility, and will be referred to as <BASE> for the rest of this guide. You will want to exact this ZIP file on some server that will fit your organizations needs. Bear in mind that this utility needs access to the internet (so it can access TAP) and access the CSV that will contain your user information. If you are exporting your user information from a user management system such as Active Directory or Workday, consider setting up the utility on a device that can communicate with and receive exports from that system.
After extracting the <BASE> directory, you must perform a few configuration tasks to enable the utility to connect to and log into your TAP environment. Please follow these instructions:
- In the TAP Administration tab, create a new service account to act as the login account for this utility. Assign this account the 'Super Admin' role.
- In the extracted <BASE> directory, edit the connections.xml file. Update the properties in the webservice definition to reflect your TAP environment. There are three properties to update:
- The urlbase property should be updated to reflect the URL of your TAP environment. As an example, if your TAP tenant is called "default", and you are wanting to manage users in your production environment, the urlbase property should be set to "https://default.tap.thinksmart.com/prod/Portal/api". If you aren't sure what URL to use, log into your TAP environment via a web browser, and note the URL in the browser window.
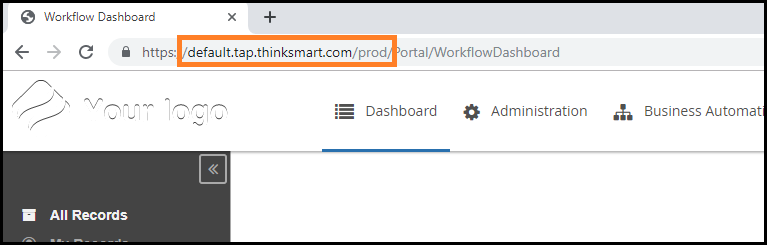
Fig. 1 - Example of the TAP URL to include in the connections.xml file - The login property should be the login value of the service account you created in step 1.
- The password property should be the password of the service account you created in step 1.
- The urlbase property should be updated to reflect the URL of your TAP environment. As an example, if your TAP tenant is called "default", and you are wanting to manage users in your production environment, the urlbase property should be set to "https://default.tap.thinksmart.com/prod/Portal/api". If you aren't sure what URL to use, log into your TAP environment via a web browser, and note the URL in the browser window.
- With these changes made, save the connections.xml file.
You are now ready to run the TAP User Import Utility.
Usage: Adding or Updating Users
Running the ImportUsers.ps1 script provided with this utility will submit any CSV files in the <BASE>\UserImports directory to TAP's User Management API. Any users detailed in the CSV file which do not currently exist in TAP will be created. Any users in the CSV file which do exist in TAP will have their information updated with whatever information is in the CSV file.
To run the ImportUsers.ps1 script, please follow these instructions:
- From your user management system, export the list of users to be added to or modified in TAP as a CSV file (please see the 'CSV Requirements' section for details on the required and optional columns as well as the formatting requirements of this CSV).
- Place the CSV file in the <BASE>\UserImports directory.
- In a powershell session, change directory to the <BASE> directory, and execute ImportUsers.ps1. (NOTE: If you are running this import via a scheduler, make certain the scheduler uses <BASE> as the working directory).
- Follow the script output to ensure that it runs without errors (or, if running via a scheduler, check the script status to ensure a successful return code).
After the script has completed running, successfully processed files will be moved to the <BASE>\UserImports\Completed directory. Files which were not processed successfully will not be moved.
NOTE: Long CSV files (those with over 500 user entries) will automatically be split up into 500-line chunks. This is because the TAP API is more reliable when running numerous relatively small files, rather than a single long file. When this happens, the chunk files will be appended with a number. So, for example, a import file called "UserImport.csv" with 1700 users will be split up into four files, called "UserImport_0000.csv", UserImport_0001.csv", etc. If this happens, the original un-split input file will be placed in the <BASE>\UserImports\Split subdirectory.
An example of the script output is provided below:
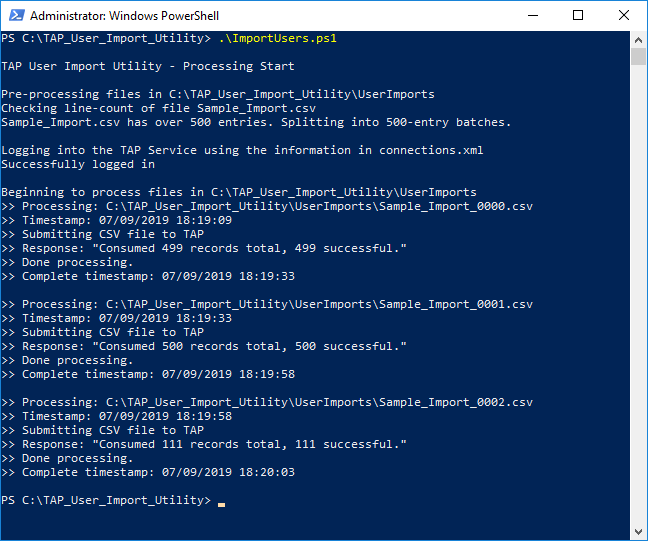
Fig. 2 - Example output of the ImportUsers.ps1 script.
Usage: Removing Users
Running the RemoveUsers.ps1 script provided with this utility will submit any CSV files in the <BASE>\UserRemovals directory to TAP's User Management API.
Any users listed in the CSV file will be removed from the TAP environment.
To run the RemoveUsers.ps1 script, please follow these instructions:
- From your user management system, export the list of users to be removed from TAP as a CSV file (please see the 'CSV Requirements' section for details on the required and optional fields as well as the formatting requirements of this CSV).
- Place the CSV files in the <BASE>\UserRemovals directory.
- In a powershell session, change directory to the <BASE> directory, and execute RemoveUsers.ps1. (NOTE: If you are running this import via a scheduler, make certain the scheduler uses <BASE> as the working directory).
- Follow the script output to ensure that it runs without errors (or, if running via a scheduler, check the script status to ensure a successful return code).
After the script has completed running, successfully processed files will be moved to the <BASE>\UserRemovals\Completed directory. Files which were not processed successfully will not be moved.
NOTE: Just as with the ImportUsers.ps1 script, if the CSV file you are submitting is above 500 entries, it will automatically be split up and submitted in 500-line batches. If this happens, the original un-split input file will be placed in the <BASE>\UserRemovals\Split subdirectory.
An example of the script output is provided below:

Fig. 3 - Example output of the RemoveUsers.ps1 script.
CSV Requirements
The CSV files that are submitted using this utility have some requirements which must be satisfied in order for the utility to work correctly. Please observe the following guidelines.
CSVs for Adding or Updating Users have the following requirements:
- CSV files should use UTF-8 character encoding.
- CSV files should end in the ".csv" file extension. Other file extensions such as ".txt" or files with no file extension will be ignored by the utility.
- The first row of the CSV must be a header row, giving a name for each column in the file.
- Each subsequent row of the CSV should contain the information for a single user, one per line.
- Because the file is a CSV, and values that have internal commas as punctuation should be enclosed in double quotes to allow CSV to parse properly. Most user management systems can do this automatically for you when exporting user information as CSV - if you have difficulty, please consult your user management system's documentation for details.
- Certain columns are required for the utility to be able to parse the file properly, while others are optional. Please note the columns:
- login - this column is required, and should be set to the user's login value (this typically will be an e-mail)
- DomainAddress - this column may or may not be required. If the login value is anything besides an e-mail, this should be set to user's e-mail address. Otherwise, this column should not be used.
- firstName - this column is required, and should be set to the user's first name.
- lastName - this column is required, and should be set to the user's last name.
- roles - this column is optional. If used, the value should be a comma separated list of TAP roles the user should have. The value of this column must be quoted, or the internal commas will cause an error in parsing the CSV.
- For example, "Role1,Role2,Role3"
- Optionally, if you have defined custom fields for user information in TAP, you may set the values of those fields in the CSV, with one field per column. The header of each column should match the Field Code of the custom field
An example CSV for Adding or Updating users follows. In this example, our environment has two custom fields (OfficeBuilding and CubicleNumber) and four roles (user, approver, designer, and super admin):
login,firstName,lastName,roles,officeBuilding,cubicleNumber
alice@tap.com,Alice,Baker,"user","Building A",1234
bob@tap.com,Bob,Smith,"approver,designer","Building B",1235
chuck@tap.com,Charles,Williams,"approver","Building A",2234
david@tap.com,David,Queens,"designer","Building C, New Annex",0103
emily@tap.com,Emily,Gibson,"super admin","Building A",4321
CSVs for Removing Users have the following requirements:
1. The CSV file must end in ".csv" - the utility specifically looks for the '.csv' file extension, any files without that file extension will not be processed.
2. The only column needed for this CSV is the 'login' column. The first line of the file should have the header 'login', and each subsequent line should be the login value of a user to be removed from the system.
An example CSV for Removing Users follows. In this example, we are looking to remove David and Alice from the example given above:
login
alice@tap.com
david@tap.com
Frequently Asked Questions
Q: The disk space use of the utility grows over time. Why is this, and how can it be prevented?
A: The base files of this utility are only a handful of KB - however, the utility does not delete any input files it processes, only moves them to either the 'complete' or 'split' subdirectories after processing completes. If your file sizes are large, you may need to clear out these directories occasionally to preserve file space. Please also note that if the utility runs into any issues while processing, some orphaned files may also not get cleared out from the temp directory - you might need to check that too.
Q: I'm specifying my custom fields in my input CSV, but they are not showing up in TAP. Why is this?
A: This could happen for several reasons. First, custom fields must be manually created in TAP before they can be imported via CSV. If you are not seeing values from the CSV show up in TAP, make sure that the custom field has been created.
Secondly, custom fields in TAP have both a 'Field Code' and a 'Field Label'. The field label is like a display name, and this is what shows up when you look at a user's profile - but the header of the column in the CSV needs to match the Field Code, which may be different. Check the Field Definitions page on the TAP Administration tab to be certain the field code matches the header in the CSV.
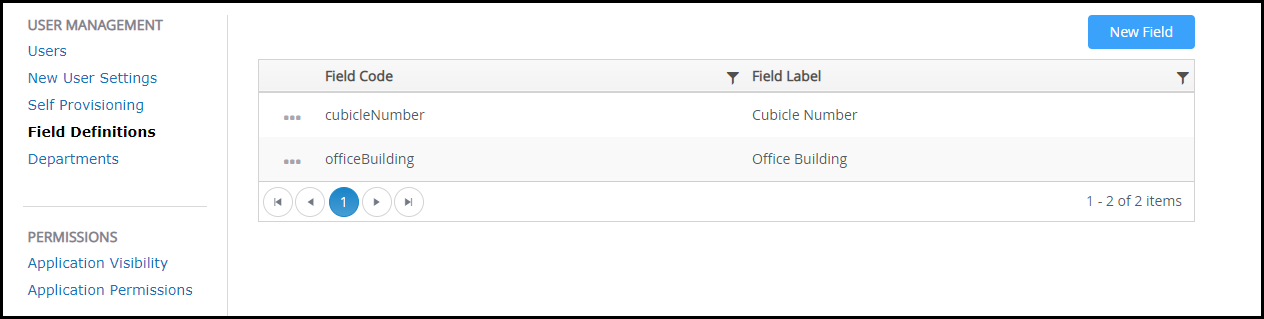
Fig. 4 - The Field Definitions page of the TAP Administration Tab. The column headers in any input CSV must match the Field Code value, not the Field Label value.
Q: If the TAP Import Process fails and returns an error message, what should I do?
A: Most failures of the import process are due to incorrectly formatted or specified input data in the CSV. As a first step of diagnostics, double-check that your CSV meets the requirements listed in the 'CSV Requirements' section.
Oftentimes, if there is an issue with a particular user entry in a CSV, it will list that row in the error message. If you see that sort of error message, double-check that row in your input CSV to make sure there are no illegal characters or formatting issues with that row.
Finally, in rare circumstances something can go wrong on the TAP back-end. When this happens, the error message will typically read either "The underlying connection was closed" or "The remote server returned an error: (500) Internal Server Error." These errors are rare, and often the result of coincidental conditions within the TAP server - often if you re-run the import, it will run successfully on re-submit, so we recommend you try that first.
If the error persists, or if you run into any errors not discussed above, Mitratech support will be happy to assist in resolving the issue. You can open a support case with Mitratech TAP support by e-mailing tapsupport@mitratech.com. When you do, please include the error log from the utility, along with the date and time the import ran, and we will be happy to assist you.
Q: I am trying to import 'department' and receiving an error.
A: The system has a feature that enables users to be added to "Assigned Departments" defined in TAP via import. This "Assigned Departments" is a system field. The system will look for a column in the CSV called "departments" and add those defined departments to the user in TAP. These departments must exist in TAP for them to be added. If the systems does not find a column named "departments" it looks for a column named "department" and will add that to the "Assigned Departments" field on the user.
If you are trying to add a user to the "Assigned Departments" in TAP please make sure the proper departments exist in TAP.
If you are trying to add a user to a User Defined Field in TAP please double check the field code. If the field code is 'department', you will need to add column to the CSV named "departments" and keep that field blank. The system will see that column and not try to check the 'department' column and add users to the "assigned Department".
Q: I have some other question that is not covered here.
A: We'd be happy to assist. Please reach out to Mitratech TAP support via the support portal with your question.