
Salesforce Keys
Salesforce Integration (oAuth)
Overview
This topic outlines the steps to setup a new Salesforce oAuth integration with TAP, and to add Salesforce elements to a workflow once the oAuth integration has been completed. You will need to have both TAP and Salesforce open (in separate browser windows or tabs), and be logged in to both accounts.
Salesforce oAuth Integration
.jpg?revision=1)
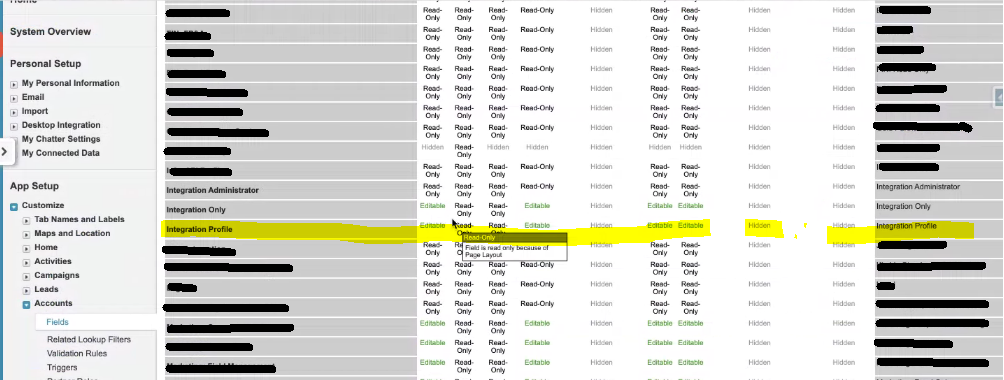
Salesforce Permissions Settings
Salesforce Sandbox and developer accounts typically have these permissions set to 'Editable' for all profiles.
In production instances of Salesforce, these settings are typically changed by security teams. To ensure the TAP and Salesforce API communication is successful, the 'Integration Profile' permissions must be set to 'Editable.'
A symptom of the wrong permissions is typically 'Unable to get reference object' when configuring a Salesforce field on the workflow.
To setup a new Salesforce oAuth integration:
- Open Salesforce (www.salesforce.com) and log in to the account from which you wish to create the API connection.
- Once logged in, navigate to the Setup page (located in the top right corner of the home page).
- From the Build menu, select Create > Apps.
- On the Apps page, under the Connected Apps section, click the New button.
- Name the new app and provide the user email to be associated with it.
.jpg?revision=1)
- Select the Enable OAuth Settings checkbox, add all Available OAuth Scopes to the Selected OAuth Scopes list, then click Save.
- Open and log in to TAP. Click the Administration
.jpg?revision=1) button in the TAP Toolbar to access the Administration module.
button in the TAP Toolbar to access the Administration module.
- The User page is displayed by default.
- Click the Salesforce Keys link in the INTEGRATIONS menu to display the Salesforce Keys page. Click the New Salesforce key button.
.jpg?revision=1)
- Copy and paste the callback URL (found at the bottom of the page) into Salesforce and click "Save".
- Return to TAP. We now need to input the "Key Label" (anything relevant) and copy over the "Consumer Key" and "Consumer Secret" from the Salesforce page onto TAP. *Do NOT click "Save" yet*
- Wait 2 - 10 minutes for the integration from Salesforce to take effect and then click "Save".
- A new screen will pop up on TAP asking you to allow or deny access - click "Allow".
The oAuth integration is now set up and can be selectively used in any workflow.
Salesforce on Workflows
Once Salesforce oAuth integration setup has been completed, you can add a Salesforce element to any workflow.
To add a Salesforce element to a workflow:
.jpg?revision=1)
- Open the desired workflow in the Designer.
- Add a new
.jpg?revision=1) Salesforce records field to the workflow form.
Salesforce records field to the workflow form.
- Click the new Salesforce record field in the workflow form, then click the
.jpg?revision=1) Salesforce Options button in the toolbar.
Salesforce Options button in the toolbar.
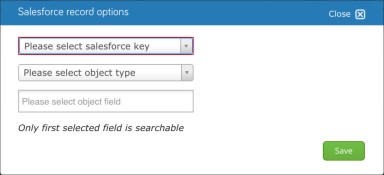
- The Salesforce record options dialog displays.
- The Salesforce record options dialog displays.
- Select the newly created Salesforce key from the Please select salesforce key menu.
- Select the desired object type from the Please select object type menu.
- Select the desired object field from the Please select object field menu.
- When all desired options have been selected, click the Save button to save your changes and close the Salesforce record options dialog.
Example Salesforce Workflow Use Case
In the example below we will build a workflow that puts attachments into a Salesforce account that has been linked to this environment.
Start by setting up a simple workflow that has an Attachment form field on the form and has a basic 2 stage Workflow. Once this is built click on the relationship between the two stages and notice a button on the ribbon bar called “Salesforce Supoort”. Click this button to customize what will be sent to Salesforce.

Within Salesforce support you can customize everything that you need to do for your workflow. For our example we will be ‘Adding a new object”, selecting the correct Salesforce key and selecting the Object Type. The Account Name will be Custom Value and I will call mine Test.

Then click “Options” and we will be adding the form field called “Attachments” that we added to our form to the section of Options called “Attachments”. The goal of this is to bring attached forms into Salesforce when we go through this relationship.

Now run a workflow and notice that when the workflow passes through this stage it will add attached documents into Salesforce as you can see in the screenshot below.

See that we have created a test account and it was created with an attachment that I put on it called “Test”.