
General Information
The TAP Toolbar
The TAP Toolbar gives you access to the six modules available through the TAP system. The TAP modules, and the functions available through each module, are described below.
.jpg?revision=1)
| Toolbar Button | Module | Description |
|---|---|---|
.jpg?revision=1) |
Dashboard | The Dashboard lets you initiate, monitor and manage workflows, and view workflow statistics. The Dashboard is a tabbed screen that gives you access to the following functional areas:
|
.jpg?revision=1) |
Create and Send | The Create and Send module lets you simultaneously send documents requiring signatures to multiple recipients.
|
.jpg?revision=1) |
Administration | Access to the TAP system is available to authenticated users only. The Administration module lets you create and manage user accounts for your TAP system. The Administration module gives you access to the following functional areas:
|
.jpg?revision=1) |
Business Automation | The Business Automation module lets you automate your standard business processes and practices by developing workflows that are automatically routed through your organization. The Business Automation module is a tabbed screen that gives you access to the following functional areas:
|
.jpg?revision=1) |
Document Library | The Document Library module is a repository for document templates, e-signature (Echosign) transactions and other files associated with workflows in your TAP system.The Document Library module gives you access to the following functional areas:
|
.jpg?revision=1&size=bestfit&width=25&height=17) |
Reports | The Reports module lets you view reports and analytics for business processes managed through the TAP system. |
Login and Logout
Access to the TAP system is available to authenticated users only. You must provide a valid username and password to log into the TAP system. You must also log out of the system to prevent unauthorized access.
NOTE
If your TAP system is configured for "self-registration," a Register link is shown on the Login screen. You can use this link to self-register a user account.
NOTE
REMEMBER TO KEEP YOUR PASSWORD SECURE! DO NOT tell your password to anyone. DO NOT write your password down. You will use your password for all logins, so remember it! If you forget your password or think your password may be compromised, you can change it at any time using the Forgot Password feature.
Logging Into the TAP System
The Login screen displays when you initially access the TAP system. You must provide a valid username and password to log into the TAP system. You can also reset your password if you forget it. If you do not have a valid user account, contact your TAP system administrator.
To log into the TAP system:
-
Enter your username and password in the associated text boxes.
- Your password is case-sensitive. BE SURE to enter your password using upper and lower-case characters as appropriate.
- Click the Log In button.
- If your login attempt is unsuccessful:
- If you enter an invalid username or password, an advisory dialog displays the message "Login failed. Invalid username or password"
- Click the OK button on the dialog to return to the Login screen. Re-enter your username and/or password, as necessary, then click the Log In button.
- If your login attempt is successful:
- The Workflow Dashboard displays.

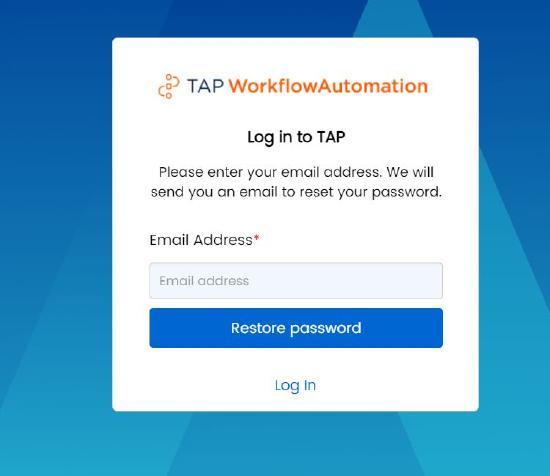
To reset your password:
If you forget your password or feel your password may have been compromised, you can use the Don't remember your password? feature to reset your password.
- Click the Don't remember your password? link on the Login screen.
- The Forgot Password dialog displays.
- Enter the email address associated with your account in the Email Address text box, then click the Restore Password button.
- A confirmation message displays and an email containing instructions for resetting your password is sent to the specified email address.
- Click the Back button on the confirmation message to return to the Login screen.
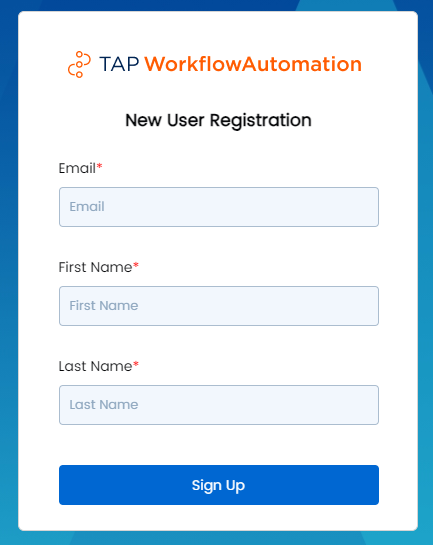
Using Self-Registration
If your TAP system is configured for "self-registration," a Register link is shown on the Login screen. You can use this link to self-register a user account. Your account will be assigned to a default user role and department.
To self-register a user account:
- Click the Register link on the Login screen.
- The New User Registration screen displays.
- Enter your email address in the Email text box.
- If you enter an email address that is already registered with the system, the message "Email address is in use" displays. Use a different email address, or contact your TAP system administrator for assistance.
- Enter your name in the First Name and Last Name text boxes.
- Click the Sign Up button to register your user account.
- The message "Your registration is being processed" displays.
- You will receive an email with instructions to complete your registration.
.png?revision=1&size=bestfit&width=264&height=333)
To prevent unauthorized access to the TAP system, you must log out of the TAP system.
- Click the
.jpg?revision=1) icon in the TAP Toolbar, then choose Sign Out.
icon in the TAP Toolbar, then choose Sign Out.
- The Login screen displays.
To prevent unauthorized access to the TAP system, you will be automatically logged out of the system if your workstation remains idle for approximately ten minutes. Prior to being logged out, an Idle Session Timeout warning screen displays, and a two-minute timer starts. When the session timer expires, your current session is terminated.
- To remain logged into the system, click the Refresh button.
- To exit your current session, click the Sign Out button, or,allow the session timer to expire.
- If you click Sign Out and there are unsaved changes that have been made to a form or workflow, the message "Do you want to leave this site? Changes you made may not be saved." displays.
- Click Leave to exit TAP without saving your changes.
- Click Stay to stay logged in to the system. You may then save your changes.
.jpg?revision=1)
NOTE
If the session timer expires and there are unsaved changes that have been made to a workflow in the Workflow Dashboard, the workflow "auto-saves" on timeout if the "Save" functionality is enabled for the workflow. You can return to the "in process" workflow by navigating to My Records in the Workflow Dashboard and selecting Edit Request from the Actions menu for the automatically saved workflow.
NOTE
If the session timer expires and there are unsaved changes that have been made to a form or workflow in the Designer, the form/workflow "auto-saves" on timeout if the Auto-save on Timeout property is enabled for the workflow.
Utility Functions
There are several features and functions that are common throughout the TAP system. Procedures for using these features and functions are provided below, and are referenced where applicable in other sections of this guide.
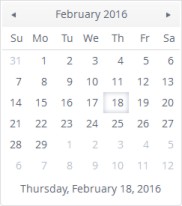
Using the Date Entry Calendar
Several functions throughout the TAP system require you to specify a date. If you wish, you may use the Date Entry Calendar to select the desired date.
To use the Date Entry Calendar:
.jpg?revision=1) |
1. Click the
2. To scroll the calendar month-by-month:
|
.jpg?revision=1) |
3. To scroll the calendar year-by-year:
|
.jpg?revision=1) |
4. To scroll the calendar in 12-year increments:
|
.jpg?revision=1) icon next to the date entry text box.
icon next to the date entry text box..jpg?revision=1) and
and .jpg?revision=1) buttons to scroll the calendar backwards and forwards one month at a time.
buttons to scroll the calendar backwards and forwards one month at a time.Working with Lists
Lists are used throughout the TAP system to aid in locating workflows, forms, related documents and other information. The TAP system provides several features that help you navigate and view the contents of lists, search lists to locate a specific entry, sort the contents of lists according to a selected sort key, and filter lists to show a subset of an entire list.
Navigating Lists
Controls for navigating a list are shown in the lower left corner of the list. The page number for the currently displayed page is highlighted in blue. Most lists display 10 entries per page. Some lists let you specify the number of entries shown on each page of the list. Typical navigation tools are shown below. The specific tools available vary depending on the list you are viewing.
.jpg?revision=1)
To navigate a list:
- Use the
.jpg?revision=1) and
and .jpg?revision=1) buttons to scroll the list backward or forward one page at a time.
buttons to scroll the list backward or forward one page at a time. - Use the
.jpg?revision=1) and
and .jpg?revision=1) buttons to scroll the list to the first or last page.
buttons to scroll the list to the first or last page. - Click a page number to scroll the list to a specific page.
- For lists that include an items per page menu, select the number of entries to be shown on each page of the list; 10, 20, 50 or 75.
Searching Lists
The Search feature lets you locate entries in a list that contain a specified search term (keyword) in the default search field for the list. The specific field that is searched depends on the list you are viewing. You may use a complete or partial word as your search term. The system reads your search term as a string of characters (rather than a whole word) and limits the list to only those entries containing the specified term anywhere in the default search field. For example, the search term “tes” would locate entries containing the words “Test” or “Associates” in the default search field. Some lists can also be searched by the date (or date range) on which an entry was created or modified. Typical search tools are shown below. The specific tools available vary depending on the list you are viewing.
.jpg?revision=1)
To search a list by keyword:
- Enter your search term in the Search text box.
- Search terms are not case-sensitive.
- You may enter one or more characters as your search term.
- Click the Search button to submit your search.
- The list refreshes to display only those entries that contain the specified search term.
To search a list by date range:
NOTE
When searching a list by date (or date range), enter calendar dates using the format MM/DD/YYYY. If desired, you can select a date using the Date Entry Calendar. To specify a single day, enter the same day in both text boxes.
- Enter the starting date of the period by which you wish to limit your search in the From text box.
- Enter the ending date of the period by which you wish to limit your search in the To text box.
- Click the Search button to submit your search.
- The list refreshes to display only those entries that meet the specified criteria.
To clear a search:
- Click the Clear button to clear all search criteria for the list.
- The list refreshes to display all available entries.
Sorting Lists
Lists are initially sorted according to a default sort key specific to the list. The .jpg?revision=1) or
or .jpg?revision=1) symbol is shown next to the column heading by which the list is sorted.
symbol is shown next to the column heading by which the list is sorted.
- The icon indicates the list is sorted alphabetically, alphanumerically or chronologically (depending on the content of the column).
-
The
icon indicates the list is sorted in reverse alphabetical/alphanumerical/chronological order, as applicable.
NOTE
Columns containing user names are sorted by the user’s first name.
To sort a list:
- Click the column head you wish to use as the sort key for the list.
- The list refreshes to display entries in alphabetical/alphanumerical/chronological order, as applicable, according to the selected sort key.
-
Click the selected column head a second time to sort the list in reverse alphabetical/alphanumerical/ chronological order.
Filtering Lists
Lists throughout the TAP System initially show all available entries for the list. You can limit the entries displayed in a list to a “subset” of available entries by applying filters to one or more columns.
The Filters popup is displayed by clicking the .jpg?revision=1) icon for the column by which you wish to filter the list. Depending on the active list, the Filters popup will be a "one term" filter or a "two term" filter. Using the Filters popup, you can enter your filter term(s), specify matching criteria (e.g., equal to, not equal to), and apply a logical operator between terms. Each filter is applied only to the contents of the associated column.
icon for the column by which you wish to filter the list. Depending on the active list, the Filters popup will be a "one term" filter or a "two term" filter. Using the Filters popup, you can enter your filter term(s), specify matching criteria (e.g., equal to, not equal to), and apply a logical operator between terms. Each filter is applied only to the contents of the associated column.
To apply a "one term" filter to a list:
- Click the Filters icon for the column by which you wish to filter the list.
- The Filters popup displays.
- The Filters popup displays.
- Select the matching criteria for the filter from the drop-down menu.
- Enter the term by which you wish to filter column contents in the text box.
- When all filter criteria has been entered, click the Filter button.
- The Filters popup closes, and the Forms List refreshes to display only those forms that meet the specified criteria.
- The Filters icon for the column to which the filter was applied is highlighted in white.
- Repeat steps 1 through 4 to add filters to additional columns.
To apply a "two term" filter to a list:
- Click the Filters icon for the column by which you wish to filter the list.
- The Filters popup displays.
- The Filters popup displays.
- Select the matching criteria for the filter from the upper drop-down menu.
- Enter the termby which you wish to filter column contents in the upper text box.
- If you wish to add a second filter to the column, select the logical operator to be applied between the two filters from the center drop-down menu, then repeat steps 2 and 3 using the lower drop-down menu and text box.
- When all filter criteria has been entered, click the Filter button.
- The Filters popup closes, and the Forms List refreshes to display only those forms that meet the specified criteria.
- The Filters icon for the column to which the filter was applied is highlighted in white.
- Repeat steps 1 through 5 to add filters to additional columns.
To remove a filter from the Forms List:
- Click the Filters icon for the column from which you wish to remove the filter.
- The Filters popup displays.
- The Filters popup displays.
- Click the Clear button.
- The Filters popup closes, and the Forms List refreshes to include those forms previously suppressed by the filter.
- The white highlighting is removed from the Filters icon.
- Repeat steps 1 and 2 to remove additional filters.
Working with Filters
Filters can be applied to lists to display a "subset" of available entries. You can apply filters to one or more columns.
The Filters popup is displayed by clicking the icon for the column by which you wish to filter the list. You can specify matching criteria (e.g., equal to, not equal to) for a filter, and (for filters that allow you to enter multiple terms) apply a logical operator between terms. Each filter is applied only to the contents of the associated column.
Matching criteria determines how the TAP system matches a specified filter against entries in the associated column. The following options are available. Depending on the specific column to which the filter is applied, some matching options are not applicable.
- Is equal to – Limits the list to entries that are an exact match to the specified term. For example, if the filter “John Smith” is applied to the Owner column, the filtered list will contain only those forms created by John Smith.
- Is not equal to – Limits the list to entries that are not an exact match to the specified term. For example, if the filter “John Smith” is applied to the Owner column, the filtered list will contain only those forms created by users other than John Smith.
-
Is greater than or equal to – Limits the list to entries that are greater than or equal to the specified term. For example, if the filter “10” is applied to the Version column, the filtered list will contain only those forms with a Version number of 10 or higher (e.g., 10, 11, 12, etc.).
-
Is after or equal to – Limits the list to entries with a date greater than or equal to the specified term. For example, if the filter “01/01/2014” is applied to the Updated Date column, the filtered list will contain only those forms updated during the calendar years 2014 and subsequent (e.g., 2014, 2015, 2016).
-
Is greater than – Limits the list to entries that are greater than the specified term. For example, if the filter “10” is applied to the Version column, the filtered list will contain only those forms with a Version number of higher than 10 (e.g., 11, 12, 13, etc.)
-
Is after – Limits the list to entries with a date greater than the specified term. For example, if the filter “12/31/2013” is applied to the Updated Date column, the filtered list will contain only those forms updated during the calendar years 2014 and subsequent (e.g., 2014, 2015, 2016)
-
Is less than or equal to – Limits the list to entries that are less than or equal to the specified term. For example, if the filter “3” is applied to the Version column, the filtered list will contain only those forms with a Versionnumber of 3 or lower (e.g., 1, 2, 3)
-
Is before or equal to – Limits the list to entries that are less than or equal to the specified term. For example, if the filter “12/31/2015” is applied to the Updated date column, the filtered list will contain only those forms updated during the calendar years 2015 and prior (e.g., 2015, 2014, 2013, etc.).
-
Is less than – Limits the list to entries that are less than the specified term. For example, if the filter “4” is applied to the Version column, the filtered list will contain only those forms with a Version number of lower than 4 (e.g., 1, 2, 3).
-
Is before – Limits the list to entries that are less than the specified term. For example, if the filter “01/01/2016” is applied to the Updated date column, the filtered list will contain only those forms updated during the calendar years 2015 and prior (e.g., 2015, 2014, 2013, etc.).
-
Starts with – Limits the list to entries that start with the specified term. For example, if the filter “John” is applied to the Owner column, the filtered list would include forms created by both John Doe and John Smith.
-
Contains – Limits the list to entries that include the specified term anywhere in the entry. For example, if the filter “comput” is applied to the Name column, the filtered list would include forms with the words compute, computer or computing in the form name.
-
Does not contain – Limits the list to entries that do not include the specified term anywhere in the entry. For example, if the filter “comput” is applied to the Name column, the filtered list would exclude forms with the words compute, computer or computing in the form name.
-
Ends with – Limits the list to entries that end with the specified term. For example, if the filter “Smith” is applied to the Owner column, the filtered list would include forms created by both Bob Smith and John Smith.
- Is null – Limits the list to entries -----
- Is not null – Limits the list to entries -----
- Is empty – Limits the list to entries that currently don't have a value/ is blank. It filters those entries, which at some point, had a value, but now is blank. This should not be confused to Is null.
- Is not empty – Limits the list to entries that currently are not blank/have a value.
Logical operators determine the logical function the TAP system apples between two filters. The following options are available:
- And – Limits the list to entries where the matching criteria for both filters are met. For example, if the filter “(Is equal to – John) And (Is not equal to – Smith)” is applied to the Owner column, the filtered list will contain forms created by all users with the first name “John” except John Smith.
- Or – Limits the list to entries where the matching criteria for either filter is met. For example, if the filter “(Is equal to – 2015) Or (Is equal to – 2016)” is applied to the Updated date column, the filtered list will contain only those reports last updated during the calendar years 2015 and 2016.
Entering Terms in Filters
When applying filters to the a list, be sure to format the filter term correctly for the selected column and matching criteria as described in the following guidelines.
- Filters are not case-sensitive.
- When applying a filter to the Name, Owner or Updated by columns, you may use a complete or partial word as the filter except under the following conditions:
- When applying a filter with a matching criteria of Is equal to, you must use a whole word as the filter.
- When applying a filter with a matching criteria of Is not equal to, you must use a whole word as the filter.
- When applying a filter to the Version column, you may enter numeric characters only.
- When applying a filter to the Updated date column, enter a calendar date using the format MM/DD/YYYY.
- If desired, you can select a date using the Date Entry Calendar.