Adding Attachments and Instructions to a Workflow Stage
The Attachments property lets you add attachments to or enter instructions for a given workflow stage.
The Attachments property lets you add attachments to or enter instructions for a given workflow stage. You can also download or delete previously added attachments.
Types of Attachments
The follow are acceptable attachment types:
| .xlxs | .xls | .docx | .doc | |
| .rar | .txt | .xml | .html | .pptx |
| .vsd | .vsdx | .csv | .eml | .tif |
| .gif | .ppt | .tiff | .css | .mht |
| .jpg | .png | .jpeg | .bmp | .msg |
To add an attachment to a workflow stage:
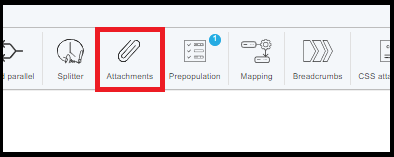
- Select the workflow stage to which you wish to add an attachment.
- Click the Attachments icon in the Workflow Page toolbar.
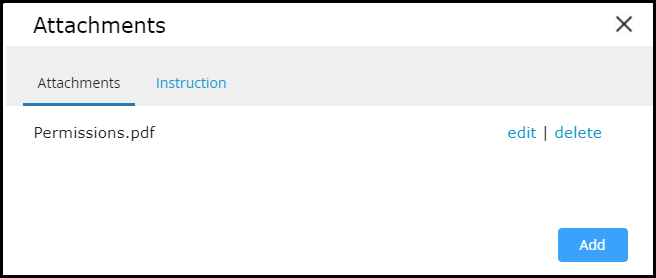
- The Attachments dialog displays. The dialog shows the Attachments page by default.
- If attachments were previously added to the workflow stage, the dialog shows a list of attachments.
- If no attachments have been added to the workflow stage, the attachment list is empty.
- If no attachments have been added to the workflow stage, the attachment list is empty.
- Click the Add button.
- The dialog refreshes to display the attachment detail page.
- The dialog refreshes to display the attachment detail page.
- Click the Upload button.
- A standard File Upload dialog displays.
- A standard File Upload dialog displays.
- Locate and select the document you wish to upload, then click the Open button on the File Upload dialog.
- The File Upload dialog closes automatically.
- A status icon displays while the upload is in process.
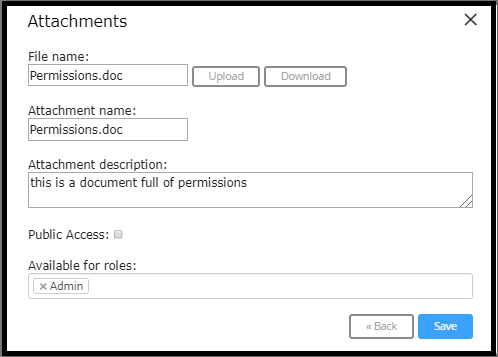
- When the upload has completed, the file name of the uploaded file is automatically entered in the File name and Attachment name text boxes.
- When the upload has completed, the file name of the uploaded file is automatically entered in the File name and Attachment name text boxes.
-
If desired, you can edit the Attachment name.
NOTE: The File name is "read only" and cannot be edited.
-
Enter a description for the attachment in the Attachment description text box (required)
- Specify who will have access to the attachment:
- To make the attachment available to all users, select the Public Access check box
- To limit access to users assigned to specific user roles, select one or more user roles from the Available for roles menu.
- NOTE: You must either select the Public Access check box or select at least one user role from the Available for roles menu or the attachment cannot be saved to the workflow stage.
- When all necessary information has been entered, click the Save button to save the attachment to the workflow stage.
- The Attachments dialog refreshes with the new attachment added to the list.
To edit an attachment:
- Select the workflow stage for which you wish to edit an attachment.
- Click the Attachments icon in the Workflow Page toolbar.
- The Attachments dialog displays and shows a list of attachments for the workflow stage.
- The Attachments dialog displays and shows a list of attachments for the workflow stage.
- From the attachments list, click the edit link for the desired attachment.
- The attachment detail page displays the current values for the attachment.
- The attachment detail page displays the current values for the attachment.
- Edit the Attachment name and Attachment description and/or modify attachment access, as desired.
- When all desired changes have been made, click the Save button to save your changes.
- The attachments list displays.
To delete an attachment:
- Select the workflow stage for which you wish to edit an attachment.
- Click the Attachments icon in the Workflow Page toolbar.
-
The Attachments dialog displays and shows a list of attachments for the workflow stage.
-
- From the attachments list, click the delete link for the desired attachment.
- The selected attachment is deleted from the list.
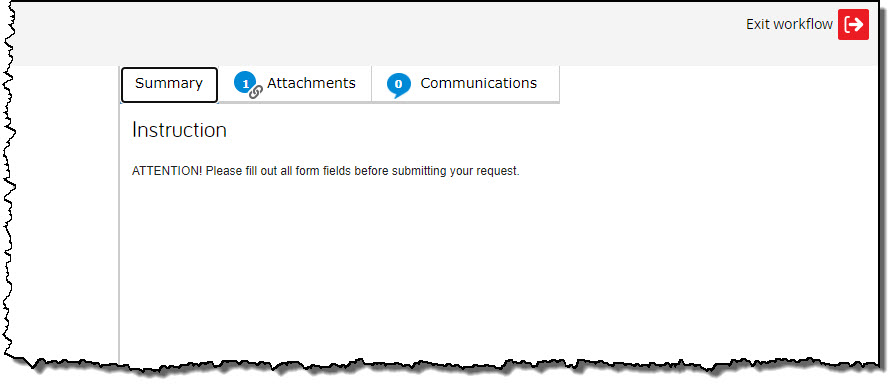
To add instructions to a workflow stage:
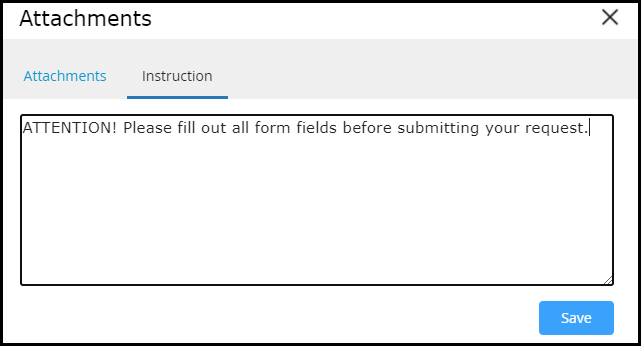
- Select the workflow stage to which you wish to add instructions.
- Click the Attachments icon in the Workflow Page toolbar.
- The Attachments dialog displays. The dialog shows the Attachments page by default.
- The Attachments dialog displays. The dialog shows the Attachments page by default.
- Click the Instruction tab.
- The Instruction page displays.
- The Instruction page displays.
- Enter desired instructions for completing the workflow stage in the text box.
- When all desired instructions have been entered, click the Save button to save your changes and then save the workflow.
Instructions will then be visible to the end user on the Summary tab once the form is initiated: