
Windows and Dialog Boxes
Users/Groups Window
The Users/Groups window allows you to manage users and the security groups to which the users belong.
Users Tab

Show inactive – An indication of whether all users are shown or only active users.
Filter – Text to be used to search for a person record.
User Name – The full name of the user account. This name is displayed on the user’s Home Page.
Login Name – The name that will be used to login to a Suite application. This field can be up to 20 characters.
Inactive – An indication (Yes/No) of whether the account is disabled permanently. An inactive account cannot login to Suite, and the user name will not appear in selection lists.
Locked Out – An indication (Yes/No) of whether the account has been disabled temporarily.
Last Login – The date/time the account most recently accessed an application.
Expiration Date – The date/time the account will no longer be valid.
Groups Tab
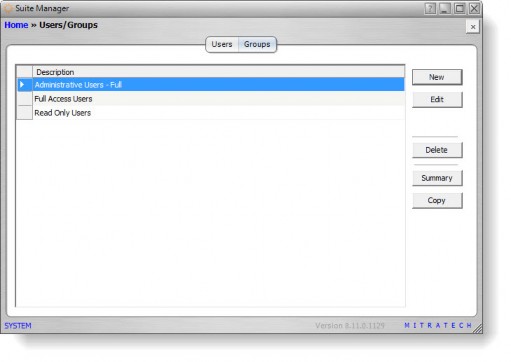
Description – A freeform comment concerning the group.
Buttons
New – Click to open the New User dialog box to create a new user account or the New Group dialog box to create a new group.
Edit – Click to open the Edit User dialog box to modify the selected user account or the Edit Group dialog box to modify the selected group.
Summary – Click to open a printable window with information for the selected user account or user group.
Delete – Click to remove the user group from Suite Manager.
Copy – Click to open the Copy User or Copy Group dialog box to create a new user or user group using the selected user or user group settings.
New User Dialog Box
The New User dialog box allows you to create a new user account and specify information concerning the user.
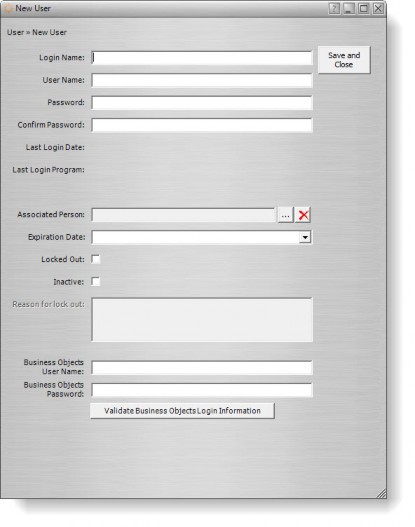
Fields
Login Name – The name that will be used to login to a Suite application. This field can be up to 20 characters.
User Name – The full name of the user account. This name is displayed on the user’s Home Page.
Password – A series of keystrokes to access the user account. This field may contain up to 20 characters. A minimum password length can be specified using the Security Settings window in Suite Manager. Blank passwords are allowed. Consider using a standard password for all newly created users, with instructions to change to a unique password after logging in to Secretariat or eCounsel for the first time.
Confirm Password – The same series of keystrokes entered above.
Last Login Date – Displays the date/time the account most recently accessed an application.
Last Login Program – Displays the name of the most recently accessed application.
SiteMinder ID – If you have enabled a SiteMinder integration and LDAP is not enabled, the unique SiteMinder variable value that will map to this user must be entered in this field.
Distinguished Name – If you have users who are in the LDAP access group and already have a user ID record in the Suite User table, the ID must be associated with the LDAP Distinguished Name.
Associated Person – The name of a person with which the account is associated. Click the button to open the Associate Person dialog box to search for a person record.
Expiration Date – The date/time the account will no longer be valid.
Locked Out – An indication of whether the account is inaccessible.
Inactive – An indication of whether the account is no longer enabled.
Reason for lock out – A freeform comment concerning the reason the user account was disabled. If the account is disabled due to failed login attempts (set in Security Settings), the system will populate this text box.
Business Objects User Name – If Analysis Center is enabled and the Business Objects integration uses the Enterprise user authentication type , the Business Objects account name to be used for Analysis Center.
Business Objects Password – If Analysis Center is enabled, the password for the Business Objects account name to be used for Analysis Center.
Buttons
Validate Business Objects Login Information – If Analysis Center is enabled, click to verify the Business Objects account name to be used for Analysis Center is active.
Save and Close – Click to create the user account.
Associate Person Dialog Box
The Associate Person dialog box allows you to select a person record in Suite to which to associate a user account (for calendar events, alerts, invoice approvals, etc.).
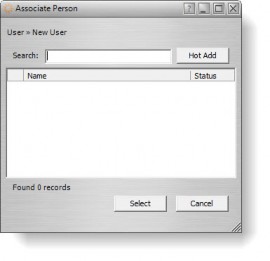
Fields
Search – Text to be used to search for a person record.
Name – The name of a user account.
Status – An indication of whether the record is marked as active or inactive.
Buttons
Hot Add – Click to open the Hot Add Person dialog box to create a person record for the user in Suite.
Select – Click to select the specified user account.
Cancel – Click to close the dialog box without selecting an account.
Hot Add Person Dialog Box
The Hot Add Person dialog box allows you to create a person record in Suite. This record may then be associated with a user account in Suite Manager for the purpose of calendar events, alerts, invoice approvals, etc.
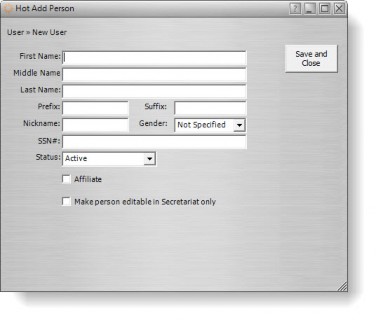
Fields
First Name – The given name for the person.
Middle Name – The middle name for the person.
Last Name – The surname for the person.
Prefix – A title (such as Dr.) needed to identify the person.
Suffix – Any information (such as Jr.) needed to identify the person.
Nickname – Another name for the person, if applicable.
Gender – The gender (Female/Male) of the person.
SSN# – The person’s Social Security Number (SSN).
Status – An indication of whether the person is active or inactive.
Affiliate – An indication of whether the person is affiliated with your company.
Make person editable in Secretariat only – An indication of whether information concerning the person may be modified from Secretariat.
Buttons
Save and Close – Click to create a record for the specified person.
Edit User Dialog Box
The Edit User dialog box allows you to modify a user account and specify information concerning the user.
Base Info Tab

Login Name – The name that will be used to login to a Suite application.
User Name – The full name of the user account.
Password – A series of keystrokes to access the user account.
Confirm Password – The same series of keystrokes entered above.
Last Login Date – Displays the date/time the account most recently accessed an application.
Last Login Program – Displays the name of the most recently accessed application.
SiteMinder ID – If you have enabled a SiteMinder integration and LDAP is not enabled, the unique SiteMinder variable value that will map to this user must be entered in this field.
Distinguished Name – If you have users who are in the LDAP access group and already have a user ID record in the Suite User table, the ID must be associated with the LDAP Distinguished Name. If you are using SAML authentication, the value in this field must be the value of the attribute in the Authentication attributes field in the Suite Manager SAML Integration tab.
Associated Person – The name of a person with which the account is associated. Click the button to open the Associate Person dialog box to search for a person record.
Expiration Date – The date/time the account will no longer be valid.
Locked Out – An indication of whether the account is inaccessible.
Inactive – An indication of whether the account is no longer enabled.
Reason for lock out – A freeform comment concerning the reason the user account was disabled.
Business Objects User Name – If Analysis Center is enabled, the Business Objects account name to be used for Analysis Center.
Business Objects Password – If Analysis Center is enabled, the password for the Business Objects account name to be used for Analysis Center.
Membership Tab

List of groups – An indication of whether the user account is a member of the security group.
Security Attributes Tab

List of applications – Lists all Suite applications to which the user’s access may be changed.
Security Attribute – The name of the attribute for which security may be changed. See “Security Attributes” on page 253.
Inherited Access – An indication of the level of access that the user account has because of membership in a group.
Override Access – An indication of the level of access that the user account may have different than the other group members.
Cumulative Access – An indication of the actual access that the user account has based on any inherited and override settings.
Buttons
Save – Click to save changes to the user account.
Validate Business Objects Login Information– If Analysis Center is enabled, click to verify the Business Objects account name to be used for Analysis Center is active.
Summary – Click to open a printable window with account information for the selected user account.
Select All – Click to select all user groups for membership by the specified user.
Unselect All – Click to remove the specified user from membership in all user groups.
Edit – Click to open the Security Attribute Access dialog box to modify the attribute.
Security Attribute Access Dialog Box
The Security Attribute Access dialog box allows you to set an access level for the specified security attribute. See “Security Attributes” on page 253 for more information.

Fields
Inherited Access Level – Lists the access level assigned to the user due to membership in a user group.
Select an Access Level/Override Access Level – The access level to be assigned to the specified user.
Cumulative Access Level – Lists the resulting access level after assigning the user a new access level and taking into account the inherited access level.
Select a saved profile (database, reports, widgets, logical groups, wizards, and WorldView sites access only) – A security attribute profile that may be assigned to the user. These profiles are defined in the Security Attributes Profiles component of Suite Manager.
Buttons
Edit Profile – For limited access, click to open the Edit Profile dialog box to make changes to the security attribute profile.
Save and Close – Click to save changes to the dialog box.
New Group Dialog Box
The New Group dialog box allows you to create a new user group.
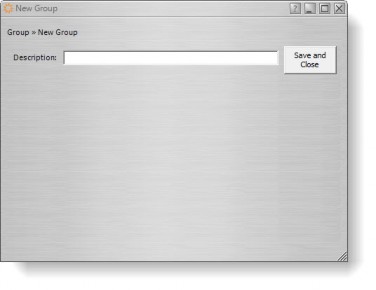
Fields
Description – A freeform comment concerning the user group.
Buttons
Save and Close – Click to create the user group.
Edit Group Dialog Box
The Edit Group dialog box allows you to modify a user group and specify information concerning the group.
Base Info Tab
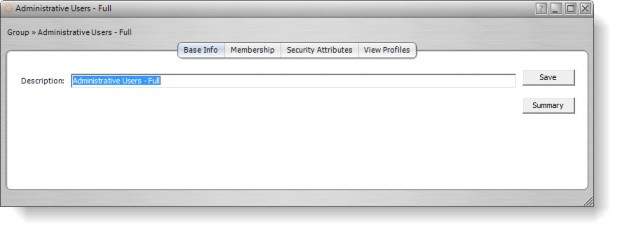
Description – A freeform comment concerning the user group.
Membership Tab
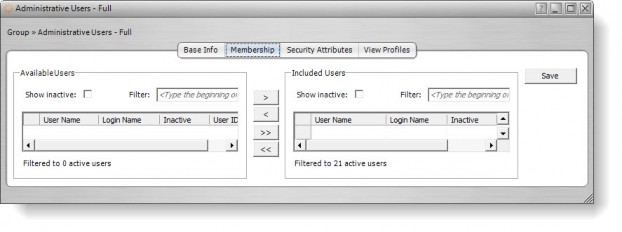
Available Users – Lists all users in the system.
Show Inactive – An indication of whether all users are shown or only active users.
Filter – Text to be used to search for a person record.
User Name – The full name of the user account. This name is displayed on the user’s Home Page.
Login Name – The name that will be used to login to a Suite application.
Inactive – An indication (Yes/No) of whether the account is disabled permanently.
Included Users – Lists all users that are members of the group. Click the > button to add a group to the list or the >> button to add all available users to the list.
Security Attributes Tab
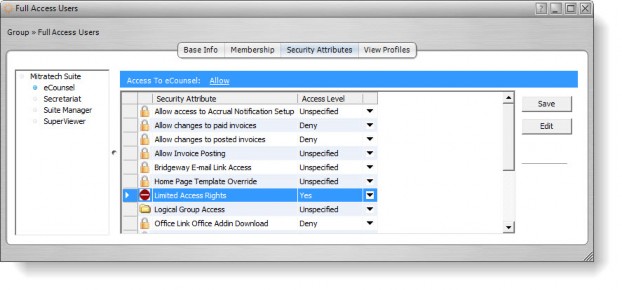
List of applications – Lists all Suite applications to which the group’s access may be changed.
Security Attribute – The name of the attribute for which security may be changed. See “Security Attributes” on page 253.
Access Level – An indication of the level of access for the user group.
View Profiles Tab
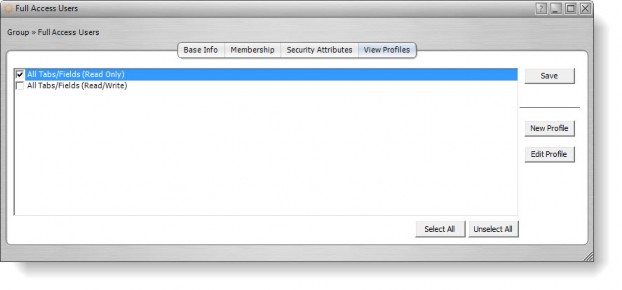
List of view profiles – Click on any checkbox to indicate if the user group has been assigned the defined view profile.
Buttons
Save – Click to save changes to the user group.
Summary – Click to open a printable window with information for the selected user group.
Edit – Click to open the Security Attribute Access dialog box to modify the attribute.
New Profile – Click to open the View Profile dialog box to create a new view profile.
Edit Profile – Click to open the View Profile dialog box to modify the selected view profile.
Select All – Click to select all user accounts for membership in the specified user group.
Unselect All – Click to remove the all users from membership in the specified user group.
Copy Group Dialog Box
The Copy Group dialog box allows you to create a new user group with the same settings as the selected group.
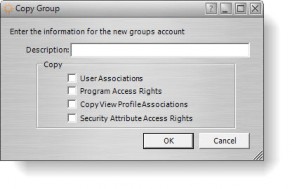
Fields
Description – A freeform comment concerning the user group.
Copy
User Associations – An indication of whether all user associations should be copied to the new group.
Program Access Rights – An indication of whether all program access rights should be copied to the new group.
Copy View Profile Associations – An indication of whether all view profiles should be copied to the new group.
Security Attribute Access Rights – An indication of whether all security attribute access rights should be copied to the new group.
Buttons
OK – Click to create the user group.
Cancel – Click to close the dialog box without create a group.