
Windows and Dialog Boxes
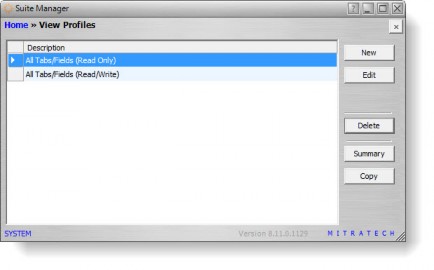
View Profiles Window
The View Profiles window allows you to manage the view profiles that will apply to a module within Suite. View profiles customize the appearance of Suite according to the user group to which a user account belongs.
Fields
Description – The name of the view profile. Descriptive names should be used in order to clarify the process of applying the view profile to a user group.
Buttons
New – Click to open the View Profile dialog box to create a new view profile.
Edit – Click to open the View Profile dialog box to modify a view profile.
Delete – Click to remove the view profile.
Summary – Click to open a printable window with information for the selected view profile.
Copy – Click to open the View Profile Copy dialog box to create a new view profile based on the selected profile.
View Profile Dialog Box
The View Profile dialog box allows you to create or modify the view profiles that will apply to a user group within Suite.
View Profile Tab
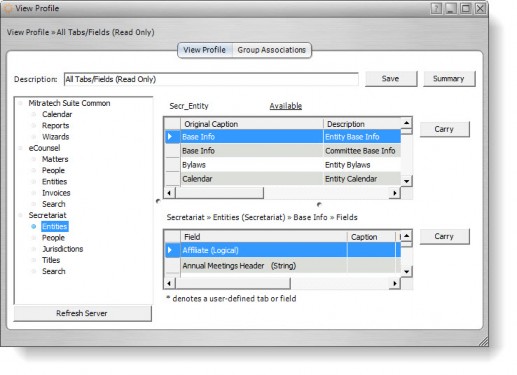
Description – The name of the view profile. Descriptive names should be used in order to clarify the process of applying the view profile to a tab or user field.
List of applications/modules – Lists each application (such as eCounsel and Secretariat) with each module that has view profiles that may be customized for the module.
Available – Click to open the Module Configuration dialog box to customize a module for the view profile.
Tabs table – Lists tabs that display for the selected application and module.
Original Caption – The default caption for the tab.
Description – A freeform comment concerning the tab.
New Caption – The name you want to appear on the tab.
Position – A numeric indication of where the tab will appear in the list of tabs for the module. For example, “1” indicates the tab will appear first, “2” indications the tab will appear second, etc.
Read-only – An indication of whether information on the tab may be changed.
Hidden – An indication of whether the tab should display in the application.
Fields table – Lists fields that display on the selected tab for the selected application and module.
Field – A freeform comment concerning the field.
Caption – The name that appears as a label.
Hint – The tooltip that appears when the mouse pointer hovers over the field.
Read-only – An indication of whether the information in the field may be changed.
Hidden – An indication of whether the field should display on the tab.
Edit Mask – A format (only available for String and Number data types) to be used when entering data in the field. See “Masks” on page 49.
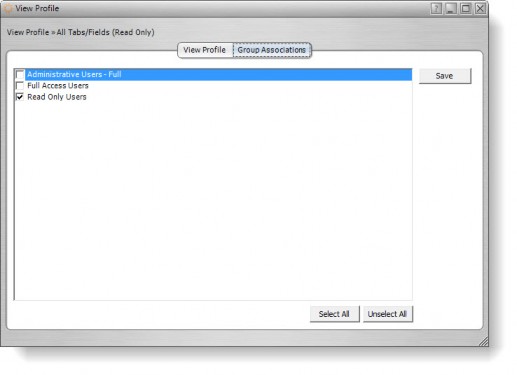
Group Associations Tab
The user groups that may be associated with the view profile. Click a checkbox to select it. This tab only displays on the dialog box when you are modifying an existing profile.
Buttons
Refresh Server – Click to immediately update the server with the configuration changes.
Save – Click to save changes on the dialog box.
Summary – Click to open a printable window with information for the selected view profile.
Carry – Click to propagate the selected setting (enabled/disabled) to all the remaining fields in the column.
Select All – Click to select all checkboxes on the tab.
Unselect All – Click to de-select all checkboxes on the tab.
Module Configuration Dialog Box
The Module Configuration dialog box allows you to modify information concerning the selected module for the selected view profile.
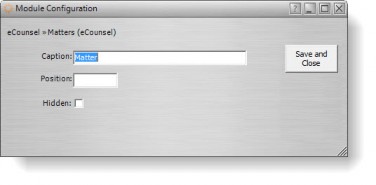
Fields
Caption – The name that displays in the Suite application for the module.
Position – A numeric indication of the placement of the module within the application.
Hidden – An indication of whether the module should not display in the application for the selected view profile.
Buttons
Save and Close – Click to save changes on the dialog box.
View Profile Copy Dialog Box
The View Profile Copy dialog box allows you to create a new view profile based on the selected view profile.
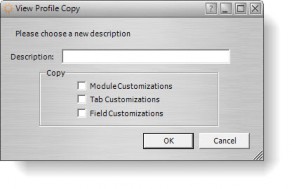
Fields
Description – The name of the new view profile.
Copy – Click to copy customizations for modules, tabs, and fields.
Buttons
OK – Click to save changes to the dialog box.