
Windows and Dialog Boxes
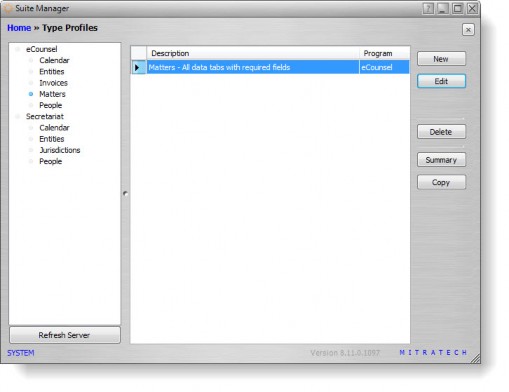
Type Profiles Window
The Type Profiles window allows you to manage the rules that will apply to a module within Suite. Type profiles apply to matter types in eCounsel and entity types in Secretariat.
Fields
List of applications/modules – Lists each application (such as eCounsel and Secretariat) with each module that has tabs that may be customized for the module.
Description – The name of the type profile. Descriptive names should be used in order to clarify the process of applying the type profile to a tab or user field.
Tabs table – Lists tabs that display for the selected application and module.
Original Caption – The default caption for the tab.
Description – A freeform comment concerning the tab.
New Caption – The name you want to appear on the tab.
Position – A numeric indication of where the tab will appear in the list of tabs for the module. For example, “1” indicates the tab will appear first, “2” indications the tab will appear second, etc.
Read-only – An indication of whether information on the tab is editable.
Hidden – An indication of whether the information should not display on the tab.
Fields table – Lists fields that display on the selected tab for the selected application and module.
Field – A freeform comment concerning the field.
Caption – The name that appears as a label.
Hint – The tooltip that appears when the mouse pointer hovers over the field.
Read-only – An indication of whether the information in the field can be modified.
Hidden – An indication of whether the field should not display on the tab.
Required – An indication of whether data must be entered for the field in order to save the record in the application.
Default Value – A value that will display in the field by default.
![]() For date fields, entering $TODAY$ as the default value sets the field to today’s date when a record is created.
For date fields, entering $TODAY$ as the default value sets the field to today’s date when a record is created.
Lookup Category – A list of predefined values that may be selected for the field.
Buttons
Refresh Server – Click to immediately update the server with the configuration changes.
New – Click to open the Type Profile dialog box to create a new type profile.
Edit – Click to open the Type Profile dialog box to modify a type profile.
Delete – Click to remove the type profile.
Summary – Click to open a printable window with information for the selected type profile.
Copy – Click to open the Type Profile Copy dialog box to create a new type profile based on the selected type profile.
Save – Click to save changes on the dialog box.
Carry – Click to propagate the setting to all fields in the column.
Type Profile Dialog Box
The Type Profile dialog box allows you to create or modify the type profiles that will apply to a module within Suite.
Type Profile Tab
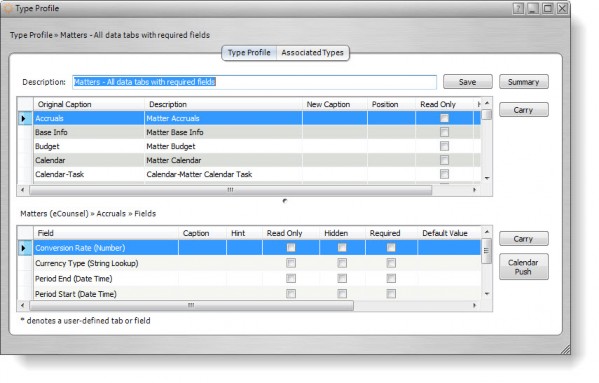
Description – The name of the type profile. Descriptive names should be used in order to clarify the process of applying the type profile to a tab or user field.
Tabs table – Lists tabs that display for the selected application and module.
Original Caption – The default caption for the tab.
Description – A freeform comment concerning the tab.
New Caption – The name you want to appear on the tab.
Position – A numeric indication of where the tab will appear in the list of tabs for the module. For example, “1” indicates the tab will appear first, “2” indications the tab will appear second, etc.
Read-only – An indication of whether information on the tab is editable.
Hidden – An indication of whether the tab should display in the application.
Fields table – Lists fields that display on the selected tab for the selected application and module.
Field – A freeform comment concerning the field.
Caption – The name that appears as a label.
Hint – The tooltip that appears when the mouse pointer hovers over the field.
Read-only – An indication of whether the information in the field can be modified.
Hidden – An indication of whether the field should display on the tab.
Required – An indication of whether data must be entered for the field in order to save the record in the application.
Default Value – A value that will display in the field by default.
![]() For date fields, entering $TODAY$ as the default value sets the field to today’s date when a record is created.
For date fields, entering $TODAY$ as the default value sets the field to today’s date when a record is created.
Lookup Category – A list of predefined values that may be selected for the field.
Calendar Push – An indication of whether specific data from the field can be used to populate certain fields in the calendar.
Associated Types Tab
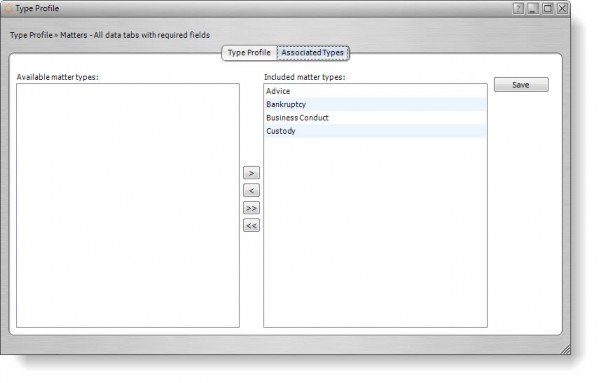
Available matter/entity types – A list of matter/entity types that may be made available for the type profile.
Included matter/entity types – A list of matter/entity types that are available for the type profile.
Arrows – Click the ![]() button to move a single matter/entity type to the list of included matter/entity types; click the
button to move a single matter/entity type to the list of included matter/entity types; click the ![]() button to remove a single matter/entity type from the list of included matter/entity types. Click the
button to remove a single matter/entity type from the list of included matter/entity types. Click the ![]() button to move all the available matter/entity types to the list of included matter/entity types; click the
button to move all the available matter/entity types to the list of included matter/entity types; click the ![]() button to remove all the included matter/entity types.
button to remove all the included matter/entity types.
Buttons
Save – Click to save changes on the dialog box.
Summary – Click to open a printable window with information for the selected type profile.
Carry – Click to propagate the selected setting (enabled/disabled) to all the remaining fields in the column.
Calendar Push – Click to open the Calendar Push Editor dialog box to indicate the information from the date/time field should be pushed as a calendar event.
Type Profile Copy Dialog Box
The Type Profile Copy dialog box allows you to create a new type profile based on the selected type profile.
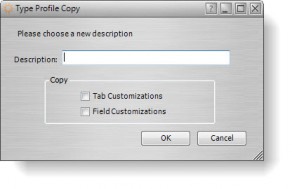
Fields
Description – The name of the type profile. Descriptive names should be used in order to clarify the process of applying the type profile to a tab or user field.
Copy – Click to copy customizations for tabs and fields.
Buttons
OK – Click to save changes to the dialog box.
Cancel – Click to close the dialog box without saving any changes.
Calendar Push Editor Dialog Box
The Calendar Push Editor dialog box allows you to configure information from the Matters or Entities modules that will be added to the Calendar as an event. When a date field has the Calendar push option, an additional button will appear next to a date field. Users can click this button to link to the Calendar module, make the appropriate selection from the New Calendar Event dialog box and open the Calendar data entry screen. Specific data from fields on the tab can be set to automatically populate certain fields in the Calendar.
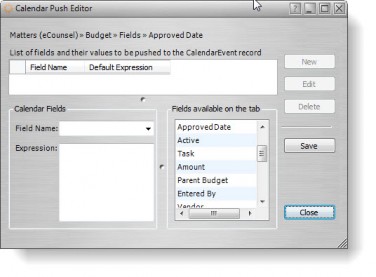
Fields
Field Name – The fields that are available on the calendar data entry field. To automatically populate specific fields in a new Calendar item, select the appropriate field from this list.
Default Expression – The criteria to be used to create the Calendar event. Double-click on a field from the Fields available on the tab list to add it to the expression. Text also may be entered in addition to, or instead of, a field from the tab. Do not use brackets.
Fields available on the tab – Lists fields that appear on the tab.
Buttons
New – Click to create a new field to be pushed to the calendar.
Edit – Click to modify information concerning the field to be pushed to the calendar.
Delete – Click to remove the field.