Configuring Suite
Overview
After installing or upgrading Suite Version 8.11 SP12, several steps need to occur to complete the BusinessObjects integration:
- Deploy the Suite BusinessObjects Web application.
- Enable BusinessObjects in Suite Manager
- Import (or reimport) the standard BusinessObjects report templates
- Configure users to access Analysis Center in Suite Manager
- Optionally, configure BusinessObjects user accounts for running reports in the user preferences in eCounsel/Secretariat
Deploying the BusinessObjects .war/.ear File
You will need to deploy the .war/.ear file labeled “suite-boxir4” located in the appropriate directory on the Suite installation media for the Java application server.
To confirm the version of the deployed BusinessObjects .war/.ear file, enter the following in a Web browser: http://<ServerName>:<Port>/<Context>/AdminServlet?cmd=about
where <ServerName> is the name of the server on which the Web application resides, <Port> is the number for the port used for communication with the Java application server, and <Context> is the name of the BusinessObjects .war or .ear file.
 The BusinessObjects Web application must be on the same Java application server as the Suite Web application in order to run reports or import new report templates. In addition, the BusinessObjects Web application must be able to access the Data Root for the Suite Web application to be able to import new report templates.
Enabling BusinessObjects
 Prior to enabling BusinessObjects, you must deploy the “suite-boxir4” .war/.ear file. See above.
After obtaining a integration license key, login to Suite Manager as a user that has the System Settings Administration security applied and do the following:
To Configure BusinessObjects:
- Open Suite Manager.
- On the Suite Manager control panel, click on the
 System Settings component in the System Configuration area.
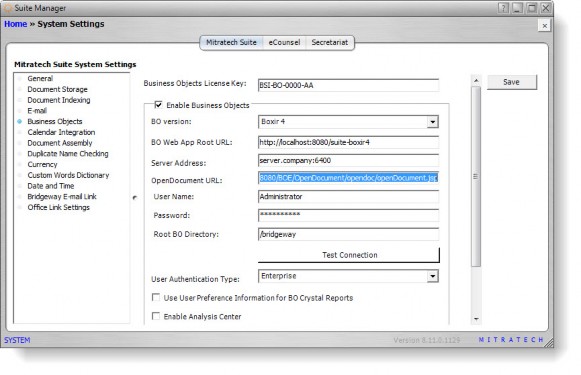
 - On the Suite tab of the System Settings window, click the BusinessObjects settings.

- Type the code given to you by Mitratech in the BusinessObjects License Key text field.
- Click the Enable BusinessObjects checkbox to select it (the license key is verified when selecting this checkbox). If a checkmark does not appear, the license key may have been entered incorrectly. Verify the key and re-enter.
 If you are unchecking the checkbox to disable BusinessObjects, make sure to remove any text from the BusinessObjects BO Web App Root URL text box or the Web application will continue to execute when you log out of eCounsel or Secretariat.
 - Select the BusinessObjects Web application file version for the appropriate BusinessObjects version you are using. For BusinessObjects BI Platform 4.2, select “boxir4”.
- Type the complete URL path to the deployment of the Suite BusinessObjects Web application.
 To verify the version of the Suite BusinessObjects Web application, enter the following in a Web browser:
http://<server_name>:<port>/<Context>/AdminServlet?cmd=about where: <server_name> is the name of the server on which the Web application resides
- <port> is the number for the port used for communication with the Java application server
- <Context> is the name of the Suite BusinessObjects .war or .ear file (the default name is “suite- boxir4-8xx”)
 Do not use the SiteMinder-specific URL as a value for this field. Suite communicates with the BusinessObjects Web application using URL strings, and authentication only occurs when data is supplied to BusinessObjects to execute a report. SiteMinder authentication is not used during this process. In addition, when using SiteMinder login authentication, the BO Web App Root URL should be defined on the Webserver to redirect to the application server to avoid a port conflict (for example, the URL would be specified as http://server/boxir4).
 Make sure the value for the Suite BusinessObjects Web application does not have a trailing forward slash.
- Type the OpenDocument URL (for example, http://<BOE_Server_Name>:<Port>/BOE/OpenDocument/opendoc/openDocument.jsp)
- Type the name of the BusinessObjects server, the system user name and password for the server, and the path to the root BusinessObjects directory.
- Select the user authentication type that will be used for authenticating users when running BusinessObjects reports or using Analysis Center. If you select Enterprise, you must associate BusinessObjects user accounts with each Suite user. See Configuring Analysis Center Users. Currently, the Suite/BusinessObjects integration supports SiteMinder using LDAP. For this authentication type, you will need to configure security attributes for those users or groups who will be editing Analysis Center reports and/or accessing BusinessObjects BI Launch Pad.
- If using the Enterprise user authentication type and running standard reports with named licensing, check the Use User Preference Information for BO Crystal Reports box. The user name and password for the named account will be used from the account entered in the Preferences area of the Tools page of the specific Suite application.
- Enter the license key for Analysis Center, then click the Enable Analysis Center checkbox to select it. The license key is verified when selecting this checkbox. If a checkmark does not appear, the license key may have been entered incorrectly. Verify the license key and re-enter. Additional configuration of users is required for Analysis Center. See Configuring Analysis Center Users.
- If BI Launch Pad is deployed, users of Analysis Center can be configured so that ad-hoc reports can be created in BI Launch Pad and uploaded to the Reports module. Type the full URL to the location from which BI Launch Pad is accessed within your site (for example, http://<BOE_Server_Name>:<Port>/ BOE/BI?startFolder=%SI_CUID%), and then click the Test InfoView/BI Launch Pad URL button to verify the location. If no users have BI Launch pad access, this field can remain blank.
- Click Save.
Importing Standard Report Templates
Template import installs the default report templates into the database. These templates can be used for generating reports and documents through the Reports module in eCounsel and Secretariat.
To Import Templates:
- Open Suite Manager.
- On the Suite Manager control panel, click on the
 Template Import component in the Tools & Utilities area.
 - On the Template Import window, select the template location, either My computer or Web server.
- If you selected My computer, click the
 button to locate the BusinessObjects Crystal Reports\Templates folder on the local computer.
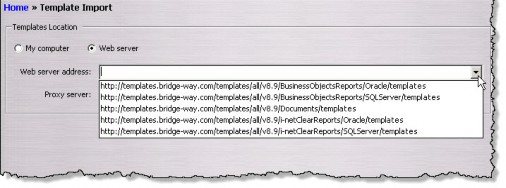
If you selected Web server, select the appropriate templates, where x is the current version of Suite (such as 8.11):
- For BusinessObjects Crystal Reports, select
http://templates.bridge-way.com/temp...acle/templates or http://templates.bridge-way.com/temp...rver/templates. - For i-net Clear Reports, select
http://templates.bridge-way.com/temp...acle/templates or http://templates.bridge-way.com/temp...rver/templates.

- Click the checkbox next to the Suite application for which you are importing templates. If you are importing templates for both applications, select both checkboxes.
- Click Find Templates.
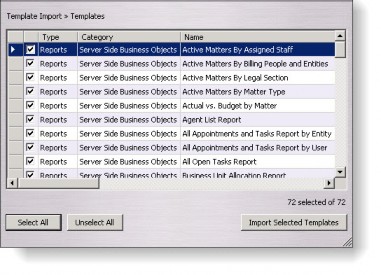
- On the Templates to Import dialog box, it is recommended that all the default Suite templates be installed. Click the Select All button or select the appropriate checkbox(es) to indicate which templates you want to install.

- Click the Import Selected Templates button. A progress meter will appear. You can abort the installation at any time by clicking Cancel. If any errors are encountered, they will be noted at the bottom of the dialog box.
- Click the Close
 button to exit the Templates to Import dialog box.
Configuring Analysis Center Users
If using the Enterprise authentication type for the BusinessObjects integration, each Suite user must be associated with a unique BusinessObjects user name and password in order to access Analysis Center or run Analysis Center reports from the Reports module.
Additionally for any BusinessObjects integration (no matter which user authentication method is selected), two security attributes determine if a user can edit Analysis Center reports and/or access BI Launch Pad from Analysis Center. You can assign security attributes for individual users or groups of users.
To Configure BusinessObjects User Accounts:
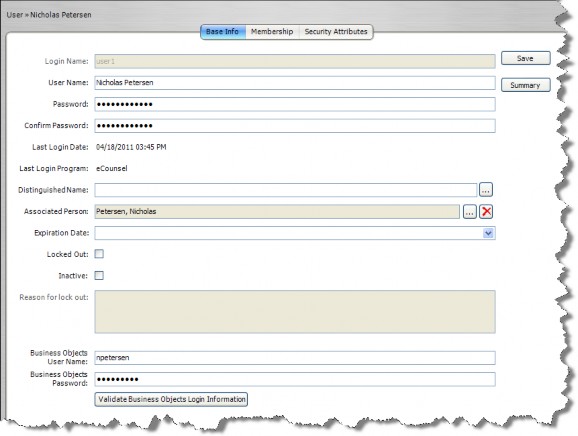
- Create a new user account and associate the user with a person record or select an existing user account to configure.
- On the New User or Edit User dialog box, type a unique BusinessObjects user name and password.
 These fields are only available if Analysis Center is enabled with the Enterprise user authentication type.
 - Click Validate BusinessObjects Login Information to verify the BusinessObjects user name/password.

To Configure Security Attributes for Analysis Center:
- On the New User or Edit User dialog box, click on the Security Attributes tab.
- Set the Allow Analysis Center Editing security attribute to Allow for any user that can edit Analysis Center reports.
 If you assign the security attributes to a user who does not have a BusinessObjects account or access to BusinessObjects, the user will receive an error from the report server.
 - Set the Allow InfoView/BI Launch Pad Access security attribute to Allow for a user or users that can access BI Launch Pad from Analysis Center to create and publish reports.

- Click Save.
Setting BusinessObjects Preferences
If standard reports within eCounsel/Secretariat should be run by a specific BusinessObjects user account, you can specify the user account and password and test the connection to BusinessObjects for each user.
To Configure BusinessObjects Preferences:
- Click Tools on the menu bar.
- On the Tools page, click on the Preferences tab.
- On the Preferences tab, click on the BusinessObjects settings.
- Type a user name and password for the named account to be used to create standard reports.

- Click Test Login.

