
Configuring BusinessObjects
Overview
Once SAP BusinessObjects BI Platform 4.2 SP7 is installed, you can create a subdirectory for all Suite standard and Analysis Center reports and configure individual BusinessObjects user accounts:
- Mitratech includes configuration to use a single account from which to run Crystal Reports from the Reports module or to specify individual accounts to run Crystal Reports from within the eCounsel/Secretariat user preferences.
- Each Analysis Center user must have a unique, corresponding BusinessObjects user account/password with privileges to create ad-hoc reports and access BusinessObjects BI Launch Pad. In addition, each user who will run Analysis Center reports published to the Reports module must have a BusinessObjects user account/password.
Creating groups for the types of user accounts and then assigning the groups to the user accounts aids in maintaining the security rights and privileges for the user accounts.
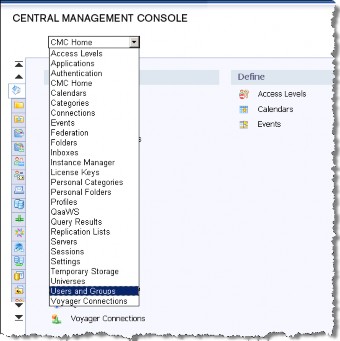
You can use one of the following methods to add users and groups in the Central Management Console:
Creating a Root BusinessObjects Directory
The BusinessObjects Central Management Console contains tools that allow you to create a root folder that can be used to store all Suite reports and Analysis Center reports.
To Create a Root Directory:
- Login to the Central Management Console as an administrator.
- On the Central Management Console, select Folders from the CMC Home menu.
- Click on the Manage menu, select New, and then select Folder.

- On the Create Folder dialog box, type the name for the folder, and click OK.

This directory name will be specified in Suite Manager when configuring the BusinessObjects integration for Suite.
Manually Creating User Groups
The following user groups help maintain the security rights and privileges for the types of users who have accounts in BusinessObjects:
- Administration – Full access to all functionality in BusinessObjects. Note that full administrator access is not required for this integration. It may be necessary to elevate some security to higher than a typically defined “user” for functionality to be achieved.
- AnalysisCenter – Access to create ad-hoc reports in both Analysis Center and the BI launch pad within BusinessObjects.
- ReportExecution – Access to execute both standard and Analysis Center reports, but not create ad-hoc reports.
To Manually Create a User Group:
- Login to the Central Management Console as an administrator.
- On the Central Management Console, select Users and Groups from the CMC Home menu.
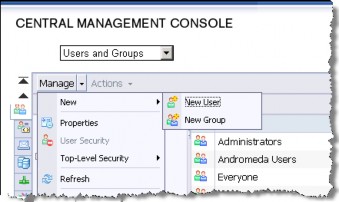
- Click on the Manage menu, select New, and then select New Group.
- On the New Group page, enter the following and then click OK.
- Type a unique name for the user group.
- Optionally, type a freeform comment to describe the purpose of the group.

- Assign the group the appropriate rights and privileges. See Granting Security and Permissions for more information concerning security.
Manually Creating User Accounts
For Suite Analysis Center users, each user account in Suite must be associated with a unique BusinessObjects user account/password.
To Manually Create a User Account:
- Login to the Central Management Console as an administrator.
- On the Central Management Console, select Users and Groups from the CMC Home menu.
- Click on the Manage menu, select New, and then select New User.
- On the New User dialog box, enter the following:
- Select Enterprise for the authentication type.
- Type a unique name for the user account.
- Type the user’s full name.
- Optionally, type the user’s e-mail address.
- Optionally, type a freeform comment to describe the user.
- Type a password for the user account, then re-type the password to confirm it.
 Unless the user will be granted access to the BI Launch Pad, he/she cannot change the password without an administrator's assistance.
 - Select either Concurrent or Named for the connection type, depending on your license type for BusinessObjects.
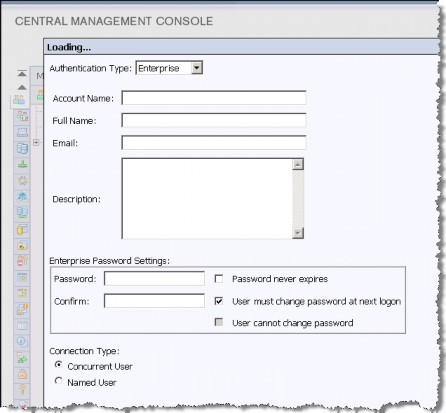
- Click Create to adding more user accounts or Create & Close if adding a single user account.
Assigning Groups to Users
Once a user account is created, you can assign groups to which the user account will belong to the user account.
To Add a Group to a User Account:
- Login to the Central Management Console as an administrator.
- On the Central Management Console, select Users and Groups from the CMC Home menu.
- Click the User List link in the left pane to list all users in the right pane.
- Press and hold the <Ctrl> key and then click the user names to add to a group.
- Click the Actions menu, and select Join Group.
 You also can change all selected users passwords by selecting Account Manager.

- On the Join Group dialog box, do the following:
- Click on the group to assign to the users.
- Click the right arrow button to assign the users to the selected group.
 To assign users to multiple groups, press and hold the <Ctrl> key when selecting the groups.
- Click OK.
To review the members of a group, click the Group Hierarchy link in the left pane, and double-click the group to view the users who are members of the selected group.

Importing Users/Groups
To bulk create groups and users in BusinessObjects, you can create a CSV file with the information and import the file into the Central Management Console.
To Create an Import File:
Prepare the text file for import as follows:
- Each row in the text file defines a single record.
- Each record consists of six fields.
- Each field must have separator between it and the next field.
- Each field can be blank except for the first two fields.
- One record can define either a group, user, or user profile. Text files must be saved in UTF-8 (UCS Transformation Format — 8-bit) format.
The format for a user record is as follows:
|
Field Number |
Contents |
|
Field 1 |
Command, such as Add |
|
Field 2 |
Group name |
|
Field 3 |
User Name |
|
Field 4 |
Full name of user |
|
Field 5 |
Password |
|
Field 6 |
E-mail address of user |
|
Field 7 |
Profile name for user |
|
Field 8 |
Profile value for user |
![]() Profile values must be enclosed in quotation marks.
Profile values must be enclosed in quotation marks.
An example of a user record is as follows:
Add, AC_Users, Psanders, Paula Sanderson, !blue,psanders@Acme.com, Manager, West Region
![]() The above record would create an account name or user name of “psanders” with the password of “!blue” in BusinessObjects. The name “Paula Sanderson” and the e-mail address of psanders@Acme.com would be associated with this account name. The user name “psanders” would be member of the group “AC_Users” and would be assigned the profile “Manager” with the profile value of “West Region”.
The above record would create an account name or user name of “psanders” with the password of “!blue” in BusinessObjects. The name “Paula Sanderson” and the e-mail address of psanders@Acme.com would be associated with this account name. The user name “psanders” would be member of the group “AC_Users” and would be assigned the profile “Manager” with the profile value of “West Region”.
To Import the File:
- Log into the Central Management Console.
- Click Users and Groups on the CMC Home page.
- In the Manage menu, click Import and then User/Group/DBCredential.
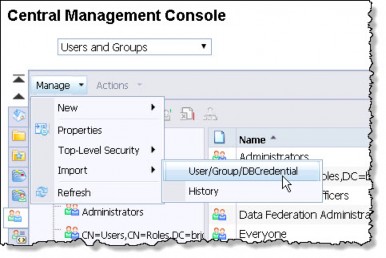
- On the Import User/Group/DBCredential page, click Choose File and select the CSV file.
- Click Verify. If no errors in formatting are found, the Import button is enabled. If any errors are listed, resolve them and click Verify again.
- Click Import. The users and user groups now appear on the Users and Groups page. The imported user accounts are disabled by default.
To Enable User Accounts:
- On the Users and Groups page, click User List in the navigation pane.
- Right-click an imported user and click Properties in the context menu that appears.
- In the Properties dialog box, scroll to the Attribute Binding area and clear the Account is disabled checkbox.
- Click the Save & Close button.
Granting Security and Permissions
Configuring Minimum Permissions for Named Accounts describes the permissions needed for each type of user of BusinessObjects within Suite. The information below is intended to describe the minimal permissions needed for a user to begin working with Analysis Center.
Getting Started with Security
The following permissions are not intended as a best practice for configuring users, but as a primer to creating a test user that can access and use Analysis Center quickly:
To Provide Access to Web Intelligence:
- On the Central Management Console home page, select
 Applications.
 - On the Applications pane, right-click
 Web Intelligence, and select User Security.
 - On the User Security dialog box, click Add Principals.
- On the Add Principals dialog box, click a user name in the Available users/groups list, click the right- arrow button, and click Add and Assign Security.
- On the Assign Security dialog box, click on the View On Demand access level, click the right-arrow button, and click OK.
 For non-editors, assign the View access level to the user.
 - On the User Security dialog box, click Close.
To Provide Access to BI Launch Pad:
- On the Applications pane, right-click on
 BI Launch Pad, (4.2) and select User Security.
 - On the User Security dialog box, click Add Principals.
- On the Add Principals dialog box, click on a user name in the Available users/groups list, click the right- arrow button, and click Add and Assign Security.
- On the Assign Security dialog box, click on the View On Demand access level, click the right-arrow button, and click OK.
 For non-editors, assign the View access level to the user.
 - On the User Security dialog box, click Close.
To Provide Access to Folders:
- On the Central Management Console home page, select
 Folders.
 - On the Folders pane, expand the All Folders node, and expand the folder in which the reports are located.
- Right-click the Suite database alias folder, and select User Security.
- On the User Security dialog box, click Add Principals.
- On the Add Principals dialog box, click on a user name in the Available users/groups list, click the right- arrow button, and click Add and Assign Security.
- On the Assign Security dialog box, click on the Full Control access level, click the right-arrow button, and click OK.
- On the User Security dialog box, click Close.
To Provide Access to a Universe:
- On the Central Management Console home page, select
 Universes.
 - On the Folders pane, expand the Universes node, and click the folder in which the universe is located.
- Right-click on the universe, and select User Security.
- On the User Security dialog box, click Add Principals.
- On the Add Principals dialog box, click on a user name in the Available users/groups list, click the right- arrow button, and click Add and Assign Security.
- On the Assign Security dialog box, click on the Full Control access level, click the right-arrow button, and click OK.
- On the User Security dialog box, click Close.
To Provide Access to a Connection:
- On the Central Management Console home page, select
 Connections.
 - On the Folders pane, right-click the connection, and select User Security.
- On the User Security dialog box, click Add Principals.
- On the Add Principals dialog box, click on a user name in the Available users/groups list, click the right- arrow button, and click Add and Assign Security.
- On the Assign Security dialog box, click the Full Control access level, click the right-arrow button, and click OK.
- On the User Security dialog box, click Close.
Configuring Minimum Permissions for Named Accounts
This section describes the minimum permissions to be configured when integrating Suite with SAP BusinessObjects Business Intelligence Platform 4.2 SP7. Mitratech recommends creating user groups for which the permissions can be configured and users assigned to the groups.
Configuring Permissions for Designers
The following permissions must be set for designers to design and run reports in Analysis Center and run public Analysis Center reports, as well as run Crystal Reports from the Reports module:
To Provide Access to a Universe:
- On the Central Management Console home page, select
 Universes.
 - On the Folders pane, expand the Universes node, and click on the folder in which the universe is located.
- Right-click on the universe, and select User Security.
- On the User Security dialog box, click Add Principals.
- On the Add Principals dialog box, click on the name of the group of designers in the Available users/groups list, click the right-arrow button, and click Add and Assign Security.
- On the Assign Security dialog box, click the Advanced tab.
- On the Advanced tab, click on the Add/Remove Rights link.
- On the Add/Remove Rights dialog box, expand the General node, and click on General.
- Click on the
 Granted option for the View Objects right.
 - Expand the System node and click Universe.
- Click on the
 Granted option for the Create and Edit Queries Based on Universe right.
 - Click on the
 Granted option for the Data Access right.
 - On the Add/Remove Rights dialog box, click OK.
- On the Assign Security dialog box, click OK.
- On the User Security dialog box, click Close.
To Provide Access to a Connection:
- On the Central Management Console home page, select
 Connections.
 - On the Folders pane, right-click on the connection, and select User Security.
- Grant the following rights to the designer user group using steps similar to Steps 4-15 above:
- General > General > View Objects
- System > Relational Connection > Data Access
To Provide Access to Web Intelligence:
- On the Central Management Console home page, select
 Applications.
 - On the Applications pane, right-click on
 Web Intelligence, and select User Security.
 - Grant the following rights to the designer user group using steps similar to above:
- General > General > Log on to Web Intelligence
- Application > Web Intelligence:
- Interfaces – enable web viewing interface
- Documents – enable creation
- Query script – enable editing (SQL, MDX,…)
- Reporting – Insert and remove reports, tables, charts and cells
To Provide Access to Folders:
- On the Central Management Console home page, select
 Folders.
 - On the Folders pane, right-click the Mitratech folder, and select User Security. Grant the following rights to the designer user group using steps similar to above:
- General > General:
- Vieiw objects
- View objects that the user owns
- Expand the Bridgeway folder, right-click on the database alias folder, and select User Security. Grant the following rights to the designer user group using steps similar to above:
- General > General:
- View objects
- View objects that the user owns
- Content > Crystal Report:
- Download files associated with the object
- Export the report’s data
- Print the report's data
- Refresh the report's data
- Expand the database alias folder, right-click on the Analysis Center folder, and select User Security. Grant the following rights to the designer user group using steps similar to above:
- General > General:
- View objects
- View objects that the user owns
- Expand the Analysis Center folder, right-click on a user folder, and select User Security. Grant the following rights to the designer user group using steps similar to above:
- General > General:
- View objects
- View objects that the user owns
- Expand the user folder, right-click on the eCounsel (or Secretariat) folder, and select User Security. Grant the following rights to the designer user group using steps similar to above:
- General > General:
- View objects
- View objects that the user owns
- Add objects to folders that the user owns
- Add objects to the folder
- Delete objects that the user owns
- Edit objects that the user owns
- Content > Web Intelligence Report:
- Edit Query
- Refresh List of Values
- Refresh the report's data
- Use Lists of Values
- View SQL
- In the Analysis Center folder, right-click on the Shared Reports folder, and select User Security. Grant the following rights to the designer user group using steps similar to above:
- General > General:
- View objects
- View objects that the user owns
- Expand the Shared Reports folder, right-click on the eCounsel (or Secretariat) folder, and select User Security. Grant the following rights to the designer user group using steps similar to above:
- General > General:
- View objects
- View objects that the user owns
- Add objects to folders that the user owns
- Add objects to the folder
- Delete objects that the user owns
- Edit objects that the user owns
- Content > Web Intelligence Report:
- Edit Query
- Refresh List of Values
- Refresh the report's data
- Use Lists of Values
- View SQL
Configuring Permissions for Users
The following permissions must be set for users to run public Analysis Center reports, as well as run Crystal Reports from the Reports module:
To Provide Access to a Universe:
- On the Central Management Console home page, select
 Universes.
 - On the Folders pane under the Universes node, click the folder in which the universe is located.
- Right-click the universe, and select User Security.
- On the User Security dialog box, click Add Principals.
- On the Add Principals dialog box, click the name of the group of users in the Available users/groups list, click the right-arrow button, and click Add and Assign Security.
- On the Assign Security dialog box, click the Advanced tab.
- On the Advanced tab, click the Add/Remove Rights link.
- On the Add/Remove Rights dialog box, expand the General > General node.
- Click the
 Granted option for the View Objects right.
 - Expand the System node, and click Universe.
- Click the
 Granted option for the Data Access right.
 - On the Add/Remove Rights dialog box, click OK.
- On the Assign Security dialog box, click OK.
- On the User Security dialog box, click Close.
To Provide Access to a Connection:
- On the Central Management Console home page, select
 Connections.
 - Right-click the connection, and select User Security.
- Grant the following rights to the user group using steps similar to Steps 4-15 above:
- General > General > View Objects
- System > Connection > Data Access
To Provide Access to Folders:
- On the Central Management Console home page, select
 Folders.
 - On the Folders pane, expand the All Folders node.
- Right-click on the Bridgeway folder, and select User Security. Grant the following rights to the user group using steps similar to above:
- General > General:
- Vieiw objects
- View objects that the user owns
- Expand the Bridgeway folder, right-click on the database alias folder, and select User Security. Grant the following rights to the user group using steps similar to above:
- General > General:
- View objects
- View objects that the user owns
- Content > Crystal Report:
- Download files associated with the object
- Export the report’s data
- Print the report's data
- Refresh the report's data
- Expand the database alias folder, right-click on the Analysis Center folder, and select User Security. Grant the following rights to the user group using steps similar to above:
- General > General:
- View objects
- View objects that the user owns
- 6. In the Analysis Center folder, right-click the Shared Reports folder, and select User Security. Grant the following rights to the user group using steps similar to above:
- General > General:
- View objects View objects that the user owns
- Expand the Shared Reports folder, right-click the eCounsel (or Secretariat) folder, and select User Security. Grant the following rights to the user group using steps similar to above:
- General > General:
- View objects
- View objects that the user owns
- Content > Web Intelligence Report:
- Refresh List of Values
- Refresh the report's data
- Use Lists of Values
- View SQL
Configuring Permissions for Report Template Import
The following permissions must be set (in addition to the above) for users to import Crystal Reports templates in Suite Manager:
To Provide Access to Folders:
- On the Central Management Console home page, select
 Folders.
 - On the Folders pane, expand the All Folders node.
- Expand the Bridgeway folder, right-click on the database alias folder, and select User Security. Grant the following rights to the user group using steps similar to above:
- General > General:
- Add objects to the folder
- Delete objects
- Edit Objects
Configuring Session Timeout Values
When BusinessObjects reports are run from the Reports module in Suite and/or Analysis Center is accessed by multiple users, BusinessObjects concurrent usage licenses are used for each session. These licenses are released based on the timeout values specified for the BusinessObjects server and the Java application server used by BusinessObjects for BI Launch Pad. If you have a limited number of concurrent usage licenses, changing the timeout values can release licenses sooner than the default of 60 minutes.
In order to change the session timeout for BusinessObjects applications, multiple settings must be changed:
- in the Central Management Console
- in the (web.xml) on the Apache Tomcat Java application server
- in the BILaunchpad.properties file
The Web Application must then be deployed and the Tomcat and SIA services restarted.
To Change Values in the Central Management Console
The following changes need to be applied using the Central Management Console on the BusinessObjects server:
- On the BusinessObjects server, click Start, select All Programs, select SAP Business Intelligence, select SAP BusinessObjects BI Platform 4, and select SAP BusinessObjects BI Platform Central Management Console.
- Logon to the Central Management Console using an administrator account.
- On the Central Management Console, click Servers in the Organize column or click the
 Servers button in the toolbar.

- In the Servers List, right-click the Connection Server and select Properties.

- On the Properties panel, change the value for Transient Object Inactivity Timeout (minutes) to 60, and click Save & Close.

 Any change to a running server will add a red flag icon to the Stale column in the server list.
 - For each of the following servers, right-click the server, select Properties, and change the Idle Connection Timeout to “10”:
- Crystal Reports Cache Server
- CrystalReportsProcessingServer
- WebIntelligenceProcessingServer
 A server restart is not required after changing all these values because the Apache Tomcat Java application server will be restarted later in the process.
- Close the Central Management Console.
To Change Values in the web.xml Files:
- Navigate to :
<BusinessObjectsInstall>\SAP BusinessObjects\SAP BusinessObjects Enterprise XI 4.2\warfiles\webapps\BOE\WEB-INF
where <BusinessObjectsInstall> is the directory in which BusinessObjects was installed (for example, C:\Program Files (x86)\SAP Business Objects\SAP BusinessObjects Enterprise XI 4.2\warfiles\webapps\BOE\WEB-INF\). - Open web.xml with a text editor such as Microsoft Notepad.
- Change the <session-timeout> value to “10”.
- Save and close the file.
To modify the BIlaunchpad.properties file:
- Copy the file BIlaunchpad.properties file from default folder and paste it another folder to make it editable.
- Open the copy of the file with a text editor such as Microsoft Notepad.
- Delete all the content in the copied BIlaunchapad.properties file except the logontoken.enabled property.
- Change “logontoken.enabled=false” to “logontoken.enabled=true”.

- Copy and paste this file to the custom folder inside of the config folder. This folder is located
<BusinessObjectsInstall>\SAP BusinessObjects\SAP BusinessObjects Enterprise XI 4.2\warfiles\webapps\BOE\WEB-INF\config\custom\
where <BusinessObjectsInstall> is the directory in which BusinessObjects was installed, for example: C:\Program Files (x86)\SAP BusinessObjects\SAP BusinessObjects Enterprise XI 4.2\warfiles\webapps\BOE\WEB-INF\config\custom\ - Restart the Tomcat server to make the changes take effect.
To create a backup of the custom configuration, store a copy of all the custom configuration files in a separate location or network drive.
To Deploy the Web Applications (war files)
- Navigate to :
<BusinessObjectsInstall>\SAP BusinessObjects\SAP BusinessObjects Enterprise XI 4.2\wdeploy\conf
where <BusinessObjectsInstall> is the directory in which BusinessObjects was installed, for example:C:\Program Files (x86)\SAP BusinessObjects\SAP BusinessObjects Enterprise XI 4.2\wdeploy\conf. - Open config.tomcat7 with a text editor such as Microsoft Notepad.
- Assign the following values to the respective variables:
as_dir=<BusinessObjectsInstall>SAP BusinessObjects\tomcat (for example, C:\Program Files (x86)\SAP BusinessObjects\tomcat)
as_instance=localhost as_service_name=BOEXI42Tomcat - Save and close the file.
- Open a Command Prompt as an administrator, type the following command to change the directory, and press the <ENTER> key:
cd <BusinessObjectsInstall>\SAP BusinessObjects\SAP BusinessObjects Enterprise XI 4.2\wdeploy
where <BusinessObjectsInstall> is the directory in which BusinessObjects was installed (for example, C:\Program Files (x86)\SAP BusinessObjects\SAP BusinessObjects Enterprise XI 4.2\wdeploy\) - Type the following command and press the <ENTER> key to validate the configuration:
wdeploy tomcat7 validateconfig
A “BUILD SUCCESSFUL” message will appear if the validation is successful. - Type the following command and press the <ENTER> key to deploy the BusinessObjects WAR files on Tomcat 7:
wdeploy tomcat7 deployall
A “BUILD SUCCESSFUL” message will appear after all the WAR files are successfully deployed.
To Restart the Tomcat and Server Intelligence Agent Servers:
- On the BusinessObjects server, click Start, select All Programs, select SAP Business Intelligence, select SAP BusinessObjects BI Platform 4, and select Central Configuration Manager.
- On the Central Configuration Manager window, right-click the Server Intelligence Agent and click Stop. Wait until the service completely stops. Right-click the Apache Tomcat for BI 4 and click Stop. Wait until the service completely stops.

- Right-click on Apache Tomcat, click Start, and wait until the status changes to “Running”.
- Right-click on the Server Intelligence Agent, click Start, and wait until the status changes to “Running”.
- Close the Central Configuration Manager window.
Configuring Single Sign-on
If your integration uses Single Sign-on (SSO) with SiteMinder, you must configure SSO with the BusinessObjects server prior to configuring Suite. In order for the integration to work properly, you must also configure SSO with the Suite server prior to configuring the integration in Suite Manager. The Suite/BusinessObjects integration supports SiteMinder with LDAP (Lightweight Directory Access Protocol).
SiteMinder authenticates with Suite during initial login. Suite authenticates with BusinessObjects using encrypted user names and passwords without further authentication with SiteMinder.
SSO, SiteMinder, and Analysis Center
When SiteMinder is enabled and a user logs in, Suite calls upon an external SiteMinder agent that validates the user, creates a cookie named SMSESSION, and returns that cookie back to the Suite application.
When SiteMinder is enabled and Analysis Center is launched, Suite looks for the SMSESSION cookie and obtains the value associated with that cookie name. If a SSO other than SiteMinder is used, the cookie does not exist and Suite cannot obtain the value that it needs to continue its authentication process.