
Tools Page
The Tools page allows you to view information concerning the Suite application, change your password, customize preferences, and request an enhancement.

Information Tab
Contains information concerning the current user and database settings. In addition, the user can change the view profile if multiple view profiles are assigned to the user. If the user has the ability to switch between view profiles, the most restrictive security will be applied.
Change Password Tab
Select this command to change your Suite login password.

Enhancement Request Tab
Click on the Enhancement Request tab to browse Mitratech's Ideas portal to submit changes or enhancements to a future version of Suite.

About Tab
Displays Suite version information. Click Support Information to see a list of patches applied to the release.

Logs Tab
This tab is included with Suite 8.11.0 Service Pack 2 and can only be accessed by users with Diagnostics Administration security rights. You must be assigned the View Logs security attribute to view log files that do not contain login information, and in addition, you must be assigned the View Security Logs to view log files that contain login information.
Logs tab contains two tabs: Logs and System Appenders
Preferences Tab
The Preferences tab in Tools is where you can personalize Suite. All preference settings are tied to your user ID; these settings will not affect any other user and will go with you from computer to computer.
- Entities
- People
- WorldView
- Business Objects (premium feature)
- Calendar
- CorpCharts
- Date and Time
Entities Preference Settings
Entities preference settings can be accessed through the Tools page.
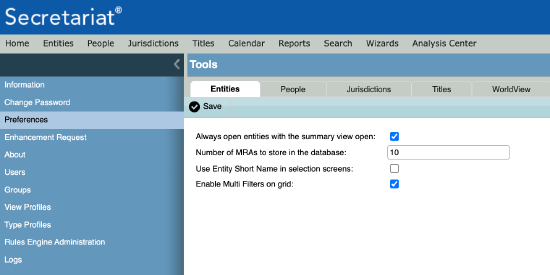
Fields
Always open entities with the summary view open – If selected, the Entities Summary page will display when the entity record is first opened.
Number of MRAs to store in the database – Determines the total MRA (Most Recently Accessed) records to display on the Entities List page.
After changing this field, you must open a record in the module list page before the new setting will take effect.
Use Entity Short Name in selection screens – If selected, the abbreviated name for the entity will be used when searching for entities using the grid list.
Buttons
Save – Click to save changes.
People Preference Settings
People preference settings can be accessed through the Tools page.

Fields
Always open people with the summary view open – If selected, the People Summary page will display when the people record is first opened.
Number of MRAs to store in the database – Determines the total MRA (Most Recently Accessed) records to display on the People List page.
After changing this field, you must open a record in the module list page before the new setting will take effect.
Buttons
Save – Click to save changes.
WorldView Preference Settings
WorldView preference settings can be accessed through the Tools page. WorldView is a program that provides a data-gathering and data-sharing system that combines changes in legal information from Secretariat databases anywhere in the world. Each site is responsible for maintaining and reporting on a subset of corporate information.
If WorldView is installed, your System Administrator will assign records and users to WorldView sites. Users assigned to a specific WorldView sites will only be able to access records that are assigned to that WorldView site. Departments, geographical locations, or whatever manner meets your company’s needs, can establish WorldView sites. “Common” is the WorldView site that allows access to the entire database.
If your company uses WorldView, you must be assigned to a site in order to log in to Secretariat.

Fields
WorldView Sites – Lists any WorldView sites to which you have access. If the checkbox is checked, all records for the site will be shown in Secretariat.
Show All Entities/People in Selection Lists – If you have been assigned the unlimited WorldView Sites Administration security attribute, an indication that you can see and select a person or entity name from a dropdown list even though you have no access to the record. This checkbox does not provide access to the record and only displays if you have the WorldView – Unfiltered Select List security attribute applied to your user ID.
Global WorldView Access – If you have been assigned the unlimited WorldView – Site Access security attribute, an indication of whether the user has access to all WorldView sites.
Buttons
Save – Click to save changes.
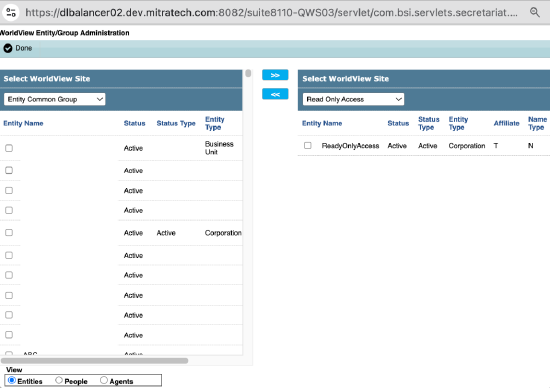
Site Administration – If you have been assigned the unlimited WorldView – Site Access security attribute, click to open the WorldView Entity/Group Administration dialog box to move entities, people, and agents between WorldView sites.
Business Objects Settings
Premium feature – A registration key code is required to activate.
Business Objects preference settings can be accessed through the Tools page. Select Business Objects to configure a specific Business Objects user account from which to execute standard reports.

Fields
Business Objects User Name – When using named accounts, the user account to be used to run reports.
Business Objects Password – The corresponding password for the above user account.
Buttons
Save – Click to save changes.
Test Login – Click to verify that the Business Objects user name and password combination is valid.
Calendar Preference Settings
System-wide settings for Microsoft Office integrations are the same for all users and for all records and are performed by the System Administrator using Suite Manager. However, each user must specify his/her e-mail address in order to receive appointments/tasks from Secretariat.

Fields
E-mail Address – The e-mail address of the current user. This setting ensures that appointments and tasks are sent to Microsoft Outlook.
Buttons
Save – Click to save changes.
CorpCharts Preference Settings
CorpCharts preference settings, which can be accessed through the Tools page, allow you to specify the default format settings for the organizational charts.

Display Tab
Subsidiaries with multiple owners – Contains options to set how multiple owners of subsidiaries are listed.
Display every instance of subsidiaries – When selected, each company is drawn once for every owner. This chart could have many repetitions of the same company depending on the complexity of the ownership structure.
Display subsidiary once, with lines to each owner – When selected, subsidiaries with multiple parents are not repeated. The subsidiary is displayed once with a line connecting it to each owner. This option is best for smaller charts; in a larger chart, this option tends to result in a number of confusing, overlapping lines.
Display subsidiary once, with footnotes for owners – When selected, subsidiaries with multiple parents are not repeated. The entity is drawn once with a line to one parent. Additional ownership relationships are indicated in the footnote section at the bottom of the chart.
Appearance – Contains options to change the display of ownership percentages.
Use Short Name – When selected, the entity name used in the chart will be the short name, as entered on the Base Info tab of the Entities module in Secretariat.
Don’t display ownership if 100% – When selected, if a subsidiary is wholly owned, the percentage will not display.
Display percentage ownership – When selected, the percentage from the Ownership tab in Secretariat displays on the chart. Click on a radio option, then enter additional information to indicate how CorpCharts is to display the information.
Levels to display – Sets the number of subsidiary levels to display on the chart.
Default Chart Zoom – Contains options to display the chart at 100% or to zoom to the page width.
Additional Fields Tab
The Additional Fields tab allows you to select additional information to appear in the shapes (by entity type).

Entity Type – The type of entity for which you want to select additional fields to display on the chart.
Show Field Names on Chart – Indicates whether the field labels will display on the chart. If this checkbox is not selected, the value of the field will display, but not the field name.
Available Fields – Lists all fields that may be placed on the chart for the selected entity type. Click on a field, then click the >> arrow to move the field to the Selected Fields list box.
Selected Fields – Lists the selected fields that will display on the chart for the selected entity type.
Chart Boxes Tab
The Chart Boxes tab allows you to configure the appearance of the entity boxes. Shapes and fonts can be set based on the entity type, region, or the foreign/domestic field. Each appearance option can be set individually.

Shape Size in Inches – The size of each chart box. In addition, you can select to resize the shape to fix the text label.
Shapes – For each item in the list, select the default shape (such as rectangle, circle, or triangle) to use.
Fonts – For each item in the list, click the ![]() button to select the font type, size, and attributes (such as color, bold, italics, etc.). A preview of the formatting is provided next to the item name.
button to select the font type, size, and attributes (such as color, bold, italics, etc.). A preview of the formatting is provided next to the item name.
Shape Background Colors – For each item in the list, select the default color (such as black, red, green, etc.).
Chart Lines Tab
The Chart Lines tab allows you to select the default appearance of the connecting lines on the chart.

Type – The line (such as solid or dashed) that is used as a connector.
Style – An indication of whether arrows are used to point to a subsidiary.
Thickness – The numeric relative thickness (values of 1-5) of the line.
Buttons
Save – Click to save changes.
Date and Time Preference Settings
System-wide settings for date/time display of calendar appointments are the same for all users and for all records and are performed by the System Administrator using Suite Manager. However, users can override the system default to display dates/times for calendar appointments in a user-specified format.
The first time you open the Date and Time settings on the Preferences tab of the Tools page in Secretariat, the system will attempt to set the time zone based on the system-wide settings for Suite (configured by your System Administrator). Adjust the settings as needed. These settings override the system-wide settings from Suite Manager.

Fields
Time Zone – The time zone to use to display dates/times for calendar appointments. An offset will be calculated and applied if needed to the server time, which is stored in UTC – Universal Coordinated Time (formerly called GMT – Greenwich Mean Time).
Format – User-specified display settings for date/times for calendar appointments.
Date Separator – The character (such as a forward slash) used between date fields.
Day Size – The number of digits (either one or two) to display for the day.
Month Size – The number of digits (either one or two) to display for the month.
Year Size – The number of digits to display for the year.
Order of Date Fields – The order in which the date fields appear.
Hours – The type of clock (either 12-hour or 24-hour) that is used to display time.
Hour Size – The number of digits (either one or two) to display for the hour.
Seconds – An indication of whether seconds are shown or not.
Buttons
Save – Click to save changes.
Reset Preferences
You can reset user preferences in the Reset Preferences tab. The tab divides preferences by module. Use Others to reset preferences for Dynamic Filters, Business Objects, and Date and Time.
The Preferences modules are:
- Calendar
- Entities
- Jurisdictions
- People
- Reports
- Search
- Titles
- Wizards
- Others
To reset the user preferences for a module, select the checkbox next to the module and clik Reset Preferences. On the modal that appears, click OK to confirm. To reset all user preferences, select the checkbox next to Module.

Rules Engine Administration Settings
For rules within Secretariat, some rules require the installation of configuration or property files that are customized per client and the installation of utility files in the form of JAR files that are specific for the rule. If your system administrator has enabled Rules Administration in Suite Manager System Settings and your user has been granted Rules Engine Administration rights, you can access the Rules Engine Administration tab on the Tools page.

Fields
File – The file to upload. Only configuration or property files and JAR files can be uploaded. If the file already exists in the folder, it will be backed up prior to uploading the new file.
Upload To – Select either Configuration File or JAR File for the respective file upload.
Buttons
Choose File – Click to open a file explorer to select the property or JAR file to upload.
Clear – Click to remove the current folder to which the file will be uploaded.
Continue – Click to upload the file to the selected folder.
Cancel – Click to exit the dialog box without uploading the file.