
Installing the Bridgeway E-mail Link Server
Bridgeway E-mail Link uses Internet Message Access Protocol over SSL (IMAPS) technology to power the integration between Bridgeway products and e-mail clients at your site, using standard Internet protocols for e- mail retrieval.
Installing the Mail Server
The GNOME Dwarf Mail Server must be installed to handle virtual domains for the IMAP4 protocol. Bridgeway recommends installing the Bridgeway E-mail Link Server on a dedicated 64-bit server machine.
To Install the Bridgeway E-mail Link Server:
- If JRE 1.8.x (64-bit) is not installed on the machine, install the JDK from the installation media for Suite. See the Suite Installation Guide for more information.
- If the Suite Java application server supports unlimited strength encryption, download the Java Cryptographic Extension (JCE) Unlimited Strength Jurisdiction Policy Files 8 (local_policy.jar and US_export_policy.jar) from the Java Website and copy the files to the <Install>\Java\jre<Version>\lib\security directory (where <Install> is the drive and path in which the JRE was installed and <Version> is the version number of the installation).
- Copy the BridgewayE-mailLink.zip file from the Bridgeway E-mail Link folder on the Suite installation media to a location on the server computer.
- Open the file using a decompression utility or Microsoft Windows Explorer.

- Extract the contents of the compressed file to the installation directory (typically C:\Bridgeway) with the folder structure intact.

- Using Microsoft Windows Explorer, navigate to the wrapper.conf file (located in <Install>\BridgewayE-mailLink\conf, where <Install> is the drive and directory in which the ZIP file was extracted).R
- Right-click on the filename, select Open With, then select a text editing application such as WordPad or Notepad++. If using Microsoft Notepad, line breaks will not appear in the file, making the file difficult to edit.

- Change the value of the wrapper.java.command parameter to the location where the java.exe file is located (typically, C:/Program Files/Java/jrex.x.x/bin).
![]() Important: The path to the bin subdirectory must be appended with “\java”, so the Bridgeway E- mail Link Server can start the service. You must use forward slashes (/) in the path name.
Important: The path to the bin subdirectory must be appended with “\java”, so the Bridgeway E- mail Link Server can start the service. You must use forward slashes (/) in the path name.

- Save changes to the wrapper.conf file and close the text editor.
- Run InstallBridgewayE-mailLink-NT.bat (located in the <Install>\BridgewayE-mailLink folder) by double-clicking on the file or executing the file from a command prompt. Check that the Bridgeway E-mail Link Server service now appears in the Services window.
![]() Important: For some operating systems, you may need to run the batch file from the command prompt as an administrator in order to install the service.
Important: For some operating systems, you may need to run the batch file from the command prompt as an administrator in order to install the service.
Do not start the service at this time. Continue with the next section.
Configuring the Bridgeway E-mail Link Server
After installing the Bridgeway E-mail Link Server, you must make certain configuration changes before starting the Bridgeway E-mail Link Server service.
![]() If you have installed a Suite instance specifically for integration with Bridgeway E-mail Link, you must set a parameter to redirect all links from Bridgeway E-mail Link to the Suite instance to which users typically login. This setting ensures that links such as Select to edit this matter in eCounsel or Select to edit this invoice in eCounsel in Bridgeway E-mail Link function correctly. See the note about the redirectUrl tag below.
If you have installed a Suite instance specifically for integration with Bridgeway E-mail Link, you must set a parameter to redirect all links from Bridgeway E-mail Link to the Suite instance to which users typically login. This setting ensures that links such as Select to edit this matter in eCounsel or Select to edit this invoice in eCounsel in Bridgeway E-mail Link function correctly. See the note about the redirectUrl tag below.
To Configure the Bridgeway E-mail Link Server:
- Open the imap.xml file located in <Install>\BridgewayE-mailLink\conf in a text editing application such as WordPad or Notepad++. If using Notepad, line breaks will not appear in the file, making the file difficult to edit.
- Set the hostID property at the top of the file to the fully qualified name of the e-mail host server. For example:
<set name="hostId">Server1.companydomain.com</set>
![]() If users will be creating Bridgeway E-mail Link accounts for the e-mail client on machines located outside the firewall, the machine must be a Domain Name System (DNS) name that is accessible from the Internet.
If users will be creating Bridgeway E-mail Link accounts for the e-mail client on machines located outside the firewall, the machine must be a Domain Name System (DNS) name that is accessible from the Internet.
- Set the value of the endpointUrl property with the URL used to access the Suite implementation. Make sure the URL is followed by “/servlet” as in the following example:
<set name="endpointUrl">http://Server1:8080/suite8/servlet</set>
![]() The URL to access the Suite implementation follows either of these formats:
The URL to access the Suite implementation follows either of these formats:
http://<ServerName>:<Port>/<Context>/servlet
ttps://<ServerName>:<Port>/<Context>/servlet
where <ServerName> is the name of the server, <Port> is the port used for connection (omit the:<Port> if a redirector is being used),and <Context> is the context name for Suite. If you have deployed Suite on a clustered environment, enter either a single server or the load balancer depending on whether you want the Bridgeway E-mail Link Server to retrieve data from a single node or from either node.
- Set the dbAlias to the unique alias for the database connection on the Suite server. This information can be found in the Database Identifier field on the Database Properties Administrator page for Suite. For example:
<set name="dbAlias">Suite8</set> - Set access to the Bridgeway E-mail Link database by adding values for the dbUser, dbPassword, and dbURL. The user name and password provided will create an account for the database, so any values can be provided.
<set name="dbUser">admin</set>

    <set name="dbPassword">admin</set>

    <set name="dbURL">jdbc:h2:file:C:\Bridgeway\BridgewayE- mailLink\conf\beldb;MVCC=TRUE;DB_CLOSE_ON_EXIT=FALSE</set>
For the dbURL, the format of the value is as follows:
jdbc:h2:file:<Install>\BridgewayE-mailLink\conf\beldb
where <Install> is the drive and path to the Bridgeway E-mail Link installation on the server machine. - Set the value of the license key for the property below using the Bridgeway-provided license key:
<set name="licenseKey"></set> - Optionally, you can adjust several other parameters if needed:
- Adjust the minimum time between processing a user’s synchronization request from the e-mail client (triggered by any command sent from the e-mail client) by modifying the value below (in seconds):
<set name="minSyncInterval">1800</set>
This setting regulates the number of seconds before a user’s data is updated from Suite. In Bridgeway E-mail Link, a client logs in with the user’s Suite credentials to gain access to matter data. In turn, Bridgeway E-mail Link logs into Suite and transfers data to data storage for the mail client. The minSyncInterval timer determines how often the data is refreshed. - Adjust the minimum time before a user is prompted for credentials if Suite is unreachable or the user’s credentials are not valid by modifying the value below (in seconds):
<set name="minConnectIntervalOffline">300</set> - Adjust the time in seconds that a user can move an invoice out of the approve, reject, or on hold folders before the invoice is processed by eCounsel (to allow the user an opportunity to rectify a drag-and- drop error):
<set name="updWaitMinInterval">300</set> - If you have installed a Suite instance specifically for integration with Bridgeway E-mail Link, type the URL to the Suite instance to which users typically login:
<set name="redirectUrl">http://ServerBEL:8080/suite8/servlet</set>
 The URL to access the Suite implementation follows either of these formats:
http://<ServerName>:<Port>/<Context>/servlet
https://<ServerName>:<Port>/<Context>/servlet
where <ServerName> is the name of the server, <Port> is the port used for connection (omit the:<Port> if a redirector is being used),and <Context> is the context name for Suite. If you havedeployed Suite on a clustered environment, enter either a single server or the load balancer depending on whether you want the Bridgeway E-mail Link Server to retrieve data from a single node or from either node. - Adjust the time in seconds that a user’s Suite credentials will be verified by modifying the value below:
<set name="authExpiration">300</set>
This setting causes the Bridgeway E-mail Link Server to verify credentials every 5 minutes, so that if a user’s security has changed for logical groups, Worldview, etc., the data will be refreshed with the new settings applied. Also, if a user’s account is disabled or locked out, Bridgeway E-mail Link will cease to update the data in the e-mail client. - Adjust the size of the main worker thread pool, which is responsible for handling synchronization requests, by modifying the value below:
<set name="requestPoolSize">10</set>
Threads are pooled to take advantage of idleness. The request queue is a large worker queue that processes data from Suite. The number of threads working has a direct impact on Suite as it can potentially create a continuous and unrelenting load upon the Suite server. This value is the single biggest contributor to performance. A balance must be struck between expected data refresh time and queue size. - Adjust the size of the worker thread pool, which is responsible for handling synchronization requests from users that do not exist in the mail store (if “0”, all requests are handled by the “normal” request pool), by modifying the value below:
<set name="highPriorityRequestPoolSize">4</set>
The high priority queue is the queue in which new users are processed. This queue is called when a user that has previously not logged into Bridgeway E-mail Link. On a sufficiently loaded system, the high priority queue is the mechanism that makes new users see relevant data faster. A user is put into the highPriorityRequestQueue when they do not have a data already. - If you want to configure Bridgeway E-mail Link to show documents for matters, set the following variable to “true”:
<set name="showDocuments">false</set>
Warning: Bridgeway strongly recommends setting this value to “false” due to the additional load incurred by transferring numerous and large documents between eCounsel, the Bridgeway E-mail Link server, and the e-mail client. This load may cause performance issues with the integration.
- Save changes to the imap.xml file and close the editor.
- Start the Bridgeway E-mail Link Server service from Microsoft Window Services Manager. Check the <Install>\BridgewayE-mailLink\log\wrapper.log file (where <Install> is the drive and directory in which the ZIP file was extracted) to see if the Bridgeway E-mail Link Server started successfully.
Configuring Bridgeway E-mail Link in Suite Manager
Once the server is configured, you must enable Bridgeway E-mail Link using Suite Manager, the administrative tool for Suite. In addition, certain global settings can be configured in Suite Manager including:
- From Address – The address from which messages appear when Bridgeway E-mail Link populates matters and invoices. The address cannot contain special characters such as <, >, (, or ). The default is “Bridgeway E-mail Link”.
- Matters Filter – The default dynamic filter to use from which to retrieve matters if the user has the appropriate security attribute settings for eCounsel in Suite Manager. The default filter is My Matters.
- Subscribe to Reports (BusinessObjects Only) – An indication of whether users can have reports scheduled to be delivered to Bridgeway E-mail Link. If this setting is not enabled, reports will not be available in Bridgeway E-mail Link. If the setting is enabled, each user can select to continue to receive reports via e- mail or to have the reports delivered directly to Bridgeway E-mail Link.
To Configure Global Settings for Bridgeway E-mail Link:
- Open Suite Manager.
- On the Suite Manager control panel, click on the
 System Settings component in the System Configuration area.
 - On the System Settings window, click on the Bridgeway E-mail Link setting on the Mitratech Suite tab.
- On the Bridgeway E-mail Link settings, click on the Enable Bridgeway Link checkbox to enable users to create Bridgeway E-mail Link accounts and populate with information from Suite.
- In the From Address text box, specify the text that will appear on all messages in the Bridgeway E-mail Link folders. The default is “Bridgeway E-mail Link”.
- Select a default filter to use to return matters to users in Bridgeway E-mail Link. Each user can override this filter by setting a preference in eCounsel. If no default is selected, “My Matters” will be used.
- Click on the Subscribe to Reports (Business Objects Only) checkbox to enable users to have scheduled reports sent to Bridgeway E-mail Link. If checked, type a path (UNC paths can be specified) to an existing subdirectory accessible from the Suite server where reports will be stored. Click the Verify button to check that the subdirectory does exist and is accessible from the server.

- Click Save.
Setting User and Group Access in Suite Manager
Access to matters and invoices in Bridgeway E-mail Link can be limited to certain groups or individuals. To change the access for a user or group, edit the user’s or group’s Security Attributes for eCounsel in Suite Manager.
To Grant Permissions to a User:
- On the Suite Manager control panel, click the
 Users/Groups component in the Security area.
 - On the Users tab of the Users/Groups window, select the user that you wish to grant permissions and click Edit.
- On the Edit User dialog box, click the Security Attributes tab.
- Click the eCounsel setting to access the appropriate security attributes.
- If Access to eCounsel is not set to “Allow,” click the link to the right of the Access to eCounsel field. In the Program Access dialog box, select “Allow” and click Save and Close.
- For the Bridgeway E-mail Link Access security attribute, click the arrow to set the Override Access setting to “Allow.”

- Click Save. The user now has access to Bridgeway E-mail Link.
To Grant Permissions to a Group:
- On the Suite Manager control panel, click the
 Users/Groups component in the Security area.
 - On the Users tab of the Users/Groups window, select the group that you wish to grant permissions and click Edit.
- On the Edit Group dialog box, click the Security Attributes tab.
- Click the eCounsel setting to access the appropriate security attributes.
- If Access to eCounse is not set to “Allow,” click the link to the right of the Access to eCounsel field. In the Program Access dialog box, select “Allow” and click Save and Close.
- For the Bridgeway E-mail Link Access security attribute, click the arrow to set the Access Level setting to “Allow.”

- Click Save. The group now has access to Bridgeway E-mail Link.
Scheduling Reports
SAP BusinessObjects Business Intelligence Platform reports can be scheduled to be sent to recipients within Suite. If the user has a Bridgeway E-mail Link account, he/she can configure the reports to be populated in the Bridgeway E-mail Link account instead of being e-mailed. In addition, BusinessObjects BI Launch Pad can be used to schedule Analysis Center reports to be sent to recipients directly in Bridgeway E-mail Link.
Only users who have been designated as Reports Administrator can schedule reports, and only one schedule can be created at a time for a single report by a single user. Once a schedule is selected, recipients may be selected. Any security settings for the recipient will be applied to the report (for example, if the user is restricted from viewing social security numbers, and social security numbers appear on a report, the scheduled report will not show this information).
Mitratech recommends scheduling the following eCounsel reports for users of Bridgeway E-mail Link:
- Active Matters by Legal Section – This report lists all active matters by legal section within the open date range indicated.
- Cost by Legal Section – This report lists all costs in the system associated with each vendor with a graph of the same.
- Total Cost by Matter – This report lists the amount spent on matters for a specified date range sorted by matter type.
- Actual vs. Budget by Matter – This report lists all invoiced costs against budget for selected matter(s). Detailed information concerning these reports is available in the Suite Reports Guide.
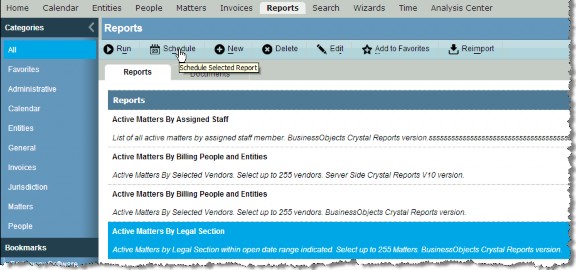
To Schedule a Report in eCounsel:
- On the Reports List page, select a report.
- Click the
 Schedule button.
- On the Report Scheduler Wizard, click on an option to select the time period used to schedule the report (only one method can be used to schedule the report). Mitratech recommends setting a weekly or monthly schedule.
- Click
 Continue.
 - Click on the checkbox next to a recipient’s name to select the recipient (only active users with an associated person record appear), then click
 Continue.
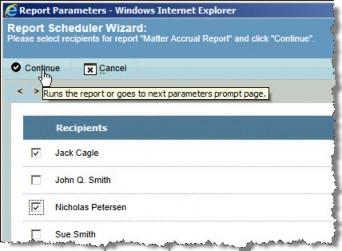
- If the report requires that a record on which to base the report must be specified, select a single record by clicking on the checkbox next to the record. To select all records, click the checkbox on the header row.

The eCounsel recommended reports require the following parameters:
|
Report |
Parameters |
|---|---|
|
Active Matters by Legal Section |
|
|
Cost by Legal Section |
|
|
Total Cost by Matter |
|
|
Actual vs. Budget by Matter |
|
- Click
 Continue.
 - Verify the schedule parameters, and click
 Close.
To Schedule an Analysis Center Report in BI Launch Pad:
- On the eCounsel console, click the Analysis Center module.

- On the Analysis Center window, click the Open BI Launch Pad button. Analysis Center provides your BusinessObjects user credentials to BI Launch Pad so that you are logged in automatically.

- On the Launch Pad page, click the Documents tab.

- Click Folders at the bottom of the navigation pane to display the folder tree.

- Locate the folder containing the saved reports. Note that Analysis Center reports may reside in a nested directory structure following these conventions:
- The root folder as defined by the Root BO Directory value in the Suite Manager BusinessObjects system settings (for example, bridgeway)
- A subfolder of the root folder from above matching the unique database identifier as defined by the Database Identifier value on the Database Properties Administrator page for Suite (for example, Suite8)
- A subfolder of the previous folder named Analysis Center
- A subfolder of the Analysis Center folder matching either the user’s Suite login name (for private reports) or Shared Reports (for public reports)
- A subfolder of the previous folder named eCounsel

-
Click the More Actions menu, and select the Schedule menu command.

-
In the Recurrence pane, select how often to run the report from the Run object menu. Options will vary depending on your selection.

-
On the Formats pane, select the format for the delivery of the report and the destination. This example specifies an Adobe Acrobat PDF file.

-
On the Destinations pane, select the method of delivery and the destination. This example specifies that the file will be e-mailed as an attachment to recipients.

-
Click Schedule. The report now appears in the list of scheduled reports.

-
The Analysis Center report will appear in in the Legal Department Reports folder in Bridgeway E-mail Link for users who were scheduled to receive the report when the IMAP folders are updated.
Configuring Invoice Rejection Reasons in Suite Manager
When eCounsel and Bridgeway E-mail Link are deployed, no rejection reasons will exist in the database if you want end users to be able to reject invoices from Bridgeway E-mail Link. In order to configure this option, you must add the rejection reasons to Suite Manager. Otherwise, the default functionality allows end users only to approve or place invoices on hold. If an invoice is rejected in Bridgeway E-mail Link using one of these rejection reasons, the rejection reason comment will contain the text from this lookup field.
To Configure Invoice Rejection Reasons for Bridgeway E-mail Link:
- Open Suite Manager.
- On the Suite Manager control panel, click the
 Lookups component in the System Configuration area.
 - On the Lookups window, click on the Invoice Rejection Reasons category.
- Type the name of the new lookup code at the bottom of the Codes list.
- Click the Add
 button. (The Add button will not appear until you type a code in the field.)

- Repeat Steps 4 and 5 for all rejection reasons that will appear in Bridgeway E-mail Link.
Limiting Invoicing Capabilities
Limiting a user’s ability to access certain features in eCounsel also limits a user’s ability to access these features in Bridgeway E-mail Link. Hiding the following functionality in Suite Manager for a user through a view or type profile also will hide the applicable folders in Bridgeway E-mail Link:
- @On Hold folder – If the Hold Date is hidden or read-only for a user in Suite Manager using a view or type profile (which removes a user’s ability to place an invoice on hold in eCounsel), the @On Hold folder will not appear in Bridgeway E-mail Link and the user will not be able to place an invoice on hold.
- @Reject folders – If the Reject button is hidden or read-only for a user in Suite Manager using a view or type profile (which removes a user’s ability to reject an invoice in eCounsel) or rejection reasons are not configured in Suite Manager (see above), the @Reject folders will not appear in Bridgeway E-mail Link and the user will not be able to reject an invoice.
Configuring Secure Sockets Layer (SSL)
Configuring Bridgeway E-mail Link Server for encrypted connections is a multiple part process. First, a digital certificate must be installed on the Bridgeway E-mail Link Server machine. Within the settings for Bridgeway E-mail Link, the protocol extension must be enabled for SMTP/IMAP4 via the server parameters, a key store containing the server certificate must be defined, and an SSLListener class must be added for the particular server instance.
![]() If you want to use SSL, install all of the SSL certificates prior to installing Bridgeway E-mail Link.
If you want to use SSL, install all of the SSL certificates prior to installing Bridgeway E-mail Link.
To Verify the Protocol Extension:
- 1. Open the imap.xml file (located in <Install>\BridgewayE-mailLink\conf) in a text editor.
- 2. In the IMAP Parameters section, make sure the “STARTTLS” entry (highlighted in red below) exists in the extensions parameter:
<!-- IMAP PARAMETERS -->

    <service class=".imap.IMAPParameters" name="IMAP Parameters">

    ...

    <set name="extensions">ACL, AUTH, LITERAL+, NAMESPACE, STARTTLS</set>

    ...

    </service>
To Define a Key Store for the Server Certificate:
- In the IMAP Server section, key store parameters exist in the imap.xml file, but are commented out. Remove the “!--” characters at the beginning of the keyStoreURL parameter node and the “--” characters at the end of the SSLProtocol parameter node:
<!-- set name="keyStoreURL">file:../conf/testkey.crt</set>

    <set name="keyStorePwd">123456</set>

    <set name="keyPwd">abcdef</set>

<set name="SSLProtocol">TLSv1</set --> - After installing a digital certificate on the Bridgeway E-mail Link Server, modify the values for the key store parameters to accurately reflect the settings for your site.
To Add an SSL Listener:
- 1. Within the IMAP Server node for the particular server, a parameter exists for an SSL Listener, but is commented out. Remove the “!--” characters at the beginning of the service node and the “-->” characters at the end of the service node.
<!-- service class="SK.gnome.dwarf.tcpip.SSLListener" name="IMAPS Listener">

    <set name="port">993</set>

</service> --> - By default, the listening port is set at 993. Change this setting if needed.
- Save the changes to the imap.xml file.
Configuring LDAP
If LDAP (Lightweight Directory Access Protocol) is configured for Suite, you also may configure it for Bridgeway E-mail Link. When creating the Bridgeway E-mail Link account in the e-mail client, users must use the <UserName>@<Domain>.<Extension> format (such as jsmith@bridgeway-eng.com) format for the user name.
The Default Mail Host and Mail Store must be specified per the instructions in “Configuring the Bridgeway E- mail Link Server” on page 9. In addition, LDAP requires a Virtual Mail Host be configured with the domain only in which users will be accessing Bridgeway E-mail Link.
![]() If you want to use LDAP, install and configure it prior to installing Bridgeway E-mail Link.
If you want to use LDAP, install and configure it prior to installing Bridgeway E-mail Link.
To Add Settings for LDAP:
- Open the imap.xml file (located in <Install>\BridgewayE-mailLink\conf) in a text editor.
- In the Virtual Mail Host section, set the hostID to the domain name.
![]() If the virtual mail host contains a hostname, enter in the following format:
If the virtual mail host contains a hostname, enter in the following format:
<HostName>.<Domain>.<Extension> format (for example, “test.abc.corp” shown in red below). Users would then use <UserName>@<HostName>.<Domain>.<Extension> format (such as jsmith@test.bridgeway-eng.com) for the user name.
- Make sure the stripDomain property is set to “false”.
<!-- VIRTUAL MAIL HOST -->

    <service name="Virtual Host" class=".MailHost">

    <set name="hostId">abc.corp</set>

    <set name="stripDomain">false</set>

</service> - Copy the Mail Store, User Store, and ACL Store sections from earlier in the file and paste below the Virtual Mail Host section prior to the “</service>” end node. Note that the TCP Listener and SSL Listener sections will still exist after the copied sections.
<!-- VIRTUAL MAIL HOST -->


    <service class=".MailHost" name="Virtual Host">

    <set name="hostId">abc.corp</set>

    <set name="stripDomain">false</set>


    <!-- MAIL STORE -->


    <service class="com.bsi.mail.store.OpalSyncFileMailStore" name="Opal Mail Store" >

    <set name="helpDir">../help/outlook</set>

    <set name="minSyncInterval">1800</set>

    <set name="minConnectIntervalOffline">300</set>

    <set name="updWaitMinInterval">600</set>

    <set name="endpointUrl">http://Server1:8080/suite8/servlet</set>

    <set name="redirectUrl">http://ServerBEL:8080/suite8/servlet</set>

    <set name="dbAlias">suite8</set>

    <set name="dbUser">admin</set>

    <set name="dbPassword">admin</set>

    <set name="dbUrl">jdbc:h2:file:C:\Bridgeway\BridgewayE- mailLink\conf\beldb;MVCC=TRUE;DB_CLOSE_ON_EXIT=FALSE</set>

    <set name="dataInterfaceClass">com.bsi.mail.suite.SuiteOpalData</set>

    <set name="licenseKey">134523523523</set>

    <set name="authExpiration">300</set>

    <set name="requestPoolSize">10</set>

    <set name="highPriorityRequestPoolSize">4</set>

    </service>


    <!-- USER STORE -->


    <service class="com.bsi.mail.store.BELUserStore" name="User Store">

    </service>


    <!-- ACL STORE -->


    <service class="com.bsi.mail.store.BELACLStore" name="ACL Store">

    </service>


</service> - Save the changes to the imap.xml file.
Setting Logging Levels
The default logging level after installation is “INFO” for informational. This level of logging can generate large log files in the gigabytes range. Use this procedure to change the level of logging and limit file size.
To Set Logging Levels in Bridgeway E-mail Link:
- Open the logger.xml file (located in <Install>\BridgewayE-mailLink\conf) in a text editor such as WordPad or Notepad++.
This file contains three sections beginning with the following lines:
<service class=".SystemLogger" name="Console Logger"><service class=".FileLogger" name="File Logger"><service class=".FileLogger" name="Mail Logger">
Each section contains a logging setting, for example:
<set name="levels">info*</set>
-
Change the logging level in each section by changing “info” to one or more of the following levels:
XFER
TRACE
DEBUG
INFO
WARN
ERROR
FATAL
Important: Changing this level to “trace” outputs user names and passwords in clear text, which may be a security issue at your site.
The syntax follows these rules:
- A single logging level logs messages only for that level.
- A comma-separated list of logging levels logs messages for those specific levels.
- A single level with an asterisk (*) at the end logs all messages from the selected severity level to the most severe (for example, WARN* includes ERROR and FATAL).
Save the file and close the editor. The change will be effective the next time the Bridgeway E-mail Link Server service is restarted.
Adding Bridgeway E-mail Link to the Safe Sender List
If you site has configured filtering for e-mails, Bridgeway E-mail Link messages may be delivered to the Junk E-mail folder in the e-mail client. A system administrator may need to create a group policy for your site to add the configured sender of the Bridgeway E-mail Link messages to your site’s junk e-mail filter settings.