
Custom Report Designer
What is the Custom Report Designer
The Custom Report Designer (CRD) is a LegalHold feature with a powerful report builder that collects data from modules. You can customize each report in a simple and intuitive environment, send reports by email and store them in an FTP server. CRD lets non-technical staff generate reports, decreasing costs related to business intelligence implementation.
CRD consists of the following steps:
Create a New Custom Report: In this step, you configure which tables you want to add to the report. You can also select a subset of fields from a table.
Configure Email Details: In this step, you configure a distribution list to send an email that contains the report as a CSV file.
Configure FTP Details: In this step, you configure an FTP server to store the CSV file that contains the report.
Configure Schedule Details: In this step, you configure the report to be created periodically and to send the report to an email distribution list or/and store it in an FTP server.
You can configure a new custom report, skip any portion of the configuration if you don't have all the configuration information available, and get back later.
The scheduled task sends an email to a distribution list or stores the CSV file in an FTP server. This means that you only need to configure Email Details or FTP Details to complete the configuration. Configuring both Email Details and FTP Details is optional.
Custom Report Designer User Interface
Follow the below instructions to access Custom Report Designer User Interface:
| Instructions | Screenshot for Reference |
|
To access CRD, click on Reporting > select Custom Report Designer. |
 |
|
CRD contains all custom report records. You can sort the files by CUSTOM REPORT NAME or by CREATED ON (date). The CRD user interface have the following sections:
|
 |
Create a New Custom Report
Follow the below instructions to Create a New Custom Report:
| Instructions | Screenshot for Reference |
|---|---|
| 1. To create a new custom report, click on the Create New button on the top right. | 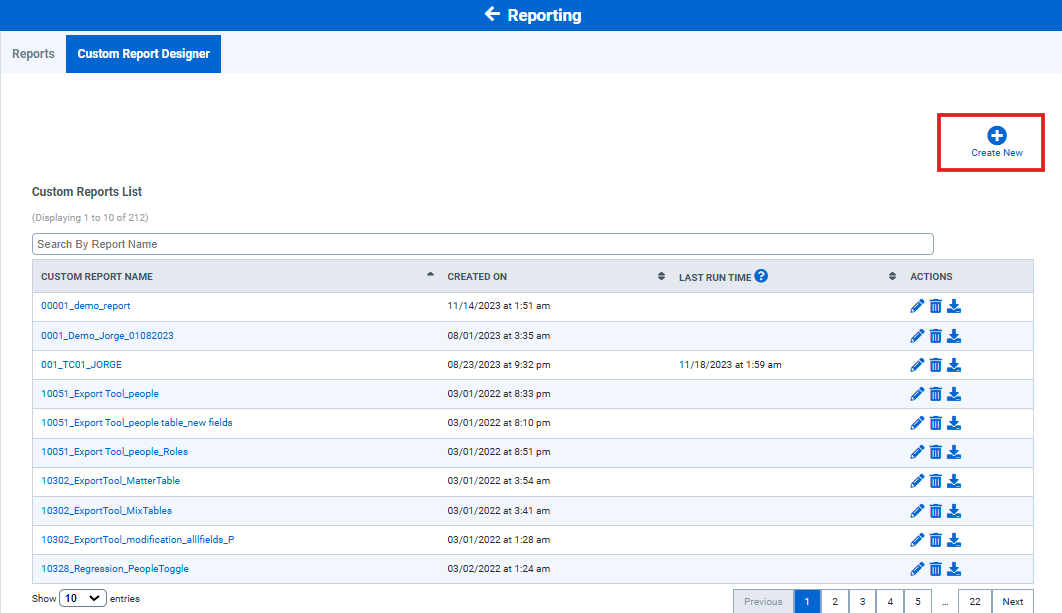 |
|
2. In the Report Details stage, File Name: Enter the filename. Do not use special characters. File Extension: Select the file extension from the dropdown menu. Note:
|
 |
|
3. Select a table from the dropdown list. Each table in the dropdown list contains fields that can be added to the custom report. Note: Select another table from the dropdown list. to add more fields as needed. |
 |
|
4. To add fields to your configuration record, select a field from Available Fields and click Add. To remove a field from the Selected Fields, select the field and click Delete. Repeat this step as needed. To delete a field from Selected Fields, click on the trash icon to the right. 5. Click on Save. |
 |
|
5. In the pop-up window that appears, select the filters that you require from the dropdown lists and then click Save. |
 |
Configure Email Details
If you wish not to proceed, click on Skip, otherwise, follow these instructions to send reports as CSV files by email:
| Instructions | Screenshot for Reference |
|---|---|
|
1. Enter the email address of the sender of the report. |
 |
|
2. Click Add People to add the email addresses that will receive the reports. |
|
| 3. Select the email addresses from the list that appears. Select an email address that you can access to verify that the configuration works properly and then click Add People again. Verify that the information is correct. You can add or delete email addresses as needed. |
 |
| 4. Click Save and Continue in the Email details step. |
Configure FTP Details
If you wish not to proceed, click on Skip, otherwise, follow these instructions to set up an FTP server.
-
Enter the following information:
-
FTP Address
-
FTP Username and FTP Password
-
FTP Port

-
Click Test Connection to verify that the connection works properly.
-
Click Save and Continue..
Configure Schedule Details
If you wish not to proceed, click on Skip, otherwise, follow these instructions to configure a schedule for the reports.
As a prerequisites to schedule a task, you need to configure Email Details or FTP Details.
Follow these instructions to set up a scheduled task:
-
Enter the following information:
- Start Date
- End Date
- Schedule
- Start Time
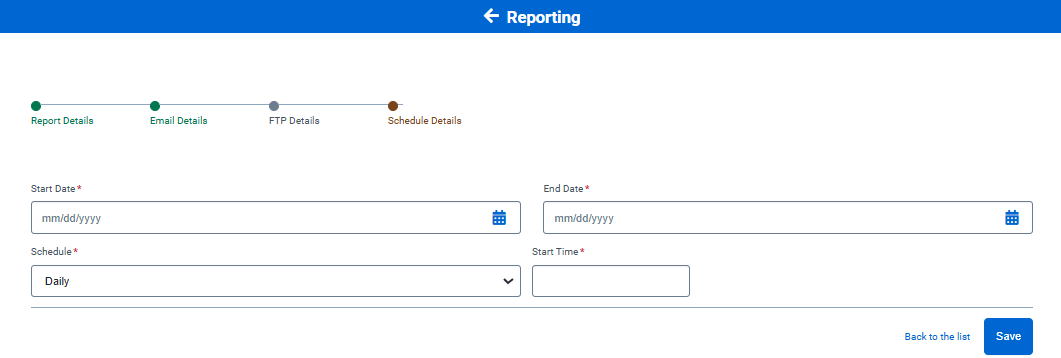
-
Click Save. You will be redirected to the Custom Report Designer.
Edit a Configuration File
Follow these instructions to edit a configuration file.
-
Go to the Custom Report Designer and enter the custom report filename in the search bar.
-
Click on the pencil icon next to the custom report filename that appears in the results.
-
Edit the custom report and then click Save.

Delete a Configuration File
Follow these instructions to delete a configuration file.
-
Go to the Custom Report Designer and enter the configuration report filename in the search bar.
-
Click on the trash icon next to the configuration report filename that appears in the results.
-
A confirmation message appears. Click Delete.

on successful deletion, you will see 'Successfully deleted' message.
Custom Report Designer
The Custom Report Designer lets you run configuration files based on a schedule. Follow these instructions to set up the export configuration tasks:
| Instructions | Screenshot for Reference |
|---|---|
|
1. To assign configuration files to the Custom Report Designer, go to Scheduled Tasks. Find the Custom Report Configuration and click on the pencil icon to the right.
|
 |
|
2.Select the configuration files you want the task to run. Click Save. |
 |
|
3. On the Scheduled Tasks page, click the + sign to expand the Custom Report Configuration 4. To run each task individually, click the |
 |
|
5. To verify that the email notification is sent, you should receive an email similar to the image if you set your email in the distribution list. |
 |
|
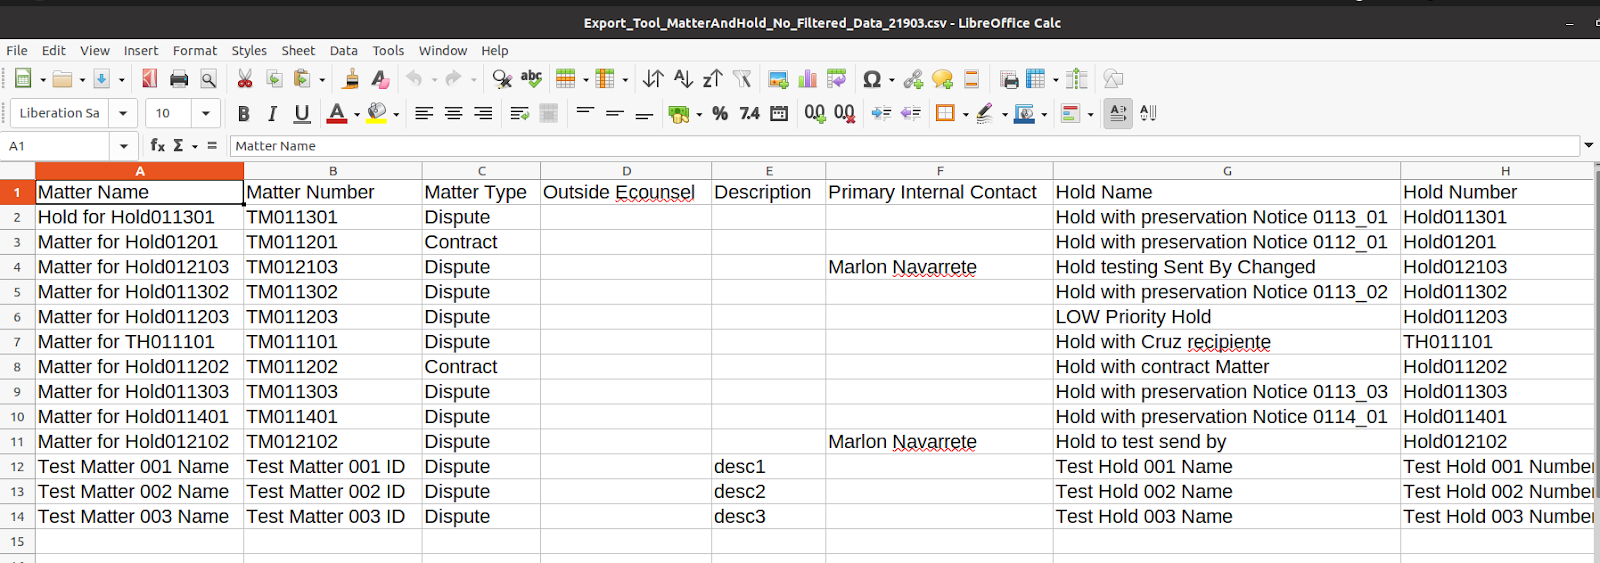
6. To verify that the CSV file was uploaded to the FTP server, connect to the FTP server that you configured in Configure FTP Details. You should see the CSV file generated by the task. The CSV file contains all the records configured in Create a New Configuration Record, as illustrated in the image. |
 |
Available Tables in the Custom Report Designer
This is the list of all available tables and fields in the Custom Report Designer:
| Table | Matters |
|---|---|
| Fields | Matter Name |
| Matter GUID | |
| Matter ID | |
| Matter Type | |
| Outside Ecounsel | |
| Description | |
| Primary Internal Contact |
| Table | Notice |
|---|---|
| Fields | Displayed |
| From Email | |
| Notice Name | |
| Notice GUID | |
| Reply to Email | |
| Subject | |
| Enable Reminder | |
| Is Modified | |
| First Sent | |
| Enable Questionnaires | |
| Preservation Notice | |
| Enable Notice Approval | |
| Notice Approved | |
| Sent By | |
| Last Hold Sent Date |
| Table | People |
|---|---|
| Fields | First Name |
| Last Name | |
| Person GUID | |
| Full Name | |
| Middle Name | |
| Employee ID | |
| Start Date | |
| End Date | |
| Job Title | |
| Phone | |
| Manager First Name | |
| Manager Last Name | |
| Manager Email | |
| Manager Employee ID | |
| Status | |
| Organization | |
| Department | |
| Silent Custodian | |
| Address | |
| Country | |
| City | |
| Network ID | |
| On Hold | |
| On Hold Enabled Date | |
| On Hold Disabled Date | |
| State | |
| ZipCode | |
| SSO Enabled | |
| Termination Date | |
| Early Termination | |
| User Name | |
| Application User ID | |
| User Created On | |
| User Modified On | |
| User Last Login Date | |
| Profile Name | |
| Account Status | |
| C-Level Executives |
| Table | Group |
|---|---|
| Fields | Name |
| Number | |
| Ignored By Sync | |
| Created Manually | |
| Created on | |
| Modified On | |
| Created By | |
| Modified By |
| Table | Recipient |
|---|---|
| Fields | Internal ID |
| Modified On | |
| Created on | |
| Status | |
| Last Notice Sent | |
| Silent | |
| Added Individually | |
| Custodian Release Date | |
| Response | |
| Response date | |
| First Sent date |
| Table | LegalHold |
|---|---|
| Fields | Name |
| Number | |
| Open Date | |
| Priority | |
| Status | |
| Created On | |
| Hold GUID | |
| Release Date |
| Table | Preservation Notice |
|---|---|
| Fields | From Email |
| Reply to Email | |
| Preservation Name | |
| Subject | |
| Preservation GUID | |
| First Sent | |
| Status |
| Table | Custom Fields |
|---|---|
| Fields | Matter Opened On |
| Friendly Matter Description | |
| Hold Data Repository |
| Table | Legal staff |
|---|---|
| Fields | Staff First Name |
| Staff Last name | |
| Staff Employee ID | |
| Staff Email | |
| Legal Staff GUID | |
| Legal Staff Role | |
| Receive copy of notice | |
| Integration Staff |
| Table | Data Steward |
|---|---|
| Fields | Data Steward First Name |
| Data Steward Last name | |
| Data Steward Employee ID | |
| Data Steward Email | |
| Data Steward GUID | |
| Modified On | |
| Created On | |
| Data Steward Status | |
| Last Notice Sent | |
| Added Individually | |
| Data Steward Release Date | |
| Data Steward Response | |
| Response Date |
Note: The filter field Response status will appear under selected filed filter Response, and available only when the report type is custodian and not for people.
Available Filters in the Custom Report Designer
You can apply different filters to the configuration files. The filters depend on the fields selected. See the following list of filters:
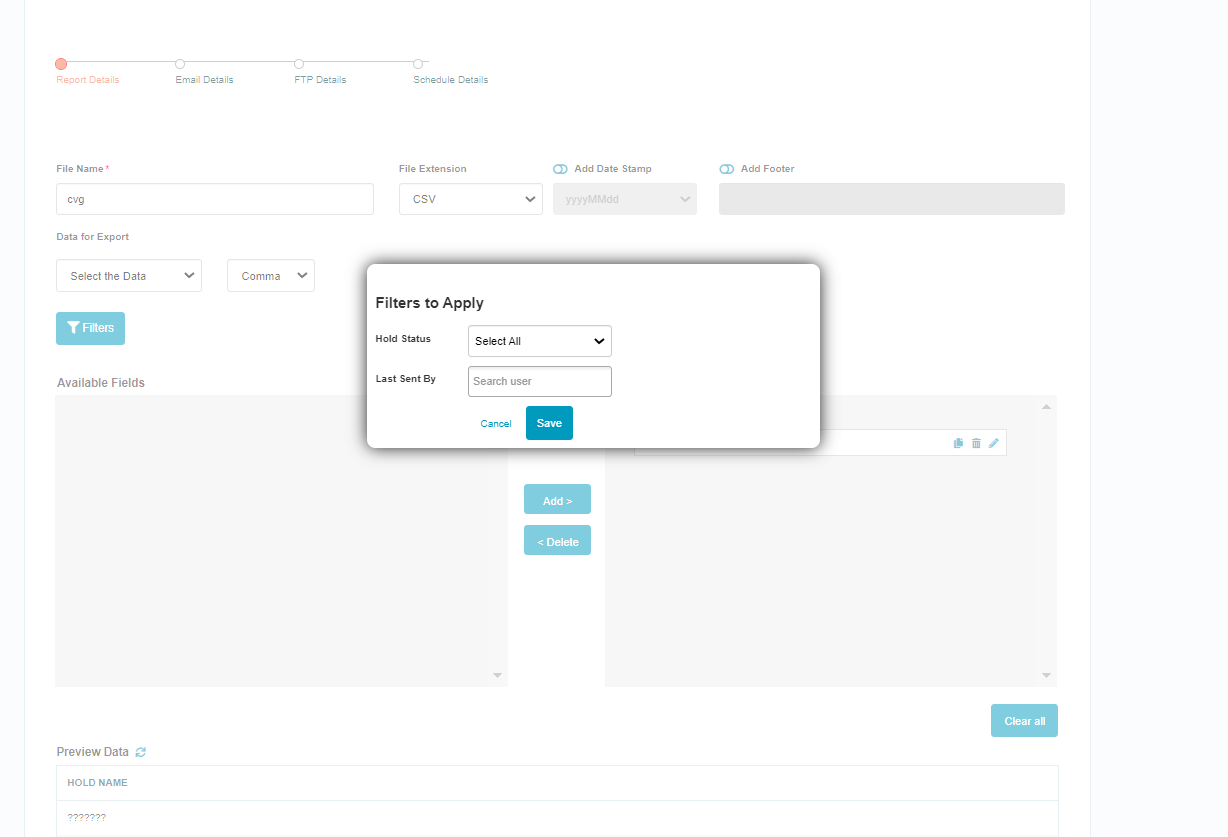
- Hold Status: Its status is ACTIVE or RELEASED. This filter is always displayed in the Apply Filters window.
- Matter type: Filter based on items customized in System Settings→ Manage Lookup Tables→ Matter Type.
- Department: Filter based on items customized in System Settings→ Manage Lookup Tables→ Departments.
- Person Status: Filter based on items customized in System Settings→ Manage Lookup Tables→ Person Status.
- Query type: This filter is displayed when fields of the People table are selected. Its values are Custodians and People.
Last sent by filter in CDR
The ‘last sent by’ filter enables the user to filter custom reports according to who sent the report lastly in CRD (Custom Report Designer ).
How to update the last sent by filter in the existing report?
Follow the below instructions to update the last sent by filter in the existing report:
| Instructions | Screenshot for Reference |
|---|---|
| 1. From the left pane options, go to Reporting → select Custom Report Designer tab. |
|
| 2. Select the report you wish to edit, from the list by clicking on the report name. And then click on the Filters button. Or click the Edit icon from the Actions tab. |
 |
|
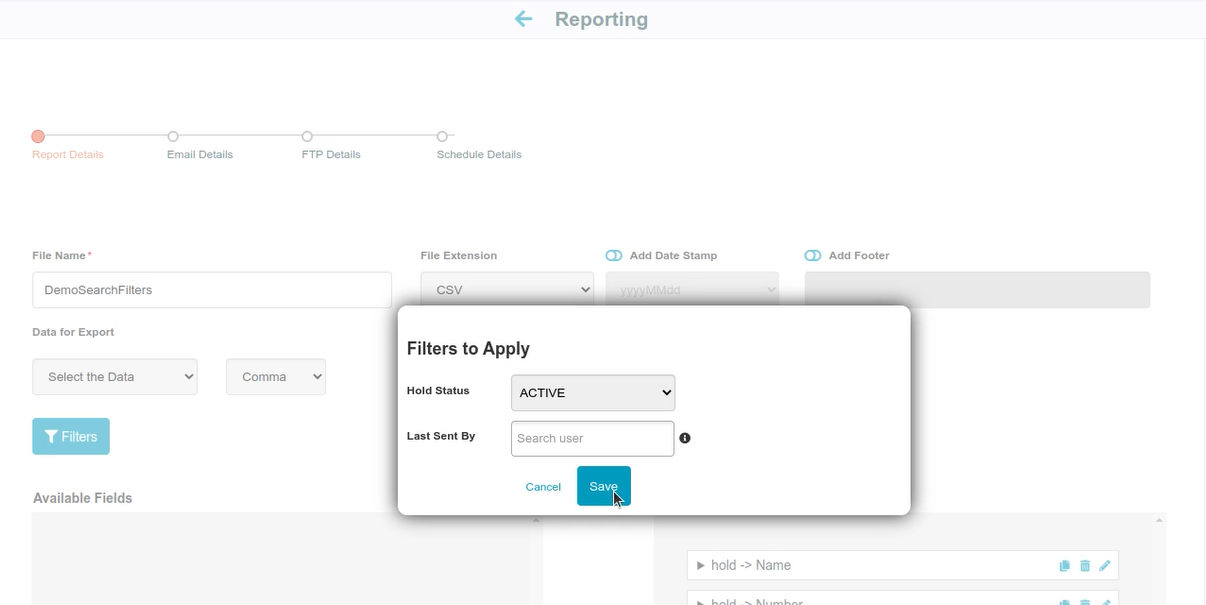
3. In the ‘Filters to Apply’ pop-up window, you can choose:
And click Save. Note: New filter won't be displayed If a Query filter is selected, this is because the query doesn't depend on the holds data. In such cases change the query type to ‘Custodians' or use Legal Hold or Matter fields. |
 |
| 4. You‘ll get the report as shown under Preview Data, to save this report click Save. Note: The report will show fields such as those selected in the Selected Fields column. |
 |
| 5. To download the excel report, Go to Reporting → Custom report designer → Click the download icon from the Actions tab for each report. |
 |
How to Create a new custom report for the last sent by filter?
Follow the below instructions to create a new custom report for the last sent by filter:
| Instructions | Screenshot for Reference |
|---|---|
| 1. From the left pane options, go to Reporting → select Custom Report Designer tab → Click the Create New button |
|
|
2. Fill in the fields for the Report stage as follows:
|
 |
|
3. Click Save to save the custom report, you’ll see the ‘Filters to Apply’ pop-up window, where you can choose filters:
And click Save again to save the filter changes. |
 |
| 4. Fill the Email Details stage, Fill the From field with the Email ID from which you need to initiate the mail. Click the Add People Icon to add the recipient list. And then click Save and Continue.. | |
|
5. In the FTP Details Stage, fill the fields such as:
And click Save and Continue.. |
|
|
6. In the Schedule Details stage, Fill the following fields according to your schedule requirement:
And Click Save. |
 |
How to add a group field to the people object?
Follow the below instructions to add a group field to the people object:
| Instructions | Screenshot for Reference |
|---|---|
| 1. Go to Reporting → Custom Report Designer tab. And click Create New icon. | |
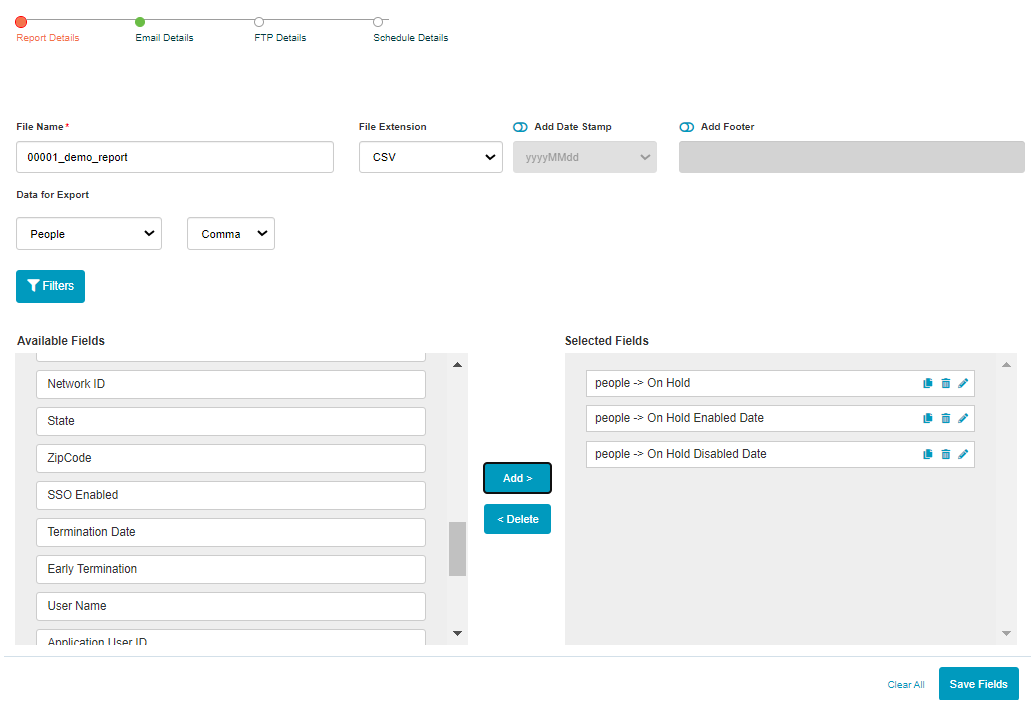
| 2. Choose People from the Data for Export Drop down list. From the available fields choose the required to selected fields. |
 |
| 3. Choose People from the Data for Export Drop down list. From the available fields choose the required to selected fields. |
 |
| 4. You can also edit the field name by clicking the Pencil Icon. |
 |
|
5. Click Save to save the changes. And you’ll get to see the Filters to Apply pop-up window. The toggle Present group in one line appears, only when Group Name and Numbers field are selected. The toggle Make the custodians unique allows you to display the custodian's name without duplicating. And click Save. |
 |
| 6. You can download the custom report generated from the Custom Reports list, by clicking the download button from the actions tab for each report. | 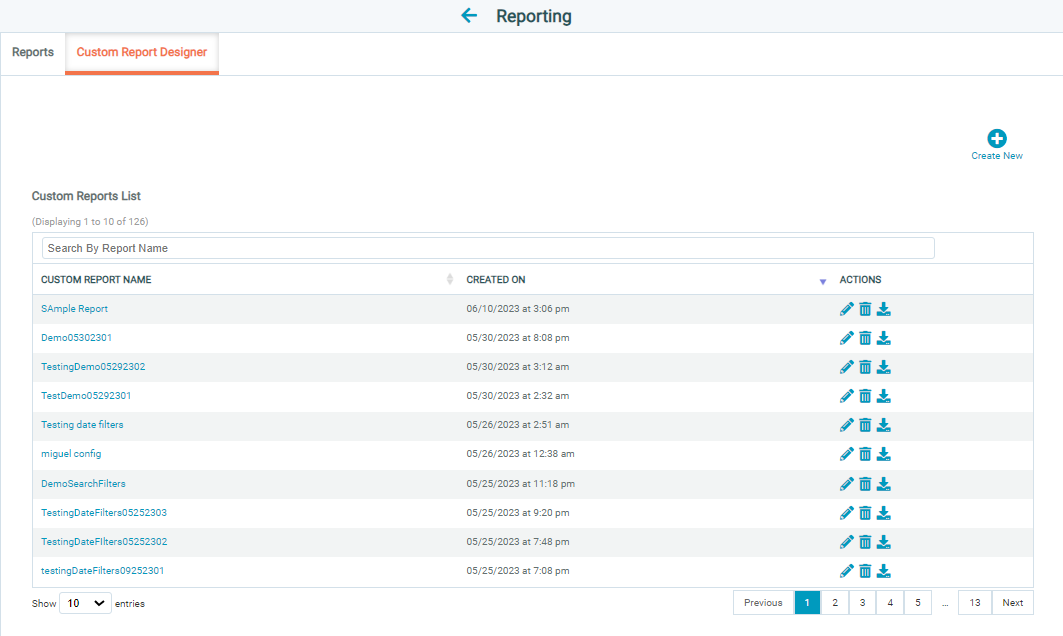 |
| 7. Here is the sample downloaded report. |  |
You can also verify the data by following these steps:
| Instructions | Screenshot for Reference |
|---|---|
| 1. Go to Manage Groups → List of Groups. |  |
| 2. From the list, select the group to see the data. |
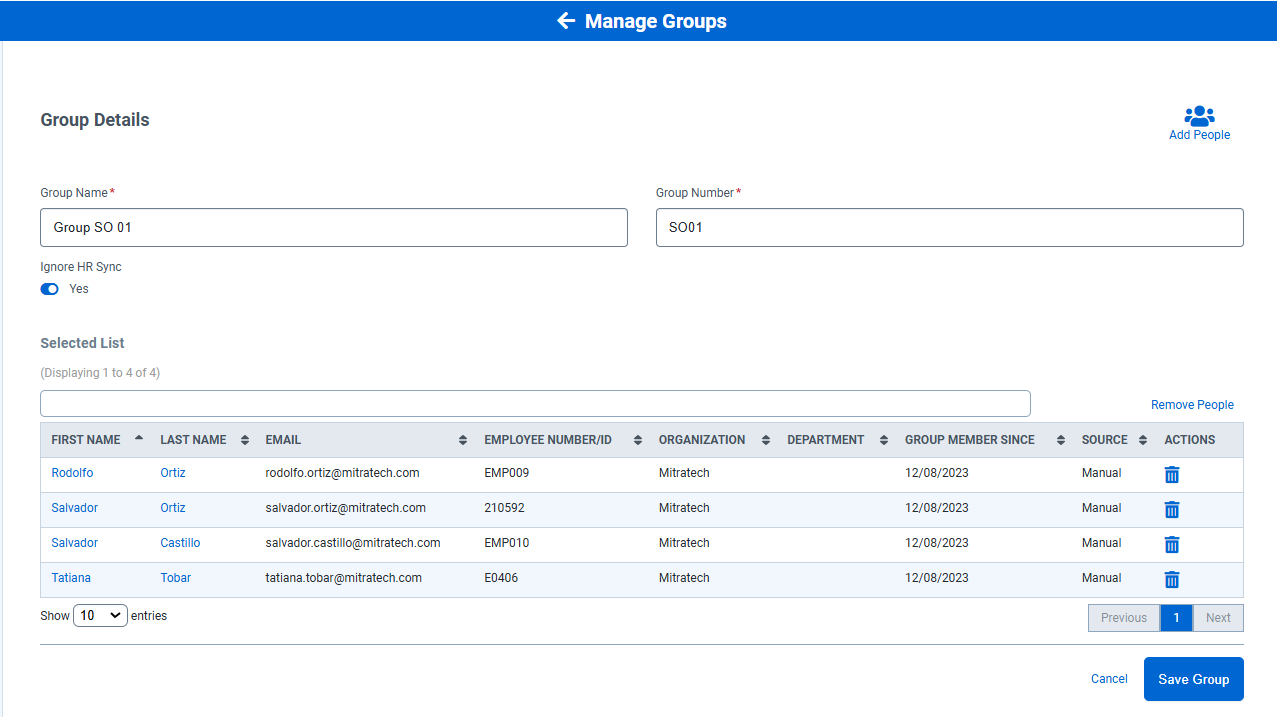 |
How to add search filters in legal hold reports?
Follow the below instructions to add search filters in legal hold reports:
| Instructions | Screenshot for Reference |
|---|---|
| 1. From the left pane options, go to Reporting → select Custom Report Designer tab → Click the Create New button |
|
|
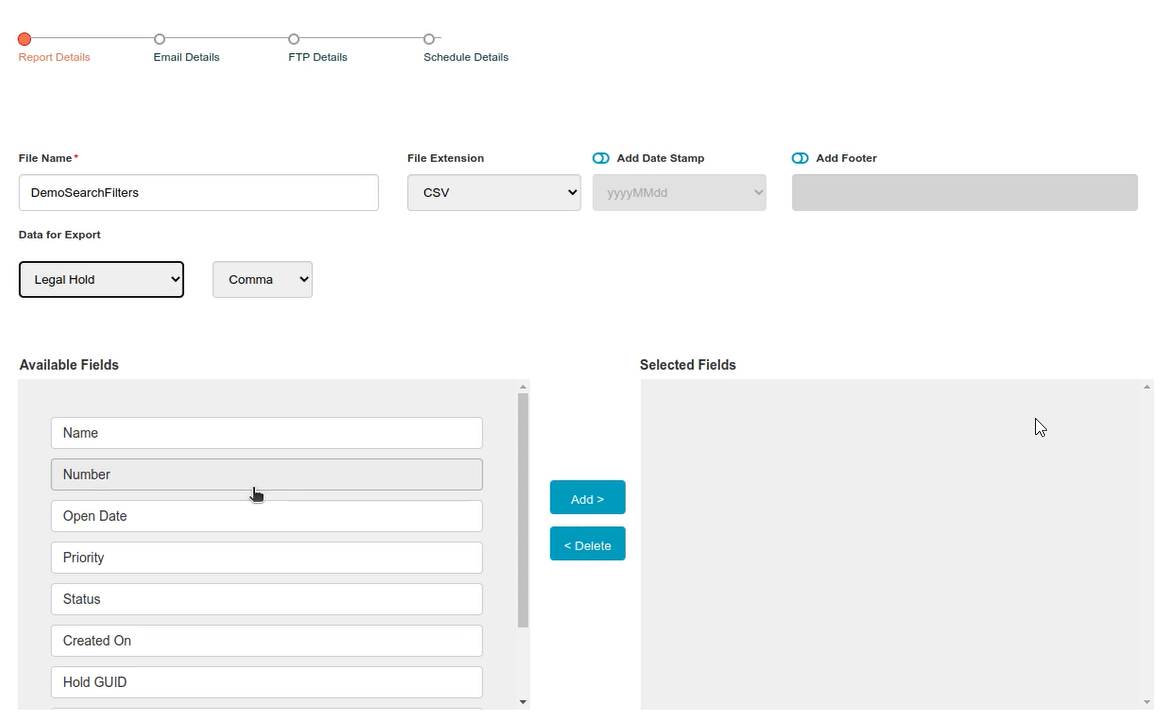
2.Choose Legal Hold from the Data for Export Drop down list. From the available fields choose the required to selected fields. |
 |
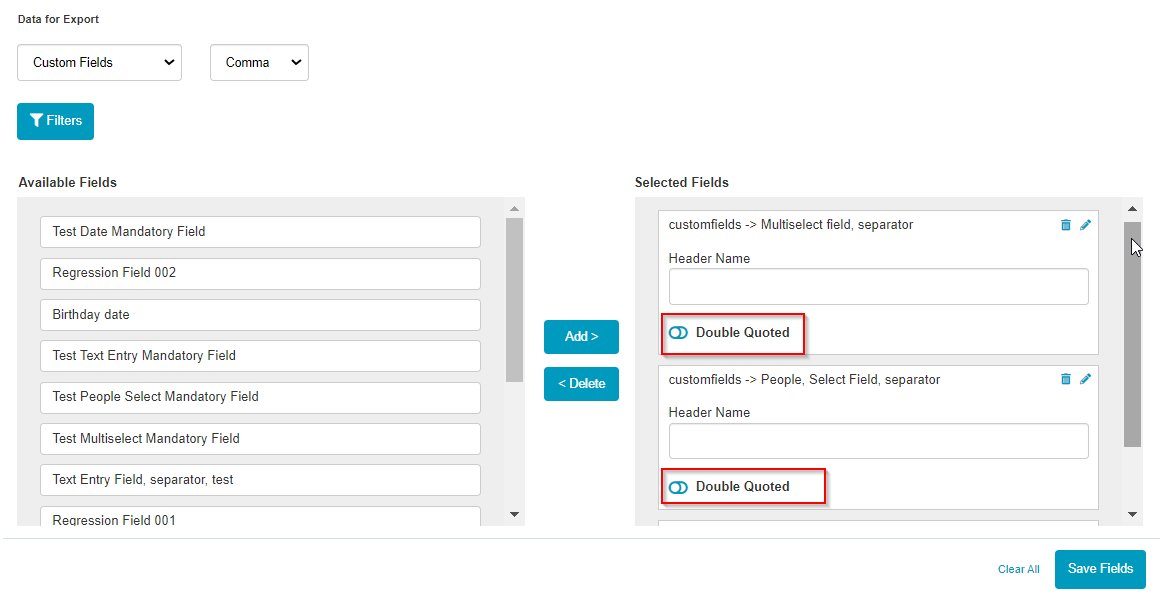
| 3.If the custom field is selected, users can turn on/off the Double Quoted toggle for Multi-select and Single select, depending upon the separator selected during data export. Note: users can set |
 |
| Note: Users can set AND or OR conditions using the toggle, if two custom field dates are selected. | 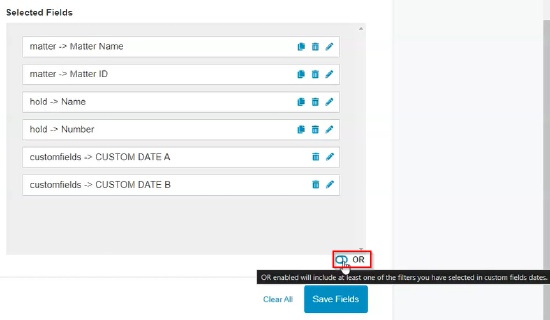 |
| 4.If you have added any date filter, click the Pencil icon to edit and set conditions in the report as shown below: |  |
| 5.You’ll get to see the Preview Data as shown: |  |
6. Click Save to save the custom report, you’ll see the ‘Filters to Apply’ pop-up window, where you can choose filters:
|
 |
|
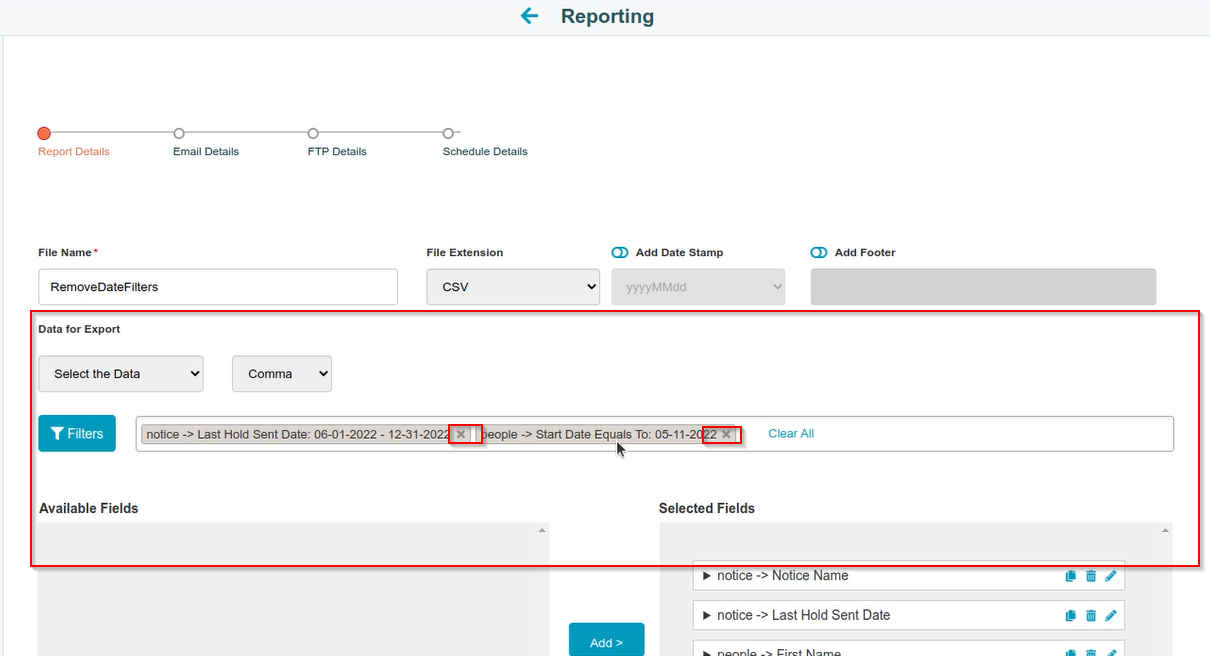
7.You can remove the date filter by clicking the close icon from the filter selections as shown:
Or click Clear All to remove these applied date filters at once. You can see the updated data under the Preview tab and click Save to save the report. |
 |
| 8. You can download the custom report generated from the Custom Reports list, by clicking the download button from the actions tab for each report. | |
How to create a new custom report for custodian information?
Follow the below instructions to create a new custom report for custodian information:
|
Instructions |
Screenshot for Reference |
|---|---|
|
1. From the left pane options, go to Reporting → select Custom Report Designer tab → Click the Create New button
|
|
|
2. Fill in the fields for the Report stage as follows:
|
|
|
3. Click Save to save the custom report, you’ll see the ‘Filters to Apply’ pop-up window, where you can choose filters:
Click on Save again to save the filter changes. |
|
|
4. Fill the Email Details stage as follows:
And then click Save and Continue. |
|
|
5. In the FTP Details Stage, fill the fields such as:
And click Save and Continue.. |
|
|
6. In the Schedule Details stage, Fill the following fields according to your schedule requirement:
And Click Save. |
 |
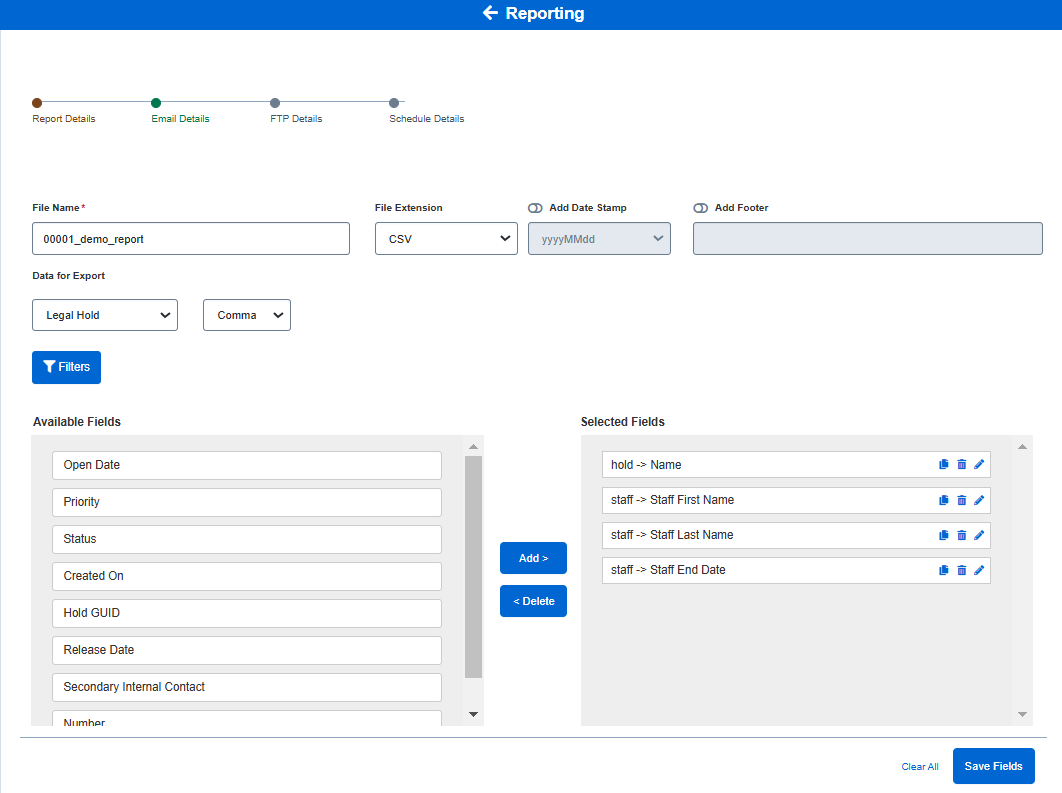
How to create a new custom report for Legal staff information?
Follow the below instructions to create a new custom report for custodian information:
|
Instructions |
Screenshot for Reference |
|---|---|
|
1. From the left pane options, go to Reporting → select Custom Report Designer tab → Click the Create New button
|
|
|
2. Fill in the fields for the Report stage as follows:
Click Save fields to save the custom report, |
 |
|
3. In the ‘Filters to Apply’ pop-up window, you can choose filters:
Click on Save and continue to save the filter changes. |
 |
|
4. Fill the Email Details stage as follows:
And then click Save and Continue. |
|
|
5. In the FTP Details Stage, fill the fields such as:
And click Save and Continue. |
|
|
6. In the Schedule Details stage, Fill the following fields according to your schedule requirement:
And Click Save. |
 |