
Step 1: Create the Workflow
During the creation process users personalize the Workflow, assign Org Units, assign all Forms, reports, and notifications, as well as define how the Workflow will be initiated.
To create the Workflow:
- Log in as an admin.
- From the home screen click Admin, then click Event Workflow from the left sidebar menu.
- The Workflow landing page will appear. From here you can see all pre-configured Workflows.
- Click the New button at the top left corner of the screen.
- The New Workflow pop-up screen will appear.
- Fill in all *required fields (described below) and click Save.
- *Org Unit - Select the Org Unit that the Workflow will be applied to.
- *Name - Name the Workflow.
- *Forms - Use this drop-down to select the live Form(s), and their corresponding drafts, that will be assigned to the Workflow. See below for further detail on how to properly assign a Form to a Workflow.
Note: Ensure the Form is accessible and editable by all roles that will be using it. See the Set Form Permissions section of the documentation for further detail.
|
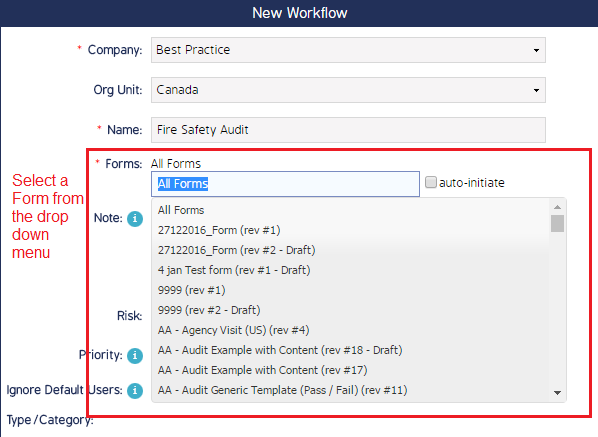
Step 1: Select a published Form, and it's corresponding draft(s), using the drop-down menu.
Note: Drafts of Forms must be added to the Workflow along with their corresponding published Form. |
 |
|
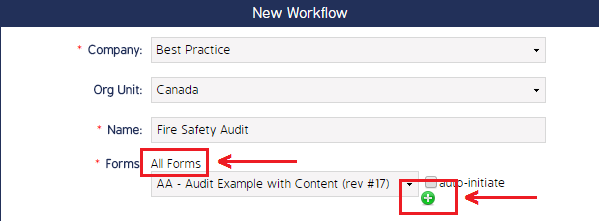
Step 2: Click the green + sign to attach the selected Form to the Workflow. Notice that the text above the drop-down menu says All Forms - this means that a Form is not yet attached to a Workflow.
Note: Click the Auto-initiate button above the green + if the Workflow will be auto-initiated by Form. See the Auto-Initiate Workflow by Form page for more information on setting a Form to auto-initiate. |
 |
|
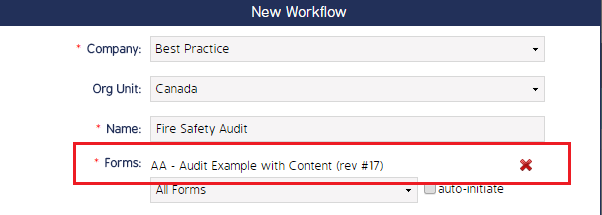
Step 3: Confirm that the Form is attached by seeing the Form name(s) above the drop-down menu. |
 |
|
This section details each field in the New Workflow screen.
|
|
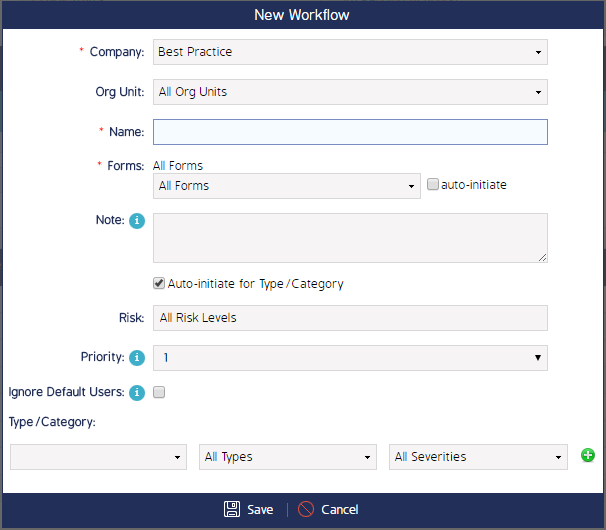
The table below details all fields shown in the New Workflow screen (image above):
|
Field |
Description / Action |
|---|---|
|
Org Unit |
Use the drop-down menu to select the Org Unit this Workflow will apply to.
Note: A Workflow can be applied to entire org unit or it can be applied to a single entity in an Org Unit. For example, this would apply if a company in Texas wanted a specific Workflow for their Houston office but not the Austin office. |
|
*Name |
Name the Workflow. |
|
*Forms |
Use the drop-down menu to select the Form(s) that will be used throughout the Workflow. It is possible to add multiple Forms to a Workflow. |
|
Auto-initiate |
If selected, the Workflow will be auto-assigned when that Form is opened but the Workflow will not initiate the first step.
Note: The only case auto-initiate would not be selected is when the admin wants an event Type or Category to initiate the Workflow, or if the Workflow will be manually started. See Auto-initiate for Type/Category (below) for more information. |
|
Auto-initiate for Type / Category |
When this option is checked, a Workflow will initiate automatically when the defined Type / Category or Risk is selected on a Form. See the Auto-initiate for Type/Category page for more information. |
|
Note |
The Workflow note will be sent in all Workflow Action notifications as part of the action description. |
|
Risk |
Select your risk level(s) and check the "Auto-Initiate for Type / Category" box above if you want this workflow to be triggered by risk. |
|
Priority |
This acts as a checks-and-balances feature which allows for Order of Priority for the Workflow. Order of Priority is defined to ensure only 1 Workflow is initiated for Events that are assigned to multiple Workflows. The Workflow with the highest priority will be initiated. |
|
Ignore Default Users |
If checked, the Workflow will ignore default user settings. See the Ignore Default Users section for more information on Default Users. |
|
Event Type / Category |
Note: This field works in conjunction with the Auto-initiate for Type / Category check box. When reading the descriptions below, assume the Auto-initiate for Type / Category box is checked.
Use the drop-down menus to select a Type, Category, and Severity that will initiate the Workflow. Users can assign multiple scenarios for one Event.
For example, separate Workflows can be configured for different types of Threats. If a Form asks "What category of threat did you encounter: Bomb threat, Fire threat, Security threat?" A different Workflow will initiate if "Fire threat" is selected versus if "Bomb threat" is selected. |