
I-9 Resolve End User Manual
Tracker I-9 Resolve Introduction
Welcome to I-9 Resolve, Tracker Corp’s revolutionary solution for remediation of historical Form I-9’s. I-9 Resolve is a solution that helps employers identify and resolve compliance errors on I-9s that that were created before implementing Tracker I-9. I-9 Resolve exposes every discernible violation in a user friendly interface that guides the user on what steps to take to resolve each error. The compliance logic takes into consideration the version of Form I-9 that should have been used given the hire date, and the rules in place for that version.
If you work for a large employer, you probably have a large number of Form I-9 records that were created before you adopted a fully-compliant electronic I-9 solution. These historical records represent a financial risk that can easily equate to tens of thousands of dollars, as U.S. Immigration and Customs Enforcement (ICE) can fine up to $2,156 for each non-compliant I-9.
I-9 Resolve requires separate license agreement in order to gain access to the feature. To learn more about I-9 Resolve, visit our website or contact our sales department to see a demo.
What is Tracker I-9 Resolve?
Tracker I-9 Resolve helps to reduce regulatory compliance risk through an easy-to-use, manager self-service (MSS) application. The application guides Users with limited Form I-9 compliance knowledge through the process of resolving non-compliant historical Form I-9’s. I-9 Resolve uses complex compliance logic based on policies and rules outlined by US Citizenship and Immigration Services (USCIS), Immigration and Customs Enforcement (ICE), and the Department of Justice (DOJ) to identify errors, define what needs to be done to remediate each error, and then enables a self-service approach to resolving the errors. I-9 Resolve allows for the distribution of finishing work across the managers in your organization, thereby effectively leveraging your organization’s resources to turn what would take months into minutes.
Who should read this User Manual?
This document is to be used as a reference for members of organizations that have purchased a license for I-9 Resolve and will be resolving Form I-9’s on behalf of a member’s respective organization.
Login
Access to I-9 Resolve requires permissions that are granted by your organization’s designated system administrator. Please contact your HR department for further details on how to obtain these permissions as well as your login Username and password. Once permissions and login information have been granted, Tracker I-9 Resolve can be accessed directly through your internet web browser or indirectly through single sign-on integration with your organization’s existing applications.
Dashboard
Once logged in, Users will be presented with the I-9 Resolve application home screen, containing several navigation links for creating and viewing Form I-9 records, as well as links to view reports. Summary modules will also be displayed, helping Users to view their Form I-9 risk exposure at a glance. All numbers displayed in the summary modules reflect I-9 records a User is responsible for, as determined by the System Administrator.
Navigation
From the dashboard, a User can navigate to an I-9 Resolve record using one of three options outlined below:
- Selecting an I-9 Resolve Task Summary module category bar.
- Performing a global search using the Search function.
- Selecting the “I-9 Resolve List View Report” link under the Reports menu dropdown.
Option 1: I-9 Resolve Task Summary Module
The I-9 Resolve Task Summary Module provides an overview of the I-9 risk exposure of an organization through three reports, the “Status Overview” report, the “Action Required Report”, and the “Error Type” report. These three reports can be accessed via a dropdown menu within the I-9 Resolve Task Summary module labeled, “View Records By:”.
Note: All numbers displayed reflect only records for which a User has access.
Status Overview: This report provides a colored pie chart visually representing the Remediation status of an organization’s I-9 population, broken down by Records Remediated, Records In Progress, and Records Not Started.
- Records Remediated – Represents the number of records that have been remediated and require no further action.
- Records in Progress – Represents the number of records that Users have started work on, but are not yet fully remediated (If Clients environment has auto-create I-9 set, the system will automatically link the I-9 Resolve record to new I-9 Complete record shell and these records will be considered “In Progress”.)
- Records Not Started – Represents the number of records requiring remediation, but work has not started.

Action Required: This report is intended to provide managers with an overview of the number of records that will require action by either the employee, employer or both. This provides some insight into the level of effort required by Clients and their employees.
- Records Remediated – Displays the total number of records that have been remediated.
- All Records Requiring Resolution – Displays the total number of records that contain one or more compliance errors and require Employer, Employee, or Preparer/Translator action to resolve.
- Records Requiring Employee Action/Documents – Displays all records that require either:
- The Employee to take correction action to resolve errors, or,
- Present their identity/employment authorization document(s), or both.
- Records Requiring Only Employer Action – Displays all records that require only the Employer to take corrective action.

Error Type: The Error Type report provides an overview of an organization’s I-9s with errors separated into error categories. In general, Form I-9 errors fall into two categories: Substantive errors and Technical errors. If left uncorrected, an employer may receive a monetary fine for substantive and uncorrected technical errors.
As a general best practice, all errors should be remediated regardless of severity, however, given their more severe nature, organizations should consider giving Substantive errors higher priority over Technical errors to address first.
- Records Remediated – Displays the total number of records that have been remediated.
- All Records Requiring Resolution – Displays the total number of records that contain one or more compliance errors and require Employer, Employee, or Preparer/Translator action to resolve.
- Records Requiring New I-9 – Displays the total number of records in the application that contain a substantive error that can only be remediated by creating a new I-9.
- Records with Unresolved Substantive Errors – Displays the total number of records that contain at least one unresolved Substantive error.
- Records with Unresolved Technical Errors – Displays the total number of records that only contain at least one unresolved Technical error.

The terms, “Critical Error”, “Substantive Error”, and “Technical Error” are defined as follows:
Critical Errors – A subset of Substantive Errors which were found to be so egregious, that the only course of action an Employer can take to remediate the historical Form I-9 is to create a new I-9 using the most current version.
Example of a Critical Error: In Section 2 of an I-9, List B document data is present and List A and C document data is blank, indicating the manager only inspected identity information and not employment eligibility.
Substantive Errors – Errors which indicate missing or incorrect information that prevents the employer from fulfilling their responsibility to verify the employee’s identity and/or work authorization status.
Example of a Substantive Error: In the List A column in Section 2 of the Form I-9, the document type field displays the value, “Driver’s License”. In this case, the driver’s license is not considered a valid document type for a List A document and so the content entered is of an unacceptable type. The driver’s license is only a valid document type for a List B document.
Technical Errors – Errors that are considered “paperwork” or “procedural” errors that do not determine the employee’s identity and/or work authorization.
Example of a Technical Error: A historical Form I-9 has an incomplete employee address in Section 1. The omission is considered a Technical error because the address fields are required.
Option 2: Global Search
The Global Search option is provided as an easy and convenient way to conduct targeted searches for individual records using identifying values contained within a record. The search bar feature is located in the upper right hand corner of the dashboard view.


Clicking the search box field will bring up the search filter which allows Users to search for records using identifying values mentioned earlier. One of the following fields must be entered in order to perform a search: Last Name, Social Security Number, Employee ID, or I-9 ID.

Option 3: I‐9 Resolve List View Report
Under the Reports dropdown on the navigation bar, Users will find the I‐9 Resolve List View Report option, which will navigate them to advanced reporting features.

Filter Settings
After selecting the I-9 Resolve link under reports, Users will be taken to the filter settings page. Users can apply filter settings by selecting from the set of parameters and clicking ‘Apply Filter’ to return a list of I-9 Resolve records.
The User can filter the settings by selecting the parameters and clicking ‘Apply Filters’ to return a list of remediation I-9 records. Alternately, the User can select ‘Clear Filter’ to reset all the filter settings to start over again. The User can select from a list of I-9 records displayed in order to navigate to the record.

Note: Radio button selection for Error Type expands into multiple checkboxes.
List of I-9 Records
Filter settings can be applied by selecting the appropriate set of parameters and clicking ‘Apply Filters’ to return a list of records which is displayed below the filter settings panel.

I‐9 Resolve Record Summary/Displaying an I‐9 Resolve Record
Once a User has searched for and selected from one of the three options outlined previously, the system will take the User to the Form I-9 detail page, which will contain the following information:
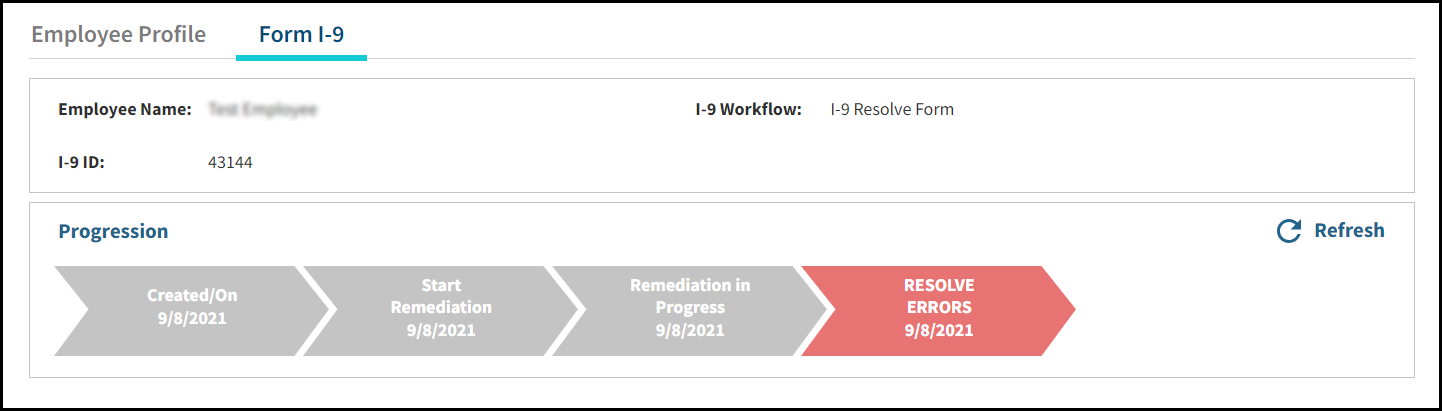
Banner
A Banner containing information relevant to the employee, along with an indicator of remediation progress and next steps.
I-9 Resolve Remediation Summary
The I-9 Resolve Remediation Summary panel provides a summary of the compliance errors found by the application organized by Critical Errors, Employee Errors, Employer Errors, as well as the number of errors already resolved, either automatically by the application or by a User.
Selecting any of the categories will expand the window and display additional information related to specific errors identified.


Form I-9 Page Info and New Section 3
If the Form Revision of the I-9 is the 03/08/13 N, then three tabs will appear adjacent to the Summary Resolve tab which be labeled, “I-9 Page 1”, “I-9 Page 2”, and “New Section 3”. Clicking through the first two tabs will display the Form I-9 fields and values, any associated errors, and a preview of the I-9 in paper form.
Errors associated with a Form value will be displayed with a highlighted error code in either yellow or green. Yellow represents unresolved errors and green represents resolved errors. Hovering the mouse over an error will display a brief description of why the error was flagged.
The third tab, labeled, “New Section 3” will provide the User with the option to create a new Section 3 for the Form I-9. See the New Section 3 section of the User Manual for more details.

Remediation Wizard Button
Selecting the Resolve Errors button will navigate Users to the Remediation Wizard, which will guide Users through the I-9 remediation process.

Remediation Wizard
The Remediation Wizard contains six components that consist of a progress bar, an error summary, remediation instructions, error descriptions, possible User actions, and a preview of the results.

Components
- Progress Bar – Outlines the order in which Users will remediate errors, organized by the severity of the error and the actor responsible for remediation. Each chevron is also highlighted with a different color to indicate its status. Orange represents the current screen in view, blue represents errors that have not yet been remediated, and green represents errors that have been fully resolved.
- I-9 Error Summary – Provides a summary of the number of unresolved errors, along with their status.
- Remediation Instructions – Provides instructions as to the next action Users need to take to resolve errors that are presented in wizard screen.
- Error Descriptions – Provides a brief description for every identified error.
- User Actions – Provides options which the User can take to advance through the wizard and resolve the employee’s I-9 errors.
- Form I-9 Preview – Provides a preview of the corrected values as it will appear on the paper printout of the I-9 once complete.
Error Remediation Responsibilities
Depending on the types of errors identified on the Form I-9, Employers may need to have up to three individuals take action in the I-9 Resolve Wizard to remediate an I-9, those being the Employee, an Employer Representative, and the Preparer/Translator.
For records where the employee is required, in many cases employees will need to bring their prior or present identity/work authorization documentation as part of the remediation process. In cases where a preparer or translator was indicated on the original I-9, employees may also need to bring them in if possible. This is also true for cases where the employee will need to create a new I-9 and require a preparer or translator to assist them.
Targeted communication to all employees is therefore an essential aspect of the remediation process and will need to be organized and conducted prior to starting the remediation process through the application. For examples of targeted communications you may send to stakeholders, please refer to the I-9 Resolve Internal Audit Best Practice guide.
Wizard Progression
The I-9 Resolve application leverages Tracker’s deep knowledge of From I-9 compliance to identify errors on the I-9 programmatically. Each I-9 record therefore will potentially contain a unique set of errors to remediate, requiring a related set of corrective actions. The wizard guides Users through the corrective action that needs to occur, based on criticality. Along the way, it also provides additional insight into each error and instructions to correct the error, as shown below in the highlighted red box.

View/Upload File
Contained within the View/Upload File tab Users will find the associated original scanned copy of the Form I-9 provided to Tracker.
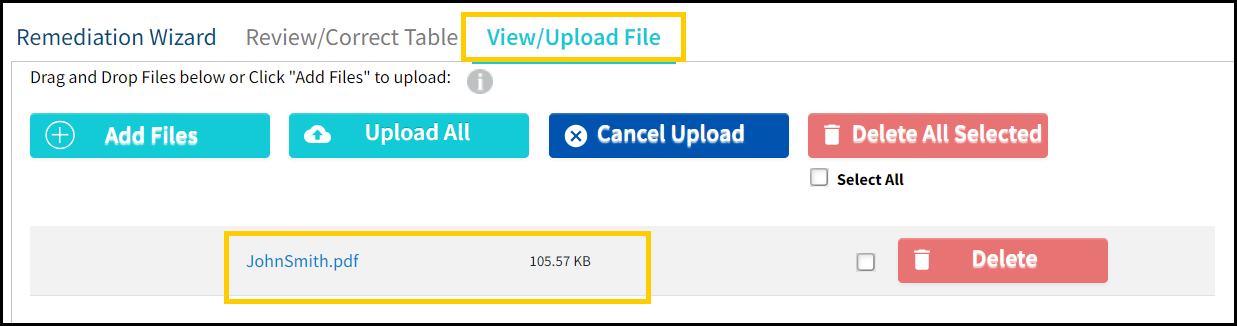
Clicking on the filename link will display the I-9 in a new browser window using your browsers pdf reader. To display properly, Users will need to whitelist Tracker or disable pop-up blockers.
You may also open the scanned file by clicking the link on the right side of the banner at the top of the I-9 Resolve record.

Review/Correct Table
The Review/Correct Table tab found at the top of the Remediation Wizard provides Users with the ability to correct data and add/remove errors from the record before any remediation activity has occurred. There are two main purposes of the Review/Correct Table tool, which are:
- To correct any data that may have been illegible to the conversion team during the scan and data entry process.
- To enable or disable compliance errors if your legal counsel has a different interpretation of the guidance provided by USCIS, ICE or the DOJ.

The tabs across the top of the Review/Correct Table page correspond to the Form I-9 fields that relate to Section 1, Section 2, and Section 3. The Other Errors tab includes errors that do not relate to a specific Section. Selecting a tab will display the list of Form I-9 fields for the Section.
The Field column describes the Form I-9 field label found in the Section tab. The value under the Data column is the current value for the corresponding Form I-9 field. Changing the value in the Data column and clicking Save will update the Form I-9 field.
The Error Code column provides a list of possible errors for the adjacent field. Hover of the help text icon to view a description and remediation instructions for the error. Check or uncheck the checkbox for the errors that you want to remove or add, then click Save. Click Exit once you are done.

Note: The Review/Correct Table is only viewable by those with Advanced Users permissions.
Any changes made in the Review/Correct Table do not constitute remedial action, as remedial action can only be performed in the wizard. Remedial action requires an individual to attest to any changes made with an electronic signature, which are then subsequently recorded in the I-9 Audit Trail and Error Log.
Electronic I-9 Audit Trail
The Electronic Audit trail provides a report of any changes that occur to an I-9 field and can be found on the Summary Resolve tab of the Form I-9 Detail page. See below:

Contained within the Electronic I-9 Audit Trail Report are seven fields, which include a Reference number, Change Date, Field Name, fields previous value, updated value, Changed By, and Audit History Event.
Descriptions for each column are as follows:
- Reference – An index key that relates to corrective action recorded on the Error Log.
- Change Date – Records the date on which a change to the related field value was made.
- Field Name – Indicates the name of the field where a value had changed.
- Previous Value – Indicates the original value contained in the field before changes were made.
- Updated Value – Indicates the new value provided by the User.
- Changed By – Indicates the actor responsible for the change.
- Audit History - Indicates the Audit action that occurred.
Error Log
The Error Log provides Users with a report on all error activity for the I-9 Resolve record. An entry will be added to the Error Log whenever an error is added, removed, or resolved. In conjunction with the Electronic I-9 Audit Trail report, the Error Log provides a complete picture of all changes and corrective action taken for an I-9.

Contained within the Error Log are seven fields, which include I-9 Audit Trail Reference, Change Date, Error Description, Error Code, Error Activity, Changed By, and Notes.

Descriptions for each column are as follows:
- I-9 Audit Trail Reference– Provides the associated index key value for the Electronic I- 9 Audit Trail Report.
- Change Date - Provides the date and time Error Activity occurred.
- Error Description - Provides a description of the error that occurred.
- Error Code – Provides the code number associated with the error.
- Error Activity – Provides a description of the action that was taken as it relates to the error.
- Changed By – Provides a record of who performed the Error Activity.
- Notes – Displays any notes associated with the Error Activity.
Errors That Can Only Be Acknowledged
Users may happen upon errors that cannot be resolved. This determination is based upon known compliance issues as defined by USCIS and ICE as well as the type of error or circumstances that are out of your control.
The scenarios by which the system determines if a record is unresolvable are as follows:
- A Form I-9 record associated with an inactive employee contains an error, resulting in an employer’s inability to resolve the error.
For Example: A Form I-9 record for John Smith is missing a signature and John no longer works for the organization. In this case, the employer determines a new signature cannot be obtained since the employee has been terminated; therefore all that can be done is to acknowledge the error. - A Form I-9 record has an error that cannot be resolved due to the nature of the defect.
For Example: The system shows a record for the employee John Smith as having a Section 1 signature date later than the start date. Section 1 signatures must be on or before the start date. The error in this case cannot be resolved since the original signature was signed after the start date. The employer then is only able to acknowledge the error. - A Form I-9 record has an error and attempts to identify the correct information to resolve the error cannot be determined.
For Example: The system shows that a record has a List A document ID error, indicating that the Document Type is missing. The proper steps to resolve this error is for the User to inspect the document that the employee presented, however, the document is not available because the employee no longer possesses the document. In this case, the User will have to create a new I-9 with new documentation.
Errors that Require a New Form I‐9
Certain Form I-9 errors can only be resolved by creating a new Form I-9. When these error conditions exist, the Tracker I-9 Resolve solution prompts the User to create a new Form I-9 that is then associated to the unsalvageable Resolve Form I-9. Once Section 2 of the new Form I-9 is signed, all open errors on the Resolve Form I-9 will be considered resolved. A note is recorded in the error log describing the reason for why a new Form I-9 was required.
In general, a new Form I-9 is required when one or more of the following conditions apply:
- The Form I-9 does not reflect that the employee provided sufficient documentation upon hire or reverification under Form I-9 rules current at the time of hire or reverification.
- The Employer Name is missing in Section 2 or 3.
- The Section 2 documents do not match the Section 1 employment status.
- There are Section 2 or 3 document data errors and the original Section 2 or 3 documents are not available for inspection or the document combination involves multi-List A documents.
When a new Form I-9 is required, an employer should ask the employee to present documentation sufficient to meet the requirements of the current version of the Form I-9. An employer must give an employee the option to present acceptable documentation of the employee’s choice to bring the Form I-9 into compliance. The Tracker I-9 Resolve solution is designed to follow these best practices.
The wizard will display an option of, “Create New I-9 Record” for records that meet the criteria above. Selecting the button will navigate Users to a new Form I-9 record which is linked to the old record.
If the remote access feature is enabled, Users will be provided with the option to either create a new onsite Form I-9, or a new remote Form I-9.
Multiple I‐9s
In some cases, Employees of a Client’s organization may have multiple I-9’s associated with their Employee Profiles for various reasons such as, rehire activity, reverifications, or duplicates of the same I-9 provided to Tracker.
As a rule, the application only allows for one Form I-9 to be active at any given time. The only exception is when historical records are first imported into the system due to conversion services.
The application provides Users with the ability to link an existing completed Form I-9 to the Resolve Record through the wizard. Linking a Resolve record automatically remediates all unresolved errors on the Resolve record with a note indicating the completion of the new I-9 remediates all remaining errors.
When a completed Form I-9 is available to link, the wizard will display the following page:
The page has four options:
- View Record – Navigates the User to the existing active completed I‐9 to review.
- Cancel – Navigates User to the I‐9 Resolve Record without taking any action.
- Continue to Wizard – Navigates User to the wizard, providing the option to remediate the remaining errors individually.
- Link Records – Links the I‐9 Resolve record with the completed Form I‐9, thereby remediating all remaining errors.
User Role Features
Managers granted Advanced User Roles will be able to access additional features of I‐9 Resolve that will not be accessible to Intermediate and Basic User Roles. Those features include, access to the Review/Correct Table found in the Remediation Wizard mentioned earlier, as well as the ability to create a new I‐9 Resolve record. As it relates to Intermediate and Basic User Roles in I‐9 Resolve, there are no differences between these two User roles.
I‐9 Resolve Client Admin Settings
For Users with Client Admin credentials, the following configurations are available in the Features tab of the System Configurations for your environment.
Form I-9 Options
Within the Features tab, and under the Form I‐9 Options section, Client Admins will find the configuration to enable or disable the I‐9 Resolve feature for their environment.

I‐9 Resolve Options
Within the Features tab, Users will also find the I‐9 Resolve Options section, which provide Client Admins with the options to enable the creation of a New I‐9 Resolve record, or change the text used when auto‐remediation occurs by the system.
