How to use Outlook with TeamConnect Essentials
Please note, the images in this guide were taken using Outlook 2016. If you are using a different version, the screen shots might appear differently than what is on your computer.
Outlook and TeamConnect Essentials
TeamConnect Outlook integrates into Microsoft Outlook so that you can view and update appointments and tasks that have been created in TeamConnect.
In Outlook, TeamConnect appointments and tasks include the same functionality as all other appointments and tasks you create with Outlook, which means that you can view and edit them as you would any other Outlook appointment or task.
If you update them from Outlook, TeamConnect reflects these updates after the two programs sync.
Note: You can also use TeamConnect Outlook to view documents and emails saved to TeamConnect matters. Unlike with TeamConnect Office, TeamConnect Outlook opens any file accessible on your computer, not only Word, Excel, and PowerPoint files.
TeamConnect Tasks in Outlook
Introduction
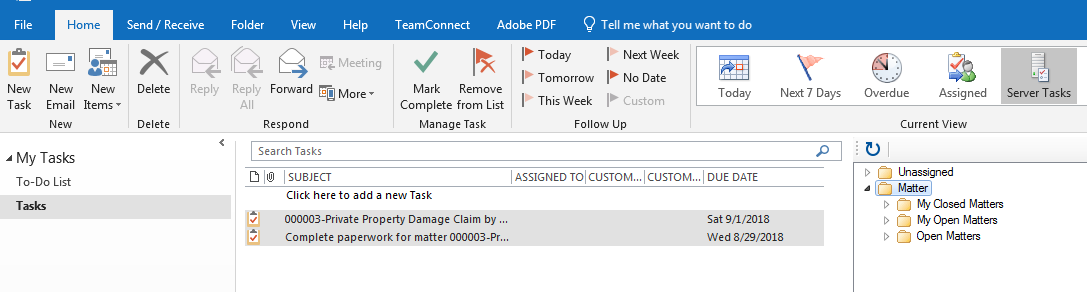
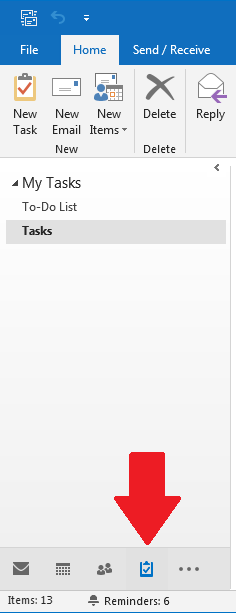
TeamConnect tasks displayed in Outlook include the name of the matter associated with the task. To locate your tasks, go to the bottom of your Outlook window and select Tasks. Your task window will initially display your To-Do List arranged by due date. To view your tasks, click on Tasks on the left-hand side of the screen.
Opening Tasks
Tasks can be opened through Outlook without logging in to the TeamConnect website. This keeps users from having to switch between applications and saves time.
To open a task, first select Tasks at the bottom of the page in Outlook. Under My Tasks, click on Tasks. Double-click any task to open it in a new window.
Updating Information
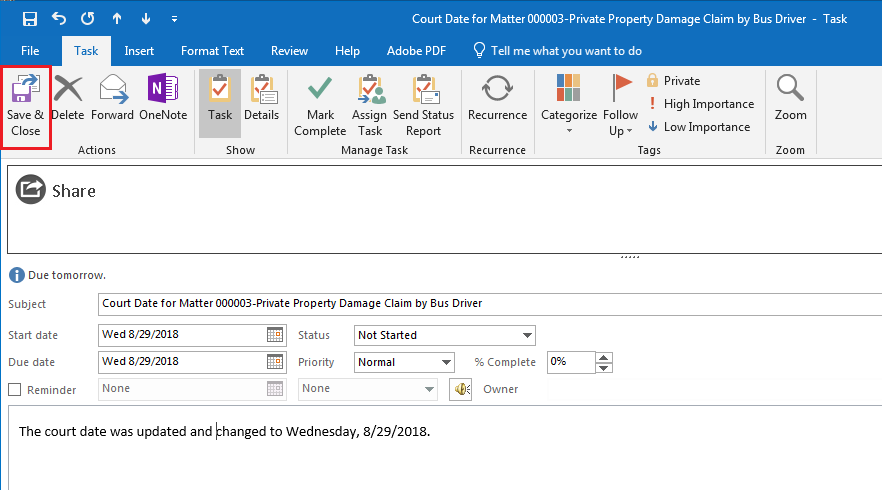
All changes or edits to tasks can be done through Tasks window in Outlook. The changes will automatically be sent back to TeamConnect. Double-click on a task to open it. From the pop-up window, all data fields can be changed to reflect the updated task. Click Save & Close.
What information can I edit?
You can edit the following fields, assuming you have the correct user permissions: Subject, Completed Date, Project Name, Start & End Date, % Complete, Status, Activity, and Category. You will receive an error message if your permissions don't allow you to edit these fields.
Can I update the Task Owner from Outlook?
From outlook, Tasks Owners can assign tasks to other TeamConnect users. The new Assignee will be updated in their TeamConnect site. Ensure the new Assignee's email address is correct, otherwise nothing will be sent back to TeamConnect.
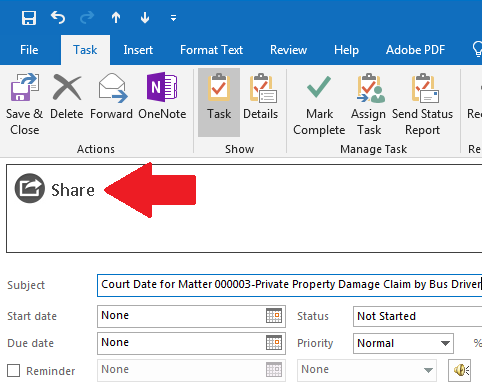
Update and Sync Project (Matter), Task Activities, and Categories with TeamConnect
Click the Share ![]() button to edit the Project (Matter), Category, or Activity.
button to edit the Project (Matter), Category, or Activity.
Sync Tasks with TeamConnect
- Double-click a task to open it in a new window for updating, then click the Share button. The option to select Project (Matter), Category, or Activity will appear after this button is clicked.
- Select one of the links, then select or deselect the check-box(es) in the pop-up window. Click on Save & Close.
Click [Select Project] to assign the task to a matter.
Click [Select Category] and select Internal Tasks, Other Vendor Fees, Outside Counsel Fees, or Task.
Click [Select Activity] to select a description of the type of task you are creating.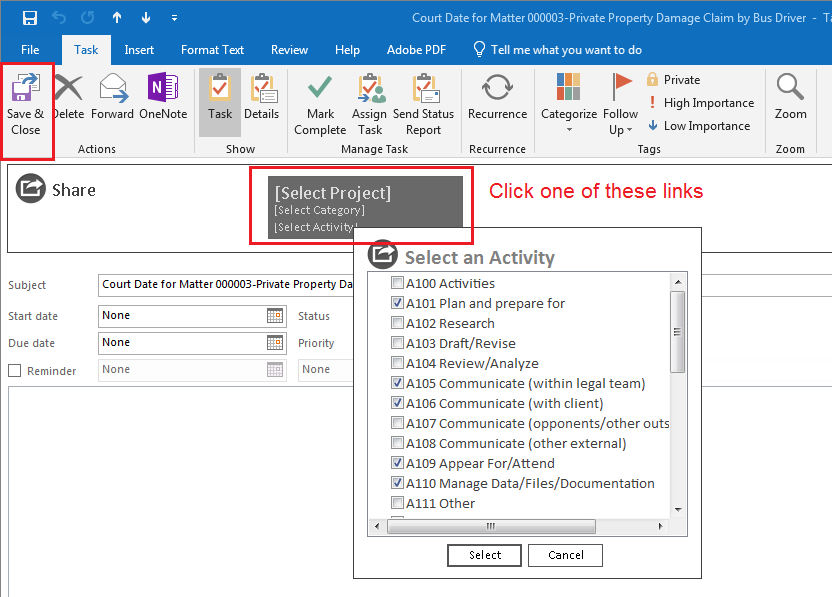
Creating Tasks
Tasks can be created through Outlook without logging in to the TeamConnect Essentials website. This keeps users from having to switch between applications and saves time.
Create a new task
The instructions below detail how to create a new calendar task in Outlook, assign it to a TeamConnect project, and send it back to TeamConnect.
Note: The task will be assigned to the user who created it, unless directly assigned to another person. See the Updating Information section for further detail.
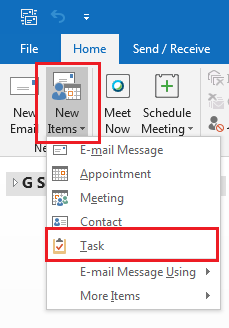
- In Outlook, click New Item in the upper left-hand corner of the Home tab, then select Task.
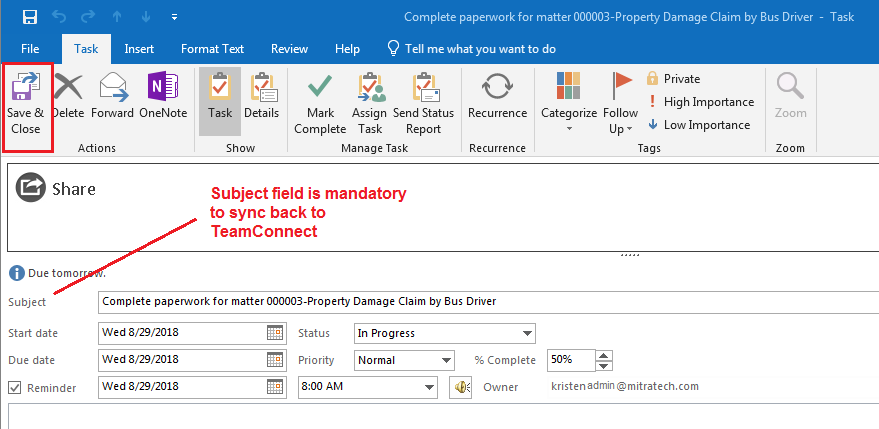
- In the new pop-up window, enter a title in the Subject box and click on
 to enter a start date.
 - Click on the
 in the Status drop-down to change Not Started to In Progress, Completed, Waiting on someone else, or Deferred. Below Status, click on next to Priority to change Normal to Low or High.
 - Click the check-box next to Reminder to set an alert date and time.
Click next to reminder time to choose a time from the drop-down box.
Note: Setting a start date will auto-create a due date and reminder date (if the reminder check-box has been selected). Click on in the respective date box to adjust the date. Click  to change the sound of the reminder alert.
Considerations:
- Subject Line is a Mandatory field, so if you deliberately remove the subject line the matter will not sync back to TeamConnect.
- The following fields will sync back to TeamConnect:
- Matter Name
- Category
- Activity
- Subject
- Task Assignee
- Start & Due date
- Status
- Priority
- % Completed
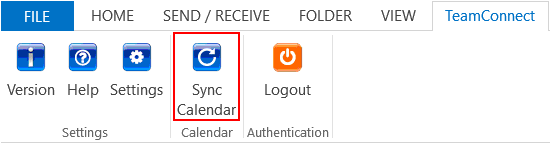
Sync TeamConnect Calendar with Outlook
You can sync appointments in TeamConnect into Outlook with the add-in. You simply need to go to the TeamConnect tab in the ribbon and select the Sync Calendar button.
Updating Categories
TeamConnect categories can be updated by opening the appointment from Outlook without having to log in to the TeamConnect application.
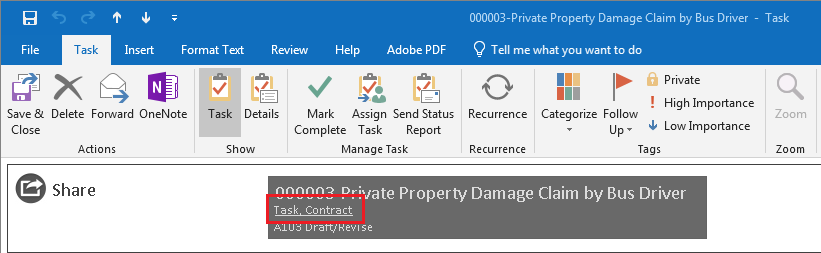
To update a task's Category
- Double-click an appointment from the Calendar to make adjustments. The category title is located under dispute title, and will display any category that was selected when first created.
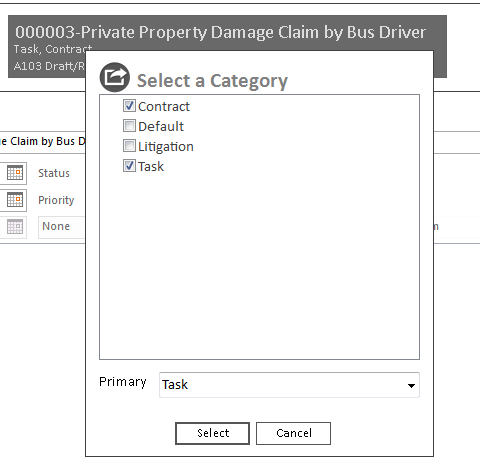
- Click the category title (Appointment).
- Add new categories or deselect the current category to change the visible data and press Select to confirm. Click Save & Close.
Note: If more than one categories are selected, all categories will be displayed, separated by commas, as seen in the image below.
Opening Appointments
TeamConnect appointments are displayed in the TeamConnect add-in located on the right-hand side of Outlook Calendars. To open an appointment, double-click the blue appointment box within the calendar, or double-click the ![]() icon in the TeamConnect plug-in pane.
icon in the TeamConnect plug-in pane.
Note: Appointment details can be expanded by hovering your mouse over an appointment within the Outlook calendar.

Deleting Appointments and Syncing
This page seeks to provide information on removing appointments from user calendars and how that process operates in both the plug-in as well as TeamConnect. For nearly all users, the important takeaway is that removal of users from appointments or removal of entire appointments in TeamConnect will be reflected in Outlook.
These details cover a low-level approach to the mechanisms behind appointment syncing.
TeamConnect Outlook Documents and Emails
Introduction
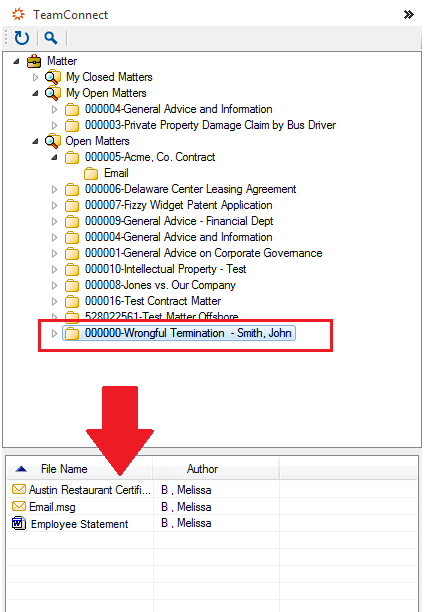
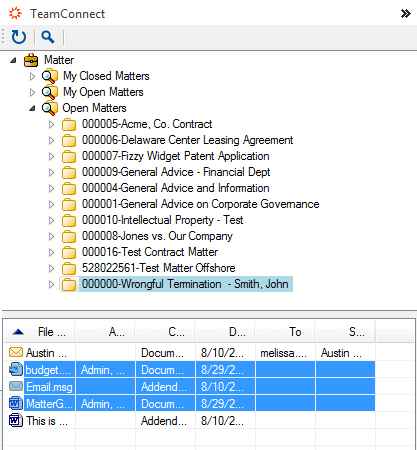
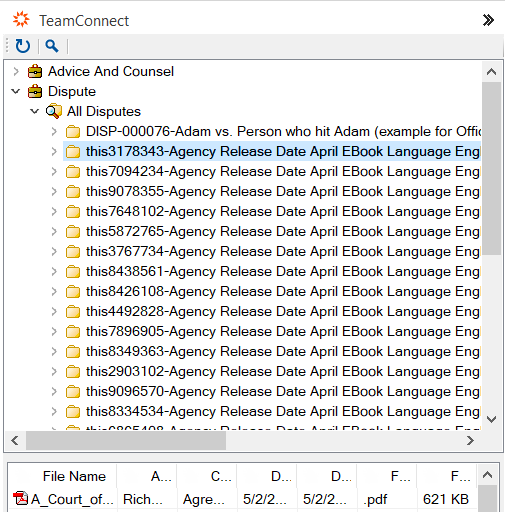
With the TeamConnect add-in in Outlook, users can easily view their documents in TeamConnect from the Matter Folders & Document Pane. The ability to view matter folders and documents from TeamConnect within Outlook eases the process of communication with clients and outside counsel who refer mostly to email. Documents and disputes can be pulled from the Matter Folders & Document Pane and inserted easily into emails, or in between folders.
Hover over a cell in the Matter metadata pane to see the full contents of the document detail.
To open a document or email, double-click the item from the list. Note: You may need to expand the folder to view sub-folders.
Metadata Population
Documents can be uploaded via the Outlook add-in, and metadata is automatically extracted and placed into the appropriate fields. This visible data will make locating and identifying documents easier.

TeamConnect extracts the following metadata from documents and emails:
| Extracted Data | Conversion Description |
| Document Name | File Name |
| Document's Creator | Author |
| Document Category | Category |
| Document Creation Date | Date Created |
| Document Last Modified | Date Modified |
| Document Extension | File Type |
| Document Size | File Size |
Emails will be reflected in the main TeamConnect instance with the above metadata when provided.
Note: If the Document's Creator cannot be extracted, the description will be left blank. If Creation Date cannot be extracted, the current date will be used. If Last Modified cannot be extracted, Creation Date will be used.
Setting Metadata Display
Metadata can be configured to display the most important and relevant information to end users in the TeamConnect Documents Pane.
The first time the Settings window is opened, the Author field will be checked by default. You will need to manually check other fields if you want them to appear in the bottom left pane.
Note: File Name cannot be modified, as it would increase the difficulty of identifying documents.
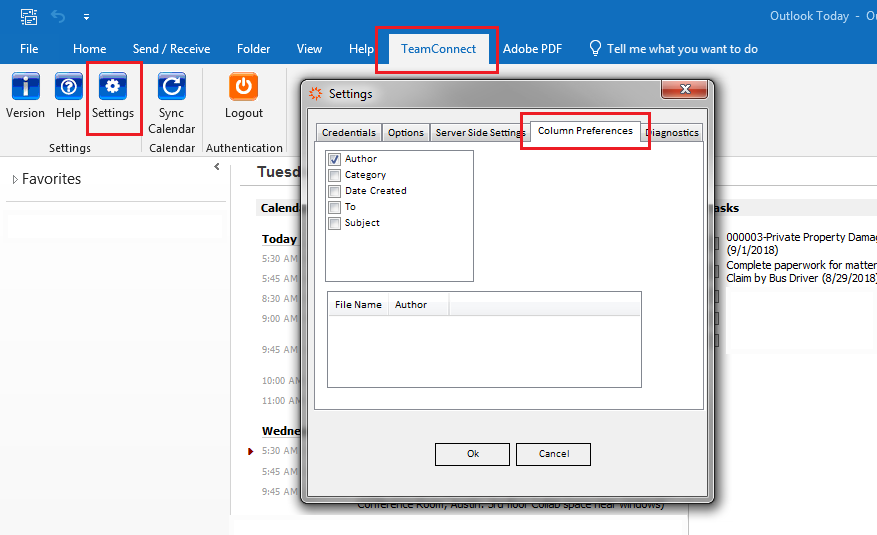
The metadata fields that have been checked will match the columns at the bottom of the TeamConnect add-in in Outlook.
IMPORTANT NOTE: When updating to a newer version of the Outlook or Office add-in, any adjustments made to these settings are preserved. If the newer add-in no longer has the settings that existed in the old version, the old settings are ignored or excluded while all other settings remain the same.
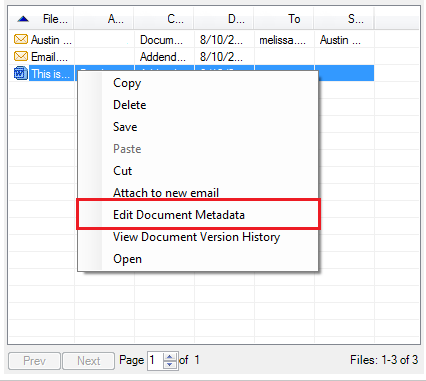
Editing Document Metadata
From any Office or the Outlook add-in, right-click on any document or email (in Outlook) in the TC Documents Pane and open an option to Edit Document Metadata.
|
Right click to open and edit the metadata.
|
View and Edit the document metadata
|
Users are able to change fields and document information that they would have access to change in the main TeamConnect application. Changes made to the document metadata here will be reflected both in the add-in as well as the main application.
|
Documents Tab The document tab contains the editable name and author date of the file as well as other non- editable information fields. Click Submit to finalize any changes to the name field or Date Authored field. While the File Type is not editable, users can change the extension via the Document Name field. Users will be prompted to click Yes after clicking Submit if they make changes to the extension. While the name will now reflect the new extension, your computer will still recognize the file as its original file type. Changes to the file type should be made in the main application. |
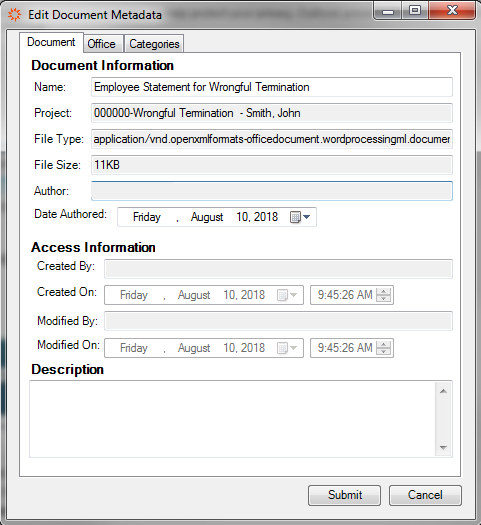 |
|
Office Tab Click the Update Office Category checkbox to make edits on the Office tab. These changes will be reflected in the document file bank in the add-in but not in the Document tab. |
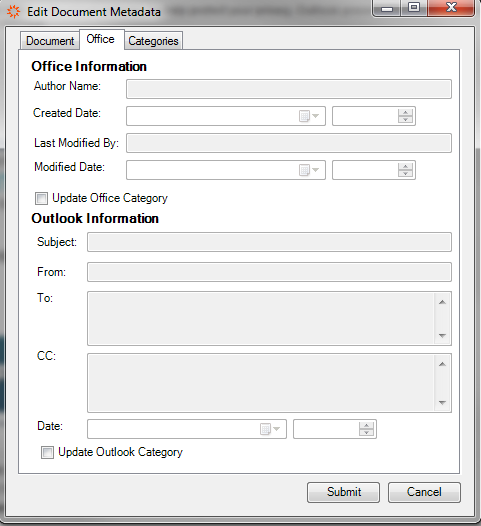 |
|
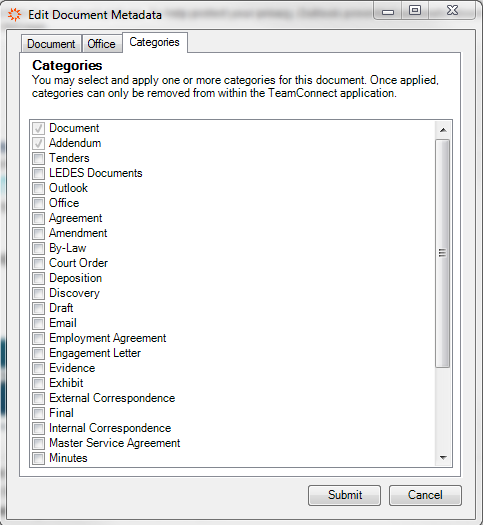
Categories Tab The Categories tab allows for improved filtering and document management. Click the checkbox next to the desired categories to add that category. Categories inherited from TeamConnect cannot be removed from the add-in. Likewise, categories added in the add-in itself cannot be removed after clicking Submit. Categories can be removed in the main application. |
 |
Uploading Documents
Documents uploaded in TeamConnect will appear in the Matter Folders & Document Pane in Outlook.
Note: Documents uploaded in TeamConnect must be assigned to a dispute in order to be viewed in that Matter Folders & Document Pane in Outlook.
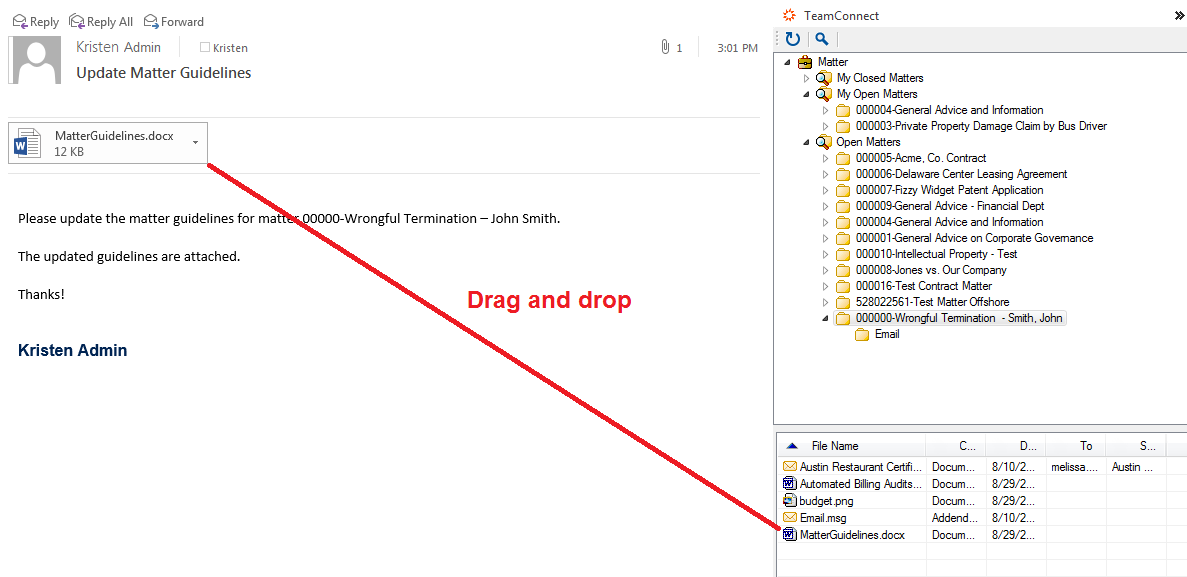
To upload a document to the TeamConnect document pane
Drag one or more emails or document(s) from your email and drop it into the desired file.
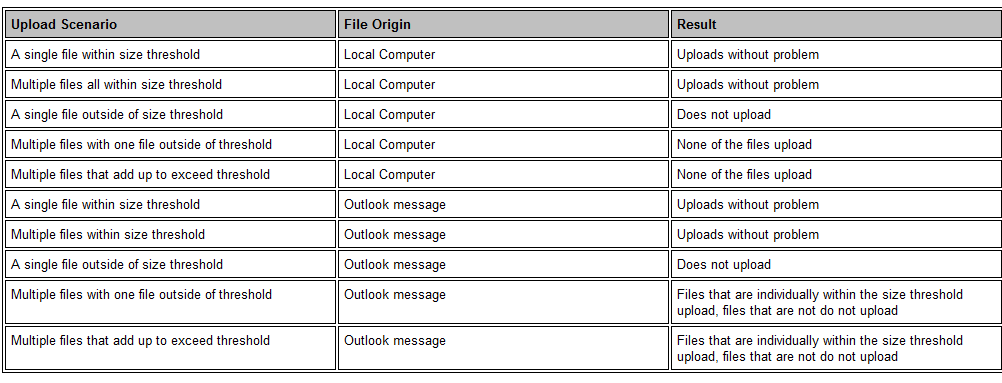
Document Size Threshold
The warning is 10 MB, the actual size threshold is 20 MB.
If more than one document is selected to be uploaded and one of the documents exceeds the size threshold, only the documents that meet the requirements will show up in the pane to the right.
Attaching Documents
Documents can be quickly and easily attached to and from the Outlook TeamConnect add-in, sparing users the necessity of switching back to the main TeamConnect application.
When one or more documents are selected, they will be highlighted as a visual indication that further action (i.e. saving or deleting) can be taken. Users can select multiple documents by holding down the CTRL button while clicking the files.
Attach any selected document(s) to an email by right-clicking and selecting Attach to New Email from the pop-up context menu, or drag the selected files and drop them into a pre-existing email composition window.
Note: Files from different folders can be attached to the same email.
Opening Documents
With the TeamConnect add-in in Outlook, users can easily view their documents in TeamConnect from the Matter Folders & Document Pane.
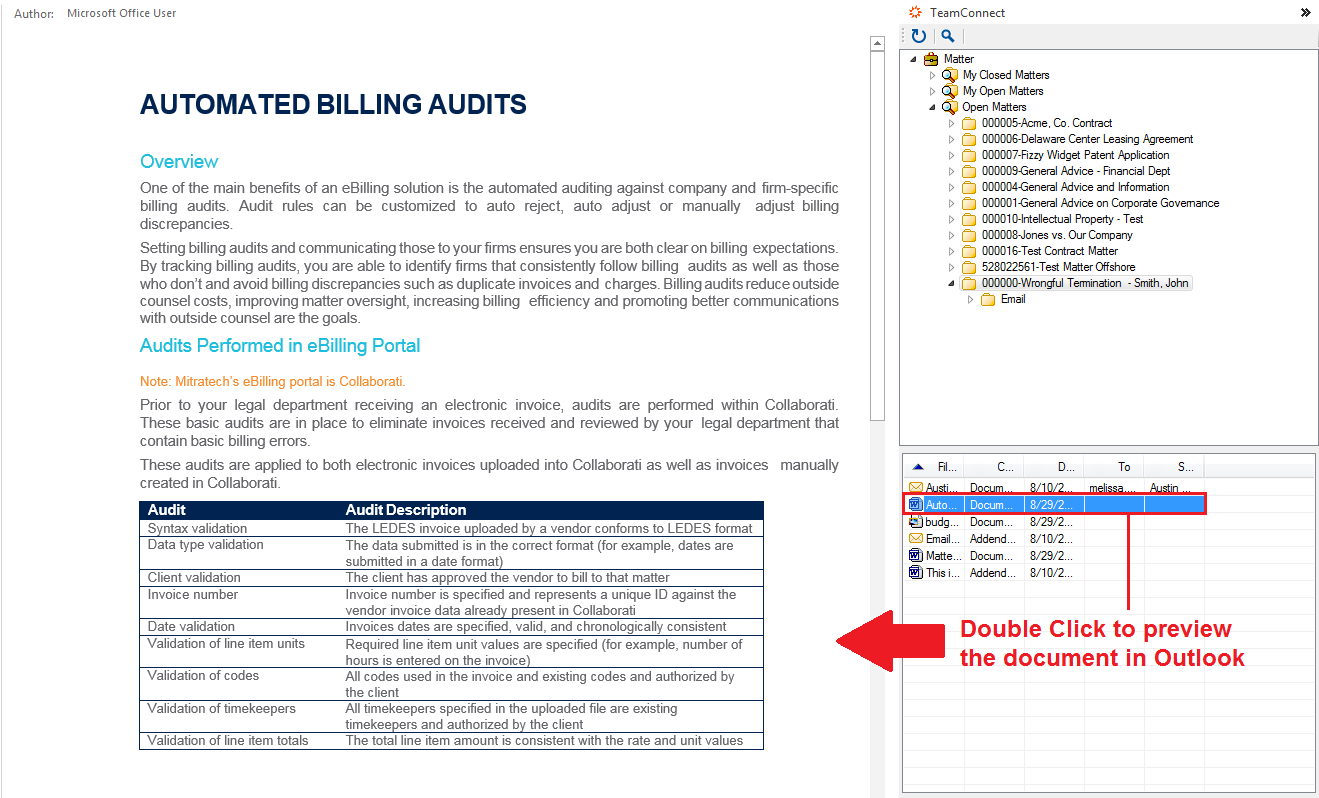
To preview a document or email, double-click the item from the list and the file will preview within the Outlook window. You may need to expand the folder to view sub-folders.
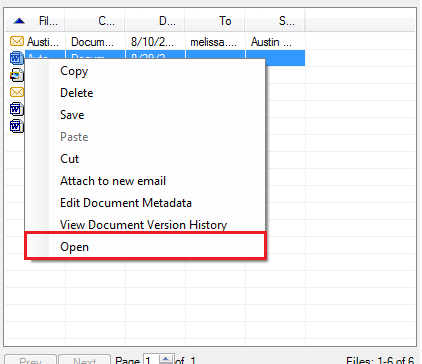
Opening Office Documents in Outlook
Users opening Office documents in Outlook should use right-click+Open to open the document (in Microsoft Word, PPT, etc.) rather than double-clicking.
Upon launch in the native application, the Document Check-In and Check-Out options will be unavailable. Users should save the document using the Save to TeamConnect button.
Important Note: Saving a document to the same folder the identical file name will cause an error message. However, clicking the exact identical file and saving to it will allow versioning.
After saving, the document will then be checked-in and sent to TeamConnect.
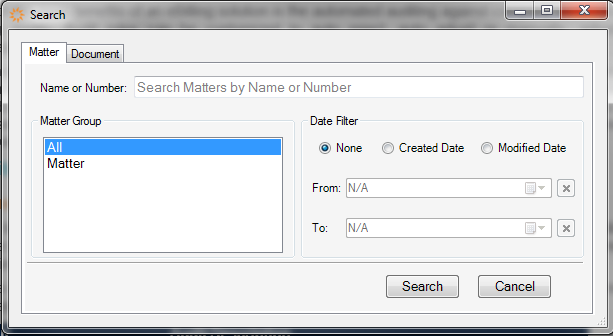
Searching Documents
Matters can be quickly searched from the TeamConnect add-in within Outlook, saving users from scrolling through hundreds or thousands of Matter folders. You can search by clicking the Magnifying Glass icon in the TeamConnect add-in pane
Enter your query into the Search text box. You can also filter by Created or Modified Date. Click Search and the search results will populate in the TeamConnect add-in pane. The documents and the action is the same as when you interact with documents in the standard TeamConnect document pane.
Note: Search results will remain until the Refresh button is pressed. This is located next to the Search button.
For more information on searching and adjusting the parameters for how your team can search, please see Search Filtering.
Moving Documents
To move one or more document(s) in the TeamConnect Outlook add-in, click on a document within the pane and drag the file up to the desired folder. You can also right-click the file and select Cut or Copy in order to open a different folder and paste it there. Alternatively, click on the document, press CTRL+C, open a new file and click on a document in the that file and press CTRL+V.
Note: When dragging a document from one file to another, a ![]() will appear in the place of the mouse indicator if the file cannot hold the document. If a file is willing to accept a document, a
will appear in the place of the mouse indicator if the file cannot hold the document. If a file is willing to accept a document, a ![]() will appear next to the mouse indicator.
will appear next to the mouse indicator.
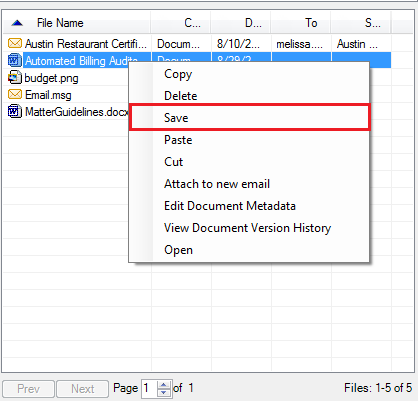
Deleting Documents
Documents can be quickly and easily deleted from the Outlook TeamConnect add-in, sparing users the necessity of switching back to the main TeamConnect application.
Right click on a document then select Delete to remove it from the folder. When one or more documents are selected, they will be highlighted as a visual indication that further action (i.e. saving or deleting) can be taken. Select multiple documents by holding down the CTRL button while clicking the files.
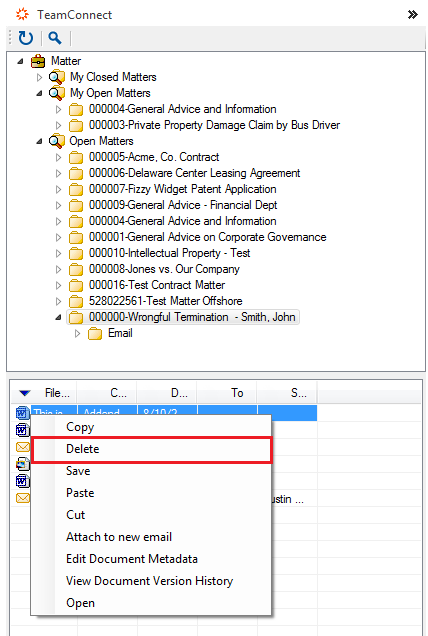
Note: The numbers of files that have been selected to be deleted will appear, but not the file names.
If a file cannot be removed, a notification will pop up stating the cause of the issue.
Overwriting Documents
Users are able to overwrite and version documents moved within the add-in and documents moved in from emails (not from your desktop or another application). See Version Control (below) for further details.
To overwrite with a document from an email:
- Drag and drop the desired document from the message to the file you want to overwrite.
Note: If you drag the file to the folder instead of to the file itself, you will encounter an error message. - If the folder already contains that file name, the file will overwrite.
- Enter a Version Comment, if desired.
- Click Ok to finalize the overwrite.
To overwrite with a document from within the add-in
Users are not able to drag and drop a file from within the add-in to another folder with an outdated file of the same name. This action throws an error and will not overwrite the old document or move the new document. In order to overwrite from within the add-in, users must first delete the old file before moving the new file to the intended location.
Version Control Overwriting
Versioning of documents and email messages is improved in Office Suite 3.0. Users are able to drag-and-drop new files onto an existing target file.
These are the following scenarios users may encounter when versioning documents:
| Action | Target | Result |
| Dropping a file from an email onto an existing file within the TC add-in (see below) | File of same type (.eml or .msg for emails) that is not checked out |
Pop-up window requests version comment. Save will version the targeted file and Cancel will cancel the versioning. Both choices close the new window. |
| Dropping a file from an email onto an existing file within the TC add-in | File of a different type | Prompts a warning message that notifies you of extension mismatch. Click Yes to proceed with the versioning or No to cancel |
| Dropping a file from an email onto an existing file within the TC add-in | File that is currently checked out | Prompts a message stating that you cannot version a checked out file. This message includes the name of the user who has checked out the document. Provides an option to save a copy with a unique added identifier (sample.doc -> sample(1).doc) instead. |
| Dropping one or more local documents into the add-in directory | Hovering over individual file | Cannot upload or version |
| Dropping one or more local documents into the add-in directory | Hovering over folder or subfolder | Uploads or begins versioning process as planned |
Versioning Files
Dragging files directly from an email to a file in the document bank can provide direct versioning. The file will always take the name of the destination file in the document bank. Users can also version a file with a document of a different extension.
For example, users can drag a .docx file to a .doc file for versioning. The file extension will still be .doc for TeamConnect or locally downloaded files, but this feature can provide better version control for users with legacy files. Users can also version an entirely unrelated file type, such as adding a .pptx file over a .pdf. TeamConnect will attempt to open the file as a .pdf and locally downloaded versions of the .pptx.pdf file will have errors.
Note: Version history will display in order of the most recent version first, having the most recent version on top. If document versioning is not turned in in TeamConnect, the document version will always display 1 regardless of updating the versions.
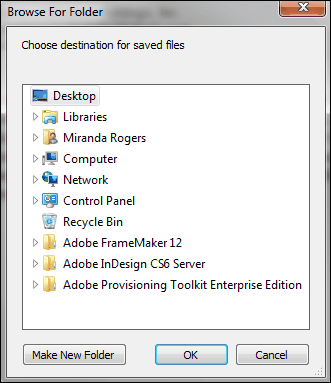
Saving to Local Machines
Documents can be quickly and easily saved to a local machine from the Outlook TeamConnect plug- in, sparing users the necessity of switching back to the main TeamConnect application.
When one or more documents are selected, they will be highlighted as a visual indication that further action (i.e. saving or deleting) can be taken. Select multiple documents by holding down the CTRL button while clicking the files.
Right-click any selected file and choose Save from the pop-up context menu to save your file.
Choose a destination in which to save the file.
Note: File names will remain as they appear on the server, but duplicate names must have a numeric identifier appended in order to provide uniqueness in the file system.