Installing Office Suite on TeamConnect Essentials
Installation Instructions
Introduction
The information and instructions on this page apply to version 3.X of TeamConnect Office Suite.
TeamConnect Office integrates into Microsoft Word, Excel, and PowerPoint.
TeamConnect Outlook integrates with Microsoft Outlook.
You must install each add-in separately
- First, you have get the TeamConnect add-in installation files,
Note: You no longer have to install the TeamConnect add-in module. If you need the installation files, please reach out to Mitratech Support. - Then, you install the Office add-in,
- Lastly, you install the Outlook add-in
Note: The Office Integration License file must be installed, this can be verified by checking the Office Configuration tab, this will show even if license is not installed, but it will say "Office Suite License not found" if there isn't a license installed. If you see this message please reach out to your TeamConnect admin or Mitratech Support.
Performance Note:
Performance will vary depending on the number of integrated search views and the number of projects returned by those search views. Testing of Office Suite 3.0 indicates the following results
- An environment with 23 integrated search views can be initialized in 5 seconds.
- An environment with 54 integrated search views can be initialized in 11 seconds.
These numbers might be affected by other factors such as PC configuration (RAM, CPU, etc.) as well as the network limitations (speed, latency, etc.).
Prerequisites and System Requirements
Prerequisites
- You must retreive the software from an SFTP or MFT provided by Mitratech.
System Requirements
- Must be able to run installer as an administrator
- TeamConnect Essentials 6.0+ and TeamConnect 6.0+ must be installed
- For TeamConnect 32 & 64 bit Office: Microsoft Word, Excel, and PowerPoint 2013 & 2016.
- For TeamConnect 32 & 64 bit Outlook: Microsoft Outlook 2013 & 2016.
Note: Please make sure you install the appropriate versions of the add-in with your version of Office/Outlook. Example: 32 bit add-in for 32 bit Office/Outlook.
Upgrade Considerations:
- TeamConnect Office Suite 3.0 can be upgraded from any 2.X version of TeamConnect Office Suite.
- Users with versions prior to 2.X must first upgrade through the 2.X installer on the Available Updates in TeamConnect.
Supported Versions
- TeamConnect Office Suite 3.1 does not work with Microsoft Word, Excel, PowerPoint, and Outlook 2013, however Office Suite 3.0 does.
- Office 365 Pro Plus is supported, however other versions of Office 365 are not currently supported. See our other supported 3rd party products here.
Installing the Office Add-in
- Select the appropriate x86 or x64 installer based on your version of Office.
- x86 is used for 32-bit Office
- x64 is used for 64-bit Office
Note: This is not based on your version of the Windows Operating System. Please make sure you install the appropriate versions of the add-in with your version of Office/Outlook. Example: 32 bit add-in for 32 bit Office/Outlook.
To find what version of Office you have, go to File > Account > About Word. You can check any Microsoft Office system, it doesn't have to be Word (e.g. PowerPoint, Excel, etc.)
- In the \\TeamConnect Office Add-ins\Office\x86 - For 32-bit Office installs, right-click the setup.exe file and select Run as Administrator. The add-in will not install correctly if you do not run as admin.
- Note: This is the recommended file to run regardless of if you have a 32- or a 64-bit machine
- Follow the steps in the Wizard to complete the install.
- Click Next from the Mitratech TeamConnect Outlook Add-in window.
- If you want to change the location of where this is stored, click the Browse button. Otherwise click the Next button to use the default folder.
- From the Mitratech Setup window, enter the URL for your instance of TeamConnect.
Be sure to include http:// at the beginning of the URL, and a / at the end of the URL (e.g. http://testsite:1234/4.0.2/).
Note: If you want to preset the login URL for your users, enter "false" in the URL editable entry field. This will ensure that users cannot edit the log-in URL. Entering "false" will not work if there is no log-in URL. Enter "true" if you would like to make the URL editable. All fields left blank will default to "true."
- Click Next to begin the installation.
- Click Next from the Mitratech Setup window.
- Click Close to exit the installer.
After successful installation, the TeamConnect tab appears in Microsoft Word, Excel, and PowerPoint.
Installing the Outlook Add-in
- Select the appropriate x86 or x64 installer based on your version of Office.
- x86 is used for 32-bit Office
- x64 is used for 64-bit Office
Note: This is not based on your version of the Windows Operating System.
To find what version of Office you have, go to File > Account > About Outlook.
- In the \\TeamConnect Office Add-ins\Outlook\x86 - For 32-bit Outlook installs, run the setup.exe file.
- Follow the steps in the Wizard to complete the install.
- Click Next from the Mitratech TeamConnect Outlook Add-in window.
- From the Mitratech Setup window, enter the URL for your instance of TeamConnect.
Be sure to include http:// at the beginning of the URL, and a / at the end of the URL (e.g. http://testsite:1234/4.0.2/)Note: If you want to preset the login URL for your users, enter "false" in the URL editable entry field. This will ensure that users cannot edit the log-in URL. Entering "false" will not work if there is no log-in URL. Enter "true" if you would like to make the URL editable. All fields left blank will default to "true," with the exception of Browser Enabled.
Note: If you want to remove the built-in browser from Outlook, enter "false" in the Browser Enabled entry field. Enter "true" to leave the browser in the program. - Click Next to begin the installation.
- Insert any Proxy information needed.
- If you want to change the location of where this is stored, click the Browse button. Otherwise click the Next button to use the default folder.
- Click Next from the Mitratech Setup window.
- Click Close to exit the installer.
After successful installation, the TeamConnect tab appears in Outlook.
If you need to change your TeamConnect login information, click the Settings button from the TeamConnect pane. Entering your login information allows TeamConnect to integrate with the Office programs.
Confirm that the Add-in was installed successfully
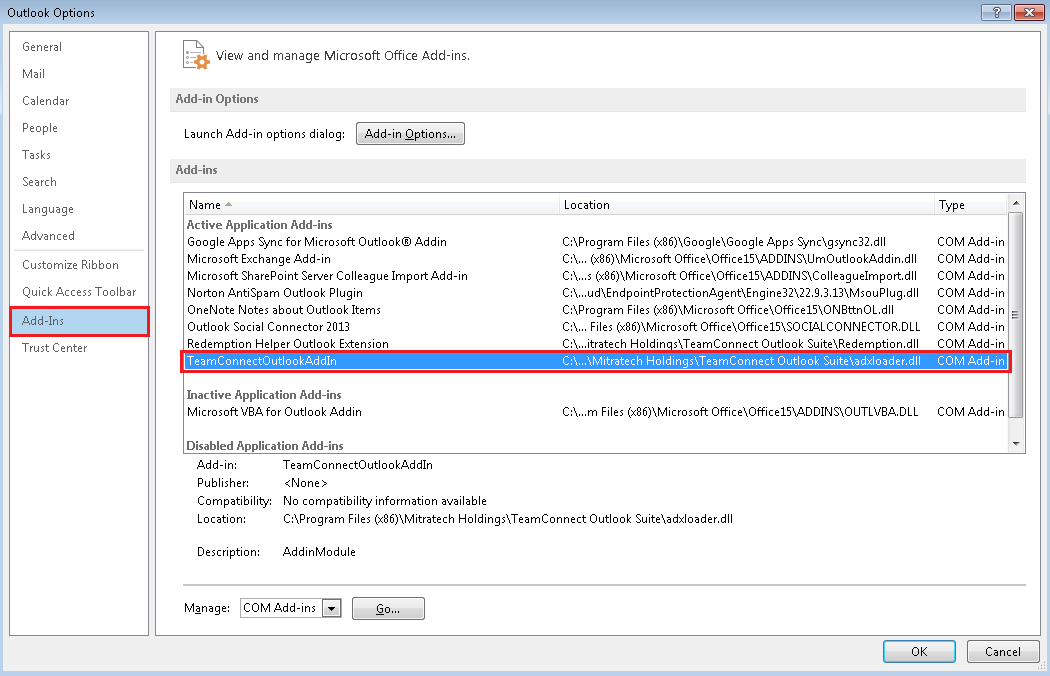
Once the add-ins are installed, open Office and/or Outlook and verify you can see the TeamConnect add-in pane. If you cannot see the pane on the right hand side, then you may need to confirm the add-in is enabled:
- Under File > Options > Add-ins > click "Go..."
- next to "Manage: COM Add-ins," verify the check box is checked for "TeamConnectOfficeAddIn"

- next to "Manage: COM Add-ins," verify the check box is checked for "TeamConnectOfficeAddIn"
-
Once you have confirmed that the add-in is enabled in Office/Outlook, if the pane is still not showing, then check the .ini file for the user on the machine to verify that the views are enabled.
-
Office: C:\Users\<user name>\AppData\Roaming\Mitratech\Office Settings\OfficeSettings.ini
- Outlook: C:\Users\<user name>\AppData\Roaming\Mitratech\Outlook Settings\OutlookSettings.ini
-
Note: you may need to set Windows Explorer to show hidden items, in Windows X, this is done by going to View > checking the 'hidden items' box
-
- If the boolean is set to "True," then it will be visible within Outlook.

-
-
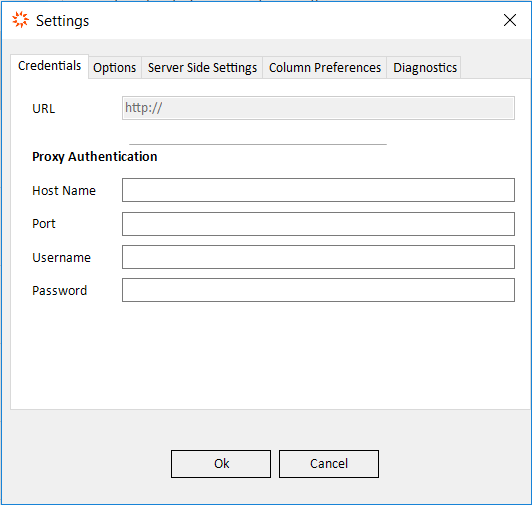
Once you have the TeamConnect pane visible in Office/Outlook, you can configure the connection to your TeamConnect instance. Open the settings by clicking on the Gear icon on the top of the TeamConnect pane. There will be three fields to fill out if you are using a proxy.
a. Click the Settings button in the TeamConnect Ribbon:

b. From here, you will need to fill out the URL, Username, & Password fields. Only fill out the others if needed per your proxy settings or if no login information was input during initial installation.

If you need to change your TeamConnect login information, click the Settings button from the TeamConnect pane. Entering your login information allows TeamConnect to integrate with the Office programs.
Having an issue with .NET? Click Here.
Creating a GPO for Outlook and Office Add-in
Introduction
This guide provides step-by-step instructions for installing the add-in on multiple machines via GPO. This is a different method as opposed to going to each machine and installing the add-in manually.
Before Beginning
- Prior to beginning this process, the add-in installers should be saved in a folder along the following path: \\<domain>\netlogon\
Note: If you do not already have the installation files for the add-in, please contact your TeamConnect administrator.
- In order to have the add-in deploy through GPO, you need to first access your domain controller. From there, you will create a new Group Policy, or GPO. This new GPO can be named anything, as long as it is clear for you.
Creating the Deployable Package
Step 1:
Access your domain policies. Right click on your Domain Policy to create a group policy object and click Edit. From here, you will need to expand out the Computer Configuration, Policies, and Software Settings arrows as seen below.
Note: A best practice is to make a new named policy for any software installation.
Next, right click in the blank space to the right of Software installation and hover over New and select Package.
Navigate to the folder you created before starting this process with the installation files and select the Setup file.
Deploy to assigned users.
Note: This will be available across the domain and it's accessible by domain users and computers since the folder resides in the
\\<domain>\netlogon\ path.
Linking the GPO
Step 2:
Return to your domain controller and right click on it, then choose Link an Existing GPO.
You will then select the Group Policy that was created for the Add-in.
Note: The GPO may take up to 2 hours to update and may require a restart. You can check to see if the GPO is there via group policy results by using the CMD prompt and typing: gpresult /r /scope:computer
Although it is not recommended, the GPO can be forced to update if needed using the CMD prompt and typing: gpupdate /force
Please refer to your IT Team prior to any forced changes.

