
Creating a Condition
To create a condition
- From the Conditions tab for an object definition, click New.
- Enter information about the condition. See the General Tab of a Condition table for a description of each field.
- Click Save.
Note: Click the Delete button of an open condition to delete it.
To create a copy of a condition
- From the condition, click Create a Copy.
- Change the Name and the Unique Key of the condition.
- Click Save.
General Tab of a Condition
|
Field or Column |
Description |
|---|---|
|
Name |
The name of the condition. The name you enter is also the name that appears in any drop-down list of conditions. |
|
Unique Key |
The unique name of the condition. |
|
Description |
Additional information about the condition. |
|
Expression Type |
|
|
Expression (when Automated Qualifier is selected) |
A drop-down list with Java class and JavaScript files that you can select for this condition. Click the Automated Qualifiers Folder link to open the folder with Java classes and JavaScript files. For examples of when to create automated qualifier, see When to Create Automated Qualifiers. |
|
Expression (when User Expression is selected) |
The following fields appear:
Click the
|
|
add more |
Click this button to add the expression to the condition. |
|
Expressions table |
This table lists all the expressions that you have added to the condition. Place a check-mark in the check-box of an expression and click edit to edit the expression. Place a check-mark in one or more check-boxes and click delete to delete the expression(s). |
|
Condition is true when |
Select one of these options to determine which expression in the condition must be met:
|


Defining Expressions
To define an expression, you specify the following:
- The left argument
- The operator
- The right argument
These three pieces together form a statement, such as these:
Sample Expressions
|
Left Argument |
Operator |
Right Argument |
|---|---|---|
|
The value selected in the Loss Type list field |
is |
Fire Damage |
|
The current user |
is not |
a member of the Outside Counsel group |
|
The Trial Date |
is changed |
from any date to any date |
|
The Expiration Date field |
is populated |
[none] |
If you add these statements as expressions, the condition evaluates the statements to determine whether the condition is true.
The type of data being compared in the left and right arguments must match. For example, if your left argument identifies a list field, then your operator and right argument options allow you to compare the selection with a selection made in another list field or to a literal list value.
Operator Fields
The operator connects the rights and left arguments. Refer to the following table for a description of each operator field.
Operator Fields for Creating Expressions
|
Selection |
Description |
Data types where operator selection is available |
|||||
|
Text |
Number |
Date |
List |
Check- box |
Related object |
||
|
Is |
Determines whether the qualifier statement is a positive or negative statement. |
x |
x |
x |
x |
x |
x |
|
Not |
x |
x |
x |
x |
x |
x |
|
|
Equal To |
Evaluates whether the left argument and right argument are the same value. |
x |
x |
x |
x |
x |
x |
|
Populated |
Evaluates whether the field identified in the left argument has a value. Do not use this selection to check whether a field that was previously null now has a value. Instead, use Changed from No Value. |
x |
x |
x |
x |
x |
|
|
Changed |
Evaluates whether the value for the field identified in the left argument has changed. It compares the old value in the database to the value in the record when rule is triggered. Tip: This option is useful for triggering audit rules. |
x
|
x
|
x
|
x
|
x
|
x
|
|
Begins With |
Evaluates whether the text value in the field identified in the left argument begins with, ends with, or contains the text that is identified in the right argument. |
x |
|||||
|
Ends With |
Evaluates whether the text value in the field identified in the left argument begins with, ends with, or contains the text that is identified in the right argument. |
x |
|||||
|
Contains |
Evaluates whether the text value in the field identified in the left argument begins with, ends with, or contains the text that is identified in the right argument. |
x |
|||||
|
Less Than |
Evaluates the number value identified in the left argument compared to the number value in the right argument. For example, you may specify that if a dollar amount Is—Greater Than Or Equal To 5000, send the action for approval. |
x |
|||||
|
Less Than Or Equal To |
Evaluates the number value identified in the left argument compared to the number value in the right argument. For example, you may specify that if a dollar amount Is—Greater Than Or Equal To 5000, send the action for approval. |
x |
|||||
|
Greater Than Or Equal To |
Evaluates the number value identified in the left argument compared to the number value in the right argument. For example, you may specify that if a dollar amount Is—Greater Than Or Equal To 5000, send the action for approval. |
x |
|||||
|
Greater Than |
Evaluates the number value identified in the left argument compared to the number value in the right argument. For example, you may specify that if a dollar amount Is—Greater Than Or Equal To 5000, send the action for approval. |
x |
|||||
|
Exists |
These options appear when you select a particular category by creating a path such as |
||||||
|
Does Not Exist |
|||||||
|
Item Added |
Evaluates whether a related object (such as involved) or sub-object (such as assignee) was added, deleted, or modified. |
x |
|||||
|
Item Deleted |
Evaluates whether a related object (such as involved) or sub-object (such as assignee) was added, deleted, or modified. |
x |
|||||
|
Item Modified |
Evaluates whether a related object (such as involved) or sub-object (such as assignee) was added, deleted, or modified. |
x |
|||||
|
After |
Compares the date in the left argument to the date in the right argument. An additional field appears when you select one of the options that requires you to specify a number of days. Enter the value for X in this field. |
x |
|||||
|
Before |
x |
||||||
|
After The Next X Days |
x |
||||||
|
Within The Next X Days |
x |
||||||
|
Within The Last X Days |
x |
||||||
|
Before The Last X Days |
x |
||||||
Right Argument Fields
The types of right arguments you can add depend on the data type of the left argument.
Rule Qualifier Right Argument Options
|
Selection |
Description |
Data types for which selection is available |
|||||
|
Text |
Number |
Date |
List |
Check- box |
Custom Object/ Involved |
||
|
Literal |
Select this option when you want to specify a value to compare to the field identified by your left argument. For example, select Literal for a qualifier item that checks whether the invoice total is greater than 5000. You must also select Literal when you want to check whether a certain item is selected in a List field. |
x |
x |
x |
x |
x |
|
|
Attribute |
Select this option when you need to compare the values of two fields in TeamConnect. After you select Attribute, you must first select Current Object or Current User, and then use Object Navigator to identify the field to which you want to compare the field identified by your left argument. For example, if you want to compare the Contact of a contact- centric project to the Contact identified in a custom field of type Involved, select Attribute to identify the custom field. |
x |
x |
x |
x |
x |
x |
|
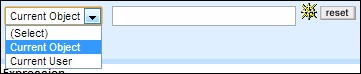
Current Object |
Select one of these options after you have selected Attribute and you need to identify a field in TeamConnect to which you are comparing the field in your left argument. For details about using Object Navigator, see Using Object Navigator. |
x
|
x
|
x
|
x
|
x
|
x
|
|
Current User |
x
|
x
|
x
|
x
|
x
|
x
|
|
|
Any Value |
These options work in conjunction with the Changed option to form a statement, such as Is changed from any value to this value (California). |
x
|
x
|
x
|
x
|
x
|
x
|
|
No Value |
x
|
x
|
x
|
x
|
x
|
||
|
This Value |
x
|
x
|
x
|
x
|
|||
|
Today |
The date that the rule is being triggered. |
x
|
|||||
|
This Date |
Allows you to compare the date in the left argument to a date that is identified in another field. |
x
|
|||||
|
From Now |
Allows you to specify a number of days from the date that the rule is being triggered. |
x
|
|||||
|
From This Date |
Allows you to specify a number of days from a date that is identified in another field. |
x
|
|||||
|
Yes |
These options correspond to a check-box being selected or not selected. |
x
|
|||||
|
No |
x
|
||||||
Qualifier Logic
The Designer user interface is designed for you to complete the condition logic in stages. After listing one or more expressions on the Qualifier tab, the following options appear, allowing you to specify when the rule action runs:
- All of the expressions are met.
- Any of the expressions are met.
- The expressions are met according to the logic that you specify.
The "logic" option allows you to specify a formula for how the condition evaluates the expressions. You refer to an expression using the number that is automatically generated on the batch screen for each item. For example, once you create a list of five expressions, you might create the following formula:
(1 or 2 or 3) and (4 or 5)
Points To Remember
Keep the following points in mind while working with qualifier logic:
- Define all of the expressions that you need in your condition before writing the formula.
- The only words that you may use in your formula are "and" and "or."
- Use parentheses () to logically group expressions. You may also nest parentheses when needed. Make sure to use complete pairs of parentheses.
- If you do not group the expressions where grouping is necessary, grouping is automatically applied by TeamConnect, and you will have to verify that the appropriate logic is achieved. For example:
1 or 2 and 3
is automatically converted to:
1 or (2 and 3)
It is best to apply the grouping yourself to ensure that it is correct. - If necessary, your formula may repeat the same expression. For example, the following formula is valid:
(1 and 2 and 3) or (1 and 2 and 4)