
Admin Guide for TeamConnect O365 Add-In 4.1
Introduction
The following is a comprehensive user guide for Admins who will facilitate the migration of appointments from the Outlook Plugin to the Outlook Add-in. This migration process is a coordinated effort between the TeamConnect Admin, the Office Suite Admin (permissions described below), and the end user. Before diving in, if you have not done so, we suggest acquainting yourself with the O365 Add-In 4.0 released with TeamConnect 7.1 (November 2023).
Please avoid concurrent usage of the Office Suite Plugin and Add-in. It is vital users stop using and uninstall the Office Suite Plugin (for Outlook) after the datastore file has been uploaded and before the end users start using the Add-in. Concurrent usage will cause data issues such as duplicate appointments, deletion of data within appointments, etc. Other noteworthy things include:
- Appointment migration from Plugin to Add-in is only supported for versions beyond TeamConnect 7.1 PB1, and is only applicable if users were using appointments in the Outlook Plugin
- Due to browser issues beyond our control, the Add-in does not work with Safari, please use an alternative web browser. Please note the Add-in is compatible with desktop environments on both Windows and Mac operating systems.
- The TeamConnect O365 Add-In is not supported on Outlook 2019 or earlier versions on the
desktop. - Please note that file check-In/check-Out is supported in the Outlook Add-In, rather than in Word, PowerPoint, and Excel. Users can efficiently manage files through Outlook Add-In or directly through TeamConnect for seamless file handling.
- Once you have uploaded your datastore file, DO NOT use the Plugin again; instead, you should use the Add-in.
Note: If end users accidentally use the Plugin again, they will need to generate/upload another datastore file in the Add-in.
Objectives
This document is intended for Outlook admin users of TeamConnect O365 Add-In 4.1 who are already using appointments in the Outlook Plugin for appointments. The following steps must be completed to prevent duplicate appointments from appearing on users’ calendar.
- To learn more about the reasons behind the transition from the Office Suite Plugin to the Outlook Add-in, refer to O365 Outlook Plugin Vs Add-in.
Office Suite Migration Process
To migrate from the Plugin to the Add-in, the following steps must be followed.
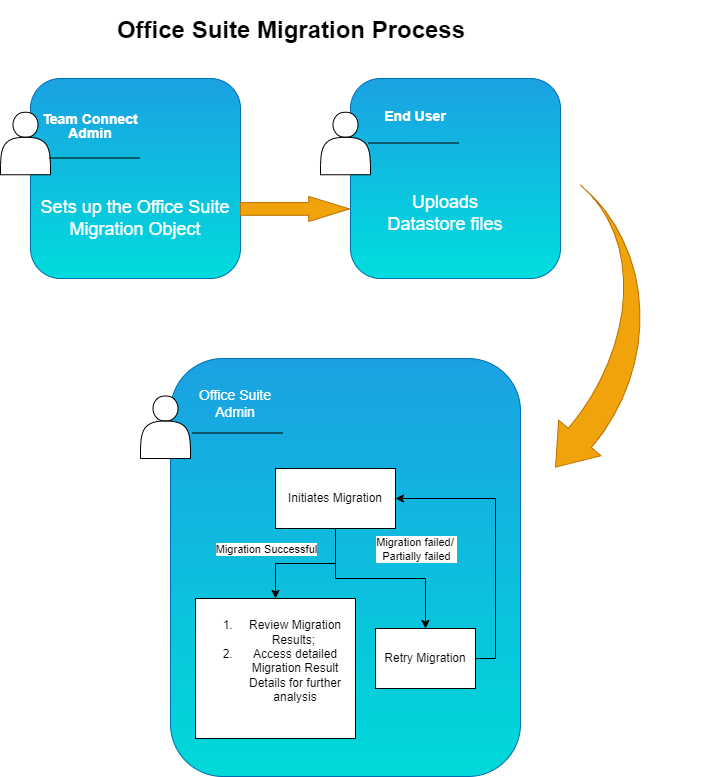
1.Permissions/Set-up
TeamConnect Administrators are responsible for the user access setup. Users designated to the "Office Suite Admin" group play a crucial role in overseeing the Office Suite Migration within TeamConnect.
Set Up User Access for Office Suite Migration Screen
This migration process is a coordinated effort:
- Office Suite Admin(s) are designated by TeamConnect (TC) Admins
- End users upload their data store file
- Office Suite Admin(s) complete the migration and troubleshoot any issues issues
When TeamConnect Admins install the module, two groups are created: "Office Suite Admin" and "Office Suite User." These groups come with predefined views. TeamConnect Admins are responsible for assigning Office Suite Admins and all end users who need to migrate a file. The following are permissions for each group:
|
Office Suite User |
Office Suite Admin |
|
Upload Files |
Upload Files |
|
View Pending Migration Details |
|
|
View Pending Results |
Assign user to Office Suite User View
Once the TeamConnect Admin accesses the Office Suite Migration screen, users can be set to ‘Office Suite User View’.
The default user view is set in the following way:
| Instructions | Screenshot for Reference |
|---|---|
|
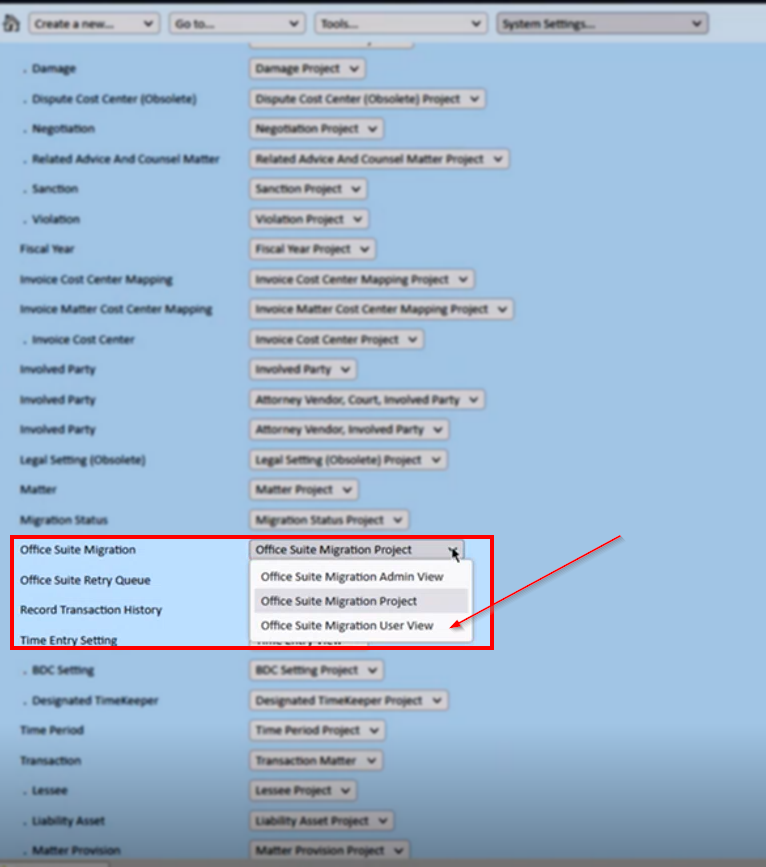 |
This default view grants end users access only to the "Upload File" section of the Office Suite Migration screen.
Assign user to Office Suite Admin View
For a TeamConnect Admin to assign a user to the Office Suite Admin view, select “Office Suite Admin View” in the “Office Suite Migration” drop-down menu (step 3 in the above section).
The user will now have the Office Suite Admin view and can perform all tasks related to appointment migration.
Custom Group Setup for Office Suite Admin Rights
If the TeamConnect Admin prefers to use their own groups instead of the predefined module groups, add the required permissions to the groups and assign the user to the group. Users assigned to the "Office Suite Admin" group will have the default Office Suite Admin View, and users assigned to the "Office Suite User" group will have the default Office Suite User View. Follow these steps to assign a user to the “Office Suite Admin” group:
Steps to Assign User to Admin Group
| Instructions | Screenshot for Reference |
|---|---|
|
 |
By following these steps, TeamConnect admins can effectively manage user access and permissions on the Office Suite Migration screen, ensuring smooth execution of migration tasks. Once assigned to the admin group, Office Suite Admin users will gain access to all three sections of the Office Suite Migration screen: "Upload File," "Pending Migration," and "Migration Results." Outlook Admins can now perform all operations related to appointment migration.
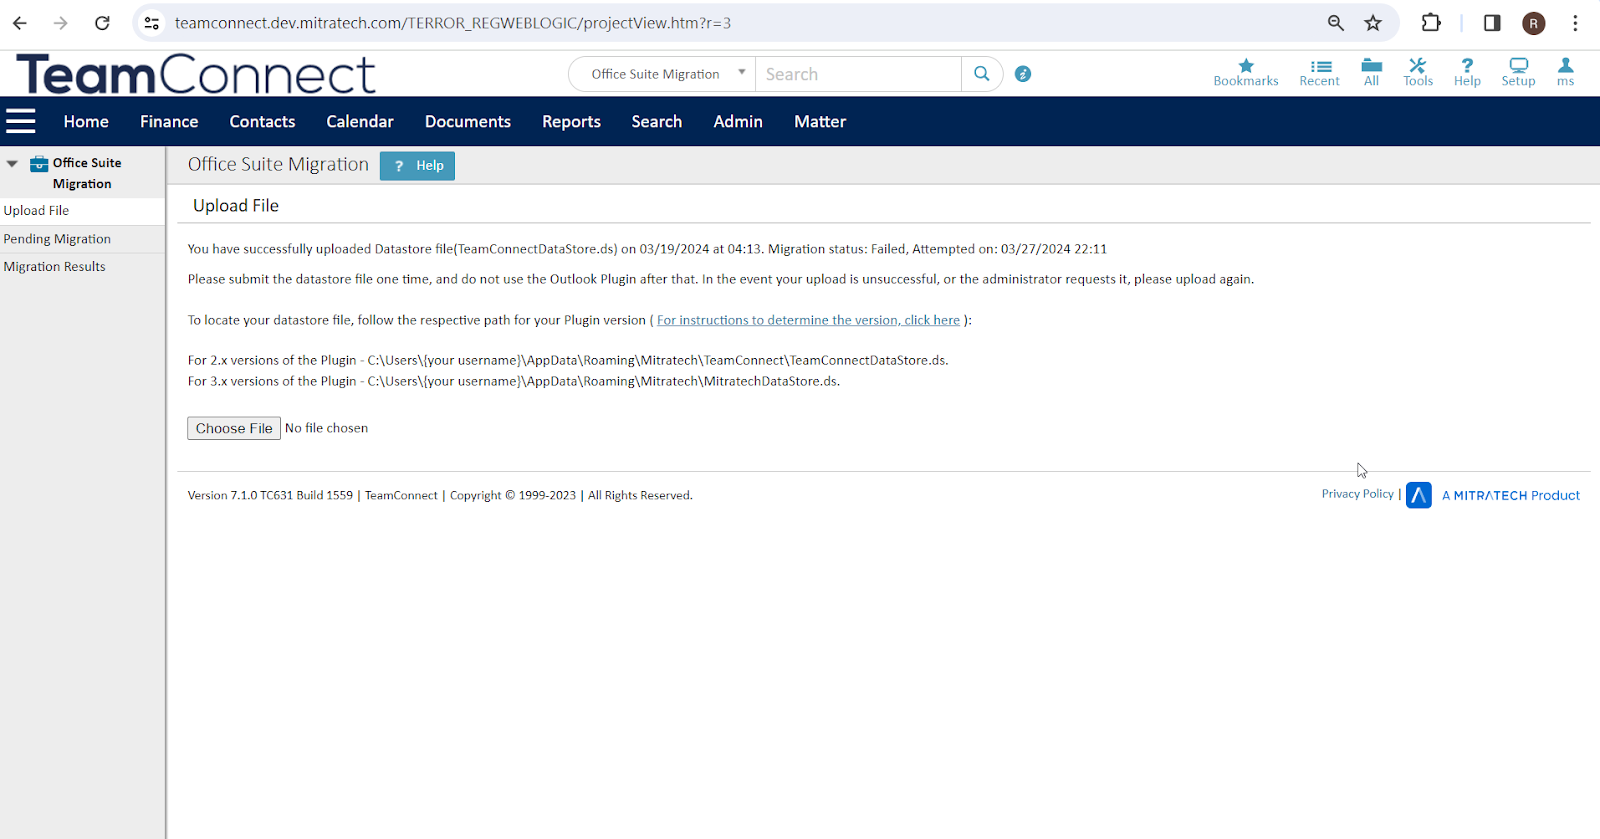
2.Upload Datastore Files
What are Datastore Files?
Datastore files refer to structured data files that contain essential information stored in a database or data storage system. In this context of the migration process, datastore files contain appointment-related data such as appointment ID, Outlook entry ID, and any other pertinent data needed for appointments within the TeamConnect system. These files ensure the successful transfer of appointment data from the Plugin to the Add-in.
Important Note: Tasks also found in datastore files will not be available in the new Outlook Add-in until November 2024.
The image below illustrates a standard format for a datastore file and contains the following information:
- The first column distinguishes between tasks and appointments, where number 2 denotes appointments and number 3 denotes tasks.
- The second column represents the ID associated with appointments or tasks.
- The third column contains the Outlook entry ID.
The migration process begins by uploading the datastore files, the end user is responsible for this step. Detailed end-user instructions on how to upload the datastore files can be found here. Once again, after uploading the datastore files, please do not use the Plugin, this action will result in the generation of duplicate appointments, and the deletion of data on existing appointments.
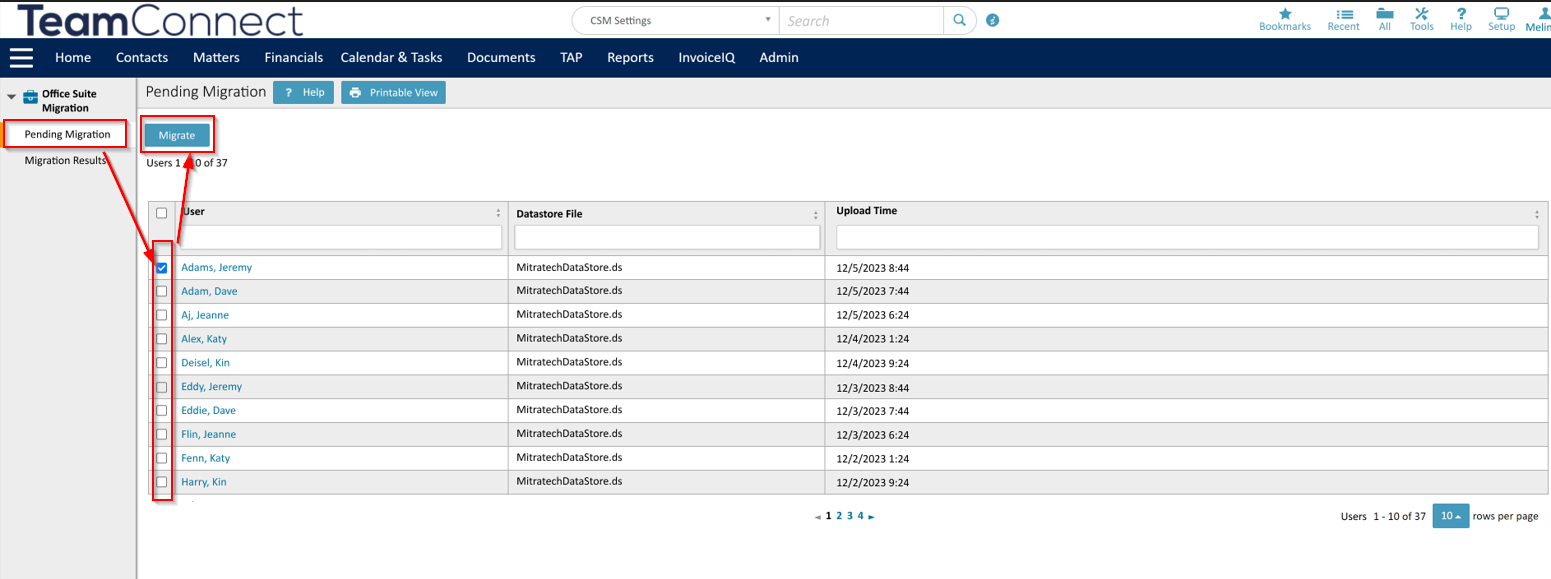
3.Migrate Datastore Files
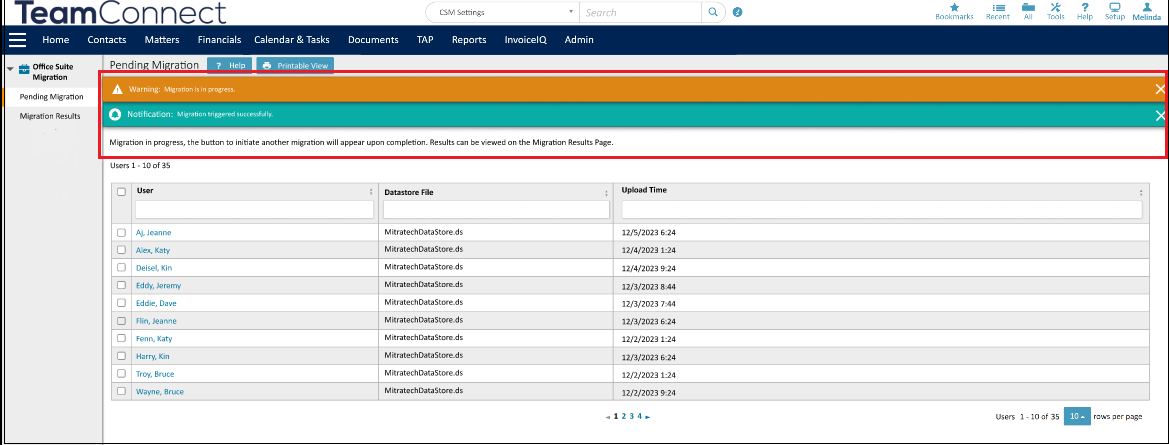
Once the end-user has uploaded their datastore file, the Office Suite Admin can now migrate all uploaded files, so appointments created in the Plugin are visible in the Add-in. To successfully complete the migration, complete the following steps:
| Instructions | Screenshot for Reference |
|---|---|
|
 |
|
 |
|
 |
|
 |
|
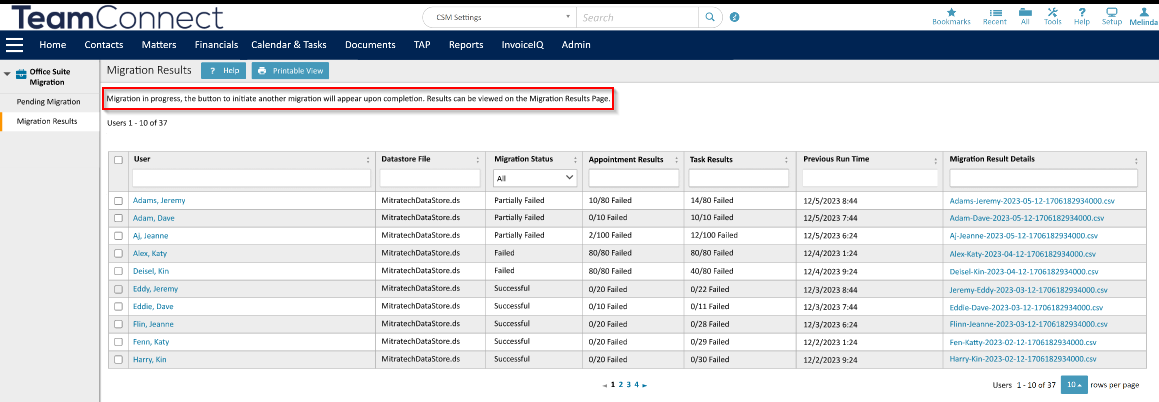
4.Migration Results
| The "Migration Results" page contains detailed information about completed migrations including the following: User, Datastore File, Migration Status, Appointment Results, Task Results, Previous Runtime, and Migration Result Details. | 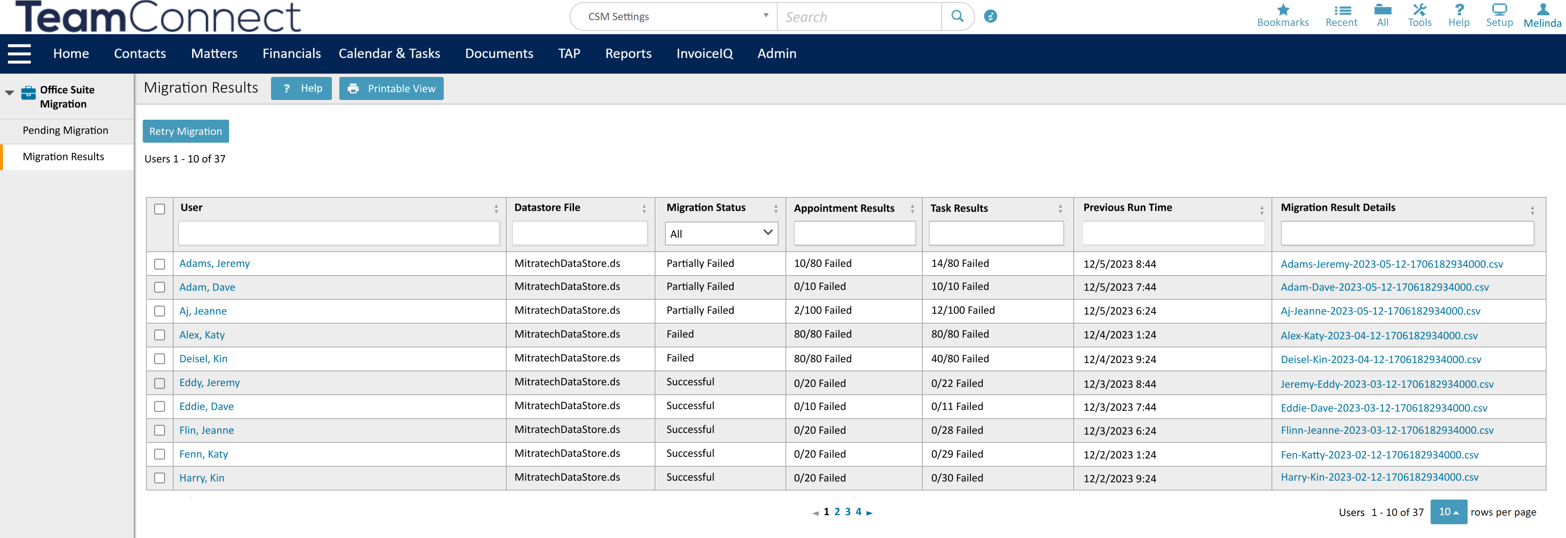 |
| The "Migration Status" column indicates the status of an appointment, showing whether the migration was 'successful', 'failed', or 'partially failed'. | 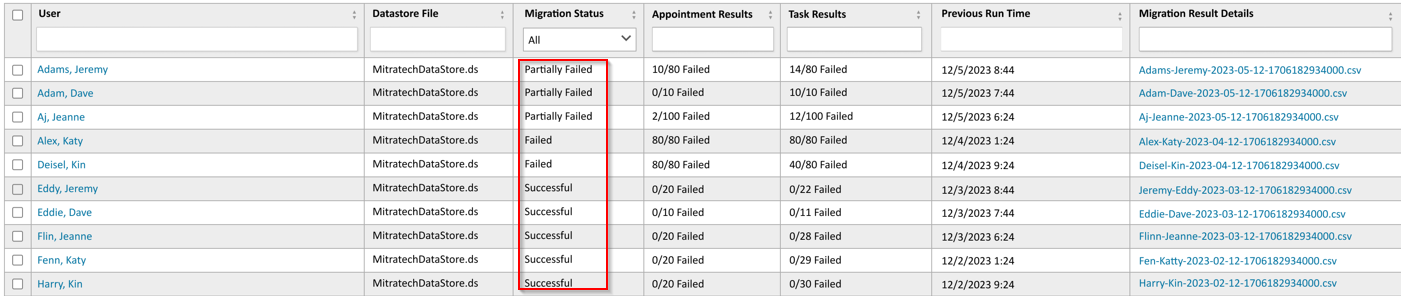 |
|
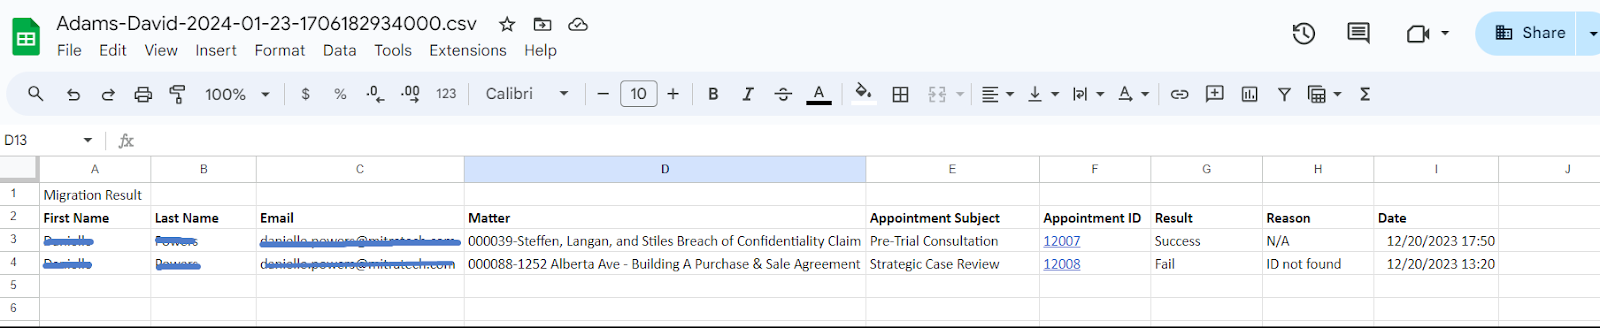 |
5.Troubleshooting Failed Migrations
In the event a migration fails or partially fails follow these steps:
- Download the CSV File from the Migration Result Details page
- Review the errors or discrepancies in column H that may have led to the migration failure.
- If needed, you can retry the migration by selecting the checkbox next to the appointment and clicking the "Retry Migration" button.

-
If you are still having failed syncs seek further assistance and contact customer support.