

SAML 2.0 SSO Installation and Configuration Guide for TeamConnect Enterprise v8.0+
Disclaimer: This information applies to TeamConnect version 8.0 and later. If you are using TeamConnect version 6.0 or earlier, see the updated guidance here ↗.
Overview
Single Sign-On (SSO) enhances security and user experience by allowing users to authenticate through an enterprise Identity Provider. TeamConnect acts as a SAML Service Provider (SP) and delegates authentication to one or more external Identity Providers (IdPs).
This guide provides instructions for integrating TeamConnect with an external Identity Provider (IdP) like Okta and Azure using the SAML 2.0 protocol. TeamConnect will act as the Service Provider (SP), delegating user authentication to your chosen IdP.
login paths. Plan any migrations from older versions accordingly. For more information, refer to the Configuring Mixed-Mode Authentication section of this guide.Prerequisites
Before you begin, ensure you have the following:
-
TeamConnect Enterprise: TeamConnect Enterprise version 8.0 or later.
-
System Administrator Privileges: You must have access to the System Settings in the TeamConnect UI.
-
Public HTTPS URL: The TeamConnect instance must be accessible via a public HTTPS URL, as the ACS (Assertion Consumer Service) endpoint requires it.
-
IdP Access: You need administrative access to your chosen Identity Provider’s portal (e.g., Okta or Azure) to retrieve IdP metadata or other SAML details.
Step 1: General SAML Configuration in TeamConnect
The first step is to enable the SAML module within TeamConnect.
-
Navigate to Setup → System Settings and click on the SAML Authentication Settings tab.
-
Tick the Enable SAML? checkbox.
-
You can now proceed with adding SAML registrations by following the steps outlined in “Step 3: Add IdP Registration to TeamConnect.”
-
Click Save and Close.
Step 2: Configure Your Identity Provider (IdP)
Next, you need to create a new SAML application within your chosen IdP (Okta or Azure).
a. For Okta
| Steps to follow | Screenshot for reference |
|---|---|
| 1. Login to your Okta admin console and navigate to Applications. |  |
| 2. Click Create App Integration and select SAML 2.0 as the sign-in method. | 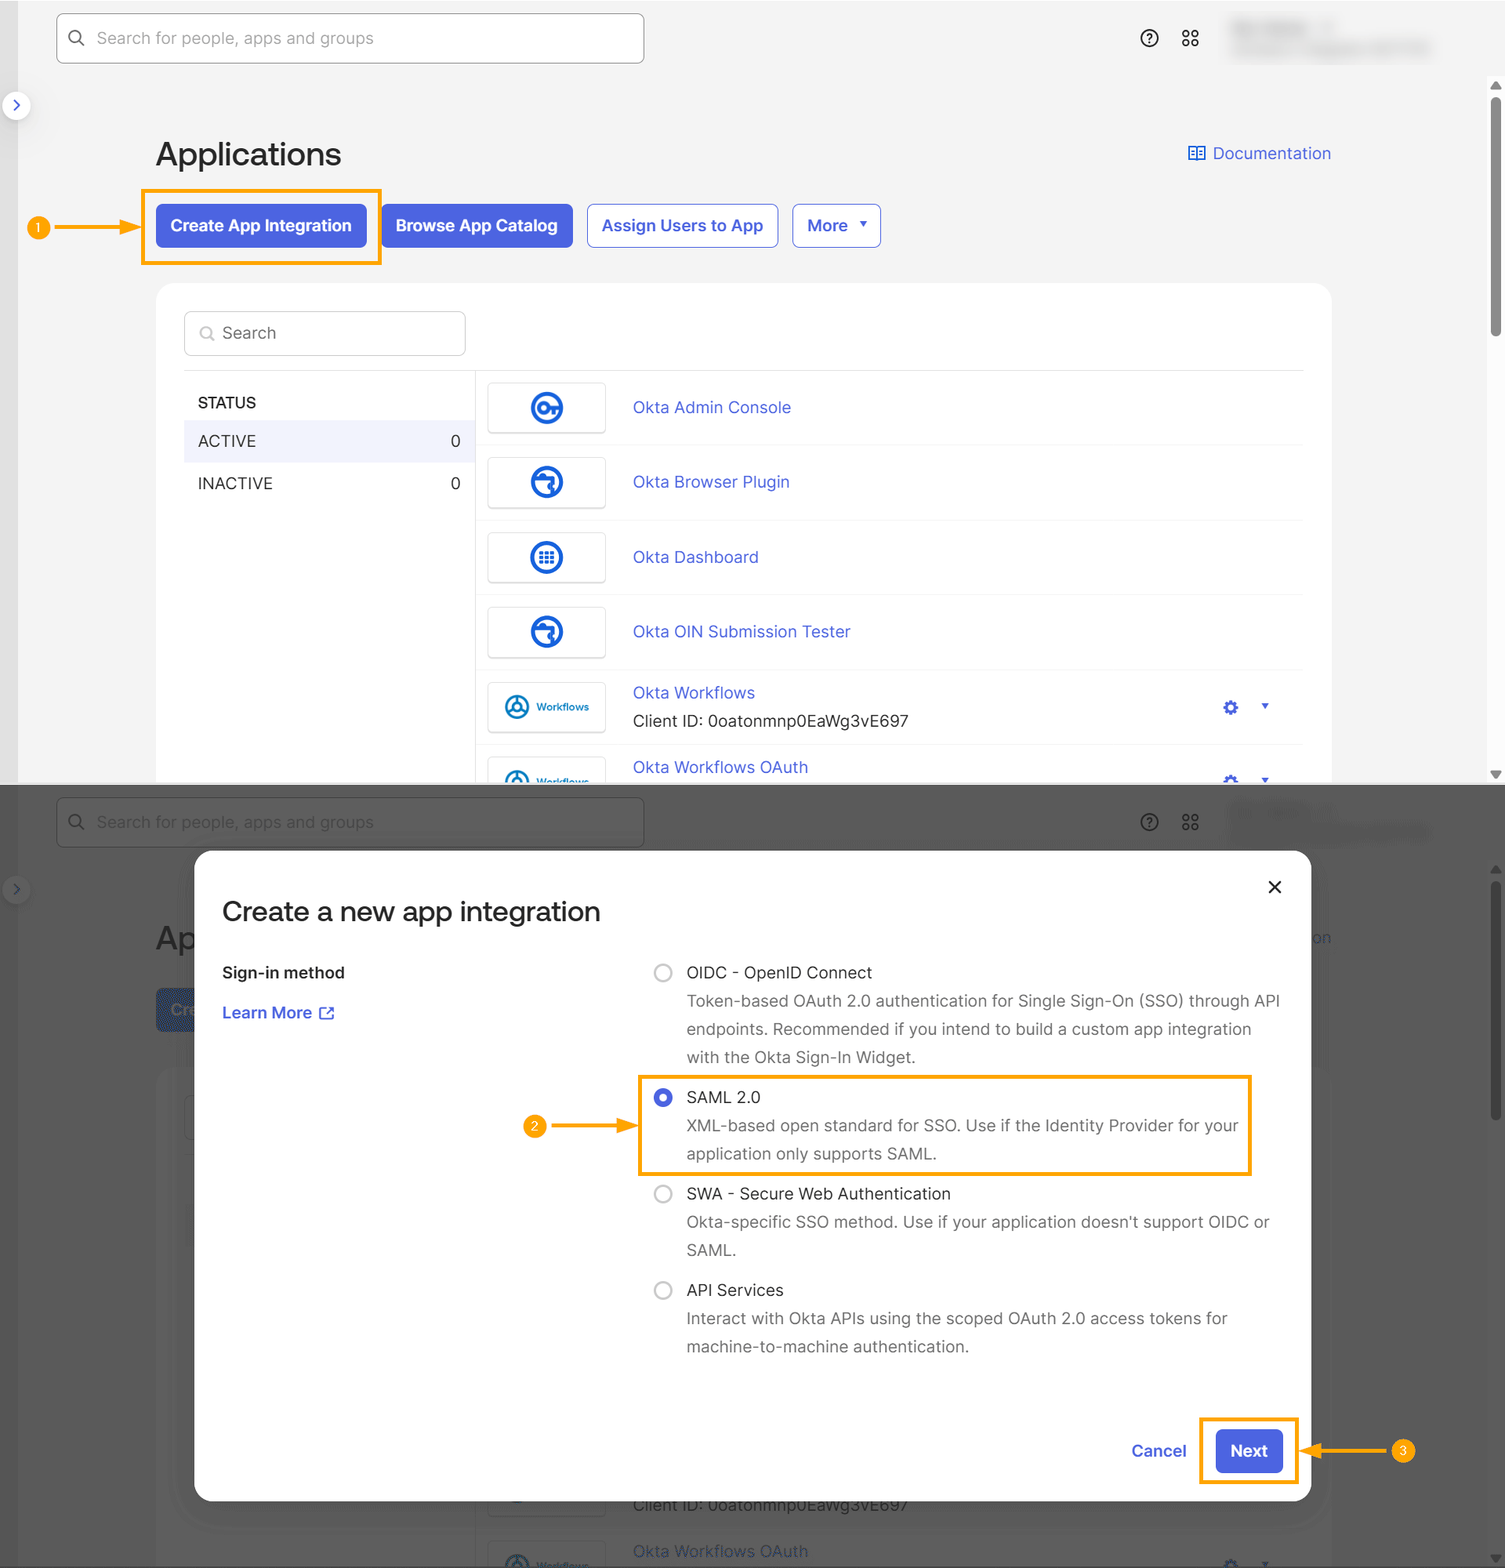 |
| 3. General Settings: Give your app a name (e.g., “TeamConnect”) and click Next. | 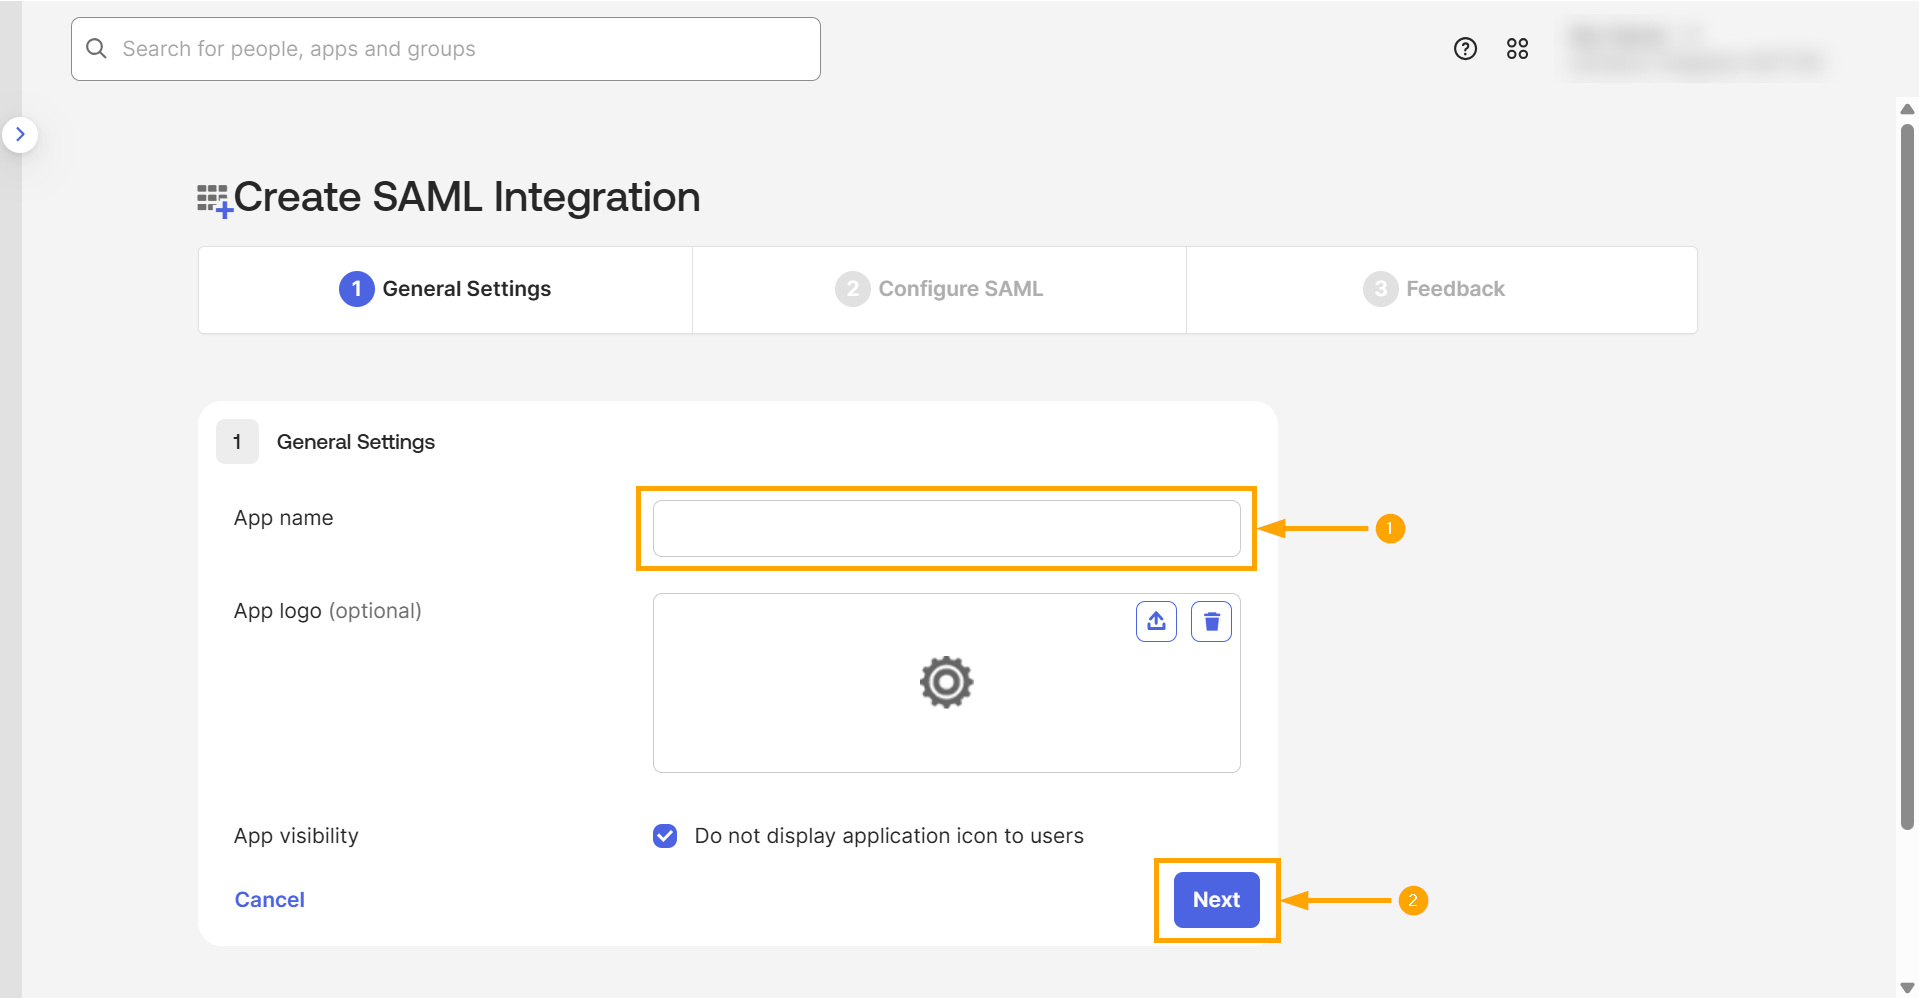 |
4. Configure SAML:
Note: You can leave the rest of the fields as they are. You don’t need to change anything else in this section.
|
 |
| 5. Scroll to the bottom of the page and click Next. |  |
| 6. Feedback: Select the checkbox It’s required to contact the vendor to enable SAML and click Finish.
You will be taken to the application’s Sign On tab. |
 |
7. Get Metadata for TeamConnect: On the application’s Sign On tab, you will find the necessary information to connect with TeamConnect:
|
  |
| 8. Click on the View SAML setup instructions button.
A new page will open. |
 |
9. Gather the following details to enter manually into TeamConnect:
|
|


b. For Azure
| Steps to follow | Screenshot for reference |
|---|---|
| 1. Go to Microsoft Azure portal and sign in with your admin account. In the left hand menu, select Azure Active Directory. Under Manage, select App registrations.
(or) You can also select App registrations under Azure services. |
 |
| 2. Click the + New registration button at the top of the page. |  |
3. Register the Application / Fill in the following fields:
|
 |
4. Access the Enterprise Application:
|
 |
5. Set up Single sign-on:
|
 |
6. Configure SAML:
|
  |
7. Gather Metadata for TeamConnect:
|
 |
8. Assign Users to the Application:
|
  |
Step 3: Add IdP Registration to TeamConnect
Now, go to TeamConnect to connect it to the IdP application you just configured.
| Steps to follow | Screenshot for reference |
|---|---|
| 1. Go to Setup → System Settings → SAML Authentication Settings. |  |
2. In the Add New SAML Registration form, fill in the details:
|
Note: If you enter invalid characters while creating the Registration ID, an error message appears.
|
| 3. Click Add Registration. The entry appears in the SAML Registration table below.
Note: You must save the System Settings form at least once after ticking Enable SAML? for the lower half of the screen (the registrations table) to appear on older builds.
|
 |
| 4. Click Save and Close on the main System Settings page to persist all changes.
❗ Important: Once a registration is added, you cannot modify its details. To make changes, you must delete the existing registration and add a new one with the updated information. To know more, see the Certificate Maintenance section.
|

Repeat for Additional IdPs (Optional)
TeamConnect supports multiple concurrent IdPs. Users pick the IdP from a drop-down on the SAML login screen. Ensure each registration has a unique Registration ID.
Here is an example screenshot for your reference of how multiple IdPs would look on the login screen:
[image]
Step 4: Testing and Validation
Before you begin testing, it is important to understand the login behavior based on your configuration.
Automatic Redirect for a Single IdP
When you configure only one Identity Provider (IdP), TeamConnect simplifies the login process for your users.
If SAML login is enabled with a single active IdP, the user journey is seamless. When a user navigates to the TeamConnect login page, the system automatically redirects them directly to that IdP’s login page, as shown here.

Furthermore, if the user is already authenticated with the IdP in their browser, they will be redirected straight to their TeamConnect homepage, providing a true one-click login experience.
If multiple Identity Providers (IDPs) are configured, the login page will display an SSO login selector screen. To know more about how the login screen appears when multiple IdPs are configured, see the Repeat for Additional IdPs section.
Now, proceed with the following validation steps:
| Steps to follow | Screenshot for reference |
|---|---|
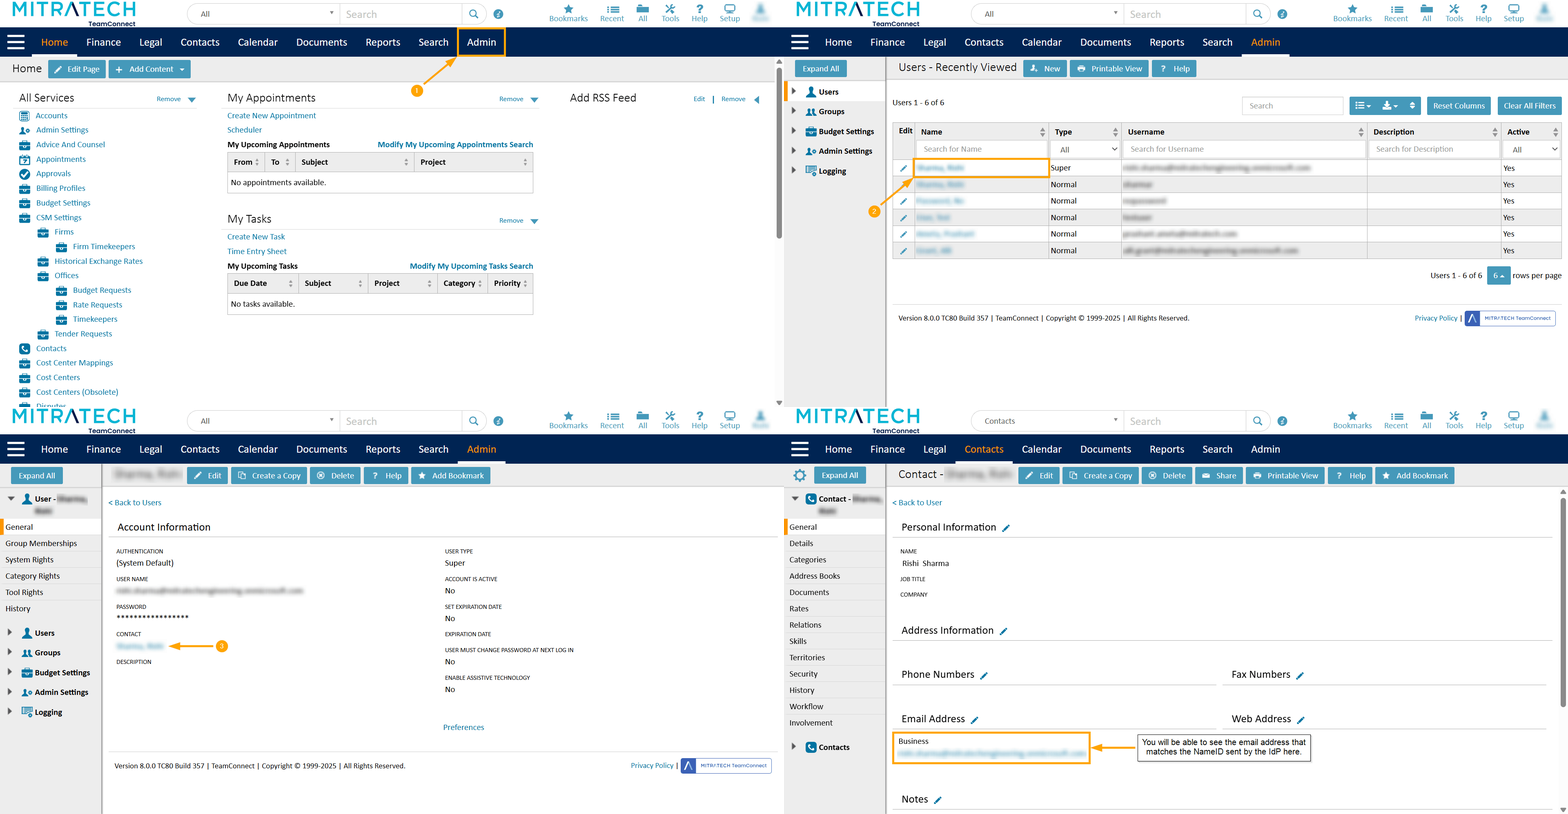
| 1. Create or map a user: Ensure a user exists in TeamConnect whose email address matches the NameID (Email Address used in the SSO IdP) that will be issued by the IdP.
To view and verify a user’s email address in TeamConnect:
|
 |
| 2. Enable SAML Authentication: Set the default authentication method for your TeamConnect instance. |  |
3. Test the Login Flow:
|
Configuring Mixed-Mode Authentication
TeamConnect supports a mixed-mode setup where some users authenticate with SAML and others continue to use passwords. You control this by setting a global default authentication method and then overriding the Authentication setting on specific user records.
Option A – SAML for Select Users (Default = Password)
Use this method when most users will log in with a standard password, but a specific group needs to use SAML.
- Leave the global default set to Standard Authenticator (or your current non-SAML method) in Admin → Admin Settings → Security.
- For each user who should use SAML, navigate to their user profile (Admin → All Users → [Username]) and in the General tab, set their Authentication dropdown to your named SAML Authenticator.
- Provide these specific (SAML) users with the direct SAML login URL:
https://<your-tc-host>/login/saml2/sso/{RegistrationID}. - All other users will continue to log in with passwords at the standard
/loginpage.
Option B – SAML for Most Users (Default = SAML)
Use this method when most users will use SAML, but a few (like administrators or external users) need to use a standard password.
- Set the global Default Authentication Method to your SAML Authenticator in Admin → Admin Settings → Security.
- For any user who must still use a password, navigate to their user profile (Admin → All Users → [Username]) and in the General tab, set their Authentication dropdown to your named Standard Authenticator.
- Provide these specific users with the direct standard login URL to bypass SSO:
http(s)://<your-tc-host>/standardLogin.
Direct Login URLs
-
Default Login:
.../login-
This URL follows your currently configured default authentication method.
-
-
Standard/Password Login:
.../standardLogin-
Use this URL to force a password login (Standard Authentication), which is useful for password-based users when SAML is the default.
-
-
SAML-Specific Login:
.../login/saml2/sso/{RegistrationID}-
This URL forces authentication against a specific IdP configuration.
-
Logout Redirection Behavior
It’s helpful to know that TeamConnect remembers which login URL you used.
Upon logout, the system automatically returns users to their original login page. For instance, a user who logged in via /standardLogin will be redirected to /standardLogin after logging out, rather than the default /login page. This maintains consistency by ensuring users are directed to the appropriate login method for subsequent sessions.
Configure Single Logout (SLO)
Single Logout (SLO) enhances security by ensuring that when a user logs out of TeamConnect, their session is also terminated across all other applications that share the same Identity Provider (IdP) session.
- While TeamConnect Enterprise (TCE) does not support IDP-initiated logout, it does support Single Log Out (SLO). When a user logs out of TCE, the SLO process will automatically terminate sessions for any other integrated applications that support IDP-initiated logout.
- SLO is optional. You can use SAML-based Single Sign-On without configuring Single Logout.
Prerequisites for Single Logout (SLO)
Before you begin, make sure that:
- Your IdP supports SAML 2.0 Single Logout.
- You have administrator access to the IdP application configuration.
- You have already created and configured a SAML registration in TeamConnect (see Step 3: Add IdP Registration to TeamConnect).
- You have generated an SP private key and certificate (see the Private Key example in Step 3, or your organization’s standard certificate generation process).
Configuring Single Logout (SLO) in the Identity Provider
Use the following settings in your IdP’s SAML application configuration.
- Generate and Upload the Signature Certificate
- TeamConnect uses a Service Provider (SP) signing certificate to sign SAML assertions and Single Logout requests.
- The following OpenSSL commands are examples only. You can run them from any directory and adjust file names or locations to meet your organization’s standards.
-
Note: The private key generated in this step must correspond to the certificate uploaded to both the Identity Provider and TeamConnect.
a. Generate the private key: You need a private key for the Service Provider, which is TeamConnect in this case. This can be created using a standard tool like OpenSSL.
- Open a command prompt or terminal and run the following command to generate a 2048-bit RSA private key:
openssl genpkey -algorithm RSA -out sp-key.pem -pkeyopt rsa_keygen_bits:2048 - This command generates a private key and saves it in the file
sp-key.pem, which you can then upload.
b. Generate the X.509 certificate: Run the following command to generate a self-signed Service Provider certificate:
openssl req -new -x509 -key sp-key.pem -out sp-cert.pem -days 365
- This command generates an X.509 certificate and saves it to the file
sp-key.pem, which you can then upload as the Signature Certificate in the IdP SAML application configuration.

-
❗Important: If the Identity Provider encrypts assertions or requires the Service Provider to sign SAML or Single Logout messages, this certificate is required. The certificate must match the private key uploaded to TeamConnect.
- Enable Single Logout in the Identity Provider: In the IdP SAML application configuration, enable application-initiated Single Logout.
Examples:
- In Okta, select the Allow application to initiate Single Logout checkbox.

- In Azure, In the Logout URL (optional) field, enter:
https://<your-tc-host>/logout- Replace
<your-tc-host>with your TeamConnect’s public hostname.
- Replace

- Configure the Single Logout URL: Set the Single Logout URL in the IdP to the TeamConnect logout endpoint.
- The format is:
https://<your-tc-host>/logout - Replace
<your-tc-host>with your TeamConnect’s public hostname.

- Configure the SP Issuer / Identity ID: Set the SP Identity ID or Issuer in the IdP to the TeamConnect SAML metadata URL.
- The format is:
https://<your-tc-host>/login/saml2/service-provider-metadata/{RegistrationID}-
Replace
<your-tc-host>with your TeamConnect’s public hostname. -
Replace
{RegistrationID}with the actual Registration ID you configured in TeamConnect (for example,OKTA).
-

Configuring Single Logout (SLO) in the TeamConnect Setup
After the IdP is configured to send and receive SLO messages, update the corresponding SAML registration in TeamConnect.
- Go to Setup → System Settings → SAML Authentication Settings.
- In the Add New SAML Registration form, add a new registration with the SLO configuration.
Important: You cannot modify the existing SAML registration. To include the SLO configured settings, either you must delete the existing registration or add a new one with the updated settings. To know more, see the Certificate Maintenance section.
- In the SAML registration form, configure the following fields:
- Single Logout URL: Enter the Single Logout URL in the IdP to the TeamConnect logout endpoint that accepts a SAML LogoutRequest.
- The format is:
https://<your-tc-host>/logout/saml2/slo - Replace
<your-tc-host>with your TeamConnect’s public hostname.
- The format is:
- Single Logout Response URL (optional): Enter the IdP endpoint that returns the SAML LogoutResponse if the SLO flow is asynchronous.
- Certificate: Upload the signing certificate you downloaded from your IdP. This certificate is used to validate SAML assertions and SLO responses from the IdP (i.e., to verify that the login assertions are coming from a trusted source).
- Private Key: Upload the SP private key only if your IdP encrypts assertions with TeamConnect’s public key or requires the SP to sign SLO messages.
-
Note: The private key must match the public certificate (
sp-cert.pem) you uploaded to the IdP so TeamConnect can decrypt the assertions
-
- Click Add Registration. The entry appears in the SAML Registration section.
- Click Save and Close on the main System Settings page to persist all changes.
Single Logout Confirmation Screen
When Single Sign-On (SSO) and Single Logout (SLO) are enabled in TeamConnect, users see a confirmation screen before they are logged out. This helps prevent accidental logouts from all connected applications and gives users greater control over their session.
How it works
- When you select Log Out in TeamConnect, a confirmation screen appears.
- The dialog box displays the following message: Are you sure you want to log out? Logging out means that you will need to sign in again for all your apps. There may be a delay of up to an hour before you are signed out of everywhere.
- You have two options:
- Continue: Logs you out of TeamConnect and all other applications associated with your SSO session.
- Cancel: Returns you to TeamConnect without logging you out.
Here is a screenshot for reference that shows how the confirmation screen appears in the TeamConnect application:

When is the confirmation screen displayed?
The confirmation screen appears only if:
- Single Sign-On (SSO) is enabled in the SAML Authentication settings.
- Single Logout (SLO) is configured for your Identity Provider (meaning, a valid Single Logout URL was provided during the IdP setup in Step 3: Add IdP Registration to TeamConnect).
- This confirmation screen is displayed only for SSO users when SLO is configured.
- If you have unsaved items, you will first see the standard TeamConnect Unsaved Items prompt. The Single Logout confirmation screen appears only after you have addressed unsaved items.
Audit Logging: Single Logout events are recorded in the TeamConnect audit logs for security and compliance monitoring. To know more about Viewing Logs in TeamConnect, see here.
Important Note: This feature does not affect:
- Users who log in using Standard/Password authentication.
- Users authenticated via SSO Identity Providers that do not support or have not configured Single Logout (SLO).
Upgrading an Existing SAML Configuration
If you are upgrading from an earlier version of TeamConnect and previously configured SAML authentication, you must remove the legacy configuration before setting up the new SAML authentication in TeamConnect version 8.0.
To upgrade your SAML configuration:
| Steps to follow | Screenshot for reference |
|---|---|
| 1. Login to TeamConnect with an administrator account. | |
| 2. Navigate to Admin → Admin Settings → Security, and locate the Default Authentication Method. |  |
| 3. Change the setting to Standard Authenticator, and select Update. |  |
| 4. Navigate to Documents → Top Level → System → Authentication → SAML and delete all files in the SAML folder. |  |
| 6. Go to Setup → System Settings → SAML Authentication Settings and reconfigure your Identity Provider (IdP) using the relevant documentation: |
Confirming the Upgrade
After you complete these steps and re-enable SAML using the new configuration, you will notice a name change for the authentication method.
- Previous Version: The method was named SAML Single Sign On. This was the option available with the previous SAML server.
- New Version: The method is now named SAML Authenticator. This is the new option that appears after you have deleted the old files and enabled SAML through the Authentication Settings page.
Here is an example screenshot for your reference:

Troubleshooting and Common Errors
If you encounter issues, check the following common problems.
| Error Messsage | Resolution |
|---|---|
| “No trusted certificate configured” | The signing certificate in the TeamConnect registration is incorrect or has extra whitespace. Re-upload the correct certificate from your IdP. |
| HTTP 400: Bad Request – RelayState invalid | The RegistrationID in TeamConnect does not match the one specified in the callback URL from the IdP. Verify the IDs match exactly (case-insensitive). |
| User not found | The email address (NameID) sent by the IdP does not match any user in TeamConnect. Create the user in TeamConnect or adjust the user mapping in the IdP. |
| Audience mismatch | The Audience URI / SP Entity ID configured in the IdP does not match TeamConnect’s SP Entity ID. Ensure the IdP’s Audience / Identifier / SP Issuer is set to: https://<your-tc-host>/login/saml2/service-provider-metadata/{RegistrationID} and that matches the Entity ID (if configured) in the corresponding SAML registration in TeamConnect. |
| Clock skew / assertion expired | The server time between TeamConnect and the IdP is out of sync. Ensure both servers are synchronized using a Network Time Protocol (NTP) service. |
Deeper Debugging: View and Decode SAML Assertions
When troubleshooting SAML SSO login issues, viewing the SAML assertion helps you verify the information your identity provider (IdP) is sending. The assertion is a security token that includes the user’s identity and authentication details, which TeamConnect uses to grant access.
Follow these steps to capture, decode, and inspect the SAML assertion.
Capture the SAML Assertion
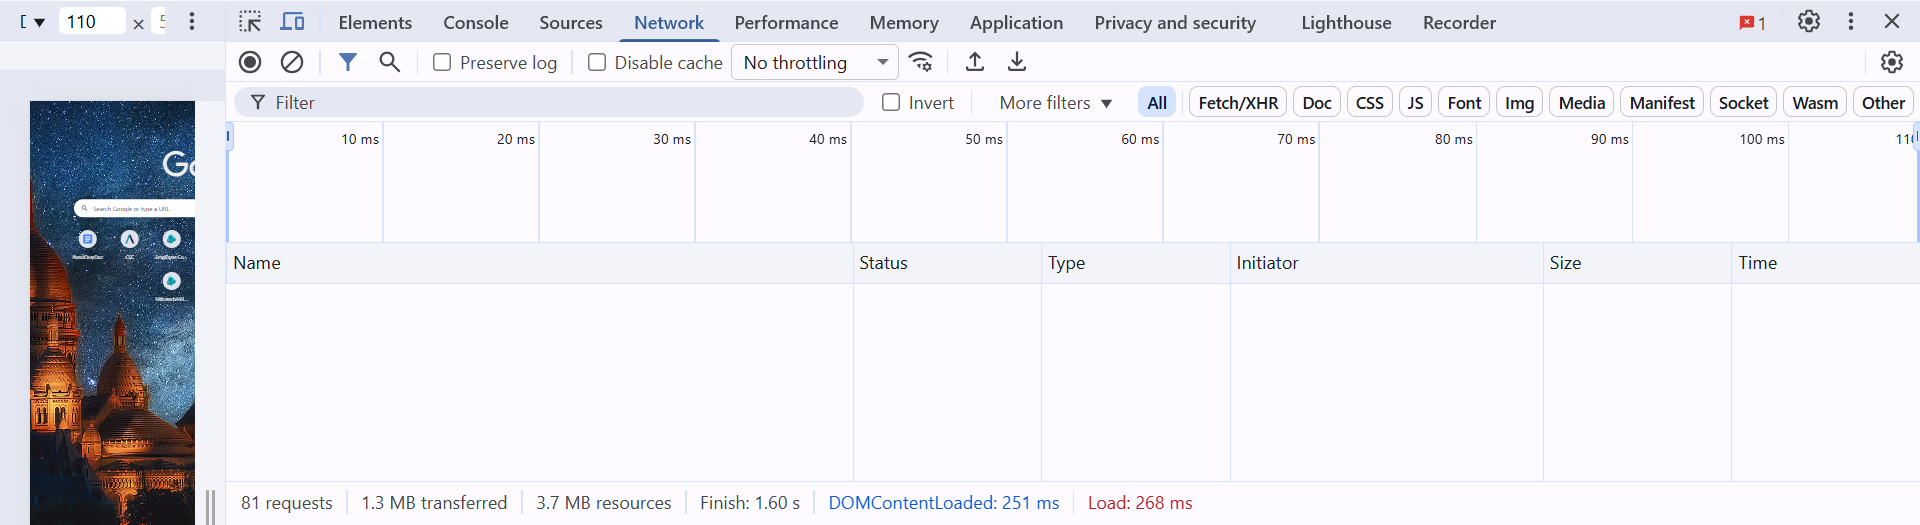
Use your browser’s developer tools to capture the SAML assertion during the login process.
| Error Messsage | Resolution |
|---|---|
| 1. Open the Developer Tools panel in your web browser.
Shortcut: Press F12 or Ctrl+Shift+I (Windows) / Cmd+Option+I (macOS).
|
 |
| 2. Select the Network tab and select the Preserve log checkbox. |  |
| 3. In a new tab, initiate the SAML login flow and complete authentication via your IdP (e.g., Okta). | |
4. After the redirect back to TeamConnect, look for a POST request in the Network tab with a path matching your ACS URL (e.g., /login/saml2/sso/{RegistrationID}). |
 |
| 5. Locate the Payload tab, and copy the entire Base64-encoded value of the SAMLRequest parameter. |  |
Decode the SAML Assertion
After copying the SAML assertion, decode it to view its contents in XML format.
| Error Messsage | Resolution |
|---|---|
| 1. Go to an online SAML decoder, such as https://www.samltool.io. |  |
| 2. Paste the copied SAMLRequest value into the field labeled SAML Token. |  |
| 3. The tool will show you the decoded XML output. |  |
Inspect the Decoded Assertion
Review the XML to confirm the IdP is sending the correct information.
| XML Element | Description | What to Verify |
|---|---|---|
<saml:Issuer> |
The entity that issued the assertion. | This must exactly match your IdP’s Entity ID. If not, TeamConnect won’t trust it. |
<saml:Audience> |
The intended recipient of the assertion. | This must exactly match the Service Provider (SP) Entity ID configured in TeamConnect. |
<saml:NameID> |
The user identity sent by the IdP. | This must match a valid user (this is the email address of the test user and exists in TeamConnect) in TeamConnect. If not, TeamConnect won’t know who is logging in. |
Viewing Audit Logs to Identify IdPs
To explicitly identify which IdP was used during a login attempt and view other details, you can inspect the TeamConnect audit logs.
The log entries can capture the following IdP details:
-
<RegistrationID> -
<EntityID> -
<NameIdFormat> -
<SingleLogoutUrl>
Example Log Entry:
2025-08-19 20:15:51,734 [name@example.com] <audit.login> Logged In (Remote Host: 0:0:0:0:0:0:0:1, Session:*****************,
RegistrationId: ExampleSSO, EntityId: https://<your-tc-host>/login/saml2/service-provider-metadata/{RegistrationID},
NameIDFormat: urn:oasis:names:tc:SAML:1.1:nameid-format:emailAddress)
Certificate Maintenance
SAML signing certificates expire. To avoid service disruption:
-
Rotate certificates before the old one expires.
-
To update a certificate, delete the existing registration in TeamConnect.
-
Immediately re-add the registration with the same settings but upload the new certificate file, then save.
Note on IdP Certificate Policies:
-
Azure or Entra ID: See the Microsoft documentation for certificate policy details .
-
Okta: See the Okta documentation for certificate policy details .
Disabling SAML
To disable SAML and revert TeamConnect to its native login page, untick the Enable SAML? checkbox and click Save and Close. Any existing SAML registrations will remain in the database but will be ignored.