
TeamConnect SAML SSO Installation and Setup
SSO-SAML Help
Welcome to the TeamConnect® SSO-SAML User Help.
This documentation is meant for people who need an overview of how to use TeamConnect SSO-SAML. It describes the product requirements as well as the installation and setup process. The topics are organized by the major tasks that you must perform when setting up TeamConnect SSO-SAML.
This document details up to version SAML 2.2.5.
Installation Requirements
You must be running one of the following TeamConnect (TCE) versions in order to install the TeamConnect SSO-SAML Add-In:
- TCE 3.3 SP3 Update19 (or later 3.3 SP3 update)
- TCE 3.4 SP1 U17 (or later 3.4 SP1 update)
- TCE 4.0 U3 (or later 4.0 update)
- TCE 4.2.0 - 4.2.9
- TCE 5.0.0 - 5.0.10
- TCE 5.1.0 - 5.1.1
- TCE 5.2.0 - 5.2.11
- TCE 6.0.0 - 6.0.2
- TCE 6.1.0 - 6.1.2
- TCE 6.2.0 - 6.2.7
- TCE 6.3.0 - 6.3.7
- TCE 7.0 - 7.1
Additionally, the user implementing the TeamConnect SSO-SAML add-in must be familiar with the following:
- SAML concepts
- Custom Authentication Plug-ins in TeamConnect
- Java KeyStore and KeyTool
- Java Cryptography Extension (JCE)
Prerequisites
SAML Gateway is a web application and will need to be deployed on an app server. See Step 4 in the Installing SAML Gateway App section of this guide for further detail.
Setup and Installation
Before you begin...
Contact your IDP Administrator to obtain the XML metadata for the IDP.
Note: If you use Siteminder for your IDP, you will not be able to specify the "type" of attribute. Use NameID instead for this case.
The SAML Gateway requires a key pair to use for encryption and signing. Obtain the key pair from your administrator or use Java keytool to create a new one using the instructions listed below.
How to Create/Generate a Keystore File?
The SAML Gateway requires a keystore (in either jks or jceks format) that contains a key pair to use for encryption and signing. Obtain the key pair file from your administrator or use the Java keytool program (or other utility) to create a new one.
The SAML Gateway is distributed with a sample keystore (samlKeystore.jceks) that can be used for testing purposes in a development type environment, but this should not be used for any production or pre-production installation.
It is suggested the new keystore be named something unique, like <Client>-<env>.jceks.
Use the following command to create a new Keystore file:
keytool –v -genkeypair -storetype jceks -keystore <keystore-file> -keysize <key-bits> -alias <alias-name> -validity <days>
Where:
keystore-file is the path of the file to create, including the extension (e.g., acme-test.jceks)
key-bits is the number of bits to use for the key. Suggested value: 2048
alias-name is the name to use for the entry (must be all lowercase)
days is the number of days the certificate will be valid. Suggested value: 3650 (10 years)
The genkeypair option:
Generates a key pair (a public key and associated private key). Wraps the public key into an X.509 v3 self-signed certificate, which is stored as a single-element certificate chain. This certificate chain and the private key are stored in a new keystore entry identified by alias.
The alias can be something like “<client><env>kp”. For example, “acmetestkp”.
Once you start the keytool, it will prompt for the keystore password. Enter a new password and make a note of it, which requires later. For example, “acmeteamconnect.”
Then keytool prompts for several pieces of information, e.g., your first and last name, your organizational unit, your organization, etc. Enter the exact information, and not something fictitious. It simply documents who created the key pair.. Suggested sample values:
- First and Last Name: Your Real Name
- Organizational Unit: Services
- Organization: Mitratech
- City or Locality: Austin
- State or Province: Texas
- Two-letter Country Code: US
Hit the Enter key on your keyboard when asked to enter the “key password”. This will make the key password the same password used for the Keystore.
Installing the SAML Gateway Application
- Replace the file named idp.xml in the WEB-INF/classes/metadata folder of the application with the metadata for your Identity Provider (IDP).
- Import the encryption key pair into the provided keystore located at WEB-INF/classes/security/samlKeystore.jceks. You will need to provide the –storetype jceks option to Java keytool when importing. The default keystore password is teamconnect.
Alternatively, you can replace the provided keystore with your own and update saml.properties. (or, you can just use the keystore file already included in the war file.) - Edit the saml.properties file in the WEB-INF/classes folder of the application.
- Use NameID + urn:oasis:names:tc:SAML:1.1:nameid-format:unspecified
- The IdP value must match the Entity ID used while configuring TCE Instance.
If using SAML 2.2.5, Gateway password and keystore passwords in SAML properties file should be encrypted. These passwords are encrypted using encrypt/encrypt.jar. The encrypt.jar will be provided along with the SAML artifacts.
Steps to encrypt the password:
- Open cmd prompt, navigate to the location of 'encrypt.jar' file.
- Write command 'java -jar encrypt.jar <password>' (where <password> is the raw string to encrypt)
- Copy the password encrypted from cmd prompt window.
| Property | Description |
|---|---|
| idp.tcUsernameIdentifier | SAML response element that will contain the TeamConnect username. Supported values are NameID and Attribute. Contact your Identity Provider for this information. |
| idp.nameIDFormat | Required only when idp.tcUsernameIdentifier is NameID e.g. urn:oasis:names:tc:SAML:1.1:nameid-format:unspecified |
| idp.attributeName | The name of the response Attribute containing the TeamConnect username. Required only when idp.tcUsernameIdentifier is Attribute.Contact your Identity Provider for this information. |
| sp.entityID | Service Provider entity ID. This is the value used to generate service provider metadata in Step 6. If you are using an existing metadata file, enter the value of the entityID attribute from the metadata file. |
| gateway.admin.username | Defines the credentials to access the SAML gateway administration interface. Default is admin. |
| gateway.admin.password | Defines the credentials to access the SAML gateway administration interface. Default is admin. If using 2.2.5, the password needs to be encrypted using encrypt.jar. |
| gateway.supportIdpInitializedSSO | Indicates whether IDP-initialized SSO should be supported. Supported values are true and false. |
| teamconnect.loginUrl | The login URL for the TeamConnect application. |
| keystore.file | Name of the Java keystore file containing the private key for encrypting and optionally signing SAML messages. This file must be located in the WEB-INF/classes/security folder of the application. You may use the provided sample keystore (samlKeystore.jceks) or replace it with your own. |
| keystore.type | Type of the keystore. Supported values are jceks and jks. |
| keystore.password | Keystore password. If using SAML 2.2.5, this password needs to be encrypted using encrypt.jar. |
| keystore.privatekey.alias | Keystore alias for the private key. For security reasons, the default private key should not be used in production. |
| keystore.privatekey.password | Password for the private key. If using SAML 2.2.5, this password needs to be encrypted using encrypt.jar. |
| saml.signatureAlgorithm=SHA1 (Default) | Sets the signature algorithm to be used (SHA1, SHA256, SHA 512). Only available in SAML 2.0.1+ |
- Deploy the SAML Gateway Application using SSO .war file on app server.
Note: This was mentioned in the Prerequisites section above. - In a web browser, go to <SAML gateway>/saml/web/metadata/generate.
Example URL: https://test-domain/Mitratech-SSO-SAML/saml/web/metadata/generate - Log in using the credentials (admin/admin).
- On the Metadata generation page, enter the Entity ID defined in step 3. The choices for Service Provider (SP) metadata generation depend on the environment and configuration, as agreed on by the IDP and SP admins.
- Click the Generate metadata button. The Metadata detail page is displayed.
- Replace the contents of the file named sp.xml in the WEB-INF/classes/ metadata folder of the application with the content of the Metadata field.
- Edit the securityContext.xml file in the WEB-INF/classes folder of the application and update the ExtendedMetadata of <bean> with id="sp" to include the property values from the Configuration field.
- edit the sslHostNameVerification line to allow all ids
<property name="sslHostnameVerification" value="allowAll"/>
- Restart the SAML gateway application.
- Provide service provider metadata to your IDP administrator for upload to the IDP.
Configure TeamConnect for SSO (Single Sign On)
Before you begin, ensure your TeamConnect version matches one of the versions on this list. You will have received an installation package from Mitratech at this point.
Edit the Files
- Open your TeamConnect instance and log in with administrative credentials.
- Open the installation folder and copy the folders to your local machine <-- this is listed on the confluence page, but it probably needs to be rewritten.
- Edit the following files: In 'files\pages' open the badCredentials.html and logout.html files in notepad++.
In badCredentials.html edit the window.location.href property and the redirect url value to match your SAML server address.
ex: https://test-domain/Mitratech-SSO-SAML/saml/login

In logout.html edit the window.location.href property and the redirect url value to match your SAML server address.
ex: https://test-domain/Mitratech-SSO-SAML/saml/logout?local=true

Upload files to TeamConnect
- Launch your TeamConnect instance if it is not already running and log in as an admin user.
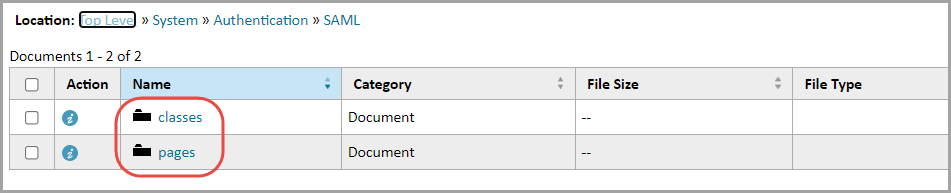
- Go to Documents and choose the Top-Level search view from the list. Navigate to the System folder and create a new folder here named 'Authentication'.

- Within the Authentication folder, create a new folder named 'SAML'.

- Within the SAML folder, create 2 new folders named classes and pages.
- Upload authenticationDescriptor.properties, Crypto.class, and SAMLAuthenticator.class to the SAML/classes directory in TeamConnect.

- Upload badCredentials.html, logout.html, and sessionTimeout.html to the SAML/pages directory in TeamConnect.

- Set the SAML plugin as the Default Authentication Method.
From the home screen click Admin Settings, select Security then change the Default Authentication Method to SAML Single Sign-On. Click Update when finished.
- Restart the TeamConnect application server.
Verify SSO is working
- Ensure a user exists that can be used for testing. The username should match the attribute being used by the IDP for authentication. (NameID, email, ect).
- Navigate to your TeamConnect login URL (ie, https://test-domain/teamconnect-6.3.0.0021/login). This should immediately redirect the browser to your IDP login screen.
- Enter the user credentials to log into the IDP, and you should be redirected back to TeamConnect and logged in as the desired user.
Configure TeamConnect for SLO (Single Logout)
In order to enable Single Logout, you must be running SAML 2.0.1 Patch 2+ and be on TeamConnect 6.1.1 Patch 9, 6.2.5+, or 6.3.0+.
- Ensure SingleLogout is enabled in your IDP. Set the SingleLogout URL in the IDP settings to point to the SingleLogout endpoint for the SAML server
ex: https://test-domain/Mitratech-SSO-SAML/saml/SingleLogout
- Navigate to Documents > Top Level > System > Authentication > SAML > pages and check out logout.html.
Open the file to edit, and replace ?local=true with ?local=false&{user.token} for both the window.location.href property and the redirect url.
ex: https://test-domain/Mitratech-SSO-SAML/saml/logout?local=false&{user.token}
Save then check in the edited file.
- Navigate to Documents > Top Level > System > Authentication > SAML > classes and check out authenticationDescriptor.properties.
Open the file to edit, and set the attribute isSLO=true.
Save then check in the edited file. - Restart the TeamConnect application server.
Verify SLO is working
- Navigate to the TeamConnect login page, and authenticate through the IDP. You should be redirected back into TeamConnect, logged in as the desired user.
- Log out of TeamConnect. You should be redirected to your SAML server logout page, and should be logged out of your IDP.
- Navigate back to the TeamConnect login URL and you should be redirected back to your IDP login page to re-authenticate, as the previous IDP session should be terminated.
Configure TeamConnect for SSO with Isolation Security
In order for SSO to fully work with Isolation Security (ie, Menlo), you must be running SAML 2.2.5 and be on TeamConnect 6.2.2 Patch 7, 6.2.7+, 6.3.4+, or 7.0+
- In TeamConnect, navigate to Documents > Top Level > System > Authentication > SAML > pages and checkout badCredentials.html.
Open the file to edit, and append ?Redirect={redirect.url} for both the window.location.href property and the redirect url.
ex: https://test-domain/Mitratech-SSO-SAML/saml/login?Redirect={redirect.url}
Save then check in the edited file.
- TeamConnect will now be able to retain the intended URL through authentication, even though Isolation Security drops the initial session
example:
- User is sent the following link via email and currently has no active TeamConnect session: https://test-domain/teamconnect-6.3.0.0021/entityrecord/DISP_103504
- User clicks the link and is directed to the TeamConnect login screen. The user is then redirected to their IDP to authenticate via SSO.
- User is authenticated in IDP, and Isolation Security moves the user into the isolated network with a new session, then is redirected to back to TeamConnect.
- User will get redirected as their authenticated user to the original link URL properly, instead of TeamConnect not being able to match the new session in isolation with the original one, resulting in the default home page.
Troubleshooting and Common Issues
Troubleshooting
LOGGING
Use the TeamConnect and SAML Gateway log files to troubleshoot issues.
TEAMCONNECT
Set the TeamConnect Authentication logger to DEBUG
SAML GATEWAY
Debug logging can be enabled on the Logging tab of the administrative console accessible via a web browser at <SAML gateway>/saml/web/logging
Note: Use different browsers when accessing the SAML Gateway administration console and logging into TeamConnect via SAML at the same time.
Common Issues
| Issue | Resolution |
|---|---|
| When generating new metadata, the dropdowns for the ‘Signing key’ and ‘Encryption key’ fields are blank. | Verify that the keystore alias for the encryption key was created using lowercase letters and that the default keystore values in saml.properties have been changed to reflect the keystore being used. |
| TeamConnect login fails with the following exception in the SAML Gateway log: ‘org.opensaml.saml2.metadata.provider.Me tadataProviderException: Metadata for entity <name> and role {urn:oasis:names:tc:SAML:2.0:metadata} SPSSODescriptor wasn't found’. |
Verify that the value of sp.entityID in saml.properties matches the entity ID of the Service Provider. |
|
TeamConnect login fails with the following exception in the SAML Gateway log: ArtifactResolutionProfileBase.resolveArtifac t | Could not decode artifact response message. org.opensaml.ws.message.decoder.Messa geDecodingException: Caused by: javax.net.ssl.SSLHandshakeException: org.springframework.security.saml.trust.Un trustedCertificateException: |
Check the certificate details in the log file. If the exception is for the IDP domain, import the root certificate for the IDP domain into the SAML Gateway application’s keystore. The IDP URL is defined in idp.xml in the WEB-INF/classes/ metadata folder of the application. |
| On login, TeamConnect displays an error message stating ‘A system error occurred during authentication. Please contact your administrator to check the system logs.’ | Verify that SAMLAuthenticator.class has been uploaded to the System/Authentication/SAML/ classes folder and the application server was restarted after upload. |
| On login, the browser redirects endlessly. |
Verify the following:
|
| On login, TeamConnect displays a Page Not Found error page instead of the home page. | Verify that the TeamConnect login URL in saml.properties is correct and does not have a ‘/’ at the end i.e. the URL should end with /login and not /login/. |
| Persistent URLs do not work -- the user is logged into TC successfully but the home page is displayed instead of the requested record. |
Verify that the TeamConnect URL in saml.properties has the same hostname as the user requested URL e.g. if the user accesses TeamConnect using then the URL in saml.properties should be |
Hosting SAML SSO Standard Deployment
This following information will help determine if the Client needs to engage Mitratech Professional Services for the implementation of SAML SSO in the Mitratech Hosted Environment.
Provided below is the outline and expectation of how Mitratech Hosting will implement SAML SSO. If the Client's configuration/expectation is different, then Mitratech Professional Services must be engaged to serve as liaison between Mitratech Hosting (Service Provider) and the Client (Identity Provider). Any issues discovered after implementation would require either Mitratech Support or Mitratech Professional Services to troubleshoot. Support or Services can engage Hosting to facilitate changes to the environment.
Client will provide Hosting
- IDP metadata file. Containts the following:
-
sp.entityID:
TEAMCONNECT_Context Root
Example: TEAMCONNECT_ACME_DEVACS URLs:
https://<TeamConnect DNS>/<TeamConnect SAML Context Root>/saml/SSO
Example: https://acme.dev.teamconnect.com/Tea...e_dev/saml/ssoSAML Authenticated Login:
https://<TeamConnectDNS>/<TeamConnect Context Root>/login
Example: https://acme.dev.teamconnect.com/ACME_DEV/loginFor Client TeamConnect admins, url that bypasses SAML and login with un/pw, after SAML is enabled:
https://<TeamConnect DNS>/<TeamConnect Context Root>/standardlogin
Example: https://acme.dev.teamconnect.com/ACM.../standardlogin
-
Hosting SAML SSO Implementation
- Hosting will use 'NameID' as the Response Element
- TeamConnect Username must be identical to the NameID being sent by IDP
- TeamConnect Username cannot be longer than 50 characters
- NameID Format will be 'urn:oasis:names:tc:SAML:1.1:nameid-format:unspecified'
- SAML Signature Algorithm being used will be 'SHA256'
- 'SHA512’ is supported, but must be specifically requested by client
Hosting will provide Client
- Service Provider (SP) Entity ID
- Commonly called the Audience
- SP metadata file
- Assertion Consumer Service (ACS) URL
- TeamConnect SAML SSO Bypass URL
- This allows users to authenticate directly with TeamConnect via username & password
- Instructions for TCE Admin to perform in the site
- Client TCE Admin or Mitratech Services BA usually performs this task
- The instructions provided must be completed prior to testing SAML SSO authentication
Frequently Asked Questions (FAQs)
- SAML SSO will support IDP Initiated & SP Initiated SAML SSO requests
- SAML SSO does not support Just-in-time (JIT) provisioning
- Formerly known as Express Provisioning
- Deep Linking is supported for TeamConnect 4.0 and higher